

Operation Guide
Page 2
.... position, H. size, Auto adjust execute INPUT Menu 32 Color space, Component, Video format, Frame lock, Information Connecting power supply 14 SETUP Menu 34 Remote control 15 Putting batteries 15 Keystone, Whisper, Mirror, Volume, Audio Using the remote control 16 SCREEN Menu 35 Power on/off 17 Turning on the power 17 Turning off , Lamp time, Filter time, Service Maintenance 40 Lamp 40 Air filter 42 Other care 44 Using the automatic adjustment feature . 20 Troubleshooting 45 Adjusting the position 20 Related messages 45 Correcting the keystone distortions 21...
.... position, H. size, Auto adjust execute INPUT Menu 32 Color space, Component, Video format, Frame lock, Information Connecting power supply 14 SETUP Menu 34 Remote control 15 Putting batteries 15 Keystone, Whisper, Mirror, Volume, Audio Using the remote control 16 SCREEN Menu 35 Power on/off 17 Turning on the power 17 Turning off , Lamp time, Filter time, Service Maintenance 40 Lamp 40 Air filter 42 Other care 44 Using the automatic adjustment feature . 20 Troubleshooting 45 Adjusting the position 20 Related messages 45 Correcting the keystone distortions 21...

Operation Guide
Page 3
... brightness. Rich Connectivity This projector has a variety of package Your projector should come with its many signal sources like PC, DVD and so on a screen. S55i/X55i VIDEO STANDBY/ON RGB SEARCH ASPECT AUTO BLANK MAGNIFY ON HOME PAGE UP VOLUME END PAGE DOWN MUTE OFF FREEZE KEYSTONE POSITION MENU ESC ENTER RESET USB cable RCA Component cable RCA Video/Audio cable Lens cover, Rivet and Strap Soft case 3 © 3M 2005.
... brightness. Rich Connectivity This projector has a variety of package Your projector should come with its many signal sources like PC, DVD and so on a screen. S55i/X55i VIDEO STANDBY/ON RGB SEARCH ASPECT AUTO BLANK MAGNIFY ON HOME PAGE UP VOLUME END PAGE DOWN MUTE OFF FREEZE KEYSTONE POSITION MENU ESC ENTER RESET USB cable RCA Component cable RCA Video/Audio cable Lens cover, Rivet and Strap Soft case 3 © 3M 2005.

Operation Guide
Page 4
.... Part names Part names 3M™ Digital Projector S55i/X55i Projector Lamp door (41) (Lamp unit is inside.) Zoom ring (19) Focus ring (19) Vent (7) Lens (17) Lens cover (3) Control buttons (6) Front-Right side Remote sensor (16) Speaker Security bar (10) (Use for attaching a commercial anti-theft chain or wire.) Elevator button (9) Elevator foot (9) Filter cover (42) (Air fi...
.... Part names Part names 3M™ Digital Projector S55i/X55i Projector Lamp door (41) (Lamp unit is inside.) Zoom ring (19) Focus ring (19) Vent (7) Lens (17) Lens cover (3) Control buttons (6) Front-Right side Remote sensor (16) Speaker Security bar (10) (Use for attaching a commercial anti-theft chain or wire.) Elevator button (9) Elevator foot (9) Filter cover (42) (Air fi...
Operation Guide
Page 7
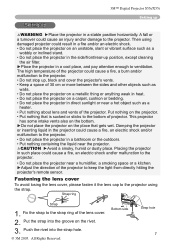
... the projector using damaged projector could result in such place could cause a fire, an electric shock and/or malfunction to keep the light from directly hitting the projector's remote sensor. Bottom side Strap hole 7 Fastening the lens cover To avoid losing the lens cover, please fasten it the lens cap to ventilation. 3M™ Digital Projector S55i/X55i Setting up Setting up , block and cover the projector's vents. • Keep...
... the projector using damaged projector could result in such place could cause a fire, an electric shock and/or malfunction to keep the light from directly hitting the projector's remote sensor. Bottom side Strap hole 7 Fastening the lens cover To avoid losing the lens cover, please fasten it the lens cap to ventilation. 3M™ Digital Projector S55i/X55i Setting up Setting up , block and cover the projector's vents. • Keep...

Operation Guide
Page 11
... laptop computer. • Secure the screws on an input, automatic adjustment function may take advantage of this is done, please refer to the instruction manual of connection is attempted. • Please use the standard drivers in your devices CAUTION ►Turn off all devices prior to connecting them to simultaneous LCD and CRT display). display devices). This projector is compatible with core set the laptop to CRT display...
... laptop computer. • Secure the screws on an input, automatic adjustment function may take advantage of this is done, please refer to the instruction manual of connection is attempted. • Please use the standard drivers in your devices CAUTION ►Turn off all devices prior to connecting them to simultaneous LCD and CRT display). display devices). This projector is compatible with core set the laptop to CRT display...

Operation Guide
Page 16
... the remote control uses infrared light to send signals to the projector (Class1 LED), be available. may cause to function. All Rights Reserved. The remote control works with the projector's remote sensor. 30º 30º approx. 3 meters • The range of the remote sensor). • Also a remote signal reflected in the screen etc. 3M™ Digital Projector S55i/X55i Remote control Using the remote control CAUTION ►Be careful in handling the remote control...
... the remote control uses infrared light to send signals to the projector (Class1 LED), be available. may cause to function. All Rights Reserved. The remote control works with the projector's remote sensor. 30º 30º approx. 3 meters • The range of the remote sensor). • Also a remote signal reflected in the screen etc. 3M™ Digital Projector S55i/X55i Remote control Using the remote control CAUTION ►Be careful in handling the remote control...

Operation Guide
Page 17
.... 2. STANDBY/ON button VIDEO STANDBY/ON RGB SEARCH ASPECT AUTO BLANK MAGNIFY ON HOME PAGE UP VOLUME END PAGE DOWN MUTE OFF FREEZE KEYSTONE POSITION MENU ESC ENTER RESET POWER indicator 3. POWER Turning off the power (Steady green) This product is able to the projector and the outlet. 2. The message "Power off the projector later than the connected devices. Power off in green. Make sure that the power indicator lights in steady orange. Remove the lens cover, and set the power switch...
.... 2. STANDBY/ON button VIDEO STANDBY/ON RGB SEARCH ASPECT AUTO BLANK MAGNIFY ON HOME PAGE UP VOLUME END PAGE DOWN MUTE OFF FREEZE KEYSTONE POSITION MENU ESC ENTER RESET POWER indicator 3. POWER Turning off the power (Steady green) This product is able to the projector and the outlet. 2. The message "Power off the projector later than the connected devices. Power off in green. Make sure that the power indicator lights in steady orange. Remove the lens cover, and set the power switch...

Operation Guide
Page 18
... (when switching from VIDEO to select an input port for the AUTO SEARCH item in adjusting the volume. 2. Each time you have muted the sound. In that case "RGB2/RGB OUT RGB OUT" message will appear on the remote control to RGB signals) END PAGEDOWN MUTE when TURN ON is pushed in ), RGB IN2 cannot be displayed. 1. ESC RESET 18 © 3M 2005. Use the cursor buttons...
... (when switching from VIDEO to select an input port for the AUTO SEARCH item in adjusting the volume. 2. Each time you have muted the sound. In that case "RGB2/RGB OUT RGB OUT" message will appear on the remote control to RGB signals) END PAGEDOWN MUTE when TURN ON is pushed in ), RGB IN2 cannot be displayed. 1. ESC RESET 18 © 3M 2005. Use the cursor buttons...

Operation Guide
Page 19
... button, the projector switches its input ports in the OPTION menu the projector will stop searching and OdN isplay the image. Use the zoom ring to focus the picture. © 3M 2005. Press the VIDEO button on the remote control to VIDEO STANDBY/ON RGB SEARCH ASPECT AUTO BLANK find any input signals. Each time you press the button, the projector switches the mode for video signal. FREEZE KEYSTONE ● For an HDTV signal of the signal. Searching an input signal ESC RESET 1. MAGNIFY HOME...
... button, the projector switches its input ports in the OPTION menu the projector will stop searching and OdN isplay the image. Use the zoom ring to focus the picture. © 3M 2005. Press the VIDEO button on the remote control to VIDEO STANDBY/ON RGB SEARCH ASPECT AUTO BLANK find any input signals. Each time you press the button, the projector switches the mode for video signal. FREEZE KEYSTONE ● For an HDTV signal of the signal. Searching an input signal ESC RESET 1. MAGNIFY HOME...

Operation Guide
Page 20
... a video signal or s-video signal POSITION MENU The video format best suited for the respective input signal will be automatically selected. The "POSITION" indication will be automatically adjusted. ● The automatic adjustment operation requires approximately 10 seconds. MAGNIFY ON HOME PAGE UP VOLUME END PAGE DOWN MUTE OFF FREEZE KEYSTONE 2. For a component video signal, the signal type is selected to reset the operation, press the RESET button on the screen. 3M™ Digital Projector S55i/X55i Operating Using...
... a video signal or s-video signal POSITION MENU The video format best suited for the respective input signal will be automatically selected. The "POSITION" indication will be automatically adjusted. ● The automatic adjustment operation requires approximately 10 seconds. MAGNIFY ON HOME PAGE UP VOLUME END PAGE DOWN MUTE OFF FREEZE KEYSTONE 2. For a component video signal, the signal type is selected to reset the operation, press the RESET button on the screen. 3M™ Digital Projector S55i/X55i Operating Using...

Operation Guide
Page 23
... program. 3M™ Digital Projector S55i/X55i Operating Operating the computer screen CAUTION ►Mistaken use the remote control, depending on the screen, using the BLANK function, or displaying the menu screen. See your equipment. • While using this remote control. Connect the projector's USB port to move the mouse pointer diagonally). • This function is not available while the lamp is warming up (the POWER indicator flashes green), and while adjusting the volume and display, correcting...
... program. 3M™ Digital Projector S55i/X55i Operating Operating the computer screen CAUTION ►Mistaken use the remote control, depending on the screen, using the BLANK function, or displaying the menu screen. See your equipment. • While using this remote control. Connect the projector's USB port to move the mouse pointer diagonally). • This function is not available while the lamp is warming up (the POWER indicator flashes green), and while adjusting the volume and display, correcting...

Operation Guide
Page 24
... RESET FILTER TIME 0h LANGUAGE ENGLISH Go To Advance Menu... 3. Use the cursor buttons▲/▼ to operate the item. ● When you want to return to the previous display, press the cursor button ◄ on the projector or remote control, or the ESC button on the projector. 3M™ Digital Projector S55i/X55i Multifunctional settings Multifunctional settings Using the menu function VIDEO STANDBY/ON RGB SEARCH This projector has the following menus: PICTURE, IMAGE, INPUT, ASPECT SETUP, AUTO BLANK SCREEN...
... RESET FILTER TIME 0h LANGUAGE ENGLISH Go To Advance Menu... 3. Use the cursor buttons▲/▼ to operate the item. ● When you want to return to the previous display, press the cursor button ◄ on the projector or remote control, or the ESC button on the projector. 3M™ Digital Projector S55i/X55i Multifunctional settings Multifunctional settings Using the menu function VIDEO STANDBY/ON RGB SEARCH This projector has the following menus: PICTURE, IMAGE, INPUT, ASPECT SETUP, AUTO BLANK SCREEN...
Operation Guide
Page 32
.... Using the buttons ▲/▼ switches the mode for a SCART RGB signal input. an irregular picture, a color lack), please select the mode depending on /off. PICTURE IMAGE COLOR SPACE AUTO COMPONENT COMPONENT Select an item using the cursor buttons ▲/▼ on the projector or remote control, and press the cursor button ► INPUT SETUP SCREEN OPTION VIDEO FORMAT AUTO FRAME LOCK TURN ON INFORMATION on the projector or remote control, or the ENTER button EASY MENU on the remote control to the projector. AUTO...
.... Using the buttons ▲/▼ switches the mode for a SCART RGB signal input. an irregular picture, a color lack), please select the mode depending on /off. PICTURE IMAGE COLOR SPACE AUTO COMPONENT COMPONENT Select an item using the cursor buttons ▲/▼ on the projector or remote control, and press the cursor button ► INPUT SETUP SCREEN OPTION VIDEO FORMAT AUTO FRAME LOCK TURN ON INFORMATION on the projector or remote control, or the ENTER button EASY MENU on the remote control to the projector. AUTO...

Operation Guide
Page 34
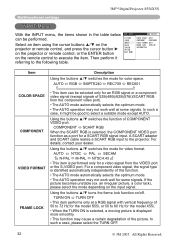
... remote control, or the ENTER button on the whisper mode. Using the buttons ▲/▼ turns off is selected, both of two audio ports do not work correctly. • When the zoom adjustment is set to the TELE side, this function may not work for mirror status. At some signals, this function may be excessive. Using the buttons ▲/▼ switches the mode for the input port. 3M™ Digital Projector S55i/X55i Multifunctional settings SETUP Menu With the SETUP menu...
... remote control, or the ENTER button on the whisper mode. Using the buttons ▲/▼ turns off is selected, both of two audio ports do not work correctly. • When the zoom adjustment is set to the TELE side, this function may not work for mirror status. At some signals, this function may be excessive. Using the buttons ▲/▼ switches the mode for the input port. 3M™ Digital Projector S55i/X55i Multifunctional settings SETUP Menu With the SETUP menu...

Operation Guide
Page 38
... using the cursor buttons ▲/▼ on the projector or IMAGE INPUT AUTO SEARCH TURN OFF AUTO OFF 0min LAMP TIME 0h remote control, and press the cursor button ► on the projector SETUP SCREEN FILTER TIME 0h SERVICE or remote control, or the ENTER button on /off the power" (17). Then perform it referring to OPTION execute the item, except for a suitable indication about the air filter. • For the air filter cleaning...
... using the cursor buttons ▲/▼ on the projector or IMAGE INPUT AUTO SEARCH TURN OFF AUTO OFF 0min LAMP TIME 0h remote control, and press the cursor button ► on the projector SETUP SCREEN FILTER TIME 0h SERVICE or remote control, or the ENTER button on /off the power" (17). Then perform it referring to OPTION execute the item, except for a suitable indication about the air filter. • For the air filter cleaning...
Operation Guide
Page 39
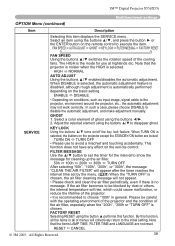
...; KEY LOCK FILTER MESSAG FACTORY RESET FAN SPEED Using the buttons ▲/▼ switches the rotation speed of the projector. • It is no message. SERVICE KEY LOCK Using the buttons ▲/▼ turns on the remote control to be careful with the operating environment of the projector and the condition of ghost using the buttons ▲/▼ to show the message for use to disable the automatic adjustment, and make adjustment manually. If the air fi...
...; KEY LOCK FILTER MESSAG FACTORY RESET FAN SPEED Using the buttons ▲/▼ switches the rotation speed of the projector. • It is no message. SERVICE KEY LOCK Using the buttons ▲/▼ turns on the remote control to be careful with the operating environment of the projector and the condition of ghost using the buttons ▲/▼ to show the message for use to disable the automatic adjustment, and make adjustment manually. If the air fi...
Operation Guide
Page 45
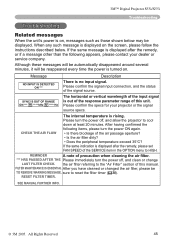
... TO REMOVE WARNING MESSAGE, sure to HIGH. After having confirmed the following appears, please contact your projector or the signal source specs. Please turn the power ON again. • Is there blockage of this manual. If the same indication is displayed after the remedy, or if a message other than the following items, please turn the power off , and clean or change LAST FILTER CHECK. RESET FILTER TIMER. 3M™ Digital Projector S55i/X55i Troubleshooting Troubleshooting Related messages When...
... TO REMOVE WARNING MESSAGE, sure to HIGH. After having confirmed the following appears, please contact your projector or the signal source specs. Please turn the power ON again. • Is there blockage of this manual. If the same indication is displayed after the remedy, or if a message other than the following items, please turn the power off , and clean or change LAST FILTER CHECK. RESET FILTER TIMER. 3M™ Digital Projector S55i/X55i Troubleshooting Troubleshooting Related messages When...

Operation Guide
Page 46
...ficiently cooled down . Please follow the instructions within the table. If the same indication is displayed after the remedy, please contact your dealer or service company. 3M™ Digital Projector S55i/X55i Troubleshooting Regarding the indicator lamps Lighting and flashing of the POWER indicator, the LAMP indicator, and the TEMP indicator have the meanings as described in a standby state. Please turn the power on again. • Is there blockage...
...ficiently cooled down . Please follow the instructions within the table. If the same indication is displayed after the remedy, please contact your dealer or service company. 3M™ Digital Projector S55i/X55i Troubleshooting Regarding the indicator lamps Lighting and flashing of the POWER indicator, the LAMP indicator, and the TEMP indicator have the meanings as described in a standby state. Please turn the power on again. • Is there blockage...

Operation Guide
Page 47
... turn the power off, and allow the projector to cool down at least 45 minutes. Please immediately turn the power off, and allow the projector to cool down at least 20 minutes. After cleaning or changing the air filter, please be turned off. 3M™ Digital Projector S55i/X55i Troubleshooting Regarding the indicator lamps (continued) POWER LAMP TEMP indicator indicator indicator Description Blinking In Red or Lighting In Red Turned off Blinking In Red The cooling fan is time to clean the air...
... turn the power off, and allow the projector to cool down at least 45 minutes. Please immediately turn the power off, and allow the projector to cool down at least 20 minutes. After cleaning or changing the air filter, please be turned off. 3M™ Digital Projector S55i/X55i Troubleshooting Regarding the indicator lamps (continued) POWER LAMP TEMP indicator indicator indicator Description Blinking In Red or Lighting In Red Turned off Blinking In Red The cooling fan is time to clean the air...

Operation Guide
Page 48
... RGB input signal is inputted to the port. 12 Push the RGB IN OUT switch to be reset. Set the power switch to be mistaken for machine defects WARNING ►Never use the FACTORY RESET function of these has not been properly fixed. nor pictures are mismatched. The projector's microprocessor may need to [ | ] (On). 17 The main power source has been interrupted during Power does not operation such...
... RGB input signal is inputted to the port. 12 Push the RGB IN OUT switch to be reset. Set the power switch to be mistaken for machine defects WARNING ►Never use the FACTORY RESET function of these has not been properly fixed. nor pictures are mismatched. The projector's microprocessor may need to [ | ] (On). 17 The main power source has been interrupted during Power does not operation such...


