

Operation Guide
Page 1
...properties of Microsoft Corporation. All other trademarks are trademarks of Video Electronics Standard Association. • Windows is a registered trademark of their respective owners. 1 © 3M 2005. About this product. CAUTION This symbol indicates information that, if ignored, could possibly result in personal injury or even death due to incorrect handling...• The reproduction, transfer or copy of all or any part of this document is subject to the pages written following this projector. S55i/X55i Multimedia Projector Operator's Guide Thank you for purchasing this symbol.
...properties of Microsoft Corporation. All other trademarks are trademarks of Video Electronics Standard Association. • Windows is a registered trademark of their respective owners. 1 © 3M 2005. About this product. CAUTION This symbol indicates information that, if ignored, could possibly result in personal injury or even death due to incorrect handling...• The reproduction, transfer or copy of all or any part of this document is subject to the pages written following this projector. S55i/X55i Multimedia Projector Operator's Guide Thank you for purchasing this symbol.

Operation Guide
Page 2
... cover 7 Arrangement 8 Adjusting the projector's elevator . . 9 Using the Security Bar 10 Connecting your devices 11 IMAGE Menu 30 Aspect, Over scan, V. All Rights Reserved. position, H. 3M™ Digital Projector S55i/X55i Content Content About this book, although only in English.) 2 ©...
... cover 7 Arrangement 8 Adjusting the projector's elevator . . 9 Using the Security Bar 10 Connecting your devices 11 IMAGE Menu 30 Aspect, Over scan, V. All Rights Reserved. position, H. 3M™ Digital Projector S55i/X55i Content Content About this book, although only in English.) 2 ©...

Operation Guide
Page 3
.... For moving the projector, be still kept as NTSC/PAL/ SECAM, Component (SD, HD) video signals onto a screen. 3M™ Digital Projector S55i/X55i Projector features / Preparations Projector features This projector is extremely compact and slim, which gives you more flexibility and usability to ...for the lens part. All Rights Reserved. The rich connectivity provides you more options to use the original packing materials. S55i/X55i VIDEO STANDBY/ON RGB SEARCH ASPECT AUTO BLANK MAGNIFY ON HOME PAGE UP VOLUME END PAGE DOWN MUTE OFF FREEZE KEYSTONE POSITION ...
.... For moving the projector, be still kept as NTSC/PAL/ SECAM, Component (SD, HD) video signals onto a screen. 3M™ Digital Projector S55i/X55i Projector features / Preparations Projector features This projector is extremely compact and slim, which gives you more flexibility and usability to ...for the lens part. All Rights Reserved. The rich connectivity provides you more options to use the original packing materials. S55i/X55i VIDEO STANDBY/ON RGB SEARCH ASPECT AUTO BLANK MAGNIFY ON HOME PAGE UP VOLUME END PAGE DOWN MUTE OFF FREEZE KEYSTONE POSITION ...

Operation Guide
Page 4
Part names Part names 3M™ Digital Projector S55i/X55i Projector Lamp door (41) (Lamp unit is inside.) Zoom ring (19) Focus ring (19) Vent (7) Lens (17) Lens cover (&#... WARNING ►During use or immediately after use, do not touch around the lamp and vents of the projector. () It could cause a burn. 4 © 3M 2005. All Rights Reserved.
Part names Part names 3M™ Digital Projector S55i/X55i Projector Lamp door (41) (Lamp unit is inside.) Zoom ring (19) Focus ring (19) Vent (7) Lens (17) Lens cover (&#... WARNING ►During use or immediately after use, do not touch around the lamp and vents of the projector. () It could cause a burn. 4 © 3M 2005. All Rights Reserved.
Operation Guide
Page 5
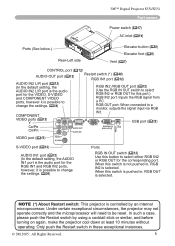
... (12) Use this button to select either RGB IN2 or RGB OUT for this switch is pushed in these exceptional instances. © 3M 2005. 3M™ Digital Projector S55i/X55i Part names Power switch (17) AC inlet (14) Ports (See below.) Rear-Left side Elevator button (9) Elevator foot (...
... (12) Use this button to select either RGB IN2 or RGB OUT for this switch is pushed in these exceptional instances. © 3M 2005. 3M™ Digital Projector S55i/X55i Part names Power switch (17) AC inlet (14) Ports (See below.) Rear-Left side Elevator button (9) Elevator foot (...

Operation Guide
Page 6
All Rights Reserved. Part names Control buttons Cursor buttons 24) STANDBY/ON button (17) 3M™ Digital Projector S55i/X55i LAMP indicator (46, 47) TEMP indicator (46, 47) POWER indicator (17) INPUT button (18) Remote control SEARCH button (19) RGB ...) PAGE DOWN button (23) KEYSTONE button (21) MENU button (24) Cursor buttons 24) ENTER button (24) RESET button (24) © 3M 2005.
All Rights Reserved. Part names Control buttons Cursor buttons 24) STANDBY/ON button (17) 3M™ Digital Projector S55i/X55i LAMP indicator (46, 47) TEMP indicator (46, 47) POWER indicator (17) INPUT button (18) Remote control SEARCH button (19) RGB ...) PAGE DOWN button (23) KEYSTONE button (21) MENU button (24) Cursor buttons 24) ENTER button (24) RESET button (24) © 3M 2005.
Operation Guide
Page 7
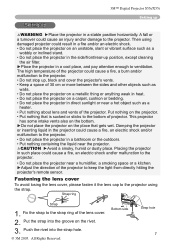
...lens cover To avoid losing the lens cover, please fasten it the lens cap to the projector. Put the strap into the strap hole. © 3M 2005. A fall or a turnover could cause an injury and/or damage to the projector using damaged projector could result in a fire and/or...could cause a fire, an electric shock and/or malfunction to the strap ring of the projector to ventilation. All Rights Reserved. 3M™ Digital Projector S55i/X55i Setting up Setting up WARNING ►Place the projector in such place could cause a fire, an electric shock and/or malfunction to...
...lens cover To avoid losing the lens cover, please fasten it the lens cap to the projector. Put the strap into the strap hole. © 3M 2005. A fall or a turnover could cause an injury and/or damage to the projector using damaged projector could result in a fire and/or...could cause a fire, an electric shock and/or malfunction to the strap ring of the projector to ventilation. All Rights Reserved. 3M™ Digital Projector S55i/X55i Setting up Setting up WARNING ►Place the projector in such place could cause a fire, an electric shock and/or malfunction to...
Operation Guide
Page 8
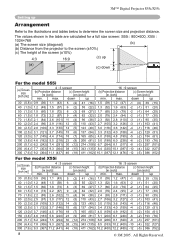
...) 46 (18) 411 (162) 10.2 (400) 12.2 (480) -12 (-5) 386 (152) 8 © 3M 2005. All Rights Reserved. max. 3M™ Digital Projector S55i/X55i Setting up (b) Projection distance [m (inch)] min. down up Arrangement Refer to the illustrations and tables below to the screen... (397) -10 (-4) 322 (127) 300 (7.6) 9.2 (364) 11.1 (437) 46 (18) 411 (162) 10.1 (397) 12.1 (476) -12 (-5) 386 (152) For the model X55i (a) Screen size [inch (m)] 30 (0.8) 40 (1.0) 50 (1.3) 60 (1.5) 70 (1.8) 80 (2.0) 90 (2.3) 100 (2.5) 120 (3.0) 150 (3.8) 200 (5.1) 250 (6.4) 300 (7.6) 4 : 3 screen 16 : 9...
...) 46 (18) 411 (162) 10.2 (400) 12.2 (480) -12 (-5) 386 (152) 8 © 3M 2005. All Rights Reserved. max. 3M™ Digital Projector S55i/X55i Setting up (b) Projection distance [m (inch)] min. down up Arrangement Refer to the illustrations and tables below to the screen... (397) -10 (-4) 322 (127) 300 (7.6) 9.2 (364) 11.1 (437) 46 (18) 411 (162) 10.1 (397) 12.1 (476) -12 (-5) 386 (152) For the model X55i (a) Screen size [inch (m)] 30 (0.8) 40 (1.0) 50 (1.3) 60 (1.5) 70 (1.8) 80 (2.0) 90 (2.3) 100 (2.5) 120 (3.0) 150 (3.8) 200 (5.1) 250 (6.4) 300 (7.6) 4 : 3 screen 16 : 9...
Operation Guide
Page 9
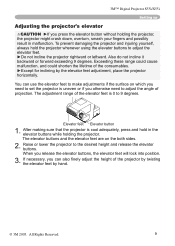
... the angle of the projector by twisting the elevator feet by the elevator feet adjustment, place the projector horizontally. 3M™ Digital Projector S55i/X55i Setting up Adjusting the projector's elevator CAUTION ►If you press the elevator button without holding the projector. The... adjustment range of the consumables. ►Except for inclining by hand. © 3M 2005. Exceeding these range could cause malfunction, and...
... the angle of the projector by twisting the elevator feet by the elevator feet adjustment, place the projector horizontally. 3M™ Digital Projector S55i/X55i Setting up Adjusting the projector's elevator CAUTION ►If you press the elevator button without holding the projector. The... adjustment range of the consumables. ►Except for inclining by hand. © 3M 2005. Exceeding these range could cause malfunction, and...
Operation Guide
Page 10
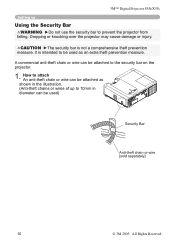
.... 1. CAUTION ►The security bar is intended to be used ) Security Bar Anti-theft chain or wire [sold separately] 10 © 3M 2005. All Rights Reserved. 3M™ Digital Projector S55i/X55i Setting up to 10mm in the illustration. (Anti-theft chains or wires of up Using the Security Bar WARNING ►Do...
.... 1. CAUTION ►The security bar is intended to be used ) Security Bar Anti-theft chain or wire [sold separately] 10 © 3M 2005. All Rights Reserved. 3M™ Digital Projector S55i/X55i Setting up to 10mm in the illustration. (Anti-theft chains or wires of up Using the Security Bar WARNING ►Do...

Operation Guide
Page 11
3M™ Digital Projector S55i/X55i Setting up Connecting your dealer for details. NOTE • Whenever attempting to connect a laptop computer to the projector, be sure to activate the laptop's RGB ...) compatible. • Please take some RGB signal modes, the optional Mac adapter is necessary. • When the image resolution is a Plug-and-Play monitor. © 3M 2005. For details on Windows. Attempting to connect a live device to the projector may not be recommended to use the standard drivers in your computer...
3M™ Digital Projector S55i/X55i Setting up Connecting your dealer for details. NOTE • Whenever attempting to connect a laptop computer to the projector, be sure to activate the laptop's RGB ...) compatible. • Please take some RGB signal modes, the optional Mac adapter is necessary. • When the image resolution is a Plug-and-Play monitor. © 3M 2005. For details on Windows. Attempting to connect a live device to the projector may not be recommended to use the standard drivers in your computer...
Operation Guide
Page 12
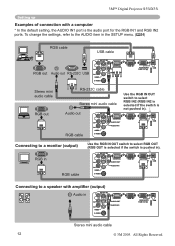
... OUT (RGB OUT is selected if the switch is the audio port for the RGB IN1 and RGB IN2 ports. All Rights Reserved. 3M™ Digital Projector S55i/X55i Setting up Examples of connection with amplifier (output) Audio in ). To change the settings, refer to the AUDIO item in the... IN2 Y R CB/PB L CR/PR VIDEO S-VIDEO CONTROL AUDIO OUT AUDIO IN1 RGB IN1 RGB IN2 RGB OUT USB K Stereo mini audio cable 12 © 3M 2005.
... OUT (RGB OUT is selected if the switch is the audio port for the RGB IN1 and RGB IN2 ports. All Rights Reserved. 3M™ Digital Projector S55i/X55i Setting up Examples of connection with amplifier (output) Audio in ). To change the settings, refer to the AUDIO item in the... IN2 Y R CB/PB L CR/PR VIDEO S-VIDEO CONTROL AUDIO OUT AUDIO IN1 RGB IN1 RGB IN2 RGB OUT USB K Stereo mini audio cable 12 © 3M 2005.
Operation Guide
Page 13
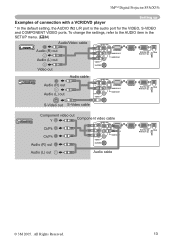
All Rights Reserved. 13 3M™ Digital Projector S55i/X55i Examples of connection with a VCR/DVD player Setting up * In the default setting, the AUDIO IN2 L/R port is the audio port for the VIDEO, S-VIDEO ... IN2 RGB OUT USB K AUDIO IN2 Y R CB/PB L CR/PR VIDEO S-VIDEO CONTROL AUDIO OUT AUDIO IN1 RGB IN1 RGB IN2 RGB OUT USB K © 3M 2005.
All Rights Reserved. 13 3M™ Digital Projector S55i/X55i Examples of connection with a VCR/DVD player Setting up * In the default setting, the AUDIO IN2 L/R port is the audio port for the VIDEO, S-VIDEO ... IN2 RGB OUT USB K AUDIO IN2 Y R CB/PB L CR/PR VIDEO S-VIDEO CONTROL AUDIO OUT AUDIO IN1 RGB IN1 RGB IN2 RGB OUT USB K © 3M 2005.

Operation Guide
Page 14
3M™ Digital Projector S55i/X55i Setting up Connecting power supply WARNING ►Please use extra caution when connecting the power cord, as incorrect or faulty connections may result in fi... the projector. If it is damaged, contact your dealer to newly get correct one. • Only plug the power cord into the outlet. 14 © 3M 2005. Never attempt to the AC inlet of the three-pronged plug. Connect the connector of the power cord to defeat the ground connection of...
3M™ Digital Projector S55i/X55i Setting up Connecting power supply WARNING ►Please use extra caution when connecting the power cord, as incorrect or faulty connections may result in fi... the projector. If it is damaged, contact your dealer to newly get correct one. • Only plug the power cord into the outlet. 14 © 3M 2005. Never attempt to the AC inlet of the three-pronged plug. Connect the connector of the power cord to defeat the ground connection of...

Operation Guide
Page 15
...direction of the arrow. 2. Slide back and remove the battery cover in the direction of the arrow and snap it back into place. © 3M 2005. All Rights Reserved. 15 Do not mix a new battery with water immediately. 1. Do not use only the batteries specified. Keep... could result in fire, injury and/or pollution of a battery, wipe out the flower and then replace a battery. 3M™ Digital Projector S55i/X55i Remote control Remote control Putting batteries WARNING ►Always handle the batteries with care and use them only as indicated in the remote...
...direction of the arrow. 2. Slide back and remove the battery cover in the direction of the arrow and snap it back into place. © 3M 2005. All Rights Reserved. 15 Do not mix a new battery with water immediately. 1. Do not use only the batteries specified. Keep... could result in fire, injury and/or pollution of a battery, wipe out the flower and then replace a battery. 3M™ Digital Projector S55i/X55i Remote control Remote control Putting batteries WARNING ►Always handle the batteries with care and use them only as indicated in the remote...

Operation Guide
Page 16
.... All Rights Reserved. Adjust the direction of the remote sensor). • Also a remote signal reflected in the screen etc. 3M™ Digital Projector S55i/X55i Remote control Using the remote control CAUTION ►Be careful in handling the remote control. • Do not drop or expose the remote...left and right of the projector to keep the light from obstacles that could block the remote control's output signal to the projector. 16 © 3M 2005. It may result in malfunction. • Remove the batteries from the remote control and store them in a safe place if you won't...
.... All Rights Reserved. Adjust the direction of the remote sensor). • Also a remote signal reflected in the screen etc. 3M™ Digital Projector S55i/X55i Remote control Using the remote control CAUTION ►Be careful in handling the remote control. • Do not drop or expose the remote...left and right of the projector to keep the light from obstacles that could block the remote control's output signal to the projector. 16 © 3M 2005. It may result in malfunction. • Remove the batteries from the remote control and store them in a safe place if you won't...

Operation Guide
Page 17
... lights in orange. Remove the lens cover, and set the power switch to turn the projector on /off in orange) POWER (Steady orange) © 3M 2005. STANDBY/ON button VIDEO STANDBY/ON RGB SEARCH ASPECT AUTO BLANK MAGNIFY ON HOME PAGE UP VOLUME END PAGE DOWN MUTE OFF FREEZE KEYSTONE... in steady orange, and set the power switch to (Steady orange) POWER (Blinking in steady orange when the lamp cooling is complete. 3. 3M™ Digital Projector S55i/X55i Power on/off Power on/off WARNING ►When the power is on the projector or the remote control. Do not look into...
... lights in orange. Remove the lens cover, and set the power switch to turn the projector on /off in orange) POWER (Steady orange) © 3M 2005. STANDBY/ON button VIDEO STANDBY/ON RGB SEARCH ASPECT AUTO BLANK MAGNIFY ON HOME PAGE UP VOLUME END PAGE DOWN MUTE OFF FREEZE KEYSTONE... in steady orange, and set the power switch to (Steady orange) POWER (Blinking in steady orange when the lamp cooling is complete. 3. 3M™ Digital Projector S55i/X55i Power on/off Power on/off WARNING ►When the power is on the projector or the remote control. Do not look into...

Operation Guide
Page 18
3M™ Digital Projector S55i/X55i Operating Operating Adjusting the volume 1. To restore the sound, press the MUTE or VOLUME button. VIDEO STANDBY/ON RGB SEARCH ASPECT AUTO BLANK RGB IN1 &#... MAGNIFY HOME MENU PAGE UP VOLUME ON ENDENTPEARGE DOWN MUTE OFF ESC FREEZE RESET KEYSTONE POSITION MENU Selecting an input signal 1. ESC RESET 18 © 3M 2005. Use the cursor buttons ▲/▼ to select an input port for the AUTO SEARCH item in ), RGB IN2 cannot be displayed. Press the...
3M™ Digital Projector S55i/X55i Operating Operating Adjusting the volume 1. To restore the sound, press the MUTE or VOLUME button. VIDEO STANDBY/ON RGB SEARCH ASPECT AUTO BLANK RGB IN1 &#... MAGNIFY HOME MENU PAGE UP VOLUME ON ENDENTPEARGE DOWN MUTE OFF ESC FREEZE RESET KEYSTONE POSITION MENU Selecting an input signal 1. ESC RESET 18 © 3M 2005. Use the cursor buttons ▲/▼ to select an input port for the AUTO SEARCH item in ), RGB IN2 cannot be displayed. Press the...

Operation Guide
Page 19
...initializes the aspect ratio setting. ENTER Adjusting the zoom and focus Focus ring 1. Use the zoom ring to focus the picture. © 3M 2005. All Rights Reserved. 19 COMPONENT VIDEO S-VIDEO VIDEO VIDEO STANDBY/ON RGB SEARCH ASPECT AUTO BLANK MAGNIFY ON HOME... PAGEDOWN MUTE OFF the operation. Searching an input signal ESC RESET 1. Use the focus ring to adjust the screen size. 3M™ Digital Projector S55i/X55i Operating Selecting an input signal (continued) 1. If no input POSITION is found, the projector will return to VIDEO signals) ...
...initializes the aspect ratio setting. ENTER Adjusting the zoom and focus Focus ring 1. Use the zoom ring to focus the picture. © 3M 2005. All Rights Reserved. 19 COMPONENT VIDEO S-VIDEO VIDEO VIDEO STANDBY/ON RGB SEARCH ASPECT AUTO BLANK MAGNIFY ON HOME... PAGEDOWN MUTE OFF the operation. Searching an input signal ESC RESET 1. Use the focus ring to adjust the screen size. 3M™ Digital Projector S55i/X55i Operating Selecting an input signal (continued) 1. If no input POSITION is found, the projector will return to VIDEO signals) ...

Operation Guide
Page 20
... ON HOME PAGE UP VOLUME And the aspect ratio will be incorrectly adjusted. A dark picture may appear outside a picture. 20 © 3M 2005. Use a bright picture when adjusting. For a video signal or s-video signal POSITION MENU The video format best suited for... the respective input signal will be automatically adjusted. The clock phase will appear on the remote control. 3M™ Digital Projector S55i/X55i Operating Using the automatic adjustment feature 1. For a component video signal, the signal type is performed at a video signal, ...
... ON HOME PAGE UP VOLUME And the aspect ratio will be incorrectly adjusted. A dark picture may appear outside a picture. 20 © 3M 2005. Use a bright picture when adjusting. For a video signal or s-video signal POSITION MENU The video format best suited for... the respective input signal will be automatically adjusted. The clock phase will appear on the remote control. 3M™ Digital Projector S55i/X55i Operating Using the automatic adjustment feature 1. For a component video signal, the signal type is performed at a video signal, ...


