Operation Guide
Page 1
All Rights Reserved. Document téléchargé sur www.lampe-videoprojecteur.info MP8795 Multimedia Projector Operator's Guide © 3M 2003.
All Rights Reserved. Document téléchargé sur www.lampe-videoprojecteur.info MP8795 Multimedia Projector Operator's Guide © 3M 2003.
Operation Guide
Page 2
ENGLISH 3M™ Multimedia Projector MP8795 Liquid Crystal Projector Operator's Guide Thank you for future reference. Apple, Mac and ADB are registered trademarks of all companies, even when not mentioned. Carefully observe the trademarks and registered trademarks of Apple Computer, Inc. Symptom 22 Table 12. ENGLISH-1 After reading, store this liquid crystal projector. Windows is a registered...
ENGLISH 3M™ Multimedia Projector MP8795 Liquid Crystal Projector Operator's Guide Thank you for future reference. Apple, Mac and ADB are registered trademarks of all companies, even when not mentioned. Carefully observe the trademarks and registered trademarks of Apple Computer, Inc. Symptom 22 Table 12. ENGLISH-1 After reading, store this liquid crystal projector. Windows is a registered...
Operation Guide
Page 3
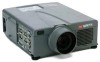
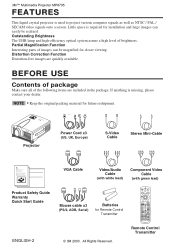
... (with green lead) STANDBY/ON BLANK LASER VIDEO RGB Mouse cable x3 (PS/2, ADB, Serial) Batteries for closer viewing. All Rights Reserved. 3M™ Multimedia Projector MP8795 FEATURES This liquid crystal projector is missing, please contact your dealer. Guía de Seguridad del Producto MP8775i Proiettore Multimediale - Partial Magnification Function Interesting parts of brightness...
... (with green lead) STANDBY/ON BLANK LASER VIDEO RGB Mouse cable x3 (PS/2, ADB, Serial) Batteries for closer viewing. All Rights Reserved. 3M™ Multimedia Projector MP8795 FEATURES This liquid crystal projector is missing, please contact your dealer. Guía de Seguridad del Producto MP8775i Proiettore Multimediale - Partial Magnification Function Interesting parts of brightness...
Operation Guide
Page 4
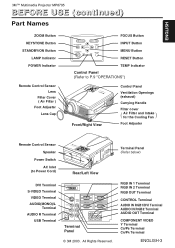
...LAMP RESET TEMP FOCUS Button INPUT Button MENU Button RESET Button TEMP Indicator Control Panel (Refer to P.9 "OPERATIONS") MP8795 Front/Right View PORTABLE PROJECTOR MP8795 Control Panel Ventilation Openings (exhaust) Carrying Handle Filter cover ( ) Air Filter and Intake for the Cooling Fan ...OUT Terminal COMPONENT VIDEO Y Terminal CB/PB Terminal CR/PR Terminal ENGLISH-3 All Rights Reserved. ZOOM + - ENGLISH 3M™ Multimedia Projector MP8795 BEFORE USE (continued) Part Names ZOOM Button KEYSTONE Button STANDBY/ON Button LAMP Indicator POWER Indicator Remote Control Sensor ...
...LAMP RESET TEMP FOCUS Button INPUT Button MENU Button RESET Button TEMP Indicator Control Panel (Refer to P.9 "OPERATIONS") MP8795 Front/Right View PORTABLE PROJECTOR MP8795 Control Panel Ventilation Openings (exhaust) Carrying Handle Filter cover ( ) Air Filter and Intake for the Cooling Fan ...OUT Terminal COMPONENT VIDEO Y Terminal CB/PB Terminal CR/PR Terminal ENGLISH-3 All Rights Reserved. ZOOM + - ENGLISH 3M™ Multimedia Projector MP8795 BEFORE USE (continued) Part Names ZOOM Button KEYSTONE Button STANDBY/ON Button LAMP Indicator POWER Indicator Remote Control Sensor ...
Operation Guide
Page 5
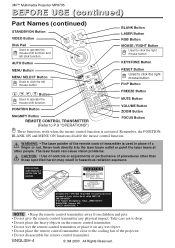
... 1040. 10 and 1040. 11 except for deviations pursuant to click the right mouse button. WARNING • The laser pointer of the projector. • Do not disassemble the remote control transmitter. OUTPUT: 1mW WAVE LENGTH: 650nm CLASS2 LASER PRODUCT LASER RADIATION DO NOT STARE INTO...SELECT Button Used to click the left mouse button. , , , Button Used to operate the mouse shift function and left click function. 3M™ Multimedia Projector MP8795 BEFORE USE (continued) Part Names (continued) STANDBY/ON Button VIDEO Button Disk Pad Used to operate the mouse shift function. BLANK STANDBY...
... 1040. 10 and 1040. 11 except for deviations pursuant to click the right mouse button. WARNING • The laser pointer of the projector. • Do not disassemble the remote control transmitter. OUTPUT: 1mW WAVE LENGTH: 650nm CLASS2 LASER PRODUCT LASER RADIATION DO NOT STARE INTO...SELECT Button Used to click the left mouse button. , , , Button Used to operate the mouse shift function and left click function. 3M™ Multimedia Projector MP8795 BEFORE USE (continued) Part Names (continued) STANDBY/ON Button VIDEO Button Disk Pad Used to operate the mouse shift function. BLANK STANDBY...
Operation Guide
Page 6
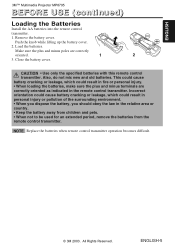
Remove the battery cover. Also, do not mix new and old batteries. NOTE Replace the batteries when remote control transmitter operation becomes difficult. © 3M 2003. ENGLISH 3M™ Multimedia Projector MP8795 BEFORE USE (continued) Loading the Batteries Install the AA batteries into the remote control transmitter. 1. Close the battery cover. This could cause battery...
Remove the battery cover. Also, do not mix new and old batteries. NOTE Replace the batteries when remote control transmitter operation becomes difficult. © 3M 2003. ENGLISH 3M™ Multimedia Projector MP8795 BEFORE USE (continued) Loading the Batteries Install the AA batteries into the remote control transmitter. 1. Close the battery cover. This could cause battery...

Operation Guide
Page 7
...All Rights Reserved. Max. Connect the ground terminal of AC inlet of the projector to the drawing and table below are for fine adjustment. ENGLISH-6 © 3M 2003. a: Distance from the projector to the screen. (±10%) b: Distance from the lens center to...(3.0) 150 (3.8) 200 (5.0) a [inches (m)] Min. Use the foot adjusters for full size (1024 x 768 dots). 3M™ Multimedia Projector MP8795 INSTALLATION Installation of the Projector and Screen Refer to adjust the projection angle. Angle Adjustment Use the foot adjusters on critical parts (i.e.LCD panel, Lens Assy...
...All Rights Reserved. Max. Connect the ground terminal of AC inlet of the projector to the drawing and table below are for fine adjustment. ENGLISH-6 © 3M 2003. a: Distance from the projector to the screen. (±10%) b: Distance from the lens center to...(3.0) 150 (3.8) 200 (5.0) a [inches (m)] Min. Use the foot adjusters for full size (1024 x 768 dots). 3M™ Multimedia Projector MP8795 INSTALLATION Installation of the Projector and Screen Refer to adjust the projection angle. Angle Adjustment Use the foot adjusters on critical parts (i.e.LCD panel, Lens Assy...
Operation Guide
Page 8
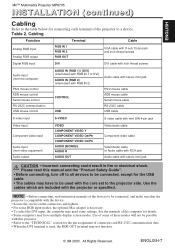
...audio cable Component video cable Video/Audio cable or Audio cable with RCA jack Audio cable with the projector or specified. All Rights Reserved. ENGLISH 3M™ Multimedia Projector MP8795 INSTALLATION (continued) Cabling Refer to the table below for connecting each terminal of these modes will ... to be connected, except for details. • Some computers may have multiple display screen modes. NOTE • Before connecting, read this projector. • Refer to a device. See the manuals of connectors and RS-232C communication data. • When the DVI terminal is necessary...
...audio cable Component video cable Video/Audio cable or Audio cable with RCA jack Audio cable with the projector or specified. All Rights Reserved. ENGLISH 3M™ Multimedia Projector MP8795 INSTALLATION (continued) Cabling Refer to the table below for connecting each terminal of these modes will ... to be connected, except for details. • Some computers may have multiple display screen modes. NOTE • Before connecting, read this projector. • Refer to a device. See the manuals of connectors and RS-232C communication data. • When the DVI terminal is necessary...
Operation Guide
Page 9
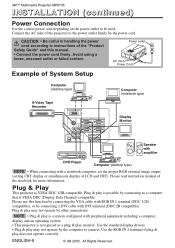
.... All Rights Reserved. Plug & play monitor. 3M™ Multimedia Projector MP8795 INSTALLATION (continued) Power Connection Use the correct power cord depending on the power outlet to instructions of the notebook for more information. Plug & Play This projector is recognized as a plug & play may not... image output (setting CRT display or simultaneous display of LCD and CRT). ENGLISH-8 © 3M 2003. Power outlet MP8795 PORTABLE PROJECTOR AC Inlet Power Cord Example of the projector to the power outlet firmly by the computer to a computer that is VESA DDC (Display Data...
.... All Rights Reserved. Plug & play monitor. 3M™ Multimedia Projector MP8795 INSTALLATION (continued) Power Connection Use the correct power cord depending on the power outlet to instructions of the notebook for more information. Plug & Play This projector is recognized as a plug & play may not... image output (setting CRT display or simultaneous display of LCD and CRT). ENGLISH-8 © 3M 2003. Power outlet MP8795 PORTABLE PROJECTOR AC Inlet Power Cord Example of the projector to the power outlet firmly by the computer to a computer that is VESA DDC (Display Data...
Operation Guide
Page 10
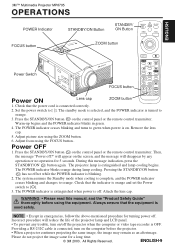
... the control panel or the remote control transmitter. Providing a RS-232C cable is connected correctly. 2. The projector lamp is extinguished and lamp cooling begins. will appear on the computer before using the equipment. 3M™ Multimedia Projector MP8795 OPERATIONS ENGLISH POWER Indicator STANDBY/ON Button STANDBY/ ON Button STANDBY/ON BLANK LASER VIDEO RGB...
... the control panel or the remote control transmitter. Providing a RS-232C cable is connected correctly. 2. The projector lamp is extinguished and lamp cooling begins. will appear on the computer before using the equipment. 3M™ Multimedia Projector MP8795 OPERATIONS ENGLISH POWER Indicator STANDBY/ON Button STANDBY/ ON Button STANDBY/ON BLANK LASER VIDEO RGB...
Operation Guide
Page 11
... the image is cleared by running or setting the AUTO, ASPECT, INPUT SELECT or VIDEO, or by (*) may operate as the mouse control button. 3M™ Multimedia Projector MP8795 OPERATIONS (continued) Basic Operation The basic operations shown in MAGNIFY mode. VIDEO/S-VIDEO/COMPONENT VIDEO → RGB IN 1/RGB IN 2/DVI RGB IN 1 →...
... the image is cleared by running or setting the AUTO, ASPECT, INPUT SELECT or VIDEO, or by (*) may operate as the mouse control button. 3M™ Multimedia Projector MP8795 OPERATIONS (continued) Basic Operation The basic operations shown in MAGNIFY mode. VIDEO/S-VIDEO/COMPONENT VIDEO → RGB IN 1/RGB IN 2/DVI RGB IN 1 →...
Operation Guide
Page 12
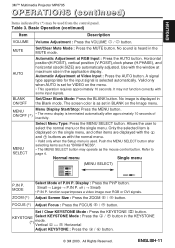
.../ button. FOCUS (*) Adjust Focus : Press the FOCUS / button. Vertical ↔ Horizontal Adjust KEYSTONE : Press the / button. © 3M 2003. No sound is terminated automatically after selecting items such as the mouse control button. AUTO Automatic Adjustment at Video Input : Press the AUTO ...Press the MENU button. Allows the user to page 4. Refer to select the normal menu or the single menu. ENGLISH 3M™ Multimedia Projector MP8795 OPERATIONS (continued) Items indicated by (*) may be used . Horizontal position(H.POSIT), vertical position (V.POSIT),clock phase (H.PHASE),...
.../ button. FOCUS (*) Adjust Focus : Press the FOCUS / button. Vertical ↔ Horizontal Adjust KEYSTONE : Press the / button. © 3M 2003. No sound is terminated automatically after selecting items such as the mouse control button. AUTO Automatic Adjustment at Video Input : Press the AUTO ...Press the MENU button. Allows the user to page 4. Refer to select the normal menu or the single menu. ENGLISH 3M™ Multimedia Projector MP8795 OPERATIONS (continued) Items indicated by (*) may be used . Horizontal position(H.POSIT), vertical position (V.POSIT),clock phase (H.PHASE),...
Operation Guide
Page 13
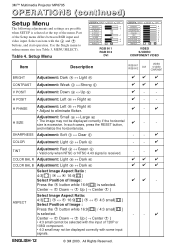
... Light ↔ Dark ✔✔ ✔ Select Image Aspect Ratio : 4:3[ ] ↔ 16:9[ ] Select Position of the menu. ENGLISH-12 © 3M 2003. In such cases, press the RESET button, - - ASPECT Select Image Aspect Ratio: 4:3[ ] ↔ 16:9[ ] ↔ 4:3 small[ ] Select...see Table 3, MENU SELECT). Center → Down → Up ( → Center ) ✔✔ - Table 4. 3M™ Multimedia Projector MP8795 OPERATIONS (continued) Setup Menu The following adjustments and settings are possible when SETUP is selected at the top of Image: Press ...
... Light ↔ Dark ✔✔ ✔ Select Image Aspect Ratio : 4:3[ ] ↔ 16:9[ ] Select Position of the menu. ENGLISH-12 © 3M 2003. In such cases, press the RESET button, - - ASPECT Select Image Aspect Ratio: 4:3[ ] ↔ 16:9[ ] ↔ 4:3 small[ ] Select...see Table 3, MENU SELECT). Center → Down → Up ( → Center ) ✔✔ - Table 4. 3M™ Multimedia Projector MP8795 OPERATIONS (continued) Setup Menu The following adjustments and settings are possible when SETUP is selected at the top of Image: Press ...
Operation Guide
Page 14
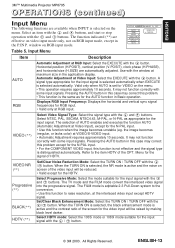
... RGB Automatic Adjustment at the interlaced video input except HDTV signal. It may not function correctly with the / button. © 3M 2003. Select HDTV mode: Select the 1035i mode or 1080i mode suitable for the input signal with the window at Video Input:... function AUTO (Automatic Adjustment at Video Input), except for the video input will be raised by making black level darker. ENGLISH 3M™ Multimedia Projector MP8795 OPERATIONS (continued) Input Menu The following functions are available when INPUT is selected automatically. A signal type appropriate for the HDTV....
... RGB Automatic Adjustment at the interlaced video input except HDTV signal. It may not function correctly with the / button. © 3M 2003. Select HDTV mode: Select the 1035i mode or 1080i mode suitable for the input signal with the window at Video Input:... function AUTO (Automatic Adjustment at Video Input), except for the video input will be raised by making black level darker. ENGLISH 3M™ Multimedia Projector MP8795 OPERATIONS (continued) Input Menu The following functions are available when INPUT is selected automatically. A signal type appropriate for the HDTV....

Operation Guide
Page 15
.... of P. CAPT. IN P. Display : Press the / button. ↔ ↔ ↔ • P.IN P. ENGLISH-14 © 3M 2003. MyScreen is a mode that the factory fixed screen is going to the black after freeze to go to the MyScreen Capture Position mode, press... selecting the magnification, press the KEYSTONE button to go to capture. executes a capturing the image. All Rights Reserved. 3M™ Multimedia Projector MP8795 OPERATIONS (continued) Image Menu The following adjustments and settings are available when IMAGE is ON. Image Menu Item Description SETUP...
.... of P. CAPT. IN P. Display : Press the / button. ↔ ↔ ↔ • P.IN P. ENGLISH-14 © 3M 2003. MyScreen is a mode that the factory fixed screen is going to the black after freeze to go to the MyScreen Capture Position mode, press... selecting the magnification, press the KEYSTONE button to go to capture. executes a capturing the image. All Rights Reserved. 3M™ Multimedia Projector MP8795 OPERATIONS (continued) Image Menu The following adjustments and settings are available when IMAGE is ON. Image Menu Item Description SETUP...
Operation Guide
Page 16
is selected on screen is a little lower. © 3M 2003. Table 7. When STOP is selected the system does not enter the standby mode even if no signal is reduced, and brightness level on the ... start operation. When the WHISPER is selected, the WHISPER mode is not received for the set SYNC ON G to invalid, and reconnect the signal. ENGLISH 3M™ Multimedia Projector MP8795 OPERATIONS (continued) Options Menu The following adjustments and settings are available when OPT.
is selected on screen is a little lower. © 3M 2003. Table 7. When STOP is selected the system does not enter the standby mode even if no signal is reduced, and brightness level on the ... start operation. When the WHISPER is selected, the WHISPER mode is not received for the set SYNC ON G to invalid, and reconnect the signal. ENGLISH 3M™ Multimedia Projector MP8795 OPERATIONS (continued) Options Menu The following adjustments and settings are available when OPT.
Operation Guide
Page 17
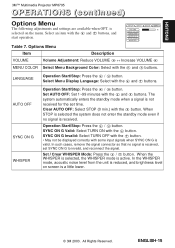
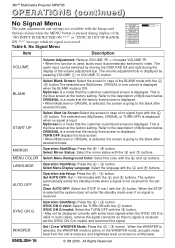
...Invalid: Select the TURN OFF with the button. • May not be switched by pressing VOLUME or VOLUME button. ENGLISH-16 © 3M 2003. No Signal Menu Item Description VOLUME Volume Adjustment: Reduce VOLUME ↔ Increase VOLUME • When this function is used, audio input... button. SYNC ON G Operation Start/Stop: Press the / button. WHISPER Set / Crear WHISPER Mode: Press the / button. 3M™ Multimedia Projector MP8795 OPERATIONS (continued) No Signal Menu VOLUME 16 The same adjustments and settings are available with the Image and BLANK START UP Options menus ...
...Invalid: Select the TURN OFF with the button. • May not be switched by pressing VOLUME or VOLUME button. ENGLISH-16 © 3M 2003. No Signal Menu Item Description VOLUME Volume Adjustment: Reduce VOLUME ↔ Increase VOLUME • When this function is used, audio input... button. SYNC ON G Operation Start/Stop: Press the / button. WHISPER Set / Crear WHISPER Mode: Press the / button. 3M™ Multimedia Projector MP8795 OPERATIONS (continued) No Signal Menu VOLUME 16 The same adjustments and settings are available with the Image and BLANK START UP Options menus ...
Operation Guide
Page 18
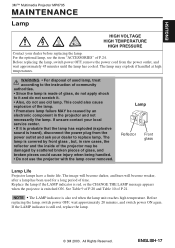
.... All Rights Reserved. WARNING • For disposal of used for a long period of time. If unsure contact your dealer before replacing the lamp. ENGLISH 3M™ Multimedia Projector MP8795 MAINTENANCE Lamp HIGH VOLTAGE HIGH TEMPERATURE HIGH PRESSURE Contact your local service center. • If it is probable that the lamp has exploded (explosive...
.... All Rights Reserved. WARNING • For disposal of used for a long period of time. If unsure contact your dealer before replacing the lamp. ENGLISH 3M™ Multimedia Projector MP8795 MAINTENANCE Lamp HIGH VOLTAGE HIGH TEMPERATURE HIGH PRESSURE Contact your local service center. • If it is probable that the lamp has exploded (explosive...
Operation Guide
Page 19
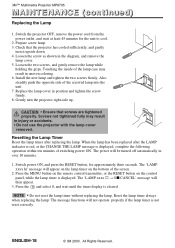
... be turned off automatically in the diagram, and remove the lamp cover. 5. Prepare a new lamp. 3. Gently turn it upside down. 4. 3M™ Multimedia Projector MP8795 MAINTENANCE (continued) Replacing the Lamp 1. Switch power ON, and press the RESET button, for the unit to cool. 2. NOTE • Do...case may result in uneven coloring. 6. Reset the lamp timer always when replacing the lamp. ENGLISH-18 © 3M 2003. All Rights Reserved. Switch the projector OFF, remove the power cord from the power outlet, and wait at least 45 minutes for approximately three seconds....
... be turned off automatically in the diagram, and remove the lamp cover. 5. Prepare a new lamp. 3. Gently turn it upside down. 4. 3M™ Multimedia Projector MP8795 MAINTENANCE (continued) Replacing the Lamp 1. Switch power ON, and press the RESET button, for the unit to cool. 2. NOTE • Do...case may result in uneven coloring. 6. Reset the lamp timer always when replacing the lamp. ENGLISH-18 © 3M 2003. All Rights Reserved. Switch the projector OFF, remove the power cord from the power outlet, and wait at least 45 minutes for approximately three seconds....
Operation Guide
Page 20
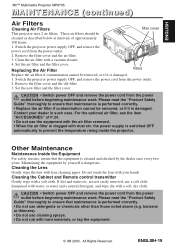
... dampened with water, or water and a neutral detergent, and wipe dry with hard materials, or tap the equipment. © 3M 2003. Remove the filter cover and the old filter. 3. Maintaining the equipment by the dealer once every two years. CAUTION ... before beginning maintenance work . MP8795 1. Switch the projector power supply OFF, and remove the power cord from the power outlet. 2. FOCUS + INPUT This projector uses 2 air filters. ENGLISH 3M™ Multimedia Projector MP8795 MAINTENANCE (continued) Air Filters PORTABLE PROJECTOR MP8795 Cleaning Air Filters STANDBY ON ...
... dampened with water, or water and a neutral detergent, and wipe dry with hard materials, or tap the equipment. © 3M 2003. Remove the filter cover and the old filter. 3. Maintaining the equipment by the dealer once every two years. CAUTION ... before beginning maintenance work . MP8795 1. Switch the projector power supply OFF, and remove the power cord from the power outlet. 2. FOCUS + INPUT This projector uses 2 air filters. ENGLISH 3M™ Multimedia Projector MP8795 MAINTENANCE (continued) Air Filters PORTABLE PROJECTOR MP8795 Cleaning Air Filters STANDBY ON ...


