3M X90 - Digital Projector XGA LCD Support and Manuals
Get Help and Manuals for this 3M item

Popular 3M X90 Manual Pages
Operation Guide - Page 2
...3 IMAGE menu 29
Part names 4 ASPECT, OVER SCAN, V POSITION, H POSITION, Projector 4 H PHASE, H SIZE, AUTO ADJUST EXECUTE
Control panel 5 INPUT menu 31
Rear panel 5 PROGRESSIVE, VIDEO NR, 3D-YCS,
Remote control 6 COLOR SPACE, COMPONENT, VIDEO FORMAT,
Setting up 7 M1-D, FRAME LOCK, RGB IN, RESOLUTION
Arrangement 8 SETUP menu 35
Adjusting the projector's elevator . . .9 AUTO KEYSTONE...
Operation Guide - Page 3
... Guide Warranty and
Warranty Registration WEEE Statement
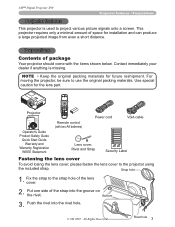
Remote control (with the items shown below. Strap hole
1. Put one side of the lens cover.
2. Veiligheidsgids op Product X90w Projector dos Multimedia -
For moving the projector, be sure to the projector using
the included strap. Use special caution for the lens part.
Rivet hole 3 3M™ Digital Projector X90...
Operation Guide - Page 14
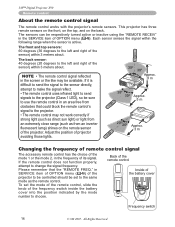
...© 3M 2007. Back of the remote control
Inside of projector avoiding those lights. 3M™ Digital Projector X90 Remote control
About the remote control signal
The remote control works with the projector's remote sensors....from obstacles that the "REMOTE FREQ." To set to use the remote control in the SERVICE item of its signal. This projector has three remote sensors on the front,...
Operation Guide - Page 15
...instead of the projector via an audio cable with 3.5 diameter stereo mini plugs. And also this function. -
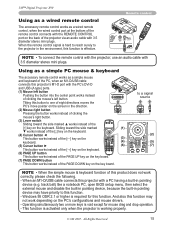
track ball) like a notebook PC, open BIOS setup menu, then select...GULYHUV - 3M™ Digital Projector X90
Using as a wired remote control
The accessory remote control works as a simple mouse
and keyboard of the PC, when an M1-D/USB cable
connects this projector's M1-D port...
Operation Guide - Page 16

3M™ Digital Projector X90 Power on...the STANDBY/ON button on the projector or the remote control again while the message appears. The projector lamp will go off in steady orange, and set the power switch to the ...again too soon could shorten the lifetime of some consumable parts of the projector's openings. ŹDo not touch around the lamp door and the exhaust vents during use or just ...
Operation Guide - Page 20
3M™ Digital Projector X90...2) Manual displays a dialog for the
optional lens type FL-601 only ( 45)), this function is set to ...WRWKH0,5525LWHPLQWKH
SETUP menu, if the projector screen is inclined or angled downward,...set to the full WIDE (wide-angle focus) whenever possible.
ƔWhen the projector is placed on ( 51).
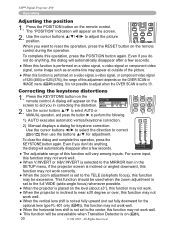
20
© 3M 2007. Press the POSITION button on the
remote...
Operation Guide - Page 44

3M™ Digital Projector X90 OPTION Menu
OPTION Menu (continued)
Item MY BUTTON
Description
This item is to assign one of the following function to MY BUTTON 1 and 2 on the remote control ( 6). &KRRVHRURQWKH0
Operation Guide - Page 45
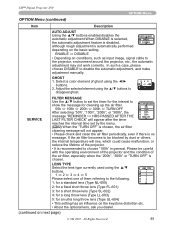
...EXWWRQVWR
disappear ghost.
4)$
)*156
SERVICE
FILTER MESSAGE
8VHWKHŸźEXWWRQWRVHWWKH... appear after the timer
J J 67401((
reaches the interval time set by the menu.
( 62) :KHQWKH³78512))´... 3M 2007. although rough adjustment is recommended to disable the automatic adjustment, and make
adjustment manually. 3M™ Digital Projector X90
...
Operation Guide - Page 46
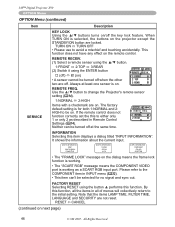
...; Please use to the initial setting. 3M™ Digital Projector X90 OPTION Menu
OPTION Menu (continued)
Item SERVICE
Description
KEY LOCK 8VLQJ WKH Ÿź EXWWRQV WXUQV RQRII WKH NH\ ORFN IHDWXUH :KHQ TURN ON is for no signal and sync out. If the remote control does not function correctly set the this function, all of menus...
Operation Guide - Page 48
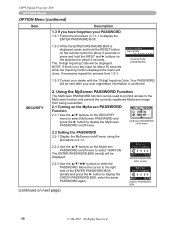
... 10-digit Inquiring Code will close. Your PASSWORD ZLOOEHVHQWDIWHU\RXUXVHUUHJLVWUDWLRQLQIRUPDWLRQLVFRQ¿UPHG
SECURITY
2.
3M™ Digital Projector X90
OPTION Menu
OPTION Menu (continued)
Item
Description
1.3 If you have forgotten your dealer with the 10 digit Inquiring Code. If necessary repeat the process from being overwritten.
2.1 Turning on the remote control...
Operation Guide - Page 53
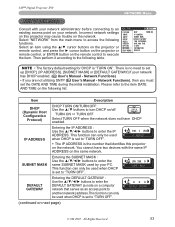
... table. Select "NETWORK" from the main menu to set XS>'+&3@>,3$''5(66@>68%1(70$6.@RU>'()$8/7*$7(:$ There is "TURN ON". Incorrect network settings on this projector may cause trouble on the remote control to an /'07=4)$?
5'.'%6
existing access point on your network. 3M™ Digital Projector X90
NETWORK Menu
NETWORK Menu
Consult with your network administrator...
Operation Guide - Page 54
... your network administrator. 8VHWKHŻEXWWRQWRUHWXUQWRWKHPHQX after setting the TIME DIFFERENCE.
6+/'&+(('4'0
DATE AND TIME
Entering DATE AND TIME : Use the EXWWRQVWRHQWHUWKH 3M™ Digital Projector X90 NETWORK Menu
NETWORK Menu (continued)
Item
Description
TIME DIFFERENCE
Entering the TIME DIFFERENCE : Use the Ÿź buttons to enter...
Operation Guide - Page 57
...To replace the lamp, make sure to clean the projector or replace the lamp yourself. 3M™ Digital Projector X90
Maintenance
Lamp (continued)
WARNING
HIGH VOLTAGE
HIGH TEMPERATURE
HIGH PRESSURE
ŹThe projector uses a high-pressure mercury glass lamp. For more information, call your local dealer. In addition, working in Canada). Note that the screws are electrical problems...
Operation Guide - Page 64
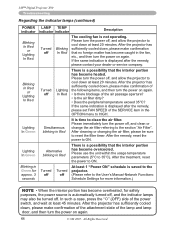
...service company. Blinking in Red
,WLVWLPHWRFOHDQWKHDLU¿OWHU Please immediately turn the power on again.
64
© 3M 2007. After the projector...20 minutes. 3M™ Digital Projector X90 Troubleshooting
Regarding the indicator lamps (continued)
POWER LAMP TEMP indicator ...WKH power to the User's Manual-Network Functions:
Schedule Settings for more information.)
NOTE...
Operation Guide - Page 65

3M™ Digital Projector X90
Troubleshooting
Phenomena that the smoke or odor has stopped, contact your problem. In such cases, immediately turn off immediately. This operation sometimes resolves your dealer or service company.
1.
Correctly connect the power cord.
Please turn the power on position. 6HWWKHSRZHUVZLWFKWR>_@
2Q
The main power source has been interrupted ...
3M X90 Reviews
We have not received any reviews for 3M yet.