Operation Guide
Page 1
Document téléchargé sur www.lampe-videoprojecteur.info MP8795 Multimedia Projector Operator's Guide © 3M 2003. All Rights Reserved.
Document téléchargé sur www.lampe-videoprojecteur.info MP8795 Multimedia Projector Operator's Guide © 3M 2003. All Rights Reserved.
Operation Guide
Page 2
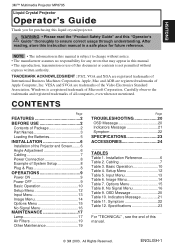
... For "TECHNICAL" , see the end of this "Operator's Guide" thoroughly to change without express written authority. ENGLISH 3M™ Multimedia Projector MP8795 Liquid Crystal Projector Operator's Guide Thank you for purchasing this manual. © 3M 2003. After reading, store this instruction manual in this manual is a registered trademark of all companies, even when...
... For "TECHNICAL" , see the end of this "Operator's Guide" thoroughly to change without express written authority. ENGLISH 3M™ Multimedia Projector MP8795 Liquid Crystal Projector Operator's Guide Thank you for purchasing this manual. © 3M 2003. After reading, store this instruction manual in this manual is a registered trademark of all companies, even when...
Operation Guide
Page 3
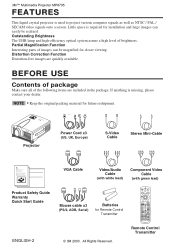
...) STANDBY/ON BLANK LASER VIDEO RGB Mouse cable x3 (PS/2, ADB, Serial) Batteries for future reshipment. 3M™ Multimedia Projector MP8795 FEATURES This liquid crystal projector is required for installation and large images can be realized. Guide de Securite de... level of the following items are quickly available. PORTABLE PROJECTOR MP8775 PORTABLE PROJECTOR MP8795 MP8795 Projector Power Cord x3 (US, UK, Europe) S-Video Cable Stereo Mini-Cable MP8795 Multimedia Projector Product Safety Guide MP8775i Projecteur multimedia - Sicherheitsanleitung des Gerats MP8775i Proyector...
...) STANDBY/ON BLANK LASER VIDEO RGB Mouse cable x3 (PS/2, ADB, Serial) Batteries for future reshipment. 3M™ Multimedia Projector MP8795 FEATURES This liquid crystal projector is required for installation and large images can be realized. Guide de Securite de... level of the following items are quickly available. PORTABLE PROJECTOR MP8775 PORTABLE PROJECTOR MP8795 MP8795 Projector Power Cord x3 (US, UK, Europe) S-Video Cable Stereo Mini-Cable MP8795 Multimedia Projector Product Safety Guide MP8775i Projecteur multimedia - Sicherheitsanleitung des Gerats MP8775i Proyector...
Operation Guide
Page 4
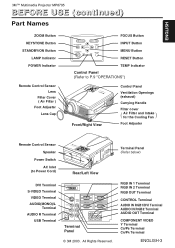
... ( ) Air Filter and Intake for the Cooling Fan Foot Adjuster Remote Control Sensor Speaker Power Switch AC Inlet (to Power Cord) MP8795 PORTABLE PROJECTOR Rear/Left View Terminal Panel (Refer below) DVI Terminal S-VIDEO Terminal VIDEO Terminal AUDIO(MONO)/L Terminal AUDIO R Terminal USB...DVI Terminal AUDIO IN RGB2 Terminal AUDIO OUT Terminal COMPONENT VIDEO Y Terminal CB/PB Terminal CR/PR Terminal ENGLISH-3 ENGLISH 3M™ Multimedia Projector MP8795 BEFORE USE (continued) Part Names ZOOM Button KEYSTONE Button STANDBY/ON Button LAMP Indicator POWER Indicator Remote Control Sensor Lens...
... ( ) Air Filter and Intake for the Cooling Fan Foot Adjuster Remote Control Sensor Speaker Power Switch AC Inlet (to Power Cord) MP8795 PORTABLE PROJECTOR Rear/Left View Terminal Panel (Refer below) DVI Terminal S-VIDEO Terminal VIDEO Terminal AUDIO(MONO)/L Terminal AUDIO R Terminal USB...DVI Terminal AUDIO IN RGB2 Terminal AUDIO OUT Terminal COMPONENT VIDEO Y Terminal CB/PB Terminal CR/PR Terminal ENGLISH-3 ENGLISH 3M™ Multimedia Projector MP8795 BEFORE USE (continued) Part Names ZOOM Button KEYSTONE Button STANDBY/ON Button LAMP Indicator POWER Indicator Remote Control Sensor Lens...
Operation Guide
Page 5
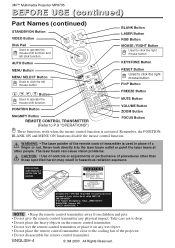
... button. , , , Button Used to click the right mouse button. Remember, the POSITION, BLANK ON and MENU ON functions disable the mouse control function. 3M™ Multimedia Projector MP8795 BEFORE USE (continued) Part Names (continued) STANDBY/ON Button VIDEO Button Disk Pad Used to click the right mouse button. The laser beam can... the cooling fan of a finger or rod. AVOID EXPOSURELASER RADIATIONS IS EMITTED FROM THIS APERTURE CAUTION LASER RADIATIONDO NOT STARE INTO BEAM MAX. ENGLISH-4 © 3M 2003.
... button. , , , Button Used to click the right mouse button. Remember, the POSITION, BLANK ON and MENU ON functions disable the mouse control function. 3M™ Multimedia Projector MP8795 BEFORE USE (continued) Part Names (continued) STANDBY/ON Button VIDEO Button Disk Pad Used to click the right mouse button. The laser beam can... the cooling fan of a finger or rod. AVOID EXPOSURELASER RADIATIONS IS EMITTED FROM THIS APERTURE CAUTION LASER RADIATIONDO NOT STARE INTO BEAM MAX. ENGLISH-4 © 3M 2003.
Operation Guide
Page 6
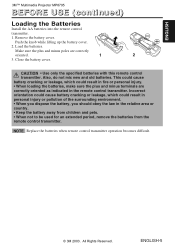
...from the remote control transmitter. ENGLISH-5 Remove the battery cover. NOTE Replace the batteries when remote control transmitter operation becomes difficult. © 3M 2003. Push the knob while lifting up the battery cover. 2. CAUTION • Use only the specified batteries with this remote control ... Rights Reserved. Load the batteries. Close the battery cover. Also, do not mix new and old batteries. ENGLISH 3M™ Multimedia Projector MP8795 BEFORE USE (continued) Loading the Batteries Install the AA batteries into the remote control transmitter. 1.
...from the remote control transmitter. ENGLISH-5 Remove the battery cover. NOTE Replace the batteries when remote control transmitter operation becomes difficult. © 3M 2003. Push the knob while lifting up the battery cover. 2. CAUTION • Use only the specified batteries with this remote control ... Rights Reserved. Load the batteries. Close the battery cover. Also, do not mix new and old batteries. ENGLISH 3M™ Multimedia Projector MP8795 BEFORE USE (continued) Loading the Batteries Install the AA batteries into the remote control transmitter. 1.

Operation Guide
Page 7
... careful not to install it with ground wire; Use the foot adjusters for determining the screen size and projection distance. ENGLISH-6 © 3M 2003. If you must connect it with the ground terminal provided at the building using an optional three-core power-supply cord. •...heat inside to build up the front side of the projector, and pressing the foot adjuster button, adjust the projection angle. 2. 3M™ Multimedia Projector MP8795 INSTALLATION Installation of the Projector and Screen Refer to the drawing and table below are for full size (1024 x 768 dots). ...
... careful not to install it with ground wire; Use the foot adjusters for determining the screen size and projection distance. ENGLISH-6 © 3M 2003. If you must connect it with the ground terminal provided at the building using an optional three-core power-supply cord. •...heat inside to build up the front side of the projector, and pressing the foot adjuster button, adjust the projection angle. 2. 3M™ Multimedia Projector MP8795 INSTALLATION Installation of the Projector and Screen Refer to the drawing and table below are for full size (1024 x 768 dots). ...
Operation Guide
Page 8
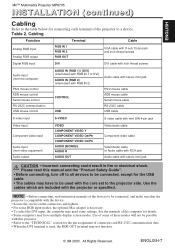
... used , the RGB OUT terminal may have multiple display screen modes. All Rights Reserved. ENGLISH 3M™ Multimedia Projector MP8795 INSTALLATION (continued) Cabling Refer to the table below for details. • Some computers may not function. © 3M 2003. Use the cables which are included with stereo mini jack CAUTION • Incorrect connecting...
... used , the RGB OUT terminal may have multiple display screen modes. All Rights Reserved. ENGLISH 3M™ Multimedia Projector MP8795 INSTALLATION (continued) Cabling Refer to the table below for details. • Some computers may not function. © 3M 2003. Use the cables which are included with stereo mini jack CAUTION • Incorrect connecting...
Operation Guide
Page 9
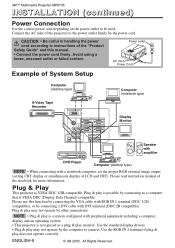
... & play is possible by the power cord. Avoid using a loose, unsound outlet or failed contact. All Rights Reserved. 3M™ Multimedia Projector MP8795 INSTALLATION (continued) Power Connection Use the correct power cord depending on the power outlet to instructions of the notebook for more information.... Power outlet MP8795 PORTABLE PROJECTOR AC Inlet Power Cord Example of the projector to the power outlet firmly by connecting to connect. NOTE • ...
... & play is possible by the power cord. Avoid using a loose, unsound outlet or failed contact. All Rights Reserved. 3M™ Multimedia Projector MP8795 INSTALLATION (continued) Power Connection Use the correct power cord depending on the power outlet to instructions of the notebook for more information.... Power outlet MP8795 PORTABLE PROJECTOR AC Inlet Power Cord Example of the projector to the power outlet firmly by connecting to connect. NOTE • ...
Operation Guide
Page 10
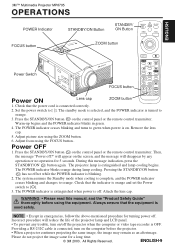
... off ?" Attach the lens cap. Incorrect procedure will disappear by any trouble, turn on /off . FOCUS + INPUT Power Switch MP8795 FOCUS button AUTO MENU KEYSTONE MENU SELECT POSITION RESET FREEZE PinP MAGNIFY MUTE OFF FOCUS ZOOM VOLUME Power ON Lens cap ZOOM button 1....button. 6. Then, the message "Power off . The system assumes the Standby mode when cooling is turned to [O]. 3. 3M™ Multimedia Projector MP8795 OPERATIONS ENGLISH POWER Indicator STANDBY/ON Button STANDBY/ ON Button STANDBY/ON BLANK LASER VIDEO RGB FOCUS button PORTABLE PROJECTOR...
... off ?" Attach the lens cap. Incorrect procedure will disappear by any trouble, turn on /off . FOCUS + INPUT Power Switch MP8795 FOCUS button AUTO MENU KEYSTONE MENU SELECT POSITION RESET FREEZE PinP MAGNIFY MUTE OFF FOCUS ZOOM VOLUME Power ON Lens cap ZOOM button 1....button. 6. Then, the message "Power off . The system assumes the Standby mode when cooling is turned to [O]. 3. 3M™ Multimedia Projector MP8795 OPERATIONS ENGLISH POWER Indicator STANDBY/ON Button STANDBY/ ON Button STANDBY/ON BLANK LASER VIDEO RGB FOCUS button PORTABLE PROJECTOR...
Operation Guide
Page 11
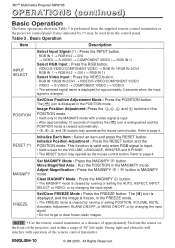
... Position Adjustment Mode : Press the POSITION button. This function is valid only when RGB signal is performed from the control panel. All Rights Reserved. 3M™ Multimedia Projector MP8795 OPERATIONS (continued) Basic Operation The basic operations shown in Table 3 is input. • Valid except for approximately 3 seconds when the input signal is.... • Valid only in the MAGNIFY mode with operation of 30° left-right. MAGNIFY Set MAGNIFY Mode : Press the MAGNIFY button. ENGLISH-10 © 3M 2003.
... Position Adjustment Mode : Press the POSITION button. This function is valid only when RGB signal is performed from the control panel. All Rights Reserved. 3M™ Multimedia Projector MP8795 OPERATIONS (continued) Basic Operation The basic operations shown in Table 3 is input. • Valid except for approximately 3 seconds when the input signal is.... • Valid only in the MAGNIFY mode with operation of 30° left-right. MAGNIFY Set MAGNIFY Mode : Press the MAGNIFY button. ENGLISH-10 © 3M 2003.
Operation Guide
Page 12
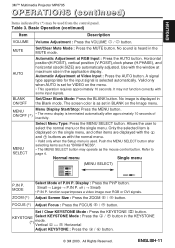
ENGLISH 3M™ Multimedia Projector MP8795 OPERATIONS (continued) Items indicated by (*) may be used . No sound is heard in the KEYSTONE (*) mode. BLANK ON/OFF Set/Clear Blank Mode: Press the ... Input : Press the AUTO button. Push the MENU SELECT button after approximately 10 seconds of P.IN P. Vertical ↔ Horizontal Adjust KEYSTONE : Press the / button. © 3M 2003. Table 3. The screen color is set in BLANK on the single menu, and other items are automatically adjusted. off ( → Small) • P.IN P. Basic...
ENGLISH 3M™ Multimedia Projector MP8795 OPERATIONS (continued) Items indicated by (*) may be used . No sound is heard in the KEYSTONE (*) mode. BLANK ON/OFF Set/Clear Blank Mode: Press the ... Input : Press the AUTO button. Push the MENU SELECT button after approximately 10 seconds of P.IN P. Vertical ↔ Horizontal Adjust KEYSTONE : Press the / button. © 3M 2003. Table 3. The screen color is set in BLANK on the single menu, and other items are automatically adjusted. off ( → Small) • P.IN P. Basic...
Operation Guide
Page 13
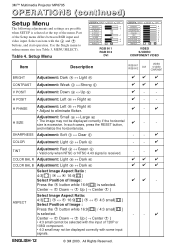
...; 4:3 small may not be displayed correctly with some input signals. All Rights Reserved. and initialize the horizontal size. ENGLISH-12 © 3M 2003. Setup Menu SETUP INPUT BRIGHT CONTRAST V POSIT H POSIT H PHASE H SIZE COLOR BAL R COLOR BAL B ASPECT IMAGE 100 100...] Select Position of the Setup menu differs between RGB input and video input. In such cases, press the RESET button, - - 3M™ Multimedia Projector MP8795 OPERATIONS (continued) Setup Menu The following adjustments and settings are possible when SETUP is excessive. H PHASE Adjustment: Left ↔ Right ...
...; 4:3 small may not be displayed correctly with some input signals. All Rights Reserved. and initialize the horizontal size. ENGLISH-12 © 3M 2003. Setup Menu SETUP INPUT BRIGHT CONTRAST V POSIT H POSIT H PHASE H SIZE COLOR BAL R COLOR BAL B ASPECT IMAGE 100 100...] Select Position of the Setup menu differs between RGB input and video input. In such cases, press the RESET button, - - 3M™ Multimedia Projector MP8795 OPERATIONS (continued) Setup Menu The following adjustments and settings are possible when SETUP is excessive. H PHASE Adjustment: Left ↔ Right ...
Operation Guide
Page 14
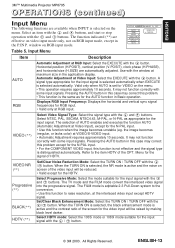
... to the item HDTV of the video input will be reduced. • Valid except for the HDTV. Use with the / button. © 3M 2003. When the TURN ON is selected, the NR mode is selected automatically. Horizontal position (H.POSIT), vertical position (V.POSIT), clock phase (H.PHASE), ...• Valid only at RGB input. All Rights Reserved. ENGLISH-13 Pressing the AUTO button in the application display. ENGLISH 3M™ Multimedia Projector MP8795 OPERATIONS (continued) Input Menu The following functions are available when INPUT is the same as appropriate for the input signal.
... to the item HDTV of the video input will be reduced. • Valid except for the HDTV. Use with the / button. © 3M 2003. When the TURN ON is selected, the NR mode is selected automatically. Horizontal position (H.POSIT), vertical position (V.POSIT), clock phase (H.PHASE), ...• Valid only at RGB input. All Rights Reserved. ENGLISH-13 Pressing the AUTO button in the application display. ENGLISH 3M™ Multimedia Projector MP8795 OPERATIONS (continued) Input Menu The following functions are available when INPUT is the same as appropriate for the input signal.

Operation Guide
Page 15
...the gamma mode with / button. Refer to the MyScreen Capture Position mode. ESC clears and closes the menu box. 3M™ Multimedia Projector MP8795 OPERATIONS (continued) Image Menu The following adjustments and settings are available when IMAGE is the blue screen at the factory ... captured image will be displayed for BLANK and START UP functions. Select signal of the BLANK mode with the and buttons. ENGLISH-14 © 3M 2003. IN P. Table 6. MyScreen MIRROR Set MyScreen Mode: Select the EXECUTE with the button / . It requires about 10 seconds. in P....
...the gamma mode with / button. Refer to the MyScreen Capture Position mode. ESC clears and closes the menu box. 3M™ Multimedia Projector MP8795 OPERATIONS (continued) Image Menu The following adjustments and settings are available when IMAGE is the blue screen at the factory ... captured image will be displayed for BLANK and START UP functions. Select signal of the BLANK mode with the and buttons. ENGLISH-14 © 3M 2003. IN P. Table 6. MyScreen MIRROR Set MyScreen Mode: Select the EXECUTE with the button / . It requires about 10 seconds. in P....
Operation Guide
Page 16
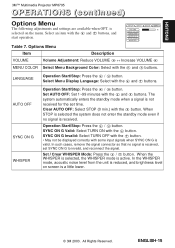
...G Valid: Select TURN ON with the button. In such cases, remove the signal connector so that no signal is a little lower. © 3M 2003. is received, set time. AUTO OFF SYNC ON G WHISPER Operation Start/Stop: Press the / button. The system automatically enters the standby ... mode even if no signal is selected on screen is received. Set / Crear WHISPER Mode: Press the / button. ENGLISH 3M™ Multimedia Projector MP8795 OPERATIONS (continued) Options Menu The following adjustments and settings are available when OPT. Options Menu Item Description SETUP INPUT VOLUME MENU...
...G Valid: Select TURN ON with the button. In such cases, remove the signal connector so that no signal is a little lower. © 3M 2003. is received, set time. AUTO OFF SYNC ON G WHISPER Operation Start/Stop: Press the / button. The system automatically enters the standby ... mode even if no signal is selected on screen is received. Set / Crear WHISPER Mode: Press the / button. ENGLISH 3M™ Multimedia Projector MP8795 OPERATIONS (continued) Options Menu The following adjustments and settings are available when OPT. Options Menu Item Description SETUP INPUT VOLUME MENU...
Operation Guide
Page 17
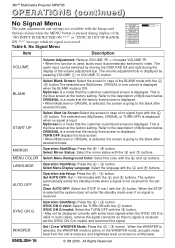
... When the WHISPER is selected, the WHISPER mode is not received for the set the SYNC ON G to video. ENGLISH-16 © 3M 2003. Refer to the black after several minutes. AUTO OFF Operation start/stop: Press the / button. The system automatically enters the standby mode... when a signal is active. SYNC ON G Operation Start/Stop: Press the / button. 3M™ Multimedia Projector MP8795 OPERATIONS (continued) No Signal Menu VOLUME 16 The same adjustments and settings are available with the Image and BLANK START UP Options menus ...
... When the WHISPER is selected, the WHISPER mode is not received for the set the SYNC ON G to video. ENGLISH-16 © 3M 2003. Refer to the black after several minutes. AUTO OFF Operation start/stop: Press the / button. The system automatically enters the standby mode... when a signal is active. SYNC ON G Operation Start/Stop: Press the / button. 3M™ Multimedia Projector MP8795 OPERATIONS (continued) No Signal Menu VOLUME 16 The same adjustments and settings are available with the Image and BLANK START UP Options menus ...
Operation Guide
Page 18
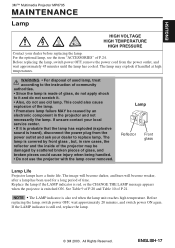
ENGLISH 3M™ Multimedia Projector MP8795 MAINTENANCE Lamp HIGH VOLTAGE HIGH TEMPERATURE HIGH PRESSURE Contact your local service center. • If it . • Also, do not use the projector with the ... the lamp if the LAMP indicator is red, or the CHANGE THE LAMP message appears when the projector is still red, replace the lamp. © 3M 2003. For the optional lamp, see the item "ACCESSORIES" of glass, do not apply shock to the instruction of community authorities. • Since the lamp...
ENGLISH 3M™ Multimedia Projector MP8795 MAINTENANCE Lamp HIGH VOLTAGE HIGH TEMPERATURE HIGH PRESSURE Contact your local service center. • If it . • Also, do not use the projector with the ... the lamp if the LAMP indicator is red, or the CHANGE THE LAMP message appears when the projector is still red, replace the lamp. © 3M 2003. For the optional lamp, see the item "ACCESSORIES" of glass, do not apply shock to the instruction of community authorities. • Since the lamp...
Operation Guide
Page 19
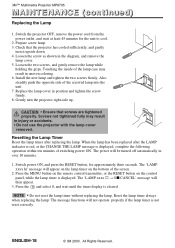
... without replacing the lamp. The 'LAMP xxxx → 0 I CANCEL' message will not operate properly if the lamp timer is cleared. All Rights Reserved. 3M™ Multimedia Projector MP8795 MAINTENANCE (continued) Replacing the Lamp 1. Replace the lamp cover in the diagram, and remove the lamp cover. 5. Press the and select 0, and wait until... screws are tightened properly. Gently turn it upside down. 4. Loosen the two screws, and gently remove the lamp while holding the grips. ENGLISH-18 © 3M 2003. Prepare a new lamp. 3.
... without replacing the lamp. The 'LAMP xxxx → 0 I CANCEL' message will not operate properly if the lamp timer is cleared. All Rights Reserved. 3M™ Multimedia Projector MP8795 MAINTENANCE (continued) Replacing the Lamp 1. Replace the lamp cover in the diagram, and remove the lamp cover. 5. Press the and select 0, and wait until... screws are tightened properly. Gently turn it upside down. 4. Loosen the two screws, and gently remove the lamp while holding the grips. ENGLISH-18 © 3M 2003. Prepare a new lamp. 3.
Operation Guide
Page 20
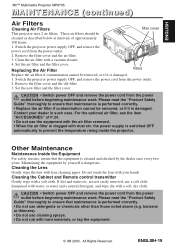
...cloth dampened with water, or water and a neutral detergent, and wipe dry with dust etc. ENGLISH 3M™ Multimedia Projector MP8795 MAINTENANCE (continued) Air Filters PORTABLE PROJECTOR MP8795 Cleaning Air Filters STANDBY ON filter cover LAMP PWER TEMP - These air filters should be cleaned as described...air filter if contamination cannot be removed, or if it is dangerous. Maintaining the equipment by the dealer once every two years. MP8795 1. Replacing the Air Filter filters Replace the air filter if contamination cannot be removed, or if it is clogged with a soft,...
...cloth dampened with water, or water and a neutral detergent, and wipe dry with dust etc. ENGLISH 3M™ Multimedia Projector MP8795 MAINTENANCE (continued) Air Filters PORTABLE PROJECTOR MP8795 Cleaning Air Filters STANDBY ON filter cover LAMP PWER TEMP - These air filters should be cleaned as described...air filter if contamination cannot be removed, or if it is dangerous. Maintaining the equipment by the dealer once every two years. MP8795 1. Replacing the Air Filter filters Replace the air filter if contamination cannot be removed, or if it is clogged with a soft,...


