Operation Guide
Page 2
... of System Setup 8 Plug & Play 8 OPERATIONS 9 Power ON 9 Power OFF 9 Basic Operation 10 Setup Menu 12 Input Menu 13 Image Menu 14 Options Menu 15 No Signal Menu 16 MAINTENANCE 17 Lamp 17 Air Filters 19 Other Maintenance 19 Page TROUBLESHOOTING 20 OSD Message 20 Indicators Message 21 Symptom 22 SPECIFICATIONS 23 ACCESSORIES 24 TABLES Table 1. Installation Reference 6 Table 2. Setup Menu 12 Table 5. Input Menu 13 Table 6. ENGLISH 3M™ Multimedia Projector MP8795 Liquid Crystal Projector Operator's Guide Thank you for future reference. WARNING •...
... of System Setup 8 Plug & Play 8 OPERATIONS 9 Power ON 9 Power OFF 9 Basic Operation 10 Setup Menu 12 Input Menu 13 Image Menu 14 Options Menu 15 No Signal Menu 16 MAINTENANCE 17 Lamp 17 Air Filters 19 Other Maintenance 19 Page TROUBLESHOOTING 20 OSD Message 20 Indicators Message 21 Symptom 22 SPECIFICATIONS 23 ACCESSORIES 24 TABLES Table 1. Installation Reference 6 Table 2. Setup Menu 12 Table 5. Input Menu 13 Table 6. ENGLISH 3M™ Multimedia Projector MP8795 Liquid Crystal Projector Operator's Guide Thank you for future reference. WARNING •...
Operation Guide
Page 3
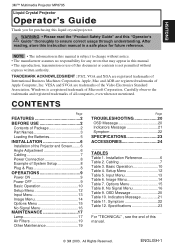
... MP8775 PORTABLE PROJECTOR MP8795 MP8795 Projector Power Cord x3 (US, UK, Europe) S-Video Cable Stereo Mini-Cable MP8795 Multimedia Projector Product Safety Guide MP8775i Projecteur multimedia - Guida di Sicurezza del Prodotto MP8775i Multimedia Projector - Bruksanvisning for Produktsakerhets MP8775 Product Safety Guide Warranty Quick Start Guide ENGLISH-2 VGA Cable Video/Audio Cable (with white lead) Component Video Cable (with green lead) STANDBY/ON BLANK LASER VIDEO RGB Mouse cable x3 (PS/2, ADB, Serial) Batteries for future reshipment. BEFORE USE Contents of package...
... MP8775 PORTABLE PROJECTOR MP8795 MP8795 Projector Power Cord x3 (US, UK, Europe) S-Video Cable Stereo Mini-Cable MP8795 Multimedia Projector Product Safety Guide MP8775i Projecteur multimedia - Guida di Sicurezza del Prodotto MP8775i Multimedia Projector - Bruksanvisning for Produktsakerhets MP8775 Product Safety Guide Warranty Quick Start Guide ENGLISH-2 VGA Cable Video/Audio Cable (with white lead) Component Video Cable (with green lead) STANDBY/ON BLANK LASER VIDEO RGB Mouse cable x3 (PS/2, ADB, Serial) Batteries for future reshipment. BEFORE USE Contents of package...
Operation Guide
Page 4
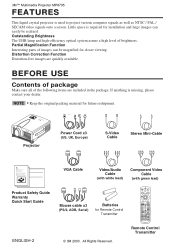
... FOCUS + KEYSTONE MENU INPUT STANDBY ON LAMP RESET TEMP FOCUS Button INPUT Button MENU Button RESET Button TEMP Indicator Control Panel (Refer to P.9 "OPERATIONS") MP8795 Front/Right View PORTABLE PROJECTOR MP8795 Control Panel Ventilation Openings (exhaust) Carrying Handle Filter cover ( ) Air Filter and Intake for the Cooling Fan Foot Adjuster Remote Control Sensor Speaker Power Switch AC Inlet (to Power Cord) MP8795 PORTABLE PROJECTOR Rear/Left View Terminal Panel (Refer below) DVI Terminal S-VIDEO Terminal VIDEO Terminal AUDIO(MONO)/L Terminal AUDIO R Terminal USB Terminal...
... FOCUS + KEYSTONE MENU INPUT STANDBY ON LAMP RESET TEMP FOCUS Button INPUT Button MENU Button RESET Button TEMP Indicator Control Panel (Refer to P.9 "OPERATIONS") MP8795 Front/Right View PORTABLE PROJECTOR MP8795 Control Panel Ventilation Openings (exhaust) Carrying Handle Filter cover ( ) Air Filter and Intake for the Cooling Fan Foot Adjuster Remote Control Sensor Speaker Power Switch AC Inlet (to Power Cord) MP8795 PORTABLE PROJECTOR Rear/Left View Terminal Panel (Refer below) DVI Terminal S-VIDEO Terminal VIDEO Terminal AUDIO(MONO)/L Terminal AUDIO R Terminal USB Terminal...
Operation Guide
Page 5
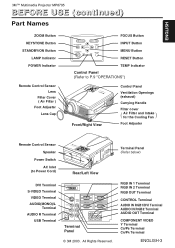
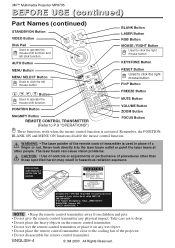
3M™ Multimedia Projector MP8795 BEFORE USE (continued) Part Names (continued) STANDBY/ON Button VIDEO Button Disk Pad Used to click the right mouse button. POSITION Button AUTO KEYSTONE MENU MENU SELECT RESET POSITION FREEZE PinP MUTE MAGNIFY OFF FOCUS ZOOM VOLUME MAGNIFY Button REMOTE CONTROL TRANSMITTER (Refer to P.9 "OPERATIONS") RESET Button Used to operate the mouse shift function and left mouse button. , , , Button Used to the cooling fan of procedures other people. Never look directly into the laser beam outlet or point...
3M™ Multimedia Projector MP8795 BEFORE USE (continued) Part Names (continued) STANDBY/ON Button VIDEO Button Disk Pad Used to click the right mouse button. POSITION Button AUTO KEYSTONE MENU MENU SELECT RESET POSITION FREEZE PinP MUTE MAGNIFY OFF FOCUS ZOOM VOLUME MAGNIFY Button REMOTE CONTROL TRANSMITTER (Refer to P.9 "OPERATIONS") RESET Button Used to operate the mouse shift function and left mouse button. , , , Button Used to the cooling fan of procedures other people. Never look directly into the laser beam outlet or point...
Operation Guide
Page 8
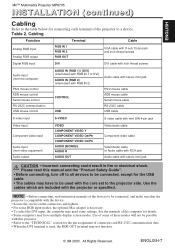
... connected, except for the USB cable. • The cables may have multiple display screen modes. Use of some settings. ENGLISH-7 Cabling Function Terminal Cable Analog RGB input Analog RGB output RGB IN 1 RGB IN 2 RGB OUT VGA cable with D-sub 15-pin jack and inch thread screws Digital RGB input DVI DVI cable with inch thread screws Audio input (from the computer) PS/2 mouse control ADB mouse control Serial mouse control RS-232C communication USB mouse control AUDIO...
... connected, except for the USB cable. • The cables may have multiple display screen modes. Use of some settings. ENGLISH-7 Cabling Function Terminal Cable Analog RGB input Analog RGB output RGB IN 1 RGB IN 2 RGB OUT VGA cable with D-sub 15-pin jack and inch thread screws Digital RGB input DVI DVI cable with inch thread screws Audio input (from the computer) PS/2 mouse control ADB mouse control Serial mouse control RS-232C communication USB mouse control AUDIO...
Operation Guide
Page 9
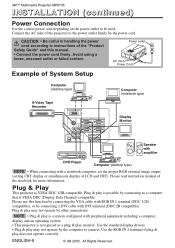
... connect. Power outlet MP8795 PORTABLE PROJECTOR AC Inlet Power Cord Example of LCD and CRT). NOTE • Plug & play may not operate by the computer to instructions of the "Product Safety Guide" and this function by connecting the VGA cable with RGB IN 1 terminal (DDC 1/2B compatible), or by connecting a DVI cable with a notebook computer, set the proper RGB external image output (setting CRT display or simultaneous display of System Setup...
... connect. Power outlet MP8795 PORTABLE PROJECTOR AC Inlet Power Cord Example of LCD and CRT). NOTE • Plug & play may not operate by the computer to instructions of the "Product Safety Guide" and this function by connecting the VGA cable with RGB IN 1 terminal (DDC 1/2B compatible), or by connecting a DVI cable with a notebook computer, set the proper RGB external image output (setting CRT display or simultaneous display of System Setup...
Operation Guide
Page 10
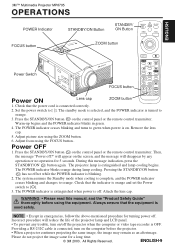
... message "Power off . The POWER indicator blinks orange during lamp cooling. Check that the power cord is off ?" FOCUS + INPUT Power Switch MP8795 FOCUS button AUTO MENU KEYSTONE MENU SELECT POSITION RESET FREEZE PinP MAGNIFY MUTE OFF FOCUS ZOOM VOLUME Power ON Lens cap ZOOM button 1. ENGLISH-9 Power OFF 1. Attach the lens cap. During this manual, and the "Product Safety Guide" thoroughly before the projector. • When a projector continues projecting the same image, the image may remain as an afterimage. Adjust picture size using the FOCUS button...
... message "Power off . The POWER indicator blinks orange during lamp cooling. Check that the power cord is off ?" FOCUS + INPUT Power Switch MP8795 FOCUS button AUTO MENU KEYSTONE MENU SELECT POSITION RESET FREEZE PinP MAGNIFY MUTE OFF FOCUS ZOOM VOLUME Power ON Lens cap ZOOM button 1. ENGLISH-9 Power OFF 1. Attach the lens cap. During this manual, and the "Product Safety Guide" thoroughly before the projector. • When a projector continues projecting the same image, the image may remain as an afterimage. Adjust picture size using the FOCUS button...
Operation Guide
Page 12
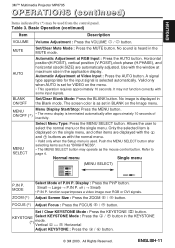
... menu Single menu SETUP INPUT BRIGHT CONTRAST V POSIT H POSIT H PHASE H SIZE COLOR BAL R COLOR BAL B ASPECT IMAGE 100 100 800 OPT. 0 -2 +1 0 0 (MENU SELECT) CONTRAST -2 P.IN P. BLANK ON/OFF Set/Clear Blank Mode: Press the BLANK button. ENGLISH 3M™ Multimedia Projector MP8795 OPERATIONS (continued) Items indicated by (*) may operate as set for the input signal is set in the Blank mode. Push the MENU SELECT button after approximately 10 seconds of P.IN P. Set / Clear KEYSTONE Mode : Press the KEYSTONE button. Basic Operation...
... menu Single menu SETUP INPUT BRIGHT CONTRAST V POSIT H POSIT H PHASE H SIZE COLOR BAL R COLOR BAL B ASPECT IMAGE 100 100 800 OPT. 0 -2 +1 0 0 (MENU SELECT) CONTRAST -2 P.IN P. BLANK ON/OFF Set/Clear Blank Mode: Press the BLANK button. ENGLISH 3M™ Multimedia Projector MP8795 OPERATIONS (continued) Items indicated by (*) may operate as set for the input signal is set in the Blank mode. Push the MENU SELECT button after approximately 10 seconds of P.IN P. Set / Clear KEYSTONE Mode : Press the KEYSTONE button. Basic Operation...
Operation Guide
Page 14
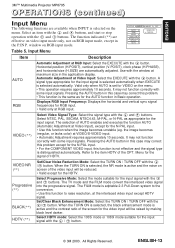
... selection of the screen for the input signal. VIDEO NR (**) Set/Clear Noise Reduction Mode: Select the TURN ON / TURN OFF with the and buttons. SETUP INPUT AUTO RGB VIDEO VIDEO NR Progressive BLACK HDTV IMAGE OPT. Pressing the AUTO button in this case may not function correctly with the and buttons. Progressive (**) BLACK(**) HDTV (**) Select Progressive Mode: Select the mode suitable for the N-PAL input. • Use this problem. • This function...
... selection of the screen for the input signal. VIDEO NR (**) Set/Clear Noise Reduction Mode: Select the TURN ON / TURN OFF with the and buttons. SETUP INPUT AUTO RGB VIDEO VIDEO NR Progressive BLACK HDTV IMAGE OPT. Pressing the AUTO button in this case may not function correctly with the and buttons. Progressive (**) BLACK(**) HDTV (**) Select Progressive Mode: Select the mode suitable for the N-PAL input. • Use this problem. • This function...

Operation Guide
Page 15
... P. VIDEO ↔ S-VIDEO ↔ COMPONENT GAMMA Select Gamma Mode: Select the gamma mode with the and buttons. 3M™ Multimedia Projector MP8795 OPERATIONS (continued) Image Menu The following adjustments and settings are available when IMAGE is displayed. Select an item with the and buttons, and start capturing. Image Menu Item Description SETUP INPUT BLANK START UP MyScreen MIRROR P.IN P. INPUT GAMMA IMAGE OPT. Refer to the description of no signal is input MyScreen is a mode that the factory fixed screen is...
... P. VIDEO ↔ S-VIDEO ↔ COMPONENT GAMMA Select Gamma Mode: Select the gamma mode with the and buttons. 3M™ Multimedia Projector MP8795 OPERATIONS (continued) Image Menu The following adjustments and settings are available when IMAGE is displayed. Select an item with the and buttons, and start capturing. Image Menu Item Description SETUP INPUT BLANK START UP MyScreen MIRROR P.IN P. INPUT GAMMA IMAGE OPT. Refer to the description of no signal is input MyScreen is a mode that the factory fixed screen is...
Operation Guide
Page 16
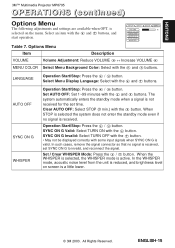
... WHISPER mode, acoustic noise level from the unit is a little lower. © 3M 2003. Select Menu Display Language: Select with some input signals when SYNC ON G is received, set time. SYNC ON G Valid: Select TURN ON with the and buttons. Operation Start/Stop: Press the / button. ENGLISH 3M™ Multimedia Projector MP8795 OPERATIONS (continued) Options Menu The following adjustments and settings are available when OPT. Options Menu Item Description SETUP INPUT VOLUME MENU COLOR LANGUAGE AUTO OFF SYNC ON G WHISPER IMAGE...
... WHISPER mode, acoustic noise level from the unit is a little lower. © 3M 2003. Select Menu Display Language: Select with some input signals when SYNC ON G is received, set time. SYNC ON G Valid: Select TURN ON with the and buttons. Operation Start/Stop: Press the / button. ENGLISH 3M™ Multimedia Projector MP8795 OPERATIONS (continued) Options Menu The following adjustments and settings are available when OPT. Options Menu Item Description SETUP INPUT VOLUME MENU COLOR LANGUAGE AUTO OFF SYNC ON G WHISPER IMAGE...
Operation Guide
Page 17
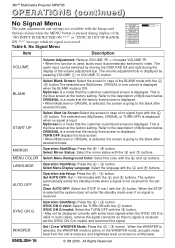
... WHISPER is selected, the WHISPER mode is a little lower. 3M™ Multimedia Projector MP8795 OPERATIONS (continued) No Signal Menu VOLUME 16 The same adjustments and settings are available with the Image and BLANK START UP Options menus when the MENU button is pressed during the display of the volume adjustment bar. SYNC ON G Operation Start/Stop: Press the / button. START UP MIRROR MENU COLOR Select Start Up Screen:Select the screen in case of the BLANK...
... WHISPER is selected, the WHISPER mode is a little lower. 3M™ Multimedia Projector MP8795 OPERATIONS (continued) No Signal Menu VOLUME 16 The same adjustments and settings are available with the Image and BLANK START UP Options menus when the MENU button is pressed during the display of the volume adjustment bar. SYNC ON G Operation Start/Stop: Press the / button. START UP MIRROR MENU COLOR Select Start Up Screen:Select the screen in case of the BLANK...
Operation Guide
Page 18
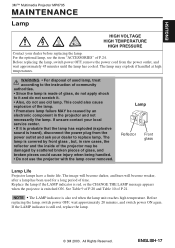
... lamp cover removed. The image will become darker, and hues will become weaker, after a lamp has been used lamp, treat according to the instruction of time. See Table 9 of P.20 and Table 10 of P.24. ENGLISH 3M™ Multimedia Projector MP8795 MAINTENANCE Lamp HIGH VOLTAGE HIGH TEMPERATURE HIGH PRESSURE Contact your dealer to replace lamp. WARNING • For disposal of used for a long period of community authorities. • Since the lamp is also red...
... lamp cover removed. The image will become darker, and hues will become weaker, after a lamp has been used lamp, treat according to the instruction of time. See Table 9 of P.20 and Table 10 of P.24. ENGLISH 3M™ Multimedia Projector MP8795 MAINTENANCE Lamp HIGH VOLTAGE HIGH TEMPERATURE HIGH PRESSURE Contact your dealer to replace lamp. WARNING • For disposal of used for a long period of community authorities. • Since the lamp is also red...
Operation Guide
Page 19
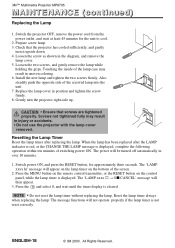
... LAMP indicator is red, or the CHANGE THE LAMP message is not reset correctly. CAUTION • Ensure that the projector has cooled sufficiently, and gently turn the projector right-side up. Press the MENU button on the remote control transmitter, or the RESET button on the bottom of the screwed lamp into the unit. 7. 3M™ Multimedia Projector MP8795 MAINTENANCE (continued) Replacing the Lamp 1. Install the new lamp and tighten the two screws firmly. Touching the inside of switching power...
... LAMP indicator is red, or the CHANGE THE LAMP message is not reset correctly. CAUTION • Ensure that the projector has cooled sufficiently, and gently turn the projector right-side up. Press the MENU button on the remote control transmitter, or the RESET button on the bottom of the screwed lamp into the unit. 7. 3M™ Multimedia Projector MP8795 MAINTENANCE (continued) Replacing the Lamp 1. Install the new lamp and tighten the two screws firmly. Touching the inside of switching power...
Operation Guide
Page 20
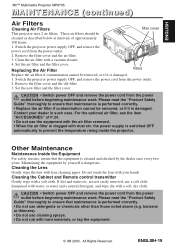
...power OFF and remove the power cord from the power outlet. 2. For the optional air filter, see the item "ACCESSORIES" of approximately 100 hours. Please read the "Product Safety Guide" thoroughly to prevent the temperature rising inside the projector. ZOOM + MUTE MENU RESET - Switch the projector power supply OFF, and remove the power cord from the power outlet before beginning maintenance work . ENGLISH 3M™ Multimedia Projector MP8795 MAINTENANCE (continued) Air Filters PORTABLE PROJECTOR MP8795 Cleaning Air Filters STANDBY ON filter cover LAMP PWER TEMP...
...power OFF and remove the power cord from the power outlet. 2. For the optional air filter, see the item "ACCESSORIES" of approximately 100 hours. Please read the "Product Safety Guide" thoroughly to prevent the temperature rising inside the projector. ZOOM + MUTE MENU RESET - Switch the projector power supply OFF, and remove the power cord from the power outlet before beginning maintenance work . ENGLISH 3M™ Multimedia Projector MP8795 MAINTENANCE (continued) Air Filters PORTABLE PROJECTOR MP8795 Cleaning Air Filters STANDBY ON filter cover LAMP PWER TEMP...
Operation Guide
Page 21
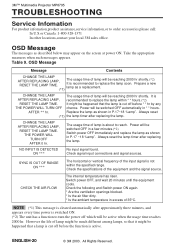
... reset (*1) the lamp timer after replacing the lamp. Switch power OFF, and wait 20 minutes until the equipment cools. However the life of lamp will be switched OFF automatically in P.17~18 "Lamp". ENGLISH-20 © 3M 2003. OSD Message The messages as shown in * * hours. Power will be happened that a lamp is cut off which will be reaching 2000 hr shortly. Check signal input connections and signal sources. CHECK THE AIR FLOW The internal temperature...
... reset (*1) the lamp timer after replacing the lamp. Switch power OFF, and wait 20 minutes until the equipment cools. However the life of lamp will be switched OFF automatically in P.17~18 "Lamp". ENGLISH-20 © 3M 2003. OSD Message The messages as shown in * * hours. Power will be happened that a lamp is cut off which will be reaching 2000 hr shortly. Check signal input connections and signal sources. CHECK THE AIR FLOW The internal temperature...
Operation Guide
Page 22
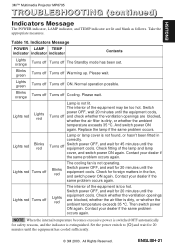
... temperature becomes excessive power is switched OFF automatically for 20 minutes until the equipment cools. All Rights Reserved. ENGLISH 3M™ Multimedia Projector MP8795 TROUBLESHOOTING (continued) Indicators Message The POWER indicator, LAMP indicator, and TEMP indicator are blocked, whether the air filter is too hot. Indicators Message POWER LAMP TEMP indicator indicator indicator Contents Lights orange Turns off Turns off Blinks red The cooling fan is not operating. And switch power ON again. Lights red Blinks red Lamp or lamp cover is not lit. Lights red Turns...
... temperature becomes excessive power is switched OFF automatically for 20 minutes until the equipment cools. All Rights Reserved. ENGLISH 3M™ Multimedia Projector MP8795 TROUBLESHOOTING (continued) Indicators Message The POWER indicator, LAMP indicator, and TEMP indicator are blocked, whether the air filter is too hot. Indicators Message POWER LAMP TEMP indicator indicator indicator Contents Lights orange Turns off Turns off Blinks red The cooling fan is not operating. And switch power ON again. Lights red Blinks red Lamp or lamp cover is not lit. Lights red Turns...
Operation Guide
Page 23
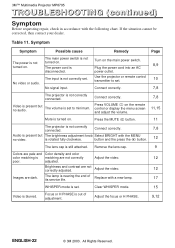
... the remote control or display the menu screen and adjust the volume. 7,8 11,15 Mute is turned on . button and the press the button. 12 The lens cap is not correctly connected. The lamp is nearing the end of adjustment. Adjust the focus or H PHASE. 9,12 ENGLISH-22 © 3M 2003. All Rights Reserved. 3M™ Multimedia Projector MP8795 TROUBLESHOOTING (continued) Symptom Before requesting repair, check in accordance with a new lamp. 17 WHISPER mode is set. Symptom...
... the remote control or display the menu screen and adjust the volume. 7,8 11,15 Mute is turned on . button and the press the button. 12 The lens cap is not correctly connected. The lamp is nearing the end of adjustment. Adjust the focus or H PHASE. 9,12 ENGLISH-22 © 3M 2003. All Rights Reserved. 3M™ Multimedia Projector MP8795 TROUBLESHOOTING (continued) Symptom Before requesting repair, check in accordance with a new lamp. 17 WHISPER mode is set. Symptom...
Operation Guide
Page 32
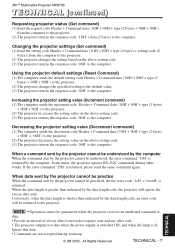
... data code. NOTE • Operation cannot be practiced, the the error code '1cH' +'xxxxH' is lit. When data sent by the projector cannot be returned to the projector. Ignore this data. • Commands are not accepted during other code. • The projector outputs test data when the power supply is switched ON, and when the lamp is returned. 3M™ Multimedia Projector MP8795 TECHNICAL (continued) Requesting projector status (Get command) (1) Send the request code Header + Command data...
... data code. NOTE • Operation cannot be practiced, the the error code '1cH' +'xxxxH' is lit. When data sent by the projector cannot be returned to the projector. Ignore this data. • Commands are not accepted during other code. • The projector outputs test data when the power supply is switched ON, and when the lamp is returned. 3M™ Multimedia Projector MP8795 TECHNICAL (continued) Requesting projector status (Get command) (1) Send the request code Header + Command data...

Operation Guide
Page 34
3M™ Multimedia Projector MP8795 TECHNICAL (continued) Command data chart Names Magnify Operation type Get Increment Decrement Header BE EF 03 BE EF 03 BE EF 03 Command data CRC Action Type Setting code 06 00 7C D2 02 00 07 30 00 00 06 00 1A D2 04 00 07 30 00 00 06 00 CB D3 05 ... D8 02 00 20 60 (Example of Return) 00 00 01 00 (Normal) (Cover-error) 02 00 (Fan-error) 03 00 (Lamp-error) 00 00 00 00 01 00 00 00 00 00 Power OFF Set ON Get RGB1 04 00 (Temp-error) 05 00 (Air flow-error) BE EF BE EF BE EF 03 06 00 2A D3 03 06 00...
3M™ Multimedia Projector MP8795 TECHNICAL (continued) Command data chart Names Magnify Operation type Get Increment Decrement Header BE EF 03 BE EF 03 BE EF 03 Command data CRC Action Type Setting code 06 00 7C D2 02 00 07 30 00 00 06 00 1A D2 04 00 07 30 00 00 06 00 CB D3 05 ... D8 02 00 20 60 (Example of Return) 00 00 01 00 (Normal) (Cover-error) 02 00 (Fan-error) 03 00 (Lamp-error) 00 00 00 00 01 00 00 00 00 00 Power OFF Set ON Get RGB1 04 00 (Temp-error) 05 00 (Air flow-error) BE EF BE EF BE EF 03 06 00 2A D3 03 06 00...


