
Weider Pro 4250 Support Question
Weider Pro 4250 Support Question
Find answers below for this question about Weider Pro 4250.Need a Weider Pro 4250 manual? We have 1 online manual for this item!
Question posted by vnvpirate on April 7th, 2015
I Need To Replace Cable For Chest And Leg Station. Both Use The Same Cable.
The person who posted this question about this Weider product did not include a detailed explanation. Please use the "Request More Information" button to the right if more details would help you to answer this question.
Current Answers
Answer #1: Posted by TechSupport101 on April 8th, 2015 4:39 AM
TechSupport101

Member since:
May 24th, 2013 Points: 12,171,305

Member since:
May 24th, 2013 Points: 12,171,305
Go here http://www.fitnessrepairparts.com/equipment/Select/5997/Weider/PRO-4250-SYSTEM-831.154020 for your model's parts.
Related Weider Pro 4250 Manual Pages
English Manual - Page 2
... before beginning assembly.
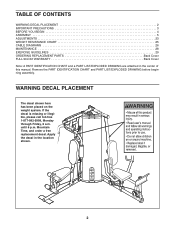
TABLE OF CONTENTS
WARNING DECAL PLACEMENT 2 IMPORTANT PRECAUTIONS 3 BEFORE YOU BEGIN 4 ASSEMBLY 5 ADJUSTMENTS 23 WEIGHT RESISTANCE CHART 25 CABLE DIAGRAMS 26 MAINTENANCE 28 EXERCISE GUIDELINES 29 ORDERING REPLACEMENT PARTS Back Cover FULL 90-DAY WARRANTY Back Cover Note: A PART IDENTIFICATION CHART and a PART LIST/EXPLODED DRAWING are attached in the...
English Manual - Page 3
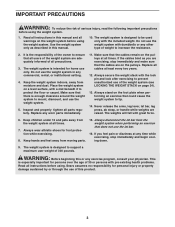
Make sure that the cables are on a level surface, with great force.
6. Replace any exercise program, consult your physician. Always secure the weight stack with dumbbells or any other type of weight to be used only with pre-existing health problems. Read all precautions.
3. Never release the arms, leg lever, lat bar, leg press, ab strap, or...
English Manual - Page 4
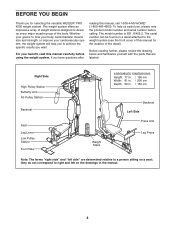
...PRO 4250 weight system. The serial number can be found on a decal attached to tone your body, build dramatic muscle size and strength, or improve your goal is 831.15402.2. Right Side
High Pulley Station Butterfly Arm Ab Pulley Station
Backrest
Seat Leg Lever Low Pulley Station...please note the product model number and serial number before using the weight system. To help you to right and ...
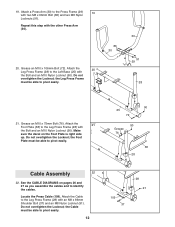
English Manual - Page 5
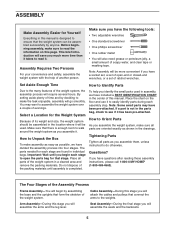
...features of evenings. By setting aside plenty of this manual.
Cable Assembly-During this stage you will save you much more convenient ... are oriented exactly as shown in the drawings. The parts needed for each assembly step.
Tightening Parts
Tighten all parts of soapy... will assemble the arms and the leg lever. Place the chart on the floor and use it takes to read the information ...
English Manual - Page 12
... must be able to pivot easily.
30 91
29 28
21. Locate the Press Cable (109). Do not
overtighten the Locknut; Attach the Cable to pivot easily.
12
109 37
28 91 the Cable must be able to the Leg Press Frame (28) with the other Press Arm (30).
86 30
20. Attach the...
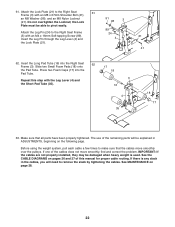
English Manual - Page 13
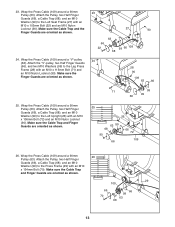
... (27) with an M10 x 106mm Bolt (72) and an M10 Nylon Locknut (90). Wrap the Press Cable (109) around a "V"-pulley (62). Make sure the Finger Guards are oriented as shown.
23
27
90
...66 99 63 68
13 Wrap the Press Cable (109) around a 90mm Pulley (63). Attach the Pulley, two Half Finger
Guards (66), a Cable Trap (68), and an M10
Washer (99) to the Leg Press Frame (28) with an M10
...
English Manual - Page 14
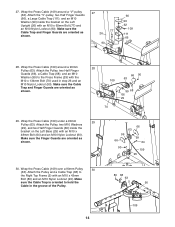
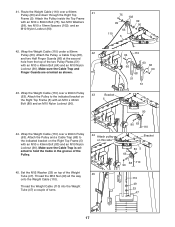
... Bolt (77) and an M10 Nylon Locknut (90). Make
sure the Cable Trap is oriented to
the Right Top Frame (5) with the M10 x 134mm Bolt (70) used in the groove of the Pulley.
80 68 63
5
90
109
14... Attach the "V"-pulley, two Half Finger Guards (66), a Large Cable Trap (111), and an M10 Washer (99) ...
English Manual - Page 15
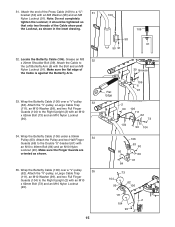
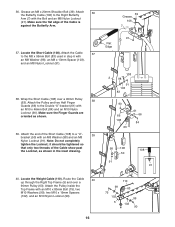
...the Left Butterfly Arm (6) with the Bolt and an M8
Nylon Locknut (91). Locate the Butterfly Cable (106). Wrap the Butterfly Cable (106) over a "V"-pulley
35
(62). Make sure the Finger Guards are
oriented as shown... x 46mm Bolt (84) and an M10 Nylon
Locknut (90). Attach the end of
the Cable is against the Butterfly Arm.
33. Grease an M8
32
x 20mm Shoulder Bolt (39). Make sure the flat...
English Manual - Page 16
...
99
75 102 5
110 63
99 102
90 36. Make sure the flat edge of the Cable show past
the Locknut, as shown.
39. Attach
36
the Butterfly Cable (106) to the M8 x 95mm Bolt (83) used in the inset drawing.
39 Grease
106 7
91 Flat Edge
108
2
98
91 103 83
90...
English Manual - Page 17
...an M10 Nylon Locknut (90). Attach the Pulley to the indicated bracket on this side
45. Attach the Pulley, a Cable Trap (68),
and two Half Finger Guards (66) at the second
hole from the top of turns.
80 63... 110 Bracket
80 5 63
68 110 90
110 49 33
47
17 Thread the Weight Cable (110) into the Weight Tube (47) a couple of the two Pulley Plates (51)
with an M10 x 80mm...
English Manual - Page 18
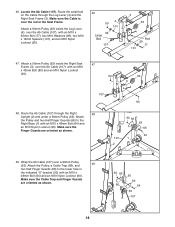
...), with an M10 x
48mm Bolt (64) and an M10 Nylon Locknut (90).
Make sure the Cable is over a 90mm Pulley (63). Route the Ab Cable (107) through the Leg Lever (4) and the Right Seat Frame (3). Attach
the Pulley and two Half Finger Guards (66) to the lower hole in the Seat Frame. Attach...
English Manual - Page 19

...(50) with
an M10 x 48mm Bolt (64) and an M10 Nylon
Locknut (90). Attach the Pulley, a Cable Trap (68), and
two Half Finger Guards (66) at the second hole
from the bottom of the two Pulley Plates... Right Base (1) with an M10 x 48mm Bolt (64) and an M10 Nylon Locknut (90). Attach the Pulley, a Cable Trap (68), and two Half Finger Covers (66) to the Right Base (1) with an M10 x
48mm Bolt (64)...
English Manual - Page 20
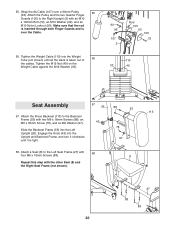
...shown) until it clockwise until all the slack is taken out of
56
the cables. Tighten the M12 Nut (49) on the
Weight Cable against the M12 Washer (33).
90 99
107 2
Rod 105 63 105
... M6 Washer (97).
43
Slide the Backrest Frame (53) into the Left Upright (26). Wrap the Ab Cable (107) over the Cable.
56. Attach the Press Backrest (113) to the Backrest
Frame (53) with the other Seat (8) and...
English Manual - Page 22
... with the Leg Lever (4) and the Short Pad Tube (35).
3 16
4
35
18 17
63. Press two Foam Caps (17) into the Right Seat
62
Frame (3).
If there is used. See MAINTENANCE on the following page. 61. If one of the remaining parts will be explained in the cables, you will need to make...
English Manual - Page 23
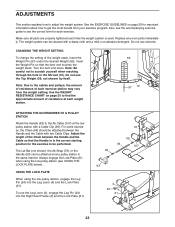
... on page 25 to the Ab Cable (107) at each exercise.
Replace any pulley station in the same manner.
The weight system can be performed. Insert the Weight Pin so that the Handle is used. For some exercises, the Chain (94) should be cleaned with two Cable Clips.
Adjust the length of resistance at any worn parts...
English Manual - Page 25

...each exercise station. The other numbers refer to the 6 lb. WEIGHT RESISTANCE CHART
The chart below shows the approximate weight resistance at each station may vary due to differences in individual weight plates as well as friction between the cables, ...PULLEY
(lbs.) 27 35 43 61 71 87 107 120 143
LEG PRESS
(lbs.) 45 59 84 118 146 162 193 223 248
AB STATION
(lbs.) 19 27 41 60 73 90 100 114 130
...
English Manual - Page 26
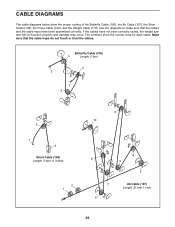
... the proper routing of the Butterfly Cable (106), the Ab Cable (107), the Short Cable (108), the Press Cable (109), and the Weight Cable (110). Butterfly Cable (106)
4
Length: 5 feet
2 5
1 3
2
1 3
Short Cable (108) Length: 3 feet 11 inches
2 1
6 10
4 8
5
3
7 9
Ab Cable (107) Length: 21 feet 1 inch
26 Use the diagrams to make sure that the cable traps do not touch or...
English Manual - Page 28
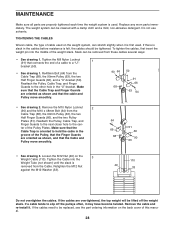
...replaced, see the part ordering information on the back cover of the Pulley, that the Finger Guards
are oriented as shown, and that the cable and Pulley move smoothly.
64
66 68
51 66
90 63
• See drawing 3. If there is used on the
3
Weight Cable (110). If the cables...a mild, non-abrasive detergent. If the cables need to the cen- MAINTENANCE
Make sure all parts are overtightened, the ...
English Manual - Page 30
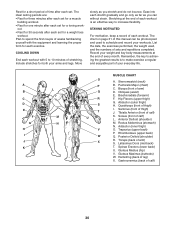
...on page 31 of each workout. Trapezius (upper back) P. Triceps (back of leg) X. Hamstring (back of arm) S. Remember, the key to achieving the greatest ... Erectors (lower back) U. Pectoralis Major (chest) C. Latissimus Dorsi (mid back) T. Gastrocnemius (back of calf) K.
List the date, the exercises performed, the weight used to increase flexibility. Abductor (outer thigh) ...
English Manual - Page 34

...
1
25mm x 40mm Inner Cap
55
8
Weight
56
1
Top Weight
57
1
Weight Pin
58
2
Handgrip
59
1
Leg Bumper
60
1
61
1
62
4
63
23
64
9
65
1
66
34
67
2
68
13
69
8
70
... Guard Quarter Finger Guard Butterfly Cable Ab Cable Short Cable Press Cable Weight Cable Large Cable Trap 20mm x 40mm Inner Cap Press Backrest User's Manual Exercise Guide Grease Packet Allen Wrench
Note...
Similar Questions

Need Replacement Seat Both Pieces For A 1500e Cross Bow Weider
need replacement seat. both pieces for a 1500e cross bow weider. I only have the longer seat but bro...
need replacement seat. both pieces for a 1500e cross bow weider. I only have the longer seat but bro...
(Posted by thepaulfrederich 3 years ago)

Weider Pro 4250
I need some serious help with the assembly of this Weider Pro 4250 Home Gym. I have taken it down an...
I need some serious help with the assembly of this Weider Pro 4250 Home Gym. I have taken it down an...
(Posted by ericglnd7 3 years ago)

Weirder Pro 575 Replacement Cables
where can I order the replacement cables for this machine.
where can I order the replacement cables for this machine.
(Posted by Lilhoss 3 years ago)

Cable Assembly
how do I run the cable assembly on the weider pro 4250?the diagrams seem to stop mid air.
how do I run the cable assembly on the weider pro 4250?the diagrams seem to stop mid air.
(Posted by jawsaw0328 8 years ago)
What Is Diagram Of Cables And Pullys
diagram of how cable runs through pully system
diagram of how cable runs through pully system
(Posted by darrinbaber 10 years ago)