Canon PIXMA MP600 Support Question
Canon PIXMA MP600 Support Question
Find answers below for this question about Canon PIXMA MP600.Need a Canon PIXMA MP600 manual? We have 2 online manuals for this item!
Question posted by madhdodo on June 1st, 2014
How To Remove Print Head On Canon Pixma Mp 600
The person who posted this question about this Canon product did not include a detailed explanation. Please use the "Request More Information" button to the right if more details would help you to answer this question.
Current Answers
Related Canon PIXMA MP600 Manual Pages
Quick Start Guide - Page 4
...printers, faxes and copiers. with functions that it will be , representation or warranties concerning the products described. Under the copyright laws, this manual thoroughly in -One.
The targeted products are licensed to change without the prior written consent of Canon U.S.A., Inc. © 2006 Canon... regarding the accuracy thereof. Canon PIXMA MP600 Photo All-in any form...
Quick Start Guide - Page 5

... Nozzle Check Pattern ...........54 Print Head Cleaning 56 Print Head Deep Cleaning 58 Aligning the Print Head 60 Cleaning Your Machine 64
Troubleshooting 67 Error Message Is Displayed on the LCD ......68 LCD Cannot Be Seen At All 70 An Unintended Language Is Displayed on the LCD 70 Cannot Install the MP Drivers 71
Cannot Connect to...
Quick Start Guide - Page 8

... lamp flashes green, and changes to restore the display.
z The MP Drivers are using the machine connected to a computer, confirm also the... the machine before the LCD goes out.
4
Before Printing z The Print Head and ink tanks are not complete, follow the Easy Setup...or a compatible device). Important
About the Power Plug When removing the power plug after turing off . If the power plug...
Quick Start Guide - Page 43
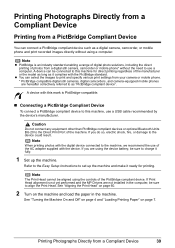
... the Easy Setup Instructions to set up the machine. See "Aligning the Print Head" on page 60.
2 Turn on page 7.
Note
The Print Head cannot be aligned using the device battery, be connected to this mark is not yet performed and the MP Drivers are hereafter collectively referred to as "PictBridge compliant device".
If you...
Quick Start Guide - Page 52
... to inform you remove an ink tank, replace it immediately. Caution
Do not hold the Print Head Holder to the right.
Important
Handling Ink z To maintain optimal printing quality, we recommend the use . Color ink is out of specified Canon brand ink tanks. When an ink tank is also consumed in Print Head Cleaning and Print Head Deep Cleaning...
Quick Start Guide - Page 53
....
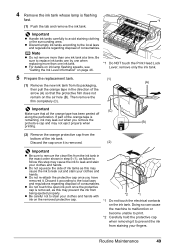
*1 Do not touch the electrical contacts
on page 46.
*1 Do NOT touch the Print Head Lock Lever; z Be careful not to replace ink tanks one by one when replacing more than one ink tank at a time. Note
z Do not remove more than one ink tank.
If part of consumables.
Important
z Handle ink tanks...
Quick Start Guide - Page 54

... unless all the ink tanks are installed.
*1 (1)
7 Close the Inner Cover.
(3) (2)
*1 Make sure the position of the ink tank into the Print Head.
(2) Press on the mark on page 68.
Printing will not start printing after the Scanning Unit (Printer Cover) is closed . Important
The machine cannot be fed properly.
8 Gently close the Scanning Unit...
Quick Start Guide - Page 55
... dry and clog.
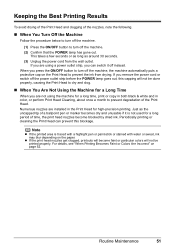
„ When You Are Not Using the Machine for high-precision printing. If you are using the machine for a long time, print or copy in both black & white and in the Print Head for a Long Time
When you remove the power cord or switch off the machine. (2) Confirm that the POWER lamp...
Quick Start Guide - Page 56
...Note
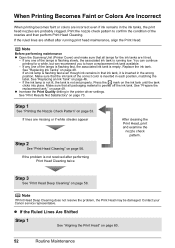
Before performing maintenance z Open the Scanning Unit (Printer Cover) and make sure that ink tank, it is inserted in the printer driver settings. See "Replacing Ink Tanks" on page...See "Print Results Not Satisfactory" on page 56. If lines are probably clogged. If the problem is not set properly. Step 3
See "Print Head Deep Cleaning" on page 58. Contact your Canon service ...
Quick Start Guide - Page 63
...
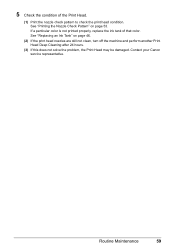
59 5 Check the condition of that color. Contact your Canon service representative.
If a particular color is not printed properly, replace the ink tank of the Print Head.
(1) Print the nozzle check pattern to check the print head condition. See "Printing the Nozzle Check Pattern" on page 46.
(2) If the print head nozzles are still not clean, turn off the machine...
Quick Start Guide - Page 68

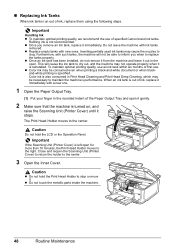
..., acetone, or any residue, especially on , and then remove any paper from the Auto
Sheet Feeder and Cassette.
2 Press the Paper Feed Switch to select the paper source to clean.
64
Routine Maintenance
z Do not use volatile liquids such as a blocked Print Head and poor printing results. Important
The sheet (B) is easily damaged, so...
Quick Start Guide - Page 73
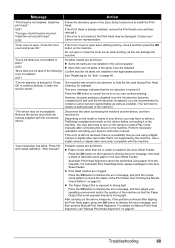
...may be damaged. Perform necessary operations according your Canon service representative.
z The Paper Output Slot is almost full. Troubleshooting
69 Install the print head." Close the inner cover and press OK."... installed, remove the Print Head once and then reinstall it and then press the OK button on the camera or select Play mode manually after aligning the Print Head again, press...
Quick Start Guide - Page 78
... parts.
(A)
(B)
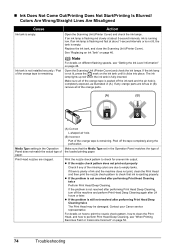
Media Type setting in (B), remove all of ink and the machine does not print, clean the Print Head and then print the nozzle check pattern to perform Print Head Deep Cleaning, see "Getting the Ink Level Information" on page 52.
74
Troubleshooting Replace the ink tank, and close the Scanning Unit (Printer Cover).
The ink lamp lights...
Quick Start Guide - Page 79
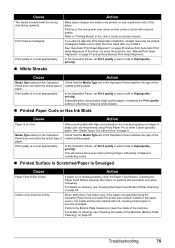
..., set in deep color, we recommend using Photo Paper Pro or other Canon specialty paper. In the Operation Panel, set Print quality in the paper source, the inside of the machine is dirty. ...the inside will wear the rollers, so perform this does not solve the problem, see "Manual Print Head Alignment" on only a particular side of paper. Cause
Action
Media Type setting in the Operation ...
Quick Start Guide - Page 80
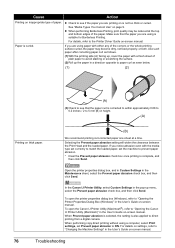
... clearance between the Print Head and the loaded paper.
z Check to see that the paper you are using is not too thick or curled. Open the printer properties dialog box,...you notice abrasion even with either any of paper.
If you are printing on -screen manual.
76
Troubleshooting In the Canon IJ Printer Utility, select Custom Settings in the Maintenance sheet, select the Prevent...
Quick Start Guide - Page 85
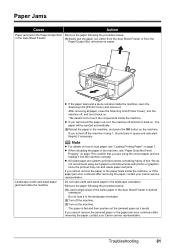
...card-sized paper jammed inside the machine, open the Scanning Unit (Printer Cover) and remove it. After removing all print jobs in queue are loading it ejects.
Note
z For details ... cannot remove the jammed paper or the paper jam error continues after removing the paper, contact your Canon service representative.
Paper Jams
Cause
Action
Paper jammed in the Paper Output Slot Remove the ...
Quick Start Guide - Page 92
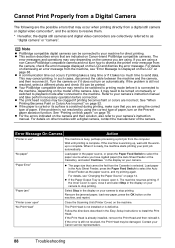
..., the digital still cameras and digital video camcorders are incorrect. "No Print Head"
The Print Head is not installed or is complete. Contact your camera to your camera's instruction manual.
See "Printing on your Canon service representative.
88
Troubleshooting Error Message On Camera
Action
"Printer in the display on the LCD and dismiss the error message. Load...
Quick Start Guide - Page 93
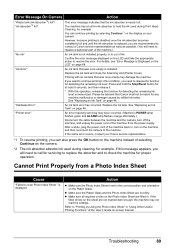
Replace the ink tank and close the Scanning Unit (Printer Cover). Press and hold the ink used during Print Head Cleaning, for example. See "Replacing an Ink Tank" on page 46.
After ... caused by refilled ink tanks. Confirm the error message displayed on page 68. Please be advised that Canon shall not be liable for detecting the remaining ink level is out of the machine.)
"No ink"...
Quick Start Guide - Page 106
...
Media Type 7 Memory Card
inserting 32 removing 33 supported by this machine 31
N
NAVI Button 3 Nozzle Check Pattern
examining 54 printing 53
P
PGI-5BK Black 46 Photo Printing from Photo 36
scanning a photo 36 select and print 37 Print Head automatic print head alignment 60 cleaning 56 deep cleaning 58 manual print head alignment 61 Printing from a Memory Card 31 Photo...
Easy Setup Instructions - Page 1
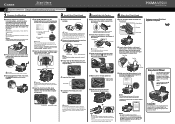
... turning on the machine, remove all of
the ink tank.
Wait about 6 minutes to select the language.
(2) Press the OK button. Photo All-in front of letter- Paper Support
Extension
Hardware setup and Print Head alignment is displayed on -screen manual.
The Print Head Holder moves to e. Scanning Unit (Printer Cover)
d Insert the Print Head.
Start Here
Easy...
Similar Questions

Type Of Print Head Is Incorrect. Install Correct Print Head Uo52
printer just stopped working and displayed above message
printer just stopped working and displayed above message
(Posted by pete80249 8 years ago)


