Canon MP830 Support Question
Canon MP830 Support Question
Find answers below for this question about Canon MP830 - PIXMA Color Inkjet.Need a Canon MP830 manual? We have 3 online manuals for this item!
Question posted by frankxchavez on June 4th, 2013
Error Code A600
I am getting a A600 error code how do I fix that
Current Answers
Answer #1: Posted by waelsaidani1 on June 4th, 2013 1:43 PM
waelsaidani1

Member since:
May 12th, 2013 Points: 19,501,797

Member since:
May 12th, 2013 Points: 19,501,797
1)power off and unplug your printer
2)remove any paper trays and paper from the printer
3)open and visually check all access panels and rollers (inside and out, top and bottom, front and back) for paper, paper fragments, foreign objects, and broken plastic pieces or missing springs.
4) Open the printer to manually load/unload the ink cartridges. Remove the ink cartridges by lifting the gray lever on the left, and carefully removing them one at a time. Also remove the cartridge carrier assembly which is the piece at the back of the 'print head assembly' - the thing that travels back and forth. It will just lift out. Now lower the gray arm on the left and manually slide the print head assembly all the way to the left and out of sight.
5) Grab your flashlight and look inside the printer to the right and notice the 'purge unit' or spittoon. It will most likely be covered in gunk and ink. CAREFULLY wipe off any excess ink with a lint-free cloth (I used an old white t-shirt) being sure to be EXTREMELY CAREFUL of the delicate moving parts in there.
6) My issue was a dislodged 1/2 X 3/4" piece of foam/filter which lays flat at the bottom of the purge unit. CHECK THIS. make sure it is secure in it's little holder. While you are in there, check for missing/broken pieces as well. I suggest using tweezers or long need-nose pliers to get in there CAREFULLY.
7) Grab your cartridge carrier assembly and flip it over. You will see a bunch of metal pins at the back and some delicate ink nozzles on the bottom. CAREFULLY wipe all the gunk off of these nozzles with your cloth and make sure the pins are clean for good contact with the matching pins in the printer. Those send the electrical signal to the ink and tell it when to spray.
8) Replace the cartridge carrier assembly and ink cartridges into the print head unit and close the lid.
9) Go into the settings and utilize your "print head alignment" and "nozzle check" maintenance features.
Related Canon MP830 Manual Pages
User's Guide - Page 3
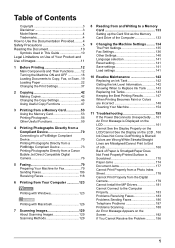
...from a Compliant Device 70 Connecting to a PictBridge Compliant Device 70 Printing Photographs Directly from a PictBridge Compliant Device 73 Printing Photographs... Maintenance 142 Replacing an Ink Tank 142 Getting the Ink Level Information 142 Knowing When ...Colors are Incorrect 148 Cleaning Your Machine 154
11 Troubleshooting 159 If the Power Disconnects Unexpectedly ..... 161 An Error...
User's Guide - Page 19
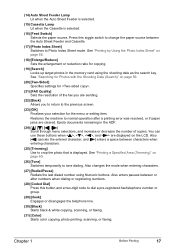
...line.
(30) [Black] Starts black & white copying, scanning, or faxing.
(31) [Color] Starts color copying, photo printing, scanning, or faxing. Chapter 1
Before Printing
17 Also enters pauses between ... ] enters a space between or after a printing error was resolved, or if paper jams are cleared. Press this button and a two-digit code to tone dialing. See "Printing by Using the ...
User's Guide - Page 79
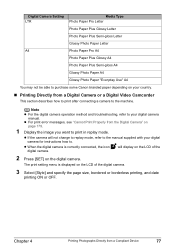
... digital camera.
3 Select [Style] and specify the page size, bordered or borderless printing, and date
printing ON or OFF.
z For print error messages, see "Cannot Print Properly from a Compliant Device
77 Chapter 4
Printing Photographs Directly from the Digital Camera" on page 179.
1 Display the image you want to print in replay mode...
User's Guide - Page 161
...Error Message is Displayed on the LCD" on page 161 z "Cannot See the Display Properly on the LCD/Cannot See the Display on the LCD" on page 166 z "Ink Does Not Come Out/Printing is Blurred/Colors... a Computer Running Windows XP, the Screen Shows the Warning Message "This device can perform faster" or "High-SPEED USB Device Plugged into nonHigh-SPEED USB Hub"" on page 183
z "Problems Receiving Faxes...
User's Guide - Page 165

...and in the ADF.
Message
Incompatible device detected. Action
Disconnect the camera cable, and reconnect it. Depending on ADF and pressing [OK]. If the error is still unresolved, there is a...the error. or Letter-sized documents. You may have to resolve the error. Auto head align has failed.
**** Error code
z A4/Letter-sized paper is jammed in the Auto Sheet Feeder. An error requiring...
User's Guide - Page 181
... if it is not resolved even after connected to the machine. No paper/Media Type error/Paper Error
Paper jam
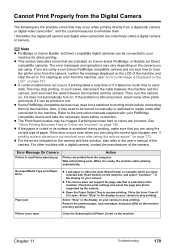
z Load paper in either the Auto Sheet Feeder or Cassette which you are...vary depending on the LCD of the camera. z Some PictBridge compatible devices may need to be clogged if printing becomes faint or colors are incorrect.
z Open the Paper Output Tray to the machine. Select...
User's Guide - Page 208

... and machines of this number must be certain of the number of devices that may cause a fax error. If requested, this sort generate electrical noise which may be connected ...telephone company.
Location Supply a suitable table, cabinet, or desk for MP830
A. See the Appendix for ringing and special codes, which often interferes with other appliances that contains, among other information...
User's Guide - Page 214
... or any combination of devices subject only to the requirement that it is recommended if available in Canada
Pre-Installation Requirements for ringing and special codes, which should be connected.... The equipment must also be used with a single-line individual service may cause a fax error. Use one .
C. The CA11A modular jack should be extended by the telephone company. The...
User's Guide - Page 217
...156 CLI-8BK Black 142 CLI-8C Cyan 142 CLI-8M Magenta 142 CLI-8Y Yellow 142 Coded Dial button 17 Color button 17 Components 12 COPY button 16 Copying 42 2-on-1 copy 47 4-on-1 copy 48...Tray 12 Duplexing Transport Unit 15
E
Enlarge/Reduce button 17 Entering Numbers, Letters, and Symbols 102 External Device Jack 15
F
FAX button 16 FAX Quality button 17 Fax Settings 136
date and time 84 sender ...
Easy Setup Instructions - Page 1
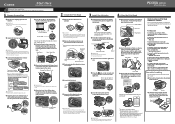
...the center.
this has no effect on the Operation Panel to get ink on the ink tank until it . Be careful not...send a fax, you are unsure of this to "An Error Message is printed in computer modem and telephone
Telephone line
Machine
...
If the orange-colored protective film is aligned automatically.
Connect external devices as follows:
External device jack Telephone line ...
Service Manual - Page 10
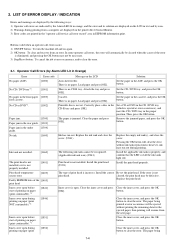
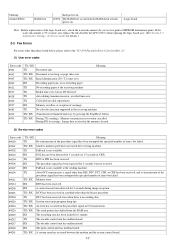
... its solution are displayed on the LCD in text and by icon. 2) Warnings during printing from a computer are displayed on the printer driver Status Monitor. 3) Error codes are printed in EEPROM information print. The type of all the ink tanks light red. cleared, the print head may run out. Inner cover is...
Service Manual - Page 11
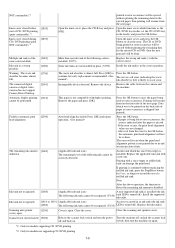
...tank
[1682]
The following color is turned off ). The remaining ink amount [1683] unknown.
(Applicable ink tank icon)
The remaining level of paper at error occurrence.
Ink tank not recognized...camera or digital video camera does not support Camera Direct Printing.
[2001]
Incompatible device detected.
Scanner lock switch locked. [5020]
Release the scanner lock switch and ...
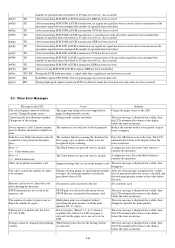
Service Manual - Page 12
...
Solution (Replacement of cycles the Alarm LED and COPY button blink, and the corresponding error code is displayed.
- Scanner unit
Continuous alternate ROM error [6100] The check sum value is detected. Carriage motor
3 times
Line feed error [6000] An error occurred in the AP motor during purging operation.
- Logic board -
Timing slit film - Logic board...
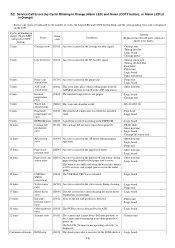
Service Manual - Page 13
... reservation cancelled During RX (receiving): Image data received in the memory cleared
(2) Service error codes
Error code TX / RX
Meaning
##100
TX
Re-transmission of the procedure signal has been attempted the specified number of an image
#085
TX
No color fax function supported in CBT).
##104
TX
RTN or PIN has been received.
##106...
Service Manual - Page 15
... transmitted.
After receiving EOR-EOP in ECM transmission, ERR has been received. Device memory is displayed for Press the OK button to continue the operation. Either ...The Black button was pressed, but it is not set. A temporary error. Press the Color button to clear the error.
The Color button was pressed, but it is inserted in the memory card.
Supported ...
Service Manual - Page 16
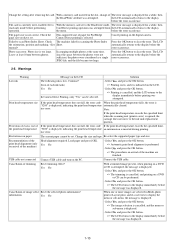
... button.
=> Printing starts, and it is cancelled, and printing on the LCD.
- Print head temperature rise
If the print head temperature does not fall , the error code If the print head temperature exceeds the specified limit, the print head temperature "5200" is displayed, indicating the print head temperature an intermission is displayed...
Service Manual - Page 20
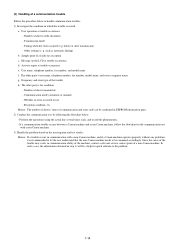
... Follow the procedure below . - Activity report at trouble occurrence - Frequency and error type of communication and error code can be examined accordingly. Memo: The number of sheets / times of the ...fax number, and model name f. Number of a non-Canon machine. Timing when the error occurred (e.g. The other party's fax condition
- Since the cause of the trouble may exists...
Service Manual - Page 59
...the Stop/Reset button. 7) Press the ON/OFF button to turn off by removing the power cord with service error code and dump list)
In service data #1 SSSW SW01, set bit 0 and bit 1 to indicate the machine ... be printed at the end of the user's data list. For details, see below . The service error code and dump list will be displayed on . For details, see below .
1) In the user mode,...
Service Manual - Page 62

*2: The number sent from the other party or dialed on the machine (the last 20 digits) *3: ID sent from the other party, when the other party is a Canon fax *4: Communication start date and time (in 24-hour display) *5: Communication duration (in minutes and seconds) *6: The number of pages completely transmitted *7: "NG" and service error code
To the table of contents
To the top
1-56
Service Manual - Page 80

...PIXMA MP830 SPECIFICATIONS
Type Paper feeding method Resolution
Throughput (target value)
Printing direction Print width Interface ASF stacking capacity Cassette stacking capacity Paper weight
Detection functions
Acoustic noise
Environmental requirements
Desktop serial color inkjet... 100 to -paper distance, Supported camera direct printing device, Presence of CD / DVD*1, Presence of memory card...
Similar Questions

Canon Mp830 Ink Cartridge Jammed To Right Side. Error Code 5100
I changed my ink cartriges this morning, and first the machine said c"annot recognize cartridge", an...
I changed my ink cartriges this morning, and first the machine said c"annot recognize cartridge", an...
(Posted by jeannad17519 9 years ago)

I Have A Pixma Mp990 Inkjet And It Will Not Print From The Computer.
It will print test pages but just puts out blank sheets when trying to print from a computer. Does i...
It will print test pages but just puts out blank sheets when trying to print from a computer. Does i...
(Posted by jssmith15 10 years ago)

Where Can I Obtain A Windows (cd-1) Cd-rom For A Canon Mx700 Multifunction Devic
(Posted by jdebanne 11 years ago)

Hello My Canon Mp830 Has An Error Code 6aoo What Is It And How Do I Clear It
need to konw how to clear an error code on my mp830 pixma.. Thank you
need to konw how to clear an error code on my mp830 pixma.. Thank you
(Posted by Anonymous-33991 12 years ago)