8512499 - eMachines Flat Panel Monitor User Guide
Page 3
Contents Using Your eMachines Flat-Panel Monitor 1 Unpacking the monitor 2 Connecting the monitor 3 Attaching the base 3 Connecting video inputs 4 Connecting power 5 Connecting a security cable 5 Setting up the optional stand 6 Attaching the USB stand 6 Adjusting monitor height tension 8 Adjusting monitor tilt tension ... bar 11 Starting the monitor 12 Adjusting monitor settings 13 Monitor buttons 13 On-screen display options 14 Changing Windows screen settings 17 Video modes 18 Power management 19 ENERGY STAR 19 Energy declaration 19 Maintaining 20 Troubleshooting 20 ...
Contents Using Your eMachines Flat-Panel Monitor 1 Unpacking the monitor 2 Connecting the monitor 3 Attaching the base 3 Connecting video inputs 4 Connecting power 5 Connecting a security cable 5 Setting up the optional stand 6 Attaching the USB stand 6 Adjusting monitor height tension 8 Adjusting monitor tilt tension ... bar 11 Starting the monitor 12 Adjusting monitor settings 13 Monitor buttons 13 On-screen display options 14 Changing Windows screen settings 17 Video modes 18 Power management 19 ENERGY STAR 19 Energy declaration 19 Maintaining 20 Troubleshooting 20 ...

8512499 - eMachines Flat Panel Monitor User Guide
Page 5
Using Your eMachines Flat-Panel Monitor • Connecting the monitor • Setting up the optional stand • Setting up the optional speaker bar • Starting the monitor • Adjusting monitor settings • Power management • Maintaining • Troubleshooting • Specifications 1
Using Your eMachines Flat-Panel Monitor • Connecting the monitor • Setting up the optional stand • Setting up the optional speaker bar • Starting the monitor • Adjusting monitor settings • Power management • Maintaining • Troubleshooting • Specifications 1
8512499 - eMachines Flat Panel Monitor User Guide
Page 6
Using Your eMachines Flat-Panel Monitor Unpacking the monitor Your monitor box should contain the following items: • Monitor (with neck attached) • Base • This User Guide • VGA cable • Power cord If you are missing any items, call Customer Care. For telephone numbers, see the label on the back of your monitor. 2
Using Your eMachines Flat-Panel Monitor Unpacking the monitor Your monitor box should contain the following items: • Monitor (with neck attached) • Base • This User Guide • VGA cable • Power cord If you are missing any items, call Customer Care. For telephone numbers, see the label on the back of your monitor. 2
8512499 - eMachines Flat Panel Monitor User Guide
Page 7
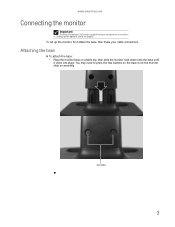
www.emachines.com Connecting the monitor Important To attach the optional USB stand instead of the base, complete the instructions in "Setting up the monitor, first attach the base, then make your cable connections. Base buttons 3 You may need to press the two buttons on the base to let the monitor slide on page 6. Attaching the base To attach the base: • Place the monitor base on a table top, then slide the monitor neck down onto the base until it clicks into place. To set up the optional stand" on smoothly.
www.emachines.com Connecting the monitor Important To attach the optional USB stand instead of the base, complete the instructions in "Setting up the monitor, first attach the base, then make your cable connections. Base buttons 3 You may need to press the two buttons on the base to let the monitor slide on page 6. Attaching the base To attach the base: • Place the monitor base on a table top, then slide the monitor neck down onto the base until it clicks into place. To set up the optional stand" on smoothly.
8512499 - eMachines Flat Panel Monitor User Guide
Page 8
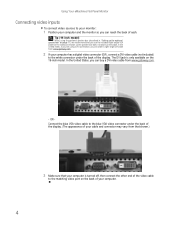
... the United States, you can reach the back of your computer and the monitor so you can order a right-angle DVI cable from www.gateway.com. 2 If your computer is only available on the 19-inch model. Tip (19-inch model) When using a DVI connection, you use the included right-angle... VGA video connector under the back of your cable and connector may vary from www.gateway.com. - Using Your eMachines Flat-Panel Monitor Connecting video inputs To connect video sources to your monitor: 1 Position your computer. 4 The DVI jack is turned off, then connect the other end of the video ...
... the United States, you can reach the back of your computer and the monitor so you can order a right-angle DVI cable from www.gateway.com. 2 If your computer is only available on the 19-inch model. Tip (19-inch model) When using a DVI connection, you use the included right-angle... VGA video connector under the back of your cable and connector may vary from www.gateway.com. - Using Your eMachines Flat-Panel Monitor Connecting video inputs To connect video sources to your monitor: 1 Position your computer. 4 The DVI jack is turned off, then connect the other end of the video ...
8512499 - eMachines Flat Panel Monitor User Guide
Page 9
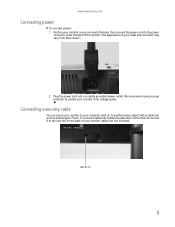
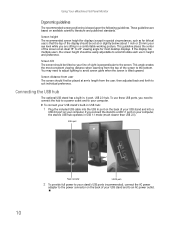
... that shown.) 2 Plug the power cord into a correctly grounded power outlet. Cable lock slot 5 www.emachines.com Connecting power To connect power: 1 Position your monitor so you can secure your monitor to your computer desk (or to another heavy object) with a cable lock (such as a Kensington™ lock). ...Connecting a security cable You can reach the back, then connect the power cord to the lock slot on the back of your monitor (cable lock not included). To connect a cable lock, follow the cable lock's instructions to connect it to the power connector under the back...
... that shown.) 2 Plug the power cord into a correctly grounded power outlet. Cable lock slot 5 www.emachines.com Connecting power To connect power: 1 Position your monitor so you can secure your monitor to your computer desk (or to another heavy object) with a cable lock (such as a Kensington™ lock). ...Connecting a security cable You can reach the back, then connect the power cord to the lock slot on the back of your monitor (cable lock not included). To connect a cable lock, follow the cable lock's instructions to connect it to the power connector under the back...
8512499 - eMachines Flat Panel Monitor User Guide
Page 10
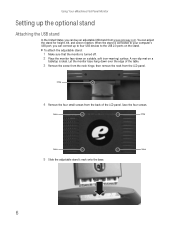
... the screw from the neck hinge, then remove the neck from the back of the LCD panel. Let the monitor base hang down on a stable, soft (non-marring) surface. Screw 4 Remove the four small screws from the LCD panel. Screw Screw Screw Screw 5 Slide the adjustable stand's neck onto the base. 6 To.... Save the four screws. A non-slip mat on the stand. You can buy an adjustable USB stand from www.gateway.com. Using Your eMachines Flat-Panel Monitor Setting up the optional stand Attaching the USB stand In the United States, you can connect up to four USB devices to the USB...
... the screw from the neck hinge, then remove the neck from the back of the LCD panel. Let the monitor base hang down on a stable, soft (non-marring) surface. Screw 4 Remove the four small screws from the LCD panel. Screw Screw Screw Screw 5 Slide the adjustable stand's neck onto the base. 6 To.... Save the four screws. A non-slip mat on the stand. You can buy an adjustable USB stand from www.gateway.com. Using Your eMachines Flat-Panel Monitor Setting up the optional stand Attaching the USB stand In the United States, you can connect up to four USB devices to the USB...
8512499 - eMachines Flat Panel Monitor User Guide
Page 12
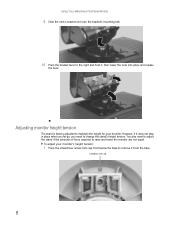
..., if it from the base. Screwdriver access cap 8 Adjusting monitor height tension The stand is factory adjusted to the right and hold it, then lower the neck into place and release the lever. Using Your eMachines Flat-Panel Monitor 9 Slide the neck's bracket slot onto the bracket's mounting ...tab. 10 Press the bracket lever to maintain the height for your monitor's height tension: 1 Press the screwdriver access hole cap from below ...
..., if it from the base. Screwdriver access cap 8 Adjusting monitor height tension The stand is factory adjusted to the right and hold it, then lower the neck into place and release the lever. Using Your eMachines Flat-Panel Monitor 9 Slide the neck's bracket slot onto the bracket's mounting ...tab. 10 Press the bracket lever to maintain the height for your monitor's height tension: 1 Press the screwdriver access hole cap from below ...

8512499 - eMachines Flat Panel Monitor User Guide
Page 13
... equalized, turn the tension screw clockwise two to four turns to increase the tension. After the forces are equal. If the monitor lowers by itself when you let go . www.emachines.com 2 Insert a Phillips screwdriver through the access hole in the base and onto the height tension screw (on the top of... the stand, in the slot above the USB In port). If the monitor rises when you let go, turn the screw counter-clockwise...
... equalized, turn the tension screw clockwise two to four turns to increase the tension. After the forces are equal. If the monitor lowers by itself when you let go . www.emachines.com 2 Insert a Phillips screwdriver through the access hole in the base and onto the height tension screw (on the top of... the stand, in the slot above the USB In port). If the monitor rises when you let go, turn the screw counter-clockwise...
8512499 - eMachines Flat Panel Monitor User Guide
Page 14
... be tilted so your eye level while you need to adjust lighting to avoid screen glare when the screen is tilted upward. Using Your eMachines Flat-Panel Monitor Ergonomic guidelines The recommended screen positioning is perpendicular to the screen. This angle creates the most desktop displays. If you connect the stand to...
... be tilted so your eye level while you need to adjust lighting to avoid screen glare when the screen is tilted upward. Using Your eMachines Flat-Panel Monitor Ergonomic guidelines The recommended screen positioning is perpendicular to the screen. This angle creates the most desktop displays. If you connect the stand to...
8512499 - eMachines Flat Panel Monitor User Guide
Page 16
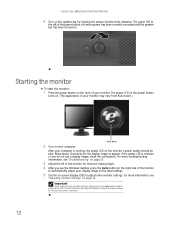
... on the speaker bar by rotating the power/volume knob clockwise. The power LED on the power button turns on. (The appearance of your monitor may vary from that shown.) 12 Power button 2 Turn on your computer is running, the power LED on page 20. 3 Adjust the ... more information, see the Windows desktop, press the Auto button on the right side of the monitor to the ideal settings. 5 Use the on . Using Your eMachines Flat-Panel Monitor 6 Turn on page 13. After your computer. Allow about 10 seconds for the current screen resolution. For more troubleshooting information, ...
... on the speaker bar by rotating the power/volume knob clockwise. The power LED on the power button turns on. (The appearance of your monitor may vary from that shown.) 12 Power button 2 Turn on your computer is running, the power LED on page 20. 3 Adjust the ... more information, see the Windows desktop, press the Auto button on the right side of the monitor to the ideal settings. 5 Use the on . Using Your eMachines Flat-Panel Monitor 6 Turn on page 13. After your computer. Allow about 10 seconds for the current screen resolution. For more troubleshooting information, ...
8512499 - eMachines Flat Panel Monitor User Guide
Page 17
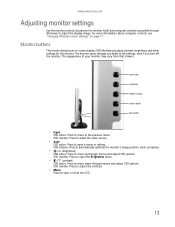
www.emachines.com Adjusting monitor settings Use the monitor controls (located on the monitor itself) and computer controls (accessible through Windows) to move up through menus and adjust OSD options. OSD inactive: Press to automatically optimize the monitor's image position, clock, and phase. • / (brightness) OSD active:...video source. • Auto OSD active: Press to the previous menu. The monitor saves changes you make to the settings, even if you turn off the monitor. (The appearance of your monitor may vary from that lets you adjust contrast, brightness, and other settings for...
www.emachines.com Adjusting monitor settings Use the monitor controls (located on the monitor itself) and computer controls (accessible through Windows) to move up through menus and adjust OSD options. OSD inactive: Press to automatically optimize the monitor's image position, clock, and phase. • / (brightness) OSD active:...video source. • Auto OSD active: Press to the previous menu. The monitor saves changes you make to the settings, even if you turn off the monitor. (The appearance of your monitor may vary from that lets you adjust contrast, brightness, and other settings for...
8512499 - eMachines Flat Panel Monitor User Guide
Page 18
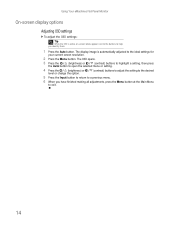
... level or change the option. 5 Press the Input button to return to a previous menu. 6 When you identify them. 1 Press the Auto button. Using Your eMachines Flat-Panel Monitor On-screen display options Adjusting OSD settings To adjust the OSD settings: Tip While the OSD is automatically adjusted to the ideal settings for...
... level or change the option. 5 Press the Input button to return to a previous menu. 6 When you identify them. 1 Press the Auto button. Using Your eMachines Flat-Panel Monitor On-screen display options Adjusting OSD settings To adjust the OSD settings: Tip While the OSD is automatically adjusted to the ideal settings for...

8512499 - eMachines Flat Panel Monitor User Guide
Page 19
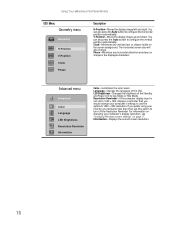
www.emachines.com OSD menus OSD Menu Main menu Main Menu Auto Picture Geometry Advanced Reset Description Auto-Automatically adjusts your monitor to its factory settings. Contrast-Adjusts the level of white between the lightest and darkest portions of the monitor backlights. High gamma levels ...-Opens the Geometry menu, where you can adjust color balance, change the OSD language, and display information about current monitor settings. Reset-Resets the monitor to its optimum settings. Gamma-Customizes the gamma level. You may need to maximize the life of an image. Picture...
www.emachines.com OSD menus OSD Menu Main menu Main Menu Auto Picture Geometry Advanced Reset Description Auto-Automatically adjusts your monitor to its factory settings. Contrast-Adjusts the level of white between the lightest and darkest portions of the monitor backlights. High gamma levels ...-Opens the Geometry menu, where you can adjust color balance, change the OSD language, and display information about current monitor settings. Reset-Resets the monitor to its optimum settings. Gamma-Customizes the gamma level. You may need to maximize the life of an image. Picture...
8512499 - eMachines Flat Panel Monitor User Guide
Page 20
V-Position-Moves the display image up and down. If you prefer using your monitor at a resolution less than that you should change . You can also press the Auto button to configure the horizontal position automatically. Clock-Minimizes any ...page 17. You can also press the Auto button to Day Mode or Nite Mode. Information-Displays the current screen resolution. 16 Using Your eMachines Flat-Panel Monitor OSD Menu Geometry menu Geometry H-Position V-Position Clock Phase Description H-Position-Moves the display image left and right. Language-Changes the language of the...
V-Position-Moves the display image up and down. If you prefer using your monitor at a resolution less than that you should change . You can also press the Auto button to configure the horizontal position automatically. Clock-Minimizes any ...page 17. You can also press the Auto button to Day Mode or Nite Mode. Information-Displays the current screen resolution. 16 Using Your eMachines Flat-Panel Monitor OSD Menu Geometry menu Geometry H-Position V-Position Clock Phase Description H-Position-Moves the display image left and right. Language-Changes the language of the...
8512499 - eMachines Flat Panel Monitor User Guide
Page 21
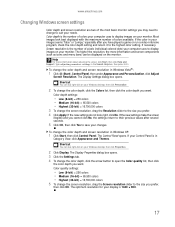
.... If the new settings do not look best displayed with the maximum number of colors available. Shortcut You can also right-click on the monitor. Type adjusting monitor settings in Windows XP: 1 Click Start, then click Control Panel. Color depth settings: • Low (8-bit) = 256 colors • Medium ... arrow button to suit your Windows desktop, then click Properties. 2 Click Display. www.emachines.com Changing Windows screen settings Color depth and screen resolution are two of the most basic monitor settings you may need to change to open the Color quality list, then click the color...
.... If the new settings do not look best displayed with the maximum number of colors available. Shortcut You can also right-click on the monitor. Type adjusting monitor settings in Windows XP: 1 Click Start, then click Control Panel. Color depth settings: • Low (8-bit) = 256 colors • Medium ... arrow button to suit your Windows desktop, then click Properties. 2 Click Display. www.emachines.com Changing Windows screen settings Color depth and screen resolution are two of the most basic monitor settings you may need to change to open the Color quality list, then click the color...
8512499 - eMachines Flat Panel Monitor User Guide
Page 22
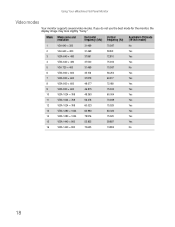
If you do not use the best mode for the monitor, the display image may look slightly "fuzzy." Using Your eMachines Flat-Panel Monitor Video modes Your monitor supports several video modes. Mode Mode name and resolution Horizontal Vertical Available in DVI mode frequency (kHz) frequency (Hz) (19-inch model) 1 VGA 640 × 350 31.469...
If you do not use the best mode for the monitor, the display image may look slightly "fuzzy." Using Your eMachines Flat-Panel Monitor Video modes Your monitor supports several video modes. Mode Mode name and resolution Horizontal Vertical Available in DVI mode frequency (kHz) frequency (Hz) (19-inch model) 1 VGA 640 × 350 31.469...
8512499 - eMachines Flat Panel Monitor User Guide
Page 23
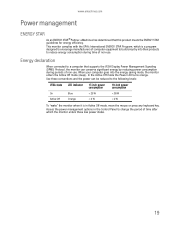
... conserve significant energy by reducing power consumption during time of non-use . This monitor complies with the EPA's International ENERGY STAR Program, which is a program designed to...encourage manufacturers of computer equipment to build circuitry into the energy saving mode, the monitor enters the Active Off mode (sleep). Energy declaration When connected to a computer that .... www.emachines.com Power management ENERGY STAR As an ENERGY STAR® Partner, eMachines has determined that supports the VESA Display Power Management Signaling (DPMS) Protocol, the monitor can be...
... conserve significant energy by reducing power consumption during time of non-use . This monitor complies with the EPA's International ENERGY STAR Program, which is a program designed to...encourage manufacturers of computer equipment to build circuitry into the energy saving mode, the monitor enters the Active Off mode (sleep). Energy declaration When connected to a computer that .... www.emachines.com Power management ENERGY STAR As an ENERGY STAR® Partner, eMachines has determined that supports the VESA Display Power Management Signaling (DPMS) Protocol, the monitor can be...
8512499 - eMachines Flat Panel Monitor User Guide
Page 24
... Your eMachines Flat-Panel Monitor Maintaining To keep the monitor in optimal working order: • Do not block the ventilation holes. • Do not expose the monitor to rain or use near water. • Keep the monitor away from radiators or heat vents. • Keep the monitor out of the monitor and... attached display, and both the back of direct sunlight. Troubleshooting Important Make sure that the video cable is connected correctly to enable multiple monitors. • You can use the notebook's screen. See Windows Help to learn how to both at the same time. Caution Do not...
... Your eMachines Flat-Panel Monitor Maintaining To keep the monitor in optimal working order: • Do not block the ventilation holes. • Do not expose the monitor to rain or use near water. • Keep the monitor away from radiators or heat vents. • Keep the monitor out of the monitor and... attached display, and both the back of direct sunlight. Troubleshooting Important Make sure that the video cable is connected correctly to enable multiple monitors. • You can use the notebook's screen. See Windows Help to learn how to both at the same time. Caution Do not...
8512499 - eMachines Flat Panel Monitor User Guide
Page 25
... your computer. Turn the monitor back on . • Make sure that the video cable is not damaged. • Check the end of the video cable for any pins that might be bent or pushed in . Color is functioning correctly, a "No Signal" message appears. www.emachines.com • If the power ...LED is orange: • Make sure that your computer is turned on. • Move the mouse or press any key on the keyboard to bring the monitor out of sleep mode. • Restart your computer with the...
... your computer. Turn the monitor back on . • Make sure that the video cable is not damaged. • Check the end of the video cable for any pins that might be bent or pushed in . Color is functioning correctly, a "No Signal" message appears. www.emachines.com • If the power ...LED is orange: • Make sure that your computer is turned on. • Move the mouse or press any key on the keyboard to bring the monitor out of sleep mode. • Restart your computer with the...


