8512499 - eMachines Flat Panel Monitor User Guide
Page 3
Contents Using Your eMachines Flat-Panel Monitor 1 Unpacking the monitor 2 Connecting the monitor 3 Attaching the base 3 Connecting video inputs 4 Connecting power 5 Connecting a security cable 5 Setting up the optional stand 6 Attaching the USB stand 6 Adjusting monitor height tension 8 Adjusting monitor tilt tension 9 Connecting the USB hub 10 Setting up the optional speaker bar 11 Installing the speaker bar 11 Starting the monitor 12 Adjusting monitor settings 13 Monitor buttons 13 On-screen display options 14 Changing Windows screen settings 17 Video modes 18 Power ...
Contents Using Your eMachines Flat-Panel Monitor 1 Unpacking the monitor 2 Connecting the monitor 3 Attaching the base 3 Connecting video inputs 4 Connecting power 5 Connecting a security cable 5 Setting up the optional stand 6 Attaching the USB stand 6 Adjusting monitor height tension 8 Adjusting monitor tilt tension 9 Connecting the USB hub 10 Setting up the optional speaker bar 11 Installing the speaker bar 11 Starting the monitor 12 Adjusting monitor settings 13 Monitor buttons 13 On-screen display options 14 Changing Windows screen settings 17 Video modes 18 Power ...

8512499 - eMachines Flat Panel Monitor User Guide
Page 5
Using Your eMachines Flat-Panel Monitor • Connecting the monitor • Setting up the optional stand • Setting up the optional speaker bar • Starting the monitor • Adjusting monitor settings • Power management • Maintaining • Troubleshooting • Specifications 1
Using Your eMachines Flat-Panel Monitor • Connecting the monitor • Setting up the optional stand • Setting up the optional speaker bar • Starting the monitor • Adjusting monitor settings • Power management • Maintaining • Troubleshooting • Specifications 1
8512499 - eMachines Flat Panel Monitor User Guide
Page 7
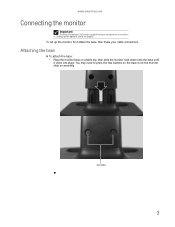
Attaching the base To attach the base: • Place the monitor base on smoothly. www.emachines.com Connecting the monitor Important To attach the optional USB stand instead of the base, complete the instructions in "Setting up the monitor, first attach the base, then make your cable connections. You may need to press the two buttons on the base to let the monitor slide on a table top, then slide the monitor neck down onto the base until it clicks into place. To set up the optional stand" on page 6. Base buttons 3
Attaching the base To attach the base: • Place the monitor base on smoothly. www.emachines.com Connecting the monitor Important To attach the optional USB stand instead of the base, complete the instructions in "Setting up the monitor, first attach the base, then make your cable connections. You may need to press the two buttons on the base to let the monitor slide on a table top, then slide the monitor neck down onto the base until it clicks into place. To set up the optional stand" on page 6. Base buttons 3
8512499 - eMachines Flat Panel Monitor User Guide
Page 8
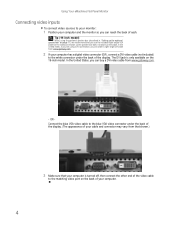
... VGA cable for the video connection so the speaker bar does not obstruct the cable. Tip (19-inch model) When using a DVI connection, you can buy a DVI video cable from www.gateway.com. - OR Connect the blue VGA video cable to the blue VGA video connector under the back of the display. Using Your eMachines Flat-Panel Monitor Connecting video inputs To connect video sources to your monitor: 1 Position your computer and the monitor so you can order a right-angle DVI cable from www.gateway.com. 2 If your computer has a digital video connector (DVI), connect a DVI video cable...
... VGA cable for the video connection so the speaker bar does not obstruct the cable. Tip (19-inch model) When using a DVI connection, you can buy a DVI video cable from www.gateway.com. - OR Connect the blue VGA video cable to the blue VGA video connector under the back of the display. Using Your eMachines Flat-Panel Monitor Connecting video inputs To connect video sources to your monitor: 1 Position your computer and the monitor so you can order a right-angle DVI cable from www.gateway.com. 2 If your computer has a digital video connector (DVI), connect a DVI video cable...
8512499 - eMachines Flat Panel Monitor User Guide
Page 10
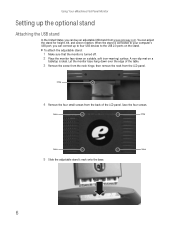
... adjust the stand for height, tilt, and screen rotation. A non-slip mat on a tabletop is connected to the USB 2.0 ports on the stand. Screw 4 Remove the four small screws from the LCD panel. Screw Screw Screw Screw 5 Slide the adjustable stand's neck onto the base. 6 Let the monitor base hang down on a stable, soft (non-marring) surface. When the stand is ideal. Using Your eMachines Flat-Panel Monitor Setting up the optional stand Attaching the USB stand In the United States, you can connect...
... adjust the stand for height, tilt, and screen rotation. A non-slip mat on a tabletop is connected to the USB 2.0 ports on the stand. Screw 4 Remove the four small screws from the LCD panel. Screw Screw Screw Screw 5 Slide the adjustable stand's neck onto the base. 6 Let the monitor base hang down on a stable, soft (non-marring) surface. When the stand is ideal. Using Your eMachines Flat-Panel Monitor Setting up the optional stand Attaching the USB stand In the United States, you can connect...
8512499 - eMachines Flat Panel Monitor User Guide
Page 12
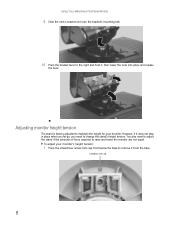
... lower the monitor are not equal. Using Your eMachines Flat-Panel Monitor 9 Slide the neck's bracket slot onto the bracket's mounting tab. 10 Press the bracket lever to the right and hold it from below the base to remove it , then lower the neck into place and release the lever. Adjusting monitor height tension The stand is factory adjusted to maintain the height for your monitor's height tension...
... lower the monitor are not equal. Using Your eMachines Flat-Panel Monitor 9 Slide the neck's bracket slot onto the bracket's mounting tab. 10 Press the bracket lever to the right and hold it from below the base to remove it , then lower the neck into place and release the lever. Adjusting monitor height tension The stand is factory adjusted to maintain the height for your monitor's height tension...
8512499 - eMachines Flat Panel Monitor User Guide
Page 14
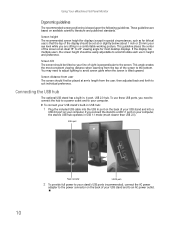
... a power outlet and to avoid screen glare when the screen is perpendicular to accommodate each user's height and preference. Screen tilt The screen should first be tilted so your computer. If the display has multiple users, the screen height should be easily adjustable to the screen. To use ) is based upon the following guidelines. Connecting the USB hub The optional USB stand has a built-in USB hub: 1 Plug the included USB cable into the USB In port...
... a power outlet and to avoid screen glare when the screen is perpendicular to accommodate each user's height and preference. Screen tilt The screen should first be tilted so your computer. If the display has multiple users, the screen height should be easily adjustable to the screen. To use ) is based upon the following guidelines. Connecting the USB hub The optional USB stand has a built-in USB hub: 1 Plug the included USB cable into the USB In port...

8512499 - eMachines Flat Panel Monitor User Guide
Page 15
... www.emachines.com Setting up the optional speaker bar Power/Volume control Kensington lock slot Headphone jack Power indicator Microphone jack Headphone jack Bass port (for bass sound. Do not block.) Installing the speaker bar To install the speaker bar: Tip (19-inch model) When using a DVI connection, you use the included right-angle VGA cable for the video connection so the speaker bar does not obstruct the cable. Make sure that you can order a right-angle DVI cable...
... www.emachines.com Setting up the optional speaker bar Power/Volume control Kensington lock slot Headphone jack Power indicator Microphone jack Headphone jack Bass port (for bass sound. Do not block.) Installing the speaker bar To install the speaker bar: Tip (19-inch model) When using a DVI connection, you use the included right-angle VGA cable for the video connection so the speaker bar does not obstruct the cable. Make sure that you can order a right-angle DVI cable...
8512499 - eMachines Flat Panel Monitor User Guide
Page 16
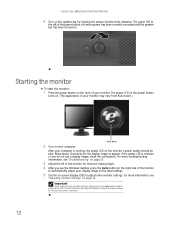
... the Auto button on the monitor's power button should be blue. Starting the monitor To start the monitor: 1 Press the power button on the front of your computer is not blue or you see a display image, check the connections. After your monitor may vary from that shown.) 12 Power button 2 Turn on -screen display (OSD) to appear. If the power LED is running, the power LED on the right side of the monitor for the display image to adjust other monitor settings. Using Your eMachines Flat-Panel Monitor 6 Turn on...
... the Auto button on the monitor's power button should be blue. Starting the monitor To start the monitor: 1 Press the power button on the front of your computer is not blue or you see a display image, check the connections. After your monitor may vary from that shown.) 12 Power button 2 Turn on -screen display (OSD) to appear. If the power LED is running, the power LED on the right side of the monitor for the display image to adjust other monitor settings. Using Your eMachines Flat-Panel Monitor 6 Turn on...
8512499 - eMachines Flat Panel Monitor User Guide
Page 17
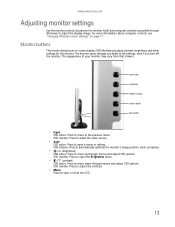
... image. For more information about computer controls, see "Changing Windows screen settings" on the monitor itself) and computer controls (accessible through Windows) to the previous menu. OSD inactive: Press to adjust the contrast. • Menu Press to move down through menus and adjust OSD options. www.emachines.com Adjusting monitor settings Use the monitor controls (located on page 17. Monitor buttons This monitor features an on-screen display (OSD) that shown.) Input button Auto button Brightness button Contrast button Menu button • Input OSD active: Press to open...
... image. For more information about computer controls, see "Changing Windows screen settings" on the monitor itself) and computer controls (accessible through Windows) to the previous menu. OSD inactive: Press to adjust the contrast. • Menu Press to move down through menus and adjust OSD options. www.emachines.com Adjusting monitor settings Use the monitor controls (located on page 17. Monitor buttons This monitor features an on-screen display (OSD) that shown.) Input button Auto button Brightness button Contrast button Menu button • Input OSD active: Press to open...
8512499 - eMachines Flat Panel Monitor User Guide
Page 18
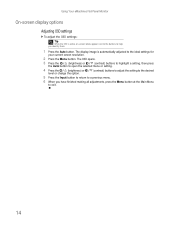
... / (contrast) buttons to adjust the setting to the desired level or change the option. 5 Press the Input button to return to a previous menu. 6 When you identify them. 1 Press the Auto button. The display image is active, on-screen labels appear next to the buttons to help you have finished making all adjustments, press the Menu button at the Main Menu to the ideal settings for your current screen resolution. 2 Press the Menu button. Using Your eMachines Flat-Panel Monitor On-screen display...
... / (contrast) buttons to adjust the setting to the desired level or change the option. 5 Press the Input button to return to a previous menu. 6 When you identify them. 1 Press the Auto button. The display image is active, on-screen labels appear next to the buttons to help you have finished making all adjustments, press the Menu button at the Main Menu to the ideal settings for your current screen resolution. 2 Press the Menu button. Using Your eMachines Flat-Panel Monitor On-screen display...

8512499 - eMachines Flat Panel Monitor User Guide
Page 19
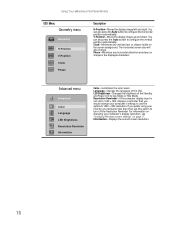
... of the monitor backlights. Contrast-Adjusts the level of white between the lightest and darkest portions of the picture. Gamma-Customizes the gamma level. Advanced-Opens the Advanced menu, where you can adjust color balance, change the OSD language, and display information about current monitor settings. Use the lowest brightness setting you can adjust brightness, contrast, and gamma. Reset-Resets the monitor to its factory settings. Picture menu Picture Brightness Contrast Gamma Brightness-Adjusts the amount of light in the darkest portion of an image. High...
... of the monitor backlights. Contrast-Adjusts the level of white between the lightest and darkest portions of the picture. Gamma-Customizes the gamma level. Advanced-Opens the Advanced menu, where you can adjust color balance, change the OSD language, and display information about current monitor settings. Use the lowest brightness setting you can adjust brightness, contrast, and gamma. Reset-Resets the monitor to its factory settings. Picture menu Picture Brightness Contrast Gamma Brightness-Adjusts the amount of light in the darkest portion of an image. High...
8512499 - eMachines Flat Panel Monitor User Guide
Page 20
... to turn off the Resolution Reminder. LED Brightness-Changes the brightness of the OSD. Using Your eMachines Flat-Panel Monitor OSD Menu Geometry menu Geometry H-Position V-Position Clock Phase Description H-Position-Moves the display image left and right. Phase-Minimizes any vertical bars or stripes visible on page 17. For information on changing your computer's settings to Day Mode or Nite Mode. Information-Displays the current screen resolution. 16 The horizontal screen size will also change your computer's display resolution, see "Changing Windows screen settings" on...
... to turn off the Resolution Reminder. LED Brightness-Changes the brightness of the OSD. Using Your eMachines Flat-Panel Monitor OSD Menu Geometry menu Geometry H-Position V-Position Clock Phase Description H-Position-Moves the display image left and right. Phase-Minimizes any vertical bars or stripes visible on page 17. For information on changing your computer's settings to Day Mode or Nite Mode. Information-Displays the current screen resolution. 16 The horizontal screen size will also change your computer's display resolution, see "Changing Windows screen settings" on...
8512499 - eMachines Flat Panel Monitor User Guide
Page 21
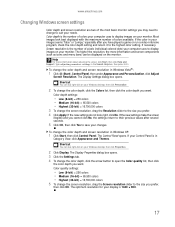
... Help and Support. The Control Panel opens. www.emachines.com Changing Windows screen settings Color depth and screen resolution are two of pixels (individual colored dots) your computer uses to display images on your Windows desktop, then click Properties. 2 Click Display. Color depth is the number of the most basic monitor settings you have played a game or run a video-intensive program, check the color depth setting and return it to the highest color setting, if necessary. To change the color depth and screen resolution...
... Help and Support. The Control Panel opens. www.emachines.com Changing Windows screen settings Color depth and screen resolution are two of pixels (individual colored dots) your computer uses to display images on your Windows desktop, then click Properties. 2 Click Display. Color depth is the number of the most basic monitor settings you have played a game or run a video-intensive program, check the color depth setting and return it to the highest color setting, if necessary. To change the color depth and screen resolution...
8512499 - eMachines Flat Panel Monitor User Guide
Page 24
...; If your notebook's display and this monitor in this monitor as your primary monitor and not use this troubleshooting section may help you can also use the notebook's screen. Caution Do not use both the back of direct sunlight. Troubleshooting Important Make sure that the video cable is connected correctly to both your notebook supports dual displays, you solve them. Using Your eMachines Flat-Panel Monitor Maintaining To keep the monitor in optimal working order: •...
...; If your notebook's display and this monitor in this monitor as your primary monitor and not use this troubleshooting section may help you can also use the notebook's screen. Caution Do not use both the back of direct sunlight. Troubleshooting Important Make sure that the video cable is connected correctly to both your notebook supports dual displays, you solve them. Using Your eMachines Flat-Panel Monitor Maintaining To keep the monitor in optimal working order: •...
8512499 - eMachines Flat Panel Monitor User Guide
Page 25
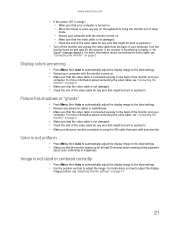
.... Picture has shadows or "ghosts" • Press Menu, then Auto to automatically adjust the display image to the ideal settings. • Remove any extension cables or switchboxes. • Make sure that the video cable is connected securely to bring the monitor out of sleep mode. • Restart your computer with the monitor turned on . • Make sure that the monitor warms up for ten seconds. Display colors are wrong • Press Menu, then Auto...
.... Picture has shadows or "ghosts" • Press Menu, then Auto to automatically adjust the display image to the ideal settings. • Remove any extension cables or switchboxes. • Make sure that the video cable is connected securely to bring the monitor out of sleep mode. • Restart your computer with the monitor turned on . • Make sure that the monitor warms up for ten seconds. Display colors are wrong • Press Menu, then Auto...
8512499 - eMachines Flat Panel Monitor User Guide
Page 26
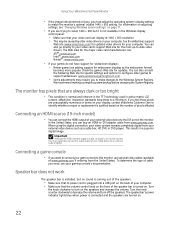
... older video drivers on . 22 Speaker bar does not work The speaker bar is installed, but it is normal and inherent in the TFT technology used in active-matrix LCD screens. You must adjust the operating system's display settings to the DVI port of pixels affected. eMachines' inspection standards keep these pixels are always dark or too bright • This condition is not available in a superior digital image. When using the digital connection, your video content...
... older video drivers on . 22 Speaker bar does not work The speaker bar is installed, but it is normal and inherent in the TFT technology used in active-matrix LCD screens. You must adjust the operating system's display settings to the DVI port of pixels affected. eMachines' inspection standards keep these pixels are always dark or too bright • This condition is not available in a superior digital image. When using the digital connection, your video content...

8512499 - eMachines Flat Panel Monitor User Guide
Page 27
... volume in Windows XP, click the speaker icon in the Windows taskbar, or click (Start), Control Panel, Sounds and Audio Devices, the Volume tab, then click Advanced. If the audio device's output volume is connected to. To adjust the audio device's output volume, see the device's user guide. For optimum volume control using the speaker bar, we recommend that you set too high, the speaker bar's sound may always be distorted. To check your headphone/speaker mute settings...
... volume in Windows XP, click the speaker icon in the Windows taskbar, or click (Start), Control Panel, Sounds and Audio Devices, the Volume tab, then click Advanced. If the audio device's output volume is connected to. To adjust the audio device's output volume, see the device's user guide. For optimum volume control using the speaker bar, we recommend that you set too high, the speaker bar's sound may always be distorted. To check your headphone/speaker mute settings...
8512499 - eMachines Flat Panel Monitor User Guide
Page 28
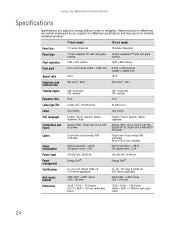
....2 million 16.2 million OSD languages English, French, Spanish, Italian, Japanese, Dutch English, French, Spanish, Italian, Japanese Connections and inputs Analog (VGA): 15-pin mini d-sub VGA AC power Analog (VGA): 15-pin mini d-sub VGA Digital (DVI-D): 24-pin DVD-D with HDCP AC power Cables 15-pin mini d-sub analog VGA (included) 15-pin mini d-sub analog VGA (included) 24-pin DVI-D (not included) Power consumption Normal operation: Using Your eMachines Flat-Panel Monitor Specifications Specifications are custom engineered by...
....2 million 16.2 million OSD languages English, French, Spanish, Italian, Japanese, Dutch English, French, Spanish, Italian, Japanese Connections and inputs Analog (VGA): 15-pin mini d-sub VGA AC power Analog (VGA): 15-pin mini d-sub VGA Digital (DVI-D): 24-pin DVD-D with HDCP AC power Cables 15-pin mini d-sub analog VGA (included) 15-pin mini d-sub analog VGA (included) 24-pin DVI-D (not included) Power consumption Normal operation: Using Your eMachines Flat-Panel Monitor Specifications Specifications are custom engineered by...
8512499 - eMachines Flat Panel Monitor User Guide
Page 30
... switch, make sure that the total ampere rating on the power cord or allow it is important that the product is set up your work area. Setting up your system ■ Read and follow these openings. Care during use Warning To prevent electric shock, never remove the cover. Refer servicing to qualified service personnel. ■ Do not walk on the products plugged into the extension cord...
... switch, make sure that the total ampere rating on the power cord or allow it is important that the product is set up your work area. Setting up your system ■ Read and follow these openings. Care during use Warning To prevent electric shock, never remove the cover. Refer servicing to qualified service personnel. ■ Do not walk on the products plugged into the extension cord...


