

Owners Manual
Page 1
Digital Sound Projector Owner's Manual English for North America, Central and South America, Australia, Asia and Taiwan models Read the supplied booklet "Quick Reference Guide" before using the unit.
Digital Sound Projector Owner's Manual English for North America, Central and South America, Australia, Asia and Taiwan models Read the supplied booklet "Quick Reference Guide" before using the unit.
Owners Manual
Page 5
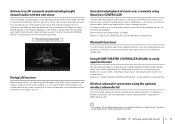
... a movie theater where speakers are collectively referred to a Bluetooth headphones. Unrestricted playback of music over a wireless connection. In addition, a wireless connection can do with this manual, iOS and Android mobile devices are installed behind the screen, allowing for a sense of integration of conversation with five distinct sound beams: left front, right...
... a movie theater where speakers are collectively referred to a Bluetooth headphones. Unrestricted playback of music over a wireless connection. In addition, a wireless connection can do with this manual, iOS and Android mobile devices are installed behind the screen, allowing for a sense of integration of conversation with five distinct sound beams: left front, right...
Owners Manual
Page 6
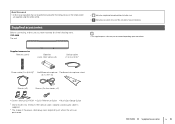
Supplied accessories Before connecting, make sure you have received all of the following items. YSP-5600 The unit • indicates supplementary explanations for better use. • indicates precautions for use of the power cable ...(2 m (6.6 ft))2 IntelliBeam microphone Cardboard microphone stand (6 m (19.7 ft)) Stands (x2) Screws (For the stands; FEATURES ➤ Supplied accessories En 6 x2) • Owner's Manual CD-ROM • Quick Reference Guide • MusicCast Setup Guide 1 China model only: Instead of the optical cable, a digital coaxial audio cable is supplied. 2 The...
Supplied accessories Before connecting, make sure you have received all of the following items. YSP-5600 The unit • indicates supplementary explanations for better use. • indicates precautions for use of the power cable ...(2 m (6.6 ft))2 IntelliBeam microphone Cardboard microphone stand (6 m (19.7 ft)) Stands (x2) Screws (For the stands; FEATURES ➤ Supplied accessories En 6 x2) • Owner's Manual CD-ROM • Quick Reference Guide • MusicCast Setup Guide 1 China model only: Instead of the optical cable, a digital coaxial audio cable is supplied. 2 The...
Owners Manual
Page 9
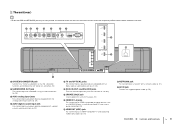
...(HDCP2.2) IN 2 IN 3 8 IN 1 (HDCP2.2) IN 2 IN 3 IN 4 HDMI OUT (ARC) IN 4 HDMI OUT (ARC) 9 0 NETWORK AC IN a 1 SYSTEM CONNECTOR jack Connect to a Yamaha subwoofer so that the HDMI and NETWORK jacks may be easily located, the illustration of the rear of the unit used in this unit's firmware...23). 6 IR-IN, IR-OUT, and RS-232C jacks They are control expansion jacks for commercial use only. 7 UPDATE ONLY jack Use to update this manual shows their respective positions with the labels used on and off (p. 25). 2 SUBWOOFER OUT jack For connecting to the subwoofer using a wired connection (p. 25...
...(HDCP2.2) IN 2 IN 3 8 IN 1 (HDCP2.2) IN 2 IN 3 IN 4 HDMI OUT (ARC) IN 4 HDMI OUT (ARC) 9 0 NETWORK AC IN a 1 SYSTEM CONNECTOR jack Connect to a Yamaha subwoofer so that the HDMI and NETWORK jacks may be easily located, the illustration of the rear of the unit used in this unit's firmware...23). 6 IR-IN, IR-OUT, and RS-232C jacks They are control expansion jacks for commercial use only. 7 UPDATE ONLY jack Use to update this manual shows their respective positions with the labels used on and off (p. 25). 2 SUBWOOFER OUT jack For connecting to the subwoofer using a wired connection (p. 25...
Owners Manual
Page 16
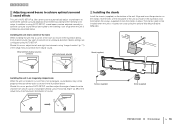
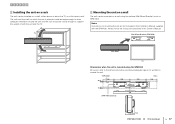
When left and right front channels using the optional Wall Mount Bracket SPM-K30. The stands need not be adjusted manually to achieve surround sound effects best suited to the listening room setup when the unit is installed as shown in the illustration, and then tighten ...
When left and right front channels using the optional Wall Mount Bracket SPM-K30. The stands need not be adjusted manually to achieve surround sound effects best suited to the listening room setup when the unit is installed as shown in the illustration, and then tighten ...
Owners Manual
Page 17
... a shelf, either above or below and leave adequate space for mounting the unit are not included in this Owner's Manual. Always follow the instructions provided in the Installation Manual supplied with the SPM-K30. YSP-5600 (mm) 188 355 26.5 355 182 92 114 24- 7x22 71.5 4- 7 730 SPM-K30 (optional) 112.4 19.4 PREPARATIONS...
... a shelf, either above or below and leave adequate space for mounting the unit are not included in this Owner's Manual. Always follow the instructions provided in the Installation Manual supplied with the SPM-K30. YSP-5600 (mm) 188 355 26.5 355 182 92 114 24- 7x22 71.5 4- 7 730 SPM-K30 (optional) 112.4 19.4 PREPARATIONS...
Owners Manual
Page 25
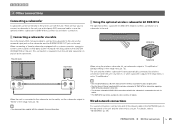
...-W16 The optional wireless subwoofer kit SWK-W16 enables wireless connection of the unit and the other end to a router. When connecting a Yamaha subwoofer equipped with the unit. Wired network connections For a wired connection, connect one end of the network cable to the NETWORK jack on...25 Connecting a subwoofer via wireless connection when the unit is turned on the wireless subwoofer kit does not glow green. • See the Owner's Manual supplied with the subwoofer for use with a system connector, connect a system control cable (or third-party 3.5mm monaural mini plug cable) to "...
...-W16 The optional wireless subwoofer kit SWK-W16 enables wireless connection of the unit and the other end to a router. When connecting a Yamaha subwoofer equipped with the unit. Wired network connections For a wired connection, connect one end of the network cable to the NETWORK jack on...25 Connecting a subwoofer via wireless connection when the unit is turned on the wireless subwoofer kit does not glow green. • See the Owner's Manual supplied with the subwoofer for use with a system connector, connect a system control cable (or third-party 3.5mm monaural mini plug cable) to "...
Owners Manual
Page 32
... beam angle so that the parameters best match your normal listening position, and press the SETUP ( ) key. Settings Select this unit • If you have manually set the beam angle with "Beam optimize only" before starting "Sound optimize only". PREPARATIONS ➤ f Initial settings En 32 The "AUTO SETUP COMPLETE" screen closes...
... beam angle so that the parameters best match your normal listening position, and press the SETUP ( ) key. Settings Select this unit • If you have manually set the beam angle with "Beam optimize only" before starting "Sound optimize only". PREPARATIONS ➤ f Initial settings En 32 The "AUTO SETUP COMPLETE" screen closes...
Owners Manual
Page 50
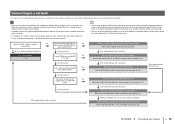
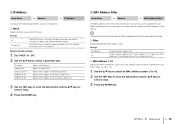
... network (using the WPS PIN code) Register the unit's PIN code with a WPS button? Wireless network (configuring a wireless connection manually) Enter required information, such as the IP address) will be assigned automatically. Wireless network (using Internet services. If the connection was...and/or network device settings. • A network connection cannot be established if the MAC address filter on your router's subnet mask manually, apply the same subnet used by selecting "Information" (p. 78) from a list of available access points (p. 53). Check your router...
... network (using the WPS PIN code) Register the unit's PIN code with a WPS button? Wireless network (configuring a wireless connection manually) Enter required information, such as the IP address) will be assigned automatically. Wireless network (using Internet services. If the connection was...and/or network device settings. • A network connection cannot be established if the MAC address filter on your router's subnet mask manually, apply the same subnet used by selecting "Information" (p. 78) from a list of available access points (p. 53). Check your router...
Owners Manual
Page 52
... devices (such as an iPhone). Wireless(Wi-Fi) Select a setup method. ·WPS Button ·Share Wi-Fi Settings (iOS) ·Access Point Scan ·Manual Setting ·PIN Code [ENTER]:OK [RETURN]:Cancel 8 When the following screen is begun, the following settings will be initialized. ·Network settings ·NET...
... devices (such as an iPhone). Wireless(Wi-Fi) Select a setup method. ·WPS Button ·Share Wi-Fi Settings (iOS) ·Access Point Scan ·Manual Setting ·PIN Code [ENTER]:OK [RETURN]:Cancel 8 When the following screen is begun, the following settings will be initialized. ·Network settings ·NET...
Owners Manual
Page 53
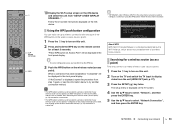
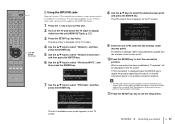
...to a network En 53 Wireless(Wi-Fi) Select a setup method. ·WPS Button ·Share Wi-Fi Settings (iOS) ·Access Point Scan ·Manual Setting ·PIN Code [ENTER]:OK [RETURN]:Cancel About WPS WPS (Wi-Fi Protected Setup) is enabled. p. 27). 3 Press the SETUP ( ) key ... S/T keys to select "Network Connection", and then press the ENTER key. Using the WPS push button configuration You can easily set up the wireless connection manually" (p. 55) to establish a connection. • "WPS Button" under "Wireless (Wi-Fi)" in the front panel display. Follow the on-screen instructions...
...to a network En 53 Wireless(Wi-Fi) Select a setup method. ·WPS Button ·Share Wi-Fi Settings (iOS) ·Access Point Scan ·Manual Setting ·PIN Code [ENTER]:OK [RETURN]:Cancel About WPS WPS (Wi-Fi Protected Setup) is enabled. p. 27). 3 Press the SETUP ( ) key ... S/T keys to select "Network Connection", and then press the ENTER key. Using the WPS push button configuration You can easily set up the wireless connection manually" (p. 55) to establish a connection. • "WPS Button" under "Wireless (Wi-Fi)" in the front panel display. Follow the on-screen instructions...
Owners Manual
Page 54
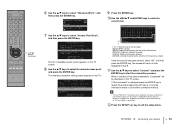
Wireless(Wi-Fi) Select a setup method. ·WPS Button ·Share Wi-Fi Settings (iOS) ·Access Point Scan ·Manual Setting ·PIN Code [ENTER]:OK [RETURN]:Cancel The list of the selected one. [DELETE]: Delete the selected character. [CLEAR]: Delete all characters entered. [CANCEL]: ... to select "Connect" and press the ENTER key to select the desired access point and press the ENTER key. See "Setting up the wireless connection manually" (p. 55) to establish a connection. 12 Press the SETUP ( ) key to select "Wireless (Wi-Fi)", and then press the ENTER key...
Wireless(Wi-Fi) Select a setup method. ·WPS Button ·Share Wi-Fi Settings (iOS) ·Access Point Scan ·Manual Setting ·PIN Code [ENTER]:OK [RETURN]:Cancel The list of the selected one. [DELETE]: Delete the selected character. [CLEAR]: Delete all characters entered. [CANCEL]: ... to select "Connect" and press the ENTER key to select the desired access point and press the ENTER key. See "Setting up the wireless connection manually" (p. 55) to establish a connection. 12 Press the SETUP ( ) key to select "Wireless (Wi-Fi)", and then press the ENTER key...
Owners Manual
Page 55
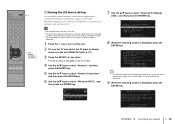
... Turn on the TV and switch the TV input to select the encryption method. z / // ENTER SETUP ( ) Setting up the wireless connection manually Setup the SSID (network name), encryption method and security key for your permission. The screen will return to that third parties may access the unit... network En 55 Wireless(Wi-Fi) Select a setup method. ·WPS Button ·Share Wi-Fi Settings (iOS) ·Access Point Scan ·Manual Setting ·PIN Code [ENTER]:OK [RETURN]:Cancel 8 Use the S/T keys to enter the SSID of the selected one. [DELETE]: Delete the selected character...
... Turn on the TV and switch the TV input to select the encryption method. z / // ENTER SETUP ( ) Setting up the wireless connection manually Setup the SSID (network name), encryption method and security key for your permission. The screen will return to that third parties may access the unit... network En 55 Wireless(Wi-Fi) Select a setup method. ·WPS Button ·Share Wi-Fi Settings (iOS) ·Access Point Scan ·Manual Setting ·PIN Code [ENTER]:OK [RETURN]:Cancel 8 Use the S/T keys to enter the SSID of the selected one. [DELETE]: Delete the selected character...
Owners Manual
Page 57
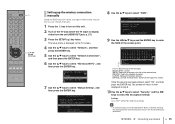
... and press the ENTER key. Wireless(Wi-Fi) Select a setup method. ·WPS Button ·Share Wi-Fi Settings (iOS) ·Access Point Scan ·Manual Setting ·PIN Code [ENTER]:OK [RETURN]:Cancel The list of the unit appears on the TV screen. 8 Use the S/T keys to a network En 57...
... and press the ENTER key. Wireless(Wi-Fi) Select a setup method. ·WPS Button ·Share Wi-Fi Settings (iOS) ·Access Point Scan ·Manual Setting ·PIN Code [ENTER]:OK [RETURN]:Cancel The list of the unit appears on the TV screen. 8 Use the S/T keys to a network En 57...
Owners Manual
Page 67
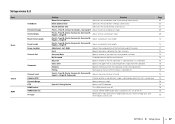
... R Adjust horizontal sound beam angle. Front L, Front R, Center, Surround L, Surround R, Height L, Height R Adjust sound beam focal length. Distance Specify the distance from the subwoofer. Pairing Manually pair the unit with the wireless subwoofer kit. Select the TV input jack from TV (digital optical) jack, AUX1 (analog) jack, and AUX2 (digital coaxial...
... R Adjust horizontal sound beam angle. Front L, Front R, Center, Surround L, Surround R, Height L, Height R Adjust sound beam focal length. Distance Specify the distance from the subwoofer. Pairing Manually pair the unit with the wireless subwoofer kit. Select the TV input jack from TV (digital optical) jack, AUX1 (analog) jack, and AUX2 (digital coaxial...
Owners Manual
Page 69
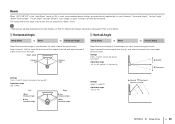
... test tones. Settings Height L, Height R Adjustable range +30° to R90° Left W key: Increase angle. Beam When "AUTO SETUP" in "Beam" menu. • When manually adjusting sound beams for the front channels, set to "Stereo". Horizontal Angle Vertical Angle Setup Menu ➜ Beam ➜ Horizontal Angle Setup Menu ➜ Beam...
... test tones. Settings Height L, Height R Adjustable range +30° to R90° Left W key: Increase angle. Beam When "AUTO SETUP" in "Beam" menu. • When manually adjusting sound beams for the front channels, set to "Stereo". Horizontal Angle Vertical Angle Setup Menu ➜ Beam ➜ Horizontal Angle Setup Menu ➜ Beam...
Owners Manual
Page 72
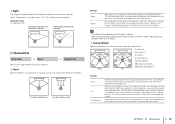
... output from the sides of the listening position as live music videos. • This setting is not available when "My Surround" is selected. • When manually adjusting sound beams for playback of movies and the like. This allows sounds to "Stereo". ❑ Surround Back Specify whether or not surround back channels...
... output from the sides of the listening position as live music videos. • This setting is not available when "My Surround" is selected. • When manually adjusting sound beams for playback of movies and the like. This allows sounds to "Stereo". ❑ Surround Back Specify whether or not surround back channels...
Owners Manual
Page 73
... of audio frequencies output from the subwoofer (the lower limit of audio frequencies output from the subwoofer to 15.0 m (50.0 ft) (default: 2.5 m (8.5 ft)) ❑ Pairing Manually pair the unit with a good sense of surround sound even in an environment where surround sound playback using height channels is not possible. Enjoy playing...
... of audio frequencies output from the subwoofer (the lower limit of audio frequencies output from the subwoofer to 15.0 m (50.0 ft) (default: 2.5 m (8.5 ft)) ❑ Pairing Manually pair the unit with a good sense of surround sound even in an environment where surround sound playback using height channels is not possible. Enjoy playing...
Owners Manual
Page 80
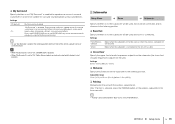
...Use the W/X keys to move the edit position and the S/T keys to use a DHCP server. Settings Off (default) On Disable the MAC address filter. Manual network settings 1 Set "DHCP" to "Off". 2 Use the S/T keys to automatically obtain the unit's network parameters (such as IP address). ❑ DHCP...devices that can be used . Specify a subnet mask. Specify the IP address of the default gateway. Configure the network parameters manually. IP Address Setup Menu ➜ Network ➜ IP Address Configure the network parameters (such as IP address). For details, see...
...Use the W/X keys to move the edit position and the S/T keys to use a DHCP server. Settings Off (default) On Disable the MAC address filter. Manual network settings 1 Set "DHCP" to "Off". 2 Use the S/T keys to automatically obtain the unit's network parameters (such as IP address). ❑ DHCP...devices that can be used . Specify a subnet mask. Specify the IP address of the default gateway. Configure the network parameters manually. IP Address Setup Menu ➜ Network ➜ IP Address Configure the network parameters (such as IP address). For details, see...
Owners Manual
Page 93
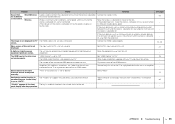
...wireless subwoofer kit. screen. Connect the HDMI cable properly. 22, 23 Menu screen of this unit to "Beam". The input switch of sound output manually from "Audio Delay" in the option menu. 84 "Disable" appears in the current status of "Channel Out" is not displayed. Set "HDMI ... and the wireless subwoofer - wireless subwoofer kit are not connected firmly. 25 is not securely connected. The unit may be adjusted 72 manually. The image is not displayed on the wireless subwoofer kit flashes green, or glows or its indicator steadily glows green. The number of...
...wireless subwoofer kit. screen. Connect the HDMI cable properly. 22, 23 Menu screen of this unit to "Beam". The input switch of sound output manually from "Audio Delay" in the option menu. 84 "Disable" appears in the current status of "Channel Out" is not displayed. Set "HDMI ... and the wireless subwoofer - wireless subwoofer kit are not connected firmly. 25 is not securely connected. The unit may be adjusted 72 manually. The image is not displayed on the wireless subwoofer kit flashes green, or glows or its indicator steadily glows green. The number of...


