Owner's Manual
Page 5
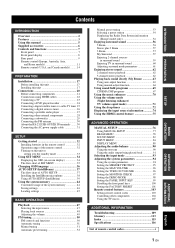
...or a cable TV tuner 25 Connecting a digital airwave tuner 26 Connecting a portable audio player 27 Connecting other components 104 Using the TV macro 107 ADDITIONAL INFORMATION Troubleshooting 109 Glossary 113 Index 115 Specifications 116 List of remote control codes i ADVANCED OPERATION ADDITIONAL INFORMATION ...51 Automatic preset tuning 52 Manual preset tuning 53 Selecting a preset station 54 Displaying the Radio Data System information (Europe model only 54 Enjoying surround sound 56 5 Beam 56 Stereo plus 3 Beam 57 3 Beam 57 My Surround 57 Enjoying 2-channel sources ...
...or a cable TV tuner 25 Connecting a digital airwave tuner 26 Connecting a portable audio player 27 Connecting other components 104 Using the TV macro 107 ADDITIONAL INFORMATION Troubleshooting 109 Glossary 113 Index 115 Specifications 116 List of remote control codes i ADVANCED OPERATION ADDITIONAL INFORMATION ...51 Automatic preset tuning 52 Manual preset tuning 53 Selecting a preset station 54 Displaying the Radio Data System information (Europe model only 54 Enjoying surround sound 56 5 Beam 56 Stereo plus 3 Beam 57 3 Beam 57 My Surround 57 Enjoying 2-channel sources ...
Owner's Manual
Page 7
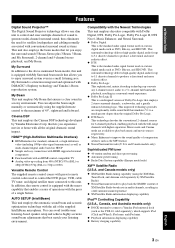
... Data System capability (Europe model only) XM™ Satellite Radio (U.S.A. INTRODUCTION Features Features Digital Sound Projector™ The Digital Sound Projector technology allows one slim unit to control and steer multiple channels of sound to the maximum of 45°, rightward and leftward. and Canada models only) ◆ XM Satellite Radio tuning capability (using the supplied remote control to...
... Data System capability (Europe model only) XM™ Satellite Radio (U.S.A. INTRODUCTION Features Features Digital Sound Projector™ The Digital Sound Projector technology allows one slim unit to control and steer multiple channels of sound to the maximum of 45°, rightward and leftward. and Canada models only) ◆ XM Satellite Radio tuning capability (using the supplied remote control to...

Owner's Manual
Page 9
See "Enjoying surround sound" on page 37. 5 Play back a source. If you want to make additional settings ...components, refer to production. See "Installation" on page 17. 2 Connect this unit to fine-tune settings and/or set remote control codes. Designs and specifications are subject to connect and operate this unit. See "AUTO SETUP (IntelliBeam)" on page 56.... See "Connections" on page 20. 3 Prepare the remote control and turn on page 32. 4 Run AUTO SETUP. See "Getting started" on the power of this unit. See "...
See "Enjoying surround sound" on page 37. 5 Play back a source. If you want to make additional settings ...components, refer to production. See "Installation" on page 17. 2 Connect this unit to fine-tune settings and/or set remote control codes. Designs and specifications are subject to connect and operate this unit. See "AUTO SETUP (IntelliBeam)" on page 56.... See "Connections" on page 20. 3 Prepare the remote control and turn on page 32. 4 Run AUTO SETUP. See "Getting started" on the power of this unit. See "...
Owner's Manual
Page 10
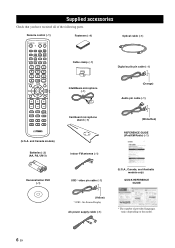
DECODE 0 +10 ENHANCER ENTRY MENU CAT/ A-E DISPLAY ENTER TV/AV YSP RETURN VOLUME CH TV VOL Fasteners (×4) Cable clamp (×1) IntelliBeam microphone (×1) Optical cable (×1) Digital audio pin cable (×1) (Orange) Audio pin cable (×1) MUTE TV... INPUT TV MUTE CODE SET CH LEVEL TEST Cardboard microphone stand (×1) (White/Red) (U.S.A. Supplied accessories Supplied accessories Check that you have received all of provided languages varies depending on the model. 6 En Remote...
DECODE 0 +10 ENHANCER ENTRY MENU CAT/ A-E DISPLAY ENTER TV/AV YSP RETURN VOLUME CH TV VOL Fasteners (×4) Cable clamp (×1) IntelliBeam microphone (×1) Optical cable (×1) Digital audio pin cable (×1) (Orange) Audio pin cable (×1) MUTE TV... INPUT TV MUTE CODE SET CH LEVEL TEST Cardboard microphone stand (×1) (White/Red) (U.S.A. Supplied accessories Supplied accessories Check that you have received all of provided languages varies depending on the model. 6 En Remote...
Owner's Manual
Page 11
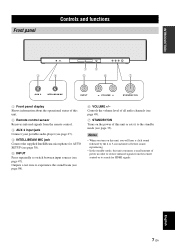
... by the 4 to 5-second interval before sound reproducing. • In the standby mode, this unit consumes a small amount of power in order to receive infrared signals from the remote control. 3 AUX 3 input jack Connect your portable audio player (see page 27). 4 INTELLIBEAM MIC jack Connect the supplied IntelliBeam microphone for HDMI signals...
... by the 4 to 5-second interval before sound reproducing. • In the standby mode, this unit consumes a small amount of power in order to receive infrared signals from the remote control. 3 AUX 3 input jack Connect your portable audio player (see page 27). 4 INTELLIBEAM MIC jack Connect the supplied IntelliBeam microphone for HDMI signals...

Owner's Manual
Page 15
...components" on the selected input signal. DECODE 0 +10 ENHANCER ENTRY MENU A-E DISPLAY ENTER TV/AV YSP RETURN VOLUME CH TV VOL MUTE TV INPUT TV MUTE CH LEVEL TEST CODE SET H I ** J* ...W* 1 Infrared window Outputs infrared control signals. B MUTE Mutes the sound. Aim this window at the component you set the appropriate remote control codes. Press again to restore the audio output to the previous...remote control used to control this unit (see page 49). See "Controlling other components using the remote control once you want to operate. 2 STANDBY/ON Sets this system...
...components" on the selected input signal. DECODE 0 +10 ENHANCER ENTRY MENU A-E DISPLAY ENTER TV/AV YSP RETURN VOLUME CH TV VOL MUTE TV INPUT TV MUTE CH LEVEL TEST CODE SET H I ** J* ...W* 1 Infrared window Outputs infrared control signals. B MUTE Mutes the sound. Aim this window at the component you set the appropriate remote control codes. Press again to restore the audio output to the previous...remote control used to control this unit (see page 49). See "Controlling other components using the remote control once you want to operate. 2 STANDBY/ON Sets this system...
Owner's Manual
Page 16
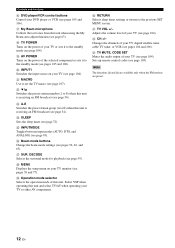
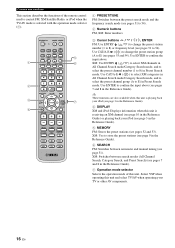
...from this unit is receiving an FM broadcast (see page 63). H TV POWER Turns on the power of your TV, digital satellite tuner, cable TV tuner, or VCR (see pages 104 and 106). O INPUTMODE Toggles between input modes (AUTO, DTS..., and ANALOG) (see page 107). Select YSP when operating this unit. V CH +/- R MENU Displays the setup menu on your TV monitor (see pages 39 and 77). ... SET MENU screen. N SLEEP Sets the sleep timer (see page 103). Sets up remote control codes (see page 72).
...from this unit is receiving an FM broadcast (see page 63). H TV POWER Turns on the power of your TV, digital satellite tuner, cable TV tuner, or VCR (see pages 104 and 106). O INPUTMODE Toggles between input modes (AUTO, DTS..., and ANALOG) (see page 107). Select YSP when operating this unit. V CH +/- R MENU Displays the setup menu on your TV monitor (see pages 39 and 77). ... SET MENU screen. N SLEEP Sets the sleep timer (see page 103). Sets up remote control codes (see page 72).
Owner's Manual
Page 17
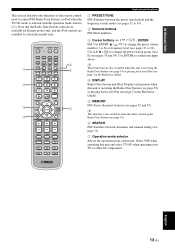
... the Reference Guide). 5 MEMORY FM: Stores the preset stations (see pages 51 to 54). DECODE 0 +10 ENHANCER ENTRY MENU A-E DISPLAY ENTER TV/AV YSP RETURN VOLUME CH TV VOL 5 6 7 MUTE TV INPUT TV MUTE CH LEVEL TEST CODE SET Controls and functions 1 PRESET/TUNE FM: Switches between automatic ... group (A to E) (see page 51). 7 Operation mode selector Selects the operation mode of the remote control used to control FM, Radio Data System, or iPod when the TV/AV mode is receiving the Radio Data System (see page 54) or playing back your iPod (see page 2 in the Reference Guide). 4...
... the Reference Guide). 5 MEMORY FM: Stores the preset stations (see pages 51 to 54). DECODE 0 +10 ENHANCER ENTRY MENU A-E DISPLAY ENTER TV/AV YSP RETURN VOLUME CH TV VOL 5 6 7 MUTE TV INPUT TV MUTE CH LEVEL TEST CODE SET Controls and functions 1 PRESET/TUNE FM: Switches between automatic ... group (A to E) (see page 51). 7 Operation mode selector Selects the operation mode of the remote control used to control FM, Radio Data System, or iPod when the TV/AV mode is receiving the Radio Data System (see page 54) or playing back your iPod (see page 2 in the Reference Guide). 4...
Owner's Manual
Page 18
... ENTRY MENU CAT/ A-E DISPLAY ENTER TV/AV YSP RETURN VOLUME CH TV VOL MUTE TV INPUT TV MUTE CODE SET CH LEVEL TEST G H I * * J* K L M N O P Q R S t U* V W * * 1 Infrared window Outputs infrared control signals. B MUTE Mutes the sound. D CH LEVEL Adjusts the volume level of ...sound field programs (see page 65). 8 ENHANCER Turns on your TV (see page 49). See "Controlling other components using the remote control once you want to operate. 2 STANDBY/ON Sets this unit (see page 104). A VOLUME +/- and Canada models) This section describes the functions of this system...
... ENTRY MENU CAT/ A-E DISPLAY ENTER TV/AV YSP RETURN VOLUME CH TV VOL MUTE TV INPUT TV MUTE CODE SET CH LEVEL TEST G H I * * J* K L M N O P Q R S t U* V W * * 1 Infrared window Outputs infrared control signals. B MUTE Mutes the sound. D CH LEVEL Adjusts the volume level of ...sound field programs (see page 65). 8 ENHANCER Turns on your TV (see page 49). See "Controlling other components using the remote control once you want to operate. 2 STANDBY/ON Sets this unit (see page 104). A VOLUME +/- and Canada models) This section describes the functions of this system...
Owner's Manual
Page 19
... component or sets it to set the TV macro (see page 93). English 15 En Select YSP when operating this unit and select TV/AV when operating your TV (see page 54). P ...Beam mode buttons Change the beam mode settings (see page 104). Adjusts the volume level of your TV, digital satellite tuner, cable TV tuner, or VCR (see page 104). Changes the channels of your TV (see pages... of this unit when using the My Beam auto-adjust function (see pages 105 and 106). Sets up remote control codes (see pages 105 and 106). U TV VOL +/- V CH +/- INTRODUCTION F DVD player/...
... component or sets it to set the TV macro (see page 93). English 15 En Select YSP when operating this unit and select TV/AV when operating your TV (see page 54). P ...Beam mode buttons Change the beam mode settings (see page 104). Adjusts the volume level of your TV, digital satellite tuner, cable TV tuner, or VCR (see page 104). Changes the channels of your TV (see pages... of this unit when using the My Beam auto-adjust function (see pages 105 and 106). Sets up remote control codes (see pages 105 and 106). U TV VOL +/- V CH +/- INTRODUCTION F DVD player/...
Owner's Manual
Page 20
...select TV/AV when operating your iPod (see pages 53 and 54). Controls and functions This section describes the functions of this unit. Select YSP when operating this unit is selected with the operation mode selector (7). 1 2 3 4 STANDBY/ON POWER POWER AV TV DOCK DVD AUX1 AUX2... Search, Category Search, and Preset Search) (see pages 7 and 8 in the Reference Guide). 7 Operation mode selector Selects the operation mode of the remote control used to E) in the Reference Guide). 5 MEMORY FM: Stores the preset stations (see pages 51 to 8) in All Channel Search mode/Category ...
...select TV/AV when operating your iPod (see pages 53 and 54). Controls and functions This section describes the functions of this unit. Select YSP when operating this unit is selected with the operation mode selector (7). 1 2 3 4 STANDBY/ON POWER POWER AV TV DOCK DVD AUX1 AUX2... Search, Category Search, and Preset Search) (see pages 7 and 8 in the Reference Guide). 7 Operation mode selector Selects the operation mode of the remote control used to E) in the Reference Guide). 5 MEMORY FM: Stores the preset stations (see pages 51 to 8) in All Channel Search mode/Category ...
Owner's Manual
Page 36
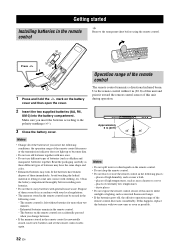
... as these different types of this unit to the polarity markings (+/-). 3 Close the battery cover. dusty places • Do not expose the remote control sensor of batteries may leak. Notes • Do not spill water or other liquids on the battery cover and then open the cover...a bath - GETTING STARTED Getting started Installing batteries in the following places: - Avoid touching the leaked material or letting it toward the remote control sensor of the batteries if you insert the batteries according to direct sunlight or lighting such as possible. 32 En places of the...
... as these different types of this unit to the polarity markings (+/-). 3 Close the battery cover. dusty places • Do not expose the remote control sensor of batteries may leak. Notes • Do not spill water or other liquids on the battery cover and then open the cover...a bath - GETTING STARTED Getting started Installing batteries in the following places: - Avoid touching the leaked material or letting it toward the remote control sensor of the batteries if you insert the batteries according to direct sunlight or lighting such as possible. 32 En places of the...

Owner's Manual
Page 37
... input source and beam mode are not operational until the power of this unit to set this unit. STANDBY/ON or STANDBY/ON Front panel Remote control VOLUME 30 Current volume level DVD MY SUR Current input source Current beam mode 33 En English and Canada models) 1 Press STANDBY/ON to... turn on the power of this unit is operational, and the other control buttons on the front panel or on the remote control are displayed. SETUP INPUT VOLUME + STANDBY/ON STANDBY/ON POWER POWER AV TV DOCK DVD AUX1 AUX2 AUX3 TV INPUT1 MACRO STB TV PRESET...
... input source and beam mode are not operational until the power of this unit to set this unit. STANDBY/ON or STANDBY/ON Front panel Remote control VOLUME 30 Current volume level DVD MY SUR Current input source Current beam mode 33 En English and Canada models) 1 Press STANDBY/ON to... turn on the power of this unit is operational, and the other control buttons on the front panel or on the remote control are displayed. SETUP INPUT VOLUME + STANDBY/ON STANDBY/ON POWER POWER AV TV DOCK DVD AUX1 AUX2 AUX3 TV INPUT1 MACRO STB TV PRESET...

Owner's Manual
Page 38
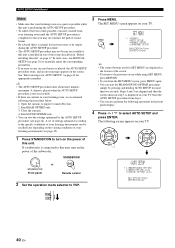
... MENU. The SET MENU screen appears on your TV. 4 Set the operation mode selector to YSP. STANDBY/ON or STANDBY/ON Front panel Remote control 3 Turn on the power of your TV. MENU p p SET MENU . ;MEMORY ;AUTO SETUP ;MANUAL SETUP ;LANGUAGE SETUP [ ]/[ ]:Up/Down [ENTER]:Enter 34... En Once this is complete, you can enjoy real surround sound while watching TV in the comfort of your own home. 1 Check that ...
... MENU. The SET MENU screen appears on your TV. 4 Set the operation mode selector to YSP. STANDBY/ON or STANDBY/ON Front panel Remote control 3 Turn on the power of your TV. MENU p p SET MENU . ;MEMORY ;AUTO SETUP ;MANUAL SETUP ;LANGUAGE SETUP [ ]/[ ]:Up/Down [ENTER]:Enter 34... En Once this is complete, you can enjoy real surround sound while watching TV in the comfort of your own home. 1 Check that ...

Owner's Manual
Page 42
.... - AUX 3 INTELLIBEAM MIC INTELLIBEAM MIC IntelliBeam microphone More than 1 m (3.3 ft) upper or lower from the center height of sound beams. However, any objects that there are no large obstacles between the IntelliBeam microphone and the walls in your listening room as these ...• Do not connect the IntelliBeam microphone to an extension cable as your actual listening environment. STANDBY/ON or STANDBY/ON Front panel Remote control 2 Connect the supplied IntelliBeam microphone to place the IntelliBeam microphone on a flat level surface more than 1.8 m (6.0 ft) Cardboard...
.... - AUX 3 INTELLIBEAM MIC INTELLIBEAM MIC IntelliBeam microphone More than 1 m (3.3 ft) upper or lower from the center height of sound beams. However, any objects that there are no large obstacles between the IntelliBeam microphone and the walls in your listening room as these ...• Do not connect the IntelliBeam microphone to an extension cable as your actual listening environment. STANDBY/ON or STANDBY/ON Front panel Remote control 2 Connect the supplied IntelliBeam microphone to place the IntelliBeam microphone on a flat level surface more than 1.8 m (6.0 ft) Cardboard...
Owner's Manual
Page 44
...conditions of your listening environment can also perform the following screen appears on your TV. STANDBY/ON or STANDBY/ON Front panel Remote control 2 Set the operation mode selector to manually adjust the corresponding parameters. • If an error occurs, an error buzzer...procedure stops, and an error message appears on the screen. ENTER ENTER ;AUTO SETUP . 1)BEAM+SOUND OPTIMZ 2)BEAM OPTIMZ only 3)SOUND OPTIMZ only [ ]/[ ]:Up/Down [ENTER]:Enter p p TV/AV YSP 40 En y • The AUTO SETUP procedure takes about three minutes maximum. The following operations ...
...conditions of your listening environment can also perform the following screen appears on your TV. STANDBY/ON or STANDBY/ON Front panel Remote control 2 Set the operation mode selector to manually adjust the corresponding parameters. • If an error occurs, an error buzzer...procedure stops, and an error message appears on the screen. ENTER ENTER ;AUTO SETUP . 1)BEAM+SOUND OPTIMZ 2)BEAM OPTIMZ only 3)SOUND OPTIMZ only [ ]/[ ]:Up/Down [ENTER]:Enter p p TV/AV YSP 40 En y • The AUTO SETUP procedure takes about three minutes maximum. The following operations ...
Owner's Manual
Page 51
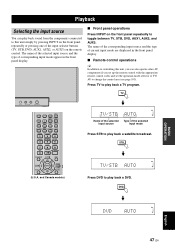
... 7 MOVIE 8 SPORTS 9 OFF SUR. DVD DVD AUTO BASIC OPERATION English 47 En DECODE 0 +10 ENHANCER ENTRY MENU CAT/ A-E DISPLAY ENTER TV/AV YSP RETURN (U.S.A. STB TV/STB AUTO Press DVD to play back a TV program. and Canada models) TV/STB AUTO Name of the selected Type of current... broadcast. PLAYBACK Playback Selecting the input source You can play back sound from the components connected to this unit, you can also operate other AV components if you set up the remote control with the appropriate remote control codes and set the operation mode selector to TV/ AV ...
... 7 MOVIE 8 SPORTS 9 OFF SUR. DVD DVD AUTO BASIC OPERATION English 47 En DECODE 0 +10 ENHANCER ENTRY MENU CAT/ A-E DISPLAY ENTER TV/AV YSP RETURN (U.S.A. STB TV/STB AUTO Press DVD to play back a TV program. and Canada models) TV/STB AUTO Name of the selected Type of current... broadcast. PLAYBACK Playback Selecting the input source You can play back sound from the components connected to this unit, you can also operate other AV components if you set up the remote control with the appropriate remote control codes and set the operation mode selector to TV/ AV ...
Owner's Manual
Page 52
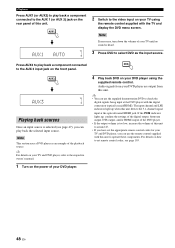
... AUX1 AUTO 2 Switch to the video input on your TV using the supplied remote control. Audio signals from this unit to around 45. • If you can use the supplied demonstration DVD to check the digital signals being input at the optical/coaxial/HDMI jack. AUX3 AUX3 Playing back sources...these components. Note This section uses a DVD player as the input source. y For details on how to set the appropriate remote control codes for your TV until no sound is too low, increase the volume of the playback source. The input channel and LFE indicators light up , confirm the settings...
... AUX1 AUTO 2 Switch to the video input on your TV using the supplied remote control. Audio signals from this unit to around 45. • If you can use the supplied demonstration DVD to check the digital signals being input at the optical/coaxial/HDMI jack. AUX3 AUX3 Playing back sources...these components. Note This section uses a DVD player as the input source. y For details on how to set the appropriate remote control codes for your TV until no sound is too low, increase the volume of the playback source. The input channel and LFE indicators light up , confirm the settings...

Owner's Manual
Page 53
... range: MIN (minimum), 01 to 99, MAX (maximum) VOLUME or VOLUME + Front panel Remote control AUDIO MUTE ON Flashes DVD 5BEAM 2 Press MUTE again (or press VOLUME +/-) to mute the sound. BASIC OPERATION English 49 En The numeric value of all input sources (including multi-channel as well...and hold VOLUME +/-. y You can continuously increase or decrease the volume level if you press VOLUME +/-. • You can select whether the sound output is to increase or decrease the volume level. "AUDIO MUTE OFF" appears temporarily in the front panel display (or the numeric value of...
... range: MIN (minimum), 01 to 99, MAX (maximum) VOLUME or VOLUME + Front panel Remote control AUDIO MUTE ON Flashes DVD 5BEAM 2 Press MUTE again (or press VOLUME +/-) to mute the sound. BASIC OPERATION English 49 En The numeric value of all input sources (including multi-channel as well...and hold VOLUME +/-. y You can continuously increase or decrease the volume level if you press VOLUME +/-. • You can select whether the sound output is to increase or decrease the volume level. "AUDIO MUTE OFF" appears temporarily in the front panel display (or the numeric value of...

Owner's Manual
Page 54
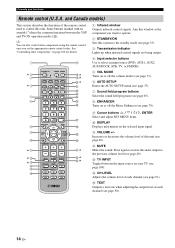
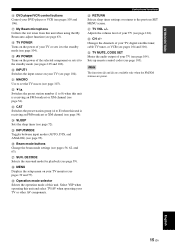
... the operation mode of this unit. 50 En If the radio signal is turned off) (see page 54). FM controls and functions ■ Remote control functions Set the operation mode selector (8) to start automatic preset tuning (see page 52). 7 SEARCH Switches between automatic tuning (the AUTO indicator...) and manual tuning (the AUTO indicator is weak, tune into the last selected FM station. DECODE 0 +10 ENHANCER ENTRY MENU A-E DISPLAY ENTER TV/AV YSP RETURN VOLUME CH TV VOL 6 7 8 MUTE TV INPUT TV MUTE CODE SET (Europe, Australia, Asia, and Korea models) 1 FM Selects FM as...
... the operation mode of this unit. 50 En If the radio signal is turned off) (see page 54). FM controls and functions ■ Remote control functions Set the operation mode selector (8) to start automatic preset tuning (see page 52). 7 SEARCH Switches between automatic tuning (the AUTO indicator...) and manual tuning (the AUTO indicator is weak, tune into the last selected FM station. DECODE 0 +10 ENHANCER ENTRY MENU A-E DISPLAY ENTER TV/AV YSP RETURN VOLUME CH TV VOL 6 7 8 MUTE TV INPUT TV MUTE CODE SET (Europe, Australia, Asia, and Korea models) 1 FM Selects FM as...

