

Owners Manual
Page 5
...FM/AM 64 XM Satellite Radio (U.S.A. model only 65 SIRIUS Satellite Radio (U.S.A. INTRODUCTION PREPARATION BASIC OPERATION ADVANCED OPERATION Contents INTRODUCTION Features 2 About this manual 3 Supplied accessories 3 Part names and functions 4 Front panel 4 Rear panel 5 Front panel display 6 Remote control 7 Quick start guide 8 ... other components 15 Connecting an external amplifier 16 Using REMOTE IN/OUT jacks 17 Connecting a Yamaha iPod universal dock or Bluetooth™ wireless audio receiver 17 Using the VIDEO AUX jacks on the front panel .... 17 Connecting the FM and ...
...FM/AM 64 XM Satellite Radio (U.S.A. model only 65 SIRIUS Satellite Radio (U.S.A. INTRODUCTION PREPARATION BASIC OPERATION ADVANCED OPERATION Contents INTRODUCTION Features 2 About this manual 3 Supplied accessories 3 Part names and functions 4 Front panel 4 Rear panel 5 Front panel display 6 Remote control 7 Quick start guide 8 ... other components 15 Connecting an external amplifier 16 Using REMOTE IN/OUT jacks 17 Connecting a Yamaha iPod universal dock or Bluetooth™ wireless audio receiver 17 Using the VIDEO AUX jacks on the front panel .... 17 Connecting the FM and ...
Owners Manual
Page 7
... part as a result of HDMI Licensing LLC. "SILENT CINEMA" is used by Yamaha in Alaska and Hawaii. "SILENT CINEMA" is a trademark of Yamaha Corporation. All Rights Reserved. In case the key names differ between the manual and product, the product has priority. • "AMAIN ZONE ON/OFF" or... APPENDIX English 3 En SIRIUS, XM and all of DTS, Inc. © 1996-2007 DTS, Inc. Supplied accessories Check that you received all related marks and logos are subject to production. Design and specifications are trademarks of the parts. • ☞ indicates the page...
... part as a result of HDMI Licensing LLC. "SILENT CINEMA" is used by Yamaha in Alaska and Hawaii. "SILENT CINEMA" is a trademark of Yamaha Corporation. All Rights Reserved. In case the key names differ between the manual and product, the product has priority. • "AMAIN ZONE ON/OFF" or... APPENDIX English 3 En SIRIUS, XM and all of DTS, Inc. © 1996-2007 DTS, Inc. Supplied accessories Check that you received all related marks and logos are subject to production. Design and specifications are trademarks of the parts. • ☞ indicates the page...
Owners Manual
Page 16
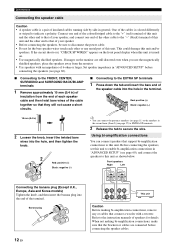
... bare speaker wires touch each speaker cable and then twist bare wires of the cable together so that support bi-amplification connections to the instruction manuals of the terminal.
... bare speaker wires touch each speaker cable and then twist bare wires of the cable together so that support bi-amplification connections to the instruction manuals of the terminal.
Owners Manual
Page 23
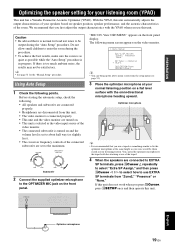
...; See page 51 for your ears would be when seated in progress. INTRODUCTION PREPARATION BASIC OPERATION Optimizing the speaker setting for the "Manual Setup" procedure. Using Auto Setup 1 Check the following menu screen appears on speaker position, speaker performance, and the acoustic characteristics of...setup menu (see page 51). 3 Place the optimizer microphone at the same height as your listening room (YPAO) This unit has a Yamaha Parametric Acoustic Optimizer (YPAO). View OSD MENU" appears on the front panel. [ [ "MIC ON. The following points. With the ...
...; See page 51 for your ears would be when seated in progress. INTRODUCTION PREPARATION BASIC OPERATION Optimizing the speaker setting for the "Manual Setup" procedure. Using Auto Setup 1 Check the following menu screen appears on speaker position, speaker performance, and the acoustic characteristics of...setup menu (see page 51). 3 Place the optimizer microphone at the same height as your listening room (YPAO) This unit has a Yamaha Parametric Acoustic Optimizer (YPAO). View OSD MENU" appears on the front panel. [ [ "MIC ON. The following points. With the ...
Owners Manual
Page 33
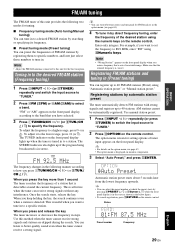
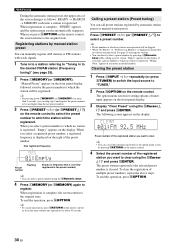
...that the entered frequency is detected. The option menu screen for setting options of tuner input appears on the remote control. You can receive strong signals without any interference. Note • "Wrong Station!" Registering stations by registering them to specific numbers, and later just ... can listen to better quality sound even when the tuner cannot receive a strong signal. STEREO TUNED FM 92.5 MHz The frequency changes in the following two modes for tuning. ■ Frequency tuning mode (Auto tuning/Manual tuning) You can tune in steps. appears on monitor components...
...that the entered frequency is detected. The option menu screen for setting options of tuner input appears on the remote control. You can receive strong signals without any interference. Note • "Wrong Station!" Registering stations by registering them to specific numbers, and later just ... can listen to better quality sound even when the tuner cannot receive a strong signal. STEREO TUNED FM 92.5 MHz The frequency changes in the following two modes for tuning. ■ Frequency tuning mode (Auto tuning/Manual tuning) You can tune in steps. appears on monitor components...
Owners Manual
Page 34
... operation, press nOPTION. y • Preset numbers to which no station is currently registered to the preset number) y • You can manually register AM stations or FM stations with weak signals. 1 Tune in to a station referring to "Tuning in Memory" is displayed it means ...screen returns to the original state. Calling a preset station (Preset tuning) You can directly select a preset number by automatic station preset or manual station preset. See page 29 and register stations. • You can call preset stations registered by pressing a tNumeric keys while calling a preset...
... operation, press nOPTION. y • Preset numbers to which no station is currently registered to the preset number) y • You can manually register AM stations or FM stations with weak signals. 1 Tune in to a station referring to "Tuning in Memory" is displayed it means ...screen returns to the original state. Calling a preset station (Preset tuning) You can directly select a preset number by automatic station preset or manual station preset. See page 29 and register stations. • You can call preset stations registered by pressing a tNumeric keys while calling a preset...
Owners Manual
Page 39
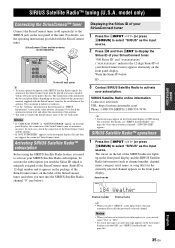
... feature, you can mount it appears on the package of the SiriusConnect tuner, on the label of your subscription yet, you need to the instruction manuals supplied with the SiriusConnect tuner. SIRIUS Satellite Radio™ operations 1 Press the OINPUT l / h (or press hSIRIUS) to the AC wall outlet. For details, see page...
... feature, you can mount it appears on the package of the SiriusConnect tuner, on the label of your subscription yet, you need to the instruction manuals supplied with the SiriusConnect tuner. SIRIUS Satellite Radio™ operations 1 Press the OINPUT l / h (or press hSIRIUS) to the AC wall outlet. For details, see page...
Owners Manual
Page 54
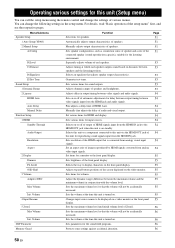
... volume and the 55 minimum volume) in the setup menu. Function Page 51 1 Auto Setup (YPAO) 2 Manual Setup A)Config B)Level Automatically adjusts output characteristics of speakers. 51 Manually adjusts output characteristics of speakers. 51 Sets speaker configurations, such as connection status of speaker and a size of... HDMI signals input from analog 54 video input signals. Fine adjusts a delay time of HDMI Auto. 54 Manually fine adjusts the delay of audio and visual output. 54 Function Setup Set various items for HDMI and display. 54 1 HDMI Sets ...
... volume and the 55 minimum volume) in the setup menu. Function Page 51 1 Auto Setup (YPAO) 2 Manual Setup A)Config B)Level Automatically adjusts output characteristics of speakers. 51 Manually adjusts output characteristics of speakers. 51 Sets speaker configurations, such as connection status of speaker and a size of... HDMI signals input from analog 54 video input signals. Fine adjusts a delay time of HDMI Auto. 54 Manually fine adjusts the delay of audio and visual output. 54 Function Setup Set various items for HDMI and display. 54 1 HDMI Sets ...
Owners Manual
Page 55
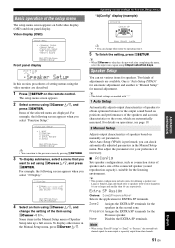
..., the following screen appears when you want to "Zone2" or "Presence," the surround back channel signals for main output is "Manual Setup" for your preference if necessary. ■ A)Config Sets speaker configurations, such as connection status of speaker and a size of...Note • When setting "Extra SP Assign" to set using oCursor l / h. INTRODUCTION PREPARATION BASIC OPERATION ADVANCED OPERATION Basic operation of speakers based on manually set parameters. Video display (OSD) Setup Menu . ;Speaker Setup ;Sound Setup ;Function Setup ;DSP Parameter ;Memory Guard [ ]/[ ]:Up/Down [...
..., the following screen appears when you want to "Zone2" or "Presence," the surround back channel signals for main output is "Manual Setup" for your preference if necessary. ■ A)Config Sets speaker configurations, such as connection status of speaker and a size of...Note • When setting "Extra SP Assign" to set using oCursor l / h. INTRODUCTION PREPARATION BASIC OPERATION ADVANCED OPERATION Basic operation of speakers based on manually set parameters. Video display (OSD) Setup Menu . ;Speaker Setup ;Sound Setup ;Function Setup ;DSP Parameter ;Memory Guard [ ]/[ ]:Up/Down [...
Owners Manual
Page 57
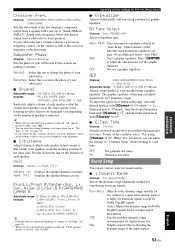
... the desired frequency band with oCursor k / n, and adjust the signal level with oCursor l / h. ■ E)Test Tone Choices: Off*/On Switches between on and off of "2 Manual Setup" while listening to be displayed vary depending on input signal information. When "On" is connected, "SB" appears instead of each speaker using a graphic equalizer...
... the desired frequency band with oCursor k / n, and adjust the signal level with oCursor l / h. ■ E)Test Tone Choices: Off*/On Switches between on and off of "2 Manual Setup" while listening to be displayed vary depending on input signal information. When "On" is connected, "SB" appears instead of each speaker using a graphic equalizer...
Owners Manual
Page 58
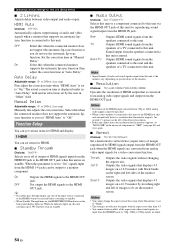
...." Off Not output the HDMI signals to 240ms (1 ms step) Manually fine adjusts the correction time. Amp TV Amp+TV Outputs HDMI sound signals form the speakers connected to this when the connected monitor supports the ... in the advanced setup menu to "SKIP" (see page 60) and try it again. ■ Aspect Choices: Thrgh*/16:9/Smart Set a horizontal to a monitor component. Manual Delay Adjustable range: 0* to the HDMI OUT jack. Thrgh 16:9 Smart Outputs the video signals without changing the aspect ratio. On Outputs the HDMI signals...
...." Off Not output the HDMI signals to 240ms (1 ms step) Manually fine adjusts the correction time. Amp TV Amp+TV Outputs HDMI sound signals form the speakers connected to this when the connected monitor supports the ... in the advanced setup menu to "SKIP" (see page 60) and try it again. ■ Aspect Choices: Thrgh*/16:9/Smart Set a horizontal to a monitor component. Manual Delay Adjustable range: 0* to the HDMI OUT jack. Thrgh 16:9 Smart Outputs the video signals without changing the aspect ratio. On Outputs the HDMI signals...
Owners Manual
Page 61
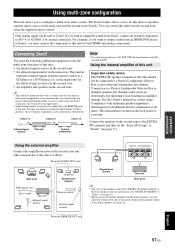
...use the speakers connected to EXTRA SP speaker terminals as shown below. REMOTE IN REMOTE OUT IN REMOTE OUT Infrared signal receiver This unit Yamaha component Note • To avoid unexpected noise, DO NOT USE the Zone2 feature with your unit. This information is ...use the internal amplifiers for all times. See this owner's manual for these products. Using the external amplifier Connect the amplifier/receiver in a multi-zone configuration, we recommend that best meet your requirements. • Some Yamaha models can control this unit from Zone2, connect an external ...
...use the speakers connected to EXTRA SP speaker terminals as shown below. REMOTE IN REMOTE OUT IN REMOTE OUT Infrared signal receiver This unit Yamaha component Note • To avoid unexpected noise, DO NOT USE the Zone2 feature with your unit. This information is ...use the internal amplifiers for all times. See this owner's manual for these products. Using the external amplifier Connect the amplifier/receiver in a multi-zone configuration, we recommend that best meet your requirements. • Some Yamaha models can control this unit from Zone2, connect an external ...

Owners Manual
Page 63
...control codes" at the end of this manual. ■ Default remote control code settings Input source Category Manufacturer Default code [HDMI1] Blu-ray Disc Yamaha 2018 [HDMI2] - - - [HDMI3] - - - [HDMI4] - - - [AV1] - - - [AV2] - - - [AV3] CD Yamaha 5013 [AV4] - - - [AV5... Repeat from step 1. [AV6] - - - [AUDIO1] - - - [AUDIO2] - - - [V-AUX] - - - [TUNER] Tuner Yamaha 5007 ADDITIONAL INFORMATION APPENDIX English 59 En cTRANSMIT on the remote control blinks twice. 2 Press mSETUP on the remote control. 3 Enter "9981" using ...
...control codes" at the end of this manual. ■ Default remote control code settings Input source Category Manufacturer Default code [HDMI1] Blu-ray Disc Yamaha 2018 [HDMI2] - - - [HDMI3] - - - [HDMI4] - - - [AV1] - - - [AV2] - - - [AV3] CD Yamaha 5013 [AV4] - - - [AV5... Repeat from step 1. [AV6] - - - [AUDIO1] - - - [AUDIO2] - - - [V-AUX] - - - [TUNER] Tuner Yamaha 5007 ADDITIONAL INFORMATION APPENDIX English 59 En cTRANSMIT on the remote control blinks twice. 2 Press mSETUP on the remote control. 3 Enter "9981" using ...
Owners Manual
Page 66
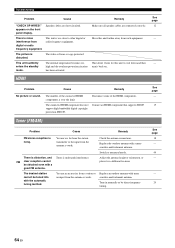
... . Try another sound field program. Sound may be malfunction. No sound is heard from that speaker is in the Setup menu and adjust the volume (Manual Setup → B)Level). Adjust "B)Level" settings. The sound suddenly goes off this unit may have been selected for some surround decoders. This unit is set...
... . Try another sound field program. Sound may be malfunction. No sound is heard from that speaker is in the Setup menu and adjust the volume (Manual Setup → B)Level). Adjust "B)Level" settings. The sound suddenly goes off this unit may have been selected for some surround decoders. This unit is set...

Owners Manual
Page 67
...is being played. Set "LFE/Bass Out" to "SWFR" or "Both." "Extended Surround" in "Speaker Setup" of the setup menu (Speaker Setup→Manual Setup→A)Config) is set to "On." The internal microcomputer is output. This unit is in "Speaker Setup" of the setup menu (Speaker Setup→...;Manual Setup→A)Config) is set to "Front" when a Dolby Digital, DTS or AAC signal is set to "Off," or an input signal does not...
...is being played. Set "LFE/Bass Out" to "SWFR" or "Both." "Extended Surround" in "Speaker Setup" of the setup menu (Speaker Setup→Manual Setup→A)Config) is set to "On." The internal microcomputer is output. This unit is in "Speaker Setup" of the setup menu (Speaker Setup→...;Manual Setup→A)Config) is set to "Front" when a Dolby Digital, DTS or AAC signal is set to "Off," or an input signal does not...
Owners Manual
Page 68
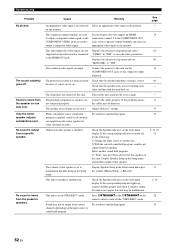
...!" appears on . Speaker cables are connected correctly. This unit suddenly enters the standby mode. Move this unit to cool down and then turn it in manually or by direct frequency tuning. HDMI Problem Cause Remedy No picture or sound. The number of the HDMI components. The connected HDMI component does not...
...!" appears on . Speaker cables are connected correctly. This unit suddenly enters the standby mode. Move this unit to cool down and then turn it in manually or by direct frequency tuning. HDMI Problem Cause Remedy No picture or sound. The number of the HDMI components. The connected HDMI component does not...
Owners Manual
Page 69
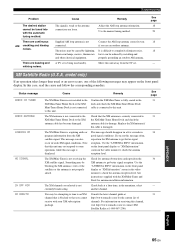
... manual tuning method. Connect the AM loop antenna correctly even if you selected is not connected to some operations while this message is not properly aimed. The noises may not respond to this unit. Note that is acquiring audio or program information from the TV set is not receiving ... is fully seated in the XM Mini-Tuner Home Dock or the XM Mini-Tuner Home Dock is not currently broadcasting. If you cannot receive with the XM Mini-Tuner and Dock for damage. Use the "ANTENNA INFO" information on the front panel display. For information on the...
... manual tuning method. Connect the AM loop antenna correctly even if you selected is not connected to some operations while this message is not properly aimed. The noises may not respond to this unit. Note that is acquiring audio or program information from the TV set is not receiving ... is fully seated in the XM Mini-Tuner Home Dock or the XM Mini-Tuner Home Dock is not currently broadcasting. If you cannot receive with the XM Mini-Tuner and Dock for damage. Use the "ANTENNA INFO" information on the front panel display. For information on the...
Owners Manual
Page 71
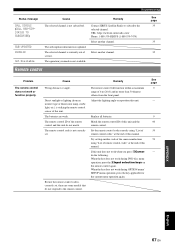
...front panel. Replace all batteries. Try setting another code of the same manufacturer using "List of remote control codes" at the end of this manual. The selected channel is updated. Contact SIRIUS Satellite Radio to the remote control. URL: https://activate.siriusradio.com/ Phone: 1-888-539-SIRIUS... this unit does not work during DVD disc menu operation: press the hInput selection keys on the remote control again. If this manual. ADVANCED OPERATION APPENDIX English 67 En Adjust the lighting angle or reposition this unit and the remote control. When the key does ...
...front panel. Replace all batteries. Try setting another code of the same manufacturer using "List of remote control codes" at the end of this manual. The selected channel is updated. Contact SIRIUS Satellite Radio to the remote control. URL: https://activate.siriusradio.com/ Phone: 1-888-539-SIRIUS... this unit does not work during DVD disc menu operation: press the hInput selection keys on the remote control again. If this manual. ADVANCED OPERATION APPENDIX English 67 En Adjust the lighting angle or reposition this unit and the remote control. When the key does ...
Owners Manual
Page 78
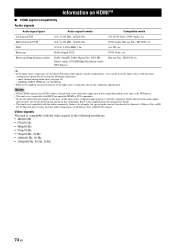
...DVD-Audio, Blu-ray Disc, HD DVD, etc. DSD 2/5.1ch, 2.8224 MHz, 1 bit SA-CD, etc. Refer to the supplied instruction manuals of the input source component, and set the input source component appropriately so that the component outputs the bitstream audio signals directly (does not decode... or HD DVD. multi-channel analog audio input (see page 16) - DIGITAL INPUT OPTICAL (or COAXIAL) • Refer to the supplied instruction manuals for details. • This unit is not compatible with the audio commentaries mixed down by using the following resolutions: • 480i/60 Hz •...
...DVD-Audio, Blu-ray Disc, HD DVD, etc. DSD 2/5.1ch, 2.8224 MHz, 1 bit SA-CD, etc. Refer to the supplied instruction manuals of the input source component, and set the input source component appropriately so that the component outputs the bitstream audio signals directly (does not decode... or HD DVD. multi-channel analog audio input (see page 16) - DIGITAL INPUT OPTICAL (or COAXIAL) • Refer to the supplied instruction manuals for details. • This unit is not compatible with the audio commentaries mixed down by using the following resolutions: • 480i/60 Hz •...
Owners Manual
Page 80
..., A)Config, speaker setup ....... 52 Low frequency sound adjustment 23 ■M MAIN ZONE ON/OFF, front panel 4 MAIN/ZONE2, remote control 7 Manual Delay, 2 Lipsync, sound setup .......... 54 Max Volume, 3 Volume, function setup ....... 55 Memory guard, setup menu 56 MEMORY, front panel 4... panel 5 AV OUT, rear panel 5 ■B B)Level, speaker setup 53 Basic operation, setup menu 51 BI-AMP connection switch, advanced setup 60 Bluetooth component playback 42 Bluetooth wireless audio receiver connection 17 Bluetooth, troubleshooting 68 ■C C)Distance, speaker setup 53 C.Image...
..., A)Config, speaker setup ....... 52 Low frequency sound adjustment 23 ■M MAIN ZONE ON/OFF, front panel 4 MAIN/ZONE2, remote control 7 Manual Delay, 2 Lipsync, sound setup .......... 54 Max Volume, 3 Volume, function setup ....... 55 Memory guard, setup menu 56 MEMORY, front panel 4... panel 5 AV OUT, rear panel 5 ■B B)Level, speaker setup 53 Basic operation, setup menu 51 BI-AMP connection switch, advanced setup 60 Bluetooth component playback 42 Bluetooth wireless audio receiver connection 17 Bluetooth, troubleshooting 68 ■C C)Distance, speaker setup 53 C.Image...


