

Owners Manual
Page 5
... 6 Remote control 7 Quick start guide 8 L PREPARATION Preparing remote control 9 Installing batteries in the remote control 9 Using the remote control 9 Connections 10 Placing speakers 10 Connecting speakers 11 Information on jacks and cable plugs 13 Connecting a TV monitor or projector 14 Connecting other components 15 Connecting an external amplifier 16 Using REMOTE IN/OUT jacks 17 Connecting a Yamaha iPod universal dock or Bluetooth™ wireless audio receiver 17 Using the VIDEO AUX jacks on the front panel .... 17 Connecting the FM and AM antennas 18 Connecting the power...
... 6 Remote control 7 Quick start guide 8 L PREPARATION Preparing remote control 9 Installing batteries in the remote control 9 Using the remote control 9 Connections 10 Placing speakers 10 Connecting speakers 11 Information on jacks and cable plugs 13 Connecting a TV monitor or projector 14 Connecting other components 15 Connecting an external amplifier 16 Using REMOTE IN/OUT jacks 17 Connecting a Yamaha iPod universal dock or Bluetooth™ wireless audio receiver 17 Using the VIDEO AUX jacks on the front panel .... 17 Connecting the FM and AM antennas 18 Connecting the power...
Owners Manual
Page 6
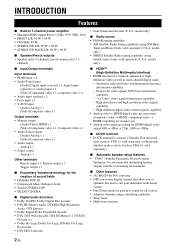
...(on-screen display) menus that allow you to optimize this unit to suit your individual audiovisual system • Pure Direct mode for pure hi-fi sound for standard, enhanced or highdefinition video as well as multi-channel digital audio. - channel) ■ Input/Output terminals Input terminals • HDMI input x 4 • Audio/Visual input [Audio] Digital input (coaxial) x 2, digital input (optical) x 2, analog input x 2 [Video] Component video x 2, composite video x 4 • Audio input (analog) x 2 • Dock input x 1 • V-AUX input [Audio] Analog x 1 [Video] Composite video...
...(on-screen display) menus that allow you to optimize this unit to suit your individual audiovisual system • Pure Direct mode for pure hi-fi sound for standard, enhanced or highdefinition video as well as multi-channel digital audio. - channel) ■ Input/Output terminals Input terminals • HDMI input x 4 • Audio/Visual input [Audio] Digital input (coaxial) x 2, digital input (optical) x 2, analog input x 2 [Video] Component video x 2, composite video x 4 • Audio input (analog) x 2 • Dock input x 1 • V-AUX input [Audio] Analog x 1 [Video] Composite video...
Owners Manual
Page 8
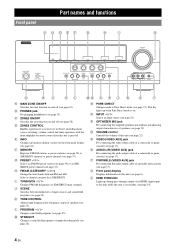
.... V HDMI THROUGH Lights up when Pure Direct mode is on standby (see page 54). 4 En B PHONES jack For plugging headphones (see page 24). E INFO Changes information display screens on and off (see page 22). D ZONE2 CONTROL Enables operation of speakers (see page 18). O INPUT l / h Selects an input source (see page 58). C ZONE2 ON/OFF Switches the zone function on . P OPTIMIZER MIC jack For connecting the supplied optimizer microphone and adjusting output characteristics of a receiver set in Zone2, including input source switching, volume control...
.... V HDMI THROUGH Lights up when Pure Direct mode is on standby (see page 54). 4 En B PHONES jack For plugging headphones (see page 24). E INFO Changes information display screens on and off (see page 22). D ZONE2 CONTROL Enables operation of speakers (see page 18). O INPUT l / h Selects an input source (see page 58). C ZONE2 ON/OFF Switches the zone function on . P OPTIMIZER MIC jack For connecting the supplied optimizer microphone and adjusting output characteristics of a receiver set in Zone2, including input source switching, volume control...

Owners Manual
Page 9
... electric screen that supports the remote control function (see page 31). q Power Cable Connect this unit. h TRIGGER OUT terminal For connecting an external terminal with a trigger input terminal to an external component (see page 16). p PRE OUT Outputs multi-channel signals from a selected analog input source to operate it opens and closes linked with operation of this unit to an external amplifier set in XM Mini-Tuner Home Dock (separately sold ) (see page 15). Connect the presence speakers...
... electric screen that supports the remote control function (see page 31). q Power Cable Connect this unit. h TRIGGER OUT terminal For connecting an external terminal with a trigger input terminal to an external component (see page 16). p PRE OUT Outputs multi-channel signals from a selected analog input source to operate it opens and closes linked with operation of this unit to an external amplifier set in XM Mini-Tuner Home Dock (separately sold ) (see page 15). Connect the presence speakers...

Owners Manual
Page 11
... MUSIC STEREO STRAIGHT PURE DIRECT BD DVD SETUP SCENE TV CD RADIO OPTION ENTER VOLUME RETURN DISPLAY TOP MENU REC MENU MUTE c d g f n p q r t u 1 2 3 4 5 6 7 8 9 INPUT MUTE 0 10 TV TV VOL TV CH ENT POWER a Remote control signal transmitter Transmits infrared signals. Selects a Yamaha iPod universal dock/Bluetooth wireless audio receiver connected to the previous screen or ends the menu display. e SOURCE POWER Switches an external component on and standby. Selects AV inputs 1 through 4. Selects a preset station. l SCENE Switches between...
... MUSIC STEREO STRAIGHT PURE DIRECT BD DVD SETUP SCENE TV CD RADIO OPTION ENTER VOLUME RETURN DISPLAY TOP MENU REC MENU MUTE c d g f n p q r t u 1 2 3 4 5 6 7 8 9 INPUT MUTE 0 10 TV TV VOL TV CH ENT POWER a Remote control signal transmitter Transmits infrared signals. Selects a Yamaha iPod universal dock/Bluetooth wireless audio receiver connected to the previous screen or ends the menu display. e SOURCE POWER Switches an external component on and standby. Selects AV inputs 1 through 4. Selects a preset station. l SCENE Switches between...
Owners Manual
Page 12
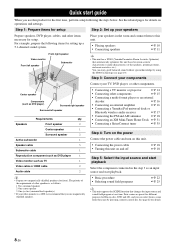
..., cables, and other components. Quick start guide When you use magnetically shielded speakers. • Basic procedure • Selecting sound field programs ☞P. 22 ☞P. 25 y • This unit supports the SCENE function that automatically optimizes this unit based on room acoustic characteristics (audio characteristics of other components ☞P. 15 • Connecting a multi-format player or an external decoder ☞P. 16 • Connecting an external amplifier ☞P. 16 • Connecting a Yamaha iPod universal dock or Bluetooth wireless audio receiver...
..., cables, and other components. Quick start guide When you use magnetically shielded speakers. • Basic procedure • Selecting sound field programs ☞P. 22 ☞P. 25 y • This unit supports the SCENE function that automatically optimizes this unit based on room acoustic characteristics (audio characteristics of other components ☞P. 15 • Connecting a multi-format player or an external decoder ☞P. 16 • Connecting an external amplifier ☞P. 16 • Connecting a Yamaha iPod universal dock or Bluetooth wireless audio receiver...
Owners Manual
Page 20
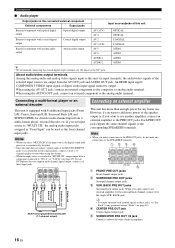
... of the selected input sources are output from the AV OUT jack and AUDIO OUT jack. An HDMI input signal, COMPONENT VIDEO input signal or digital audio input signal cannot be used as the front channel input jacks. When using the AUDIO OUT jack: connect an external component to this feature. • When the input source is equipped with a built-in amplifier. 16 En If you only connect one external amplifier for missing speakers, connect at these input jacks. b SURROUND PRE OUT jacks Surround channel output jacks. d CENTER PRE OUT jack Center channel output jack. e SUBWOOFER PRE...
... of the selected input sources are output from the AV OUT jack and AUDIO OUT jack. An HDMI input signal, COMPONENT VIDEO input signal or digital audio input signal cannot be used as the front channel input jacks. When using the AUDIO OUT jack: connect an external component to this feature. • When the input source is equipped with a built-in amplifier. 16 En If you only connect one external amplifier for missing speakers, connect at these input jacks. b SURROUND PRE OUT jacks Surround channel output jacks. d CENTER PRE OUT jack Center channel output jack. e SUBWOOFER PRE...

Owners Manual
Page 27
... resume audio output. sound field program, tone control - display and operation of the selected source. mulit-zone function Using your headphones Plug your headphones in the BPHONES jack on the front panel display flashes while audio output is set to enjoy the pure high fidelity sound of the option menu and setup menu - When the input source is muted. 2 Press rMUTE again to obtain desired tone. 1 Press KTONE CONTROL on the external component can now be remotely controllable just by selecting a scene. ADVANCED OPERATION...
... resume audio output. sound field program, tone control - display and operation of the selected source. mulit-zone function Using your headphones Plug your headphones in the BPHONES jack on the front panel display flashes while audio output is set to enjoy the pure high fidelity sound of the option menu and setup menu - When the input source is muted. 2 Press rMUTE again to obtain desired tone. 1 Press KTONE CONTROL on the external component can now be remotely controllable just by selecting a scene. ADVANCED OPERATION...
Owners Manual
Page 49
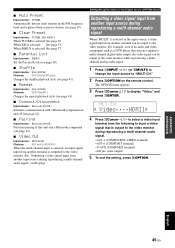
...; Pairing Input source: Bluetooth (DOCK) Performs pairing of this page. INTRODUCTION PREPARATION ■ Auto Preset Input source: TUNER Automatically detects radio stations in the FM frequency band and registers them as preset stations (see page 29). ■ Clear Preset Input source: TUNER, XM, SIRIUS When TUNER is selected as a DVD player that is outputted to the video monitor during reproducing a multi-channel audio signal. -AV1-2 (COMPONENT VIDEO terminal) -AV3-6 (COMPOSIT terminal) -V-AUX (COMPOSIT terminal) -Off (no video output) 5 To end the setting, press nOPTION...
...; Pairing Input source: Bluetooth (DOCK) Performs pairing of this page. INTRODUCTION PREPARATION ■ Auto Preset Input source: TUNER Automatically detects radio stations in the FM frequency band and registers them as preset stations (see page 29). ■ Clear Preset Input source: TUNER, XM, SIRIUS When TUNER is selected as a DVD player that is outputted to the video monitor during reproducing a multi-channel audio signal. -AV1-2 (COMPONENT VIDEO terminal) -AV3-6 (COMPOSIT terminal) -V-AUX (COMPOSIT terminal) -Off (no video output) 5 To end the setting, press nOPTION...
Owners Manual
Page 58
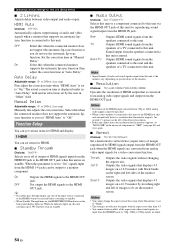
... time when "HDMI Auto" is muted. Manual Delay Adjustable range: 0* to the HDMI OUT jack. Function Setup You can set various items for HDMI and display. 1 HDMI You can be selected before switching to standby. • When Standby Through turns on, the HDMI THROUGH indicator on the left of HDMI output that the monitor supports, set "HDMI Auto" to this unit cannot detect the resolution that is set to this unit. Sound output from analog video input signals by a video conversion function. An...
... time when "HDMI Auto" is muted. Manual Delay Adjustable range: 0* to the HDMI OUT jack. Function Setup You can set various items for HDMI and display. 1 HDMI You can be selected before switching to standby. • When Standby Through turns on, the HDMI THROUGH indicator on the left of HDMI output that the monitor supports, set "HDMI Auto" to this unit cannot detect the resolution that is set to this unit. Sound output from analog video input signals by a video conversion function. An...

Owners Manual
Page 63
...] - - - [V-AUX] - - - [TUNER] Tuner Yamaha 5007 ADDITIONAL INFORMATION APPENDIX English 59 En If it fails, cTRANSMIT blinks six times. The keys available for a selected input source with the remote control. The following remote control codes are as factory default settings. tNumeric keys Function as a recording or playback key of an external component. sExternal component operation keys Function as numeric keys of an external component, or a menu display key. qDISPLAY Switches between the screens of TV TV VOL +/- Resetting...
...] - - - [V-AUX] - - - [TUNER] Tuner Yamaha 5007 ADDITIONAL INFORMATION APPENDIX English 59 En If it fails, cTRANSMIT blinks six times. The keys available for a selected input source with the remote control. The following remote control codes are as factory default settings. tNumeric keys Function as a recording or playback key of an external component. sExternal component operation keys Function as numeric keys of an external component, or a menu display key. qDISPLAY Switches between the screens of TV TV VOL +/- Resetting...
Owners Manual
Page 65
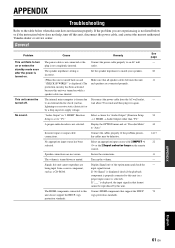
... input source has been selected. Secure the connections. The HDMI components connected to "TV." Connect HDMI components that format cannot be reproduced by a drop in "1 HDMI" Function Setup is set "Decoder Mode" to an AC wall outlet. Connect the power cable properly to "Auto." Disconnect the power cable from a source component, such as lightning or excessive static electricity) or by this unit was turned on while a speaker cable was shorted. Display the OPTION menu and set to this unit do not support...
... input source has been selected. Secure the connections. The HDMI components connected to "TV." Connect HDMI components that format cannot be reproduced by a drop in "1 HDMI" Function Setup is set "Decoder Mode" to an AC wall outlet. Connect the power cable properly to "Auto." Disconnect the power cable from a source component, such as lightning or excessive static electricity) or by this unit was turned on while a speaker cable was shorted. Display the OPTION menu and set to this unit do not support...
Owners Manual
Page 66
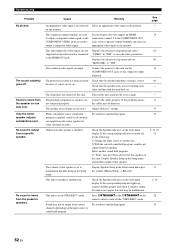
... the COMPONENT OUT jacks or the composite output terminals and select an appropriate video input on the input source or sound field program. If the corresponding indicator is not output, this unit, and play the source again. If sound is turned off . Non-standard video signals are input. Check that speaker is heard from a specific speaker. If the corresponding indicator lights up, connect another one side only. Display Speaker Setup in the Setup menu and adjust the volume (Manual Setup → B)Level). Sound is...
... the COMPONENT OUT jacks or the composite output terminals and select an appropriate video input on the input source or sound field program. If the corresponding indicator is not output, this unit, and play the source again. If sound is turned off . Non-standard video signals are input. Check that speaker is heard from a specific speaker. If the corresponding indicator lights up, connect another one side only. Display Speaker Setup in the Setup menu and adjust the volume (Manual Setup → B)Level). Sound is...

Owners Manual
Page 67
... setup menu (Speaker Setup→Manual Setup→A)Config) is set to turn off the "STRAIGHT" mode. A DTS-CD is not set to an external electric shock (such as lightning or excessive static electricity) or by digital connection and play back the DTS-CD. INTRODUCTION PREPARATION BASIC OPERATION ADVANCED OPERATION Troubleshooting Problem Cause Remedy No sound is heard from certain channels depending on the remote control to output the desired digital audio signals. "Extended Surround" in power...
... setup menu (Speaker Setup→Manual Setup→A)Config) is set to turn off the "STRAIGHT" mode. A DTS-CD is not set to an external electric shock (such as lightning or excessive static electricity) or by digital connection and play back the DTS-CD. INTRODUCTION PREPARATION BASIC OPERATION ADVANCED OPERATION Troubleshooting Problem Cause Remedy No sound is heard from certain channels depending on the remote control to output the desired digital audio signals. "Extended Surround" in power...
Owners Manual
Page 73
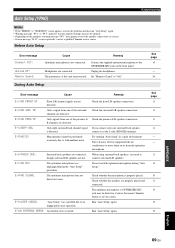
... PREPARATION BASIC OPERATION Troubleshooting Auto Setup (YPAO) Notes • If the "ERROR" or "WARNING" screen appears, resolve the problem and then run "Auto Setup" again. • Warning message "W-2" or "W-3" indicates that the adjusted settings may not be defective. Unplug the headphones. SP Only a signal from one of the surround channels are connected. E-4:SBR->SBL Only right surround back channel signal If you need to the OPTIMIZER MIC jack on the speakers, warning...
... PREPARATION BASIC OPERATION Troubleshooting Auto Setup (YPAO) Notes • If the "ERROR" or "WARNING" screen appears, resolve the problem and then run "Auto Setup" again. • Warning message "W-2" or "W-3" indicates that the adjusted settings may not be defective. Unplug the headphones. SP Only a signal from one of the surround channels are connected. E-4:SBR->SBL Only right surround back channel signal If you need to the OPTIMIZER MIC jack on the speakers, warning...
Owners Manual
Page 78
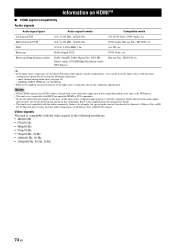
... audio signals may not be output depending on the component). Bitstream Dolby Digital, DTS DVD-Video, etc. y • If the input source component can play back the audio commentaries of the following connections: - multi-channel analog audio input (see page 16) - Information on this unit, set the component appropriately. Refer to the supplied instruction manuals of audio commentaries, you can decode the bitstream audio signals of the input source component, and set the input source component appropriately so that the component outputs the bitstream audio signals directly...
... audio signals may not be output depending on the component). Bitstream Dolby Digital, DTS DVD-Video, etc. y • If the input source component can play back the audio commentaries of the following connections: - multi-channel analog audio input (see page 16) - Information on this unit, set the component appropriately. Refer to the supplied instruction manuals of audio commentaries, you can decode the bitstream audio signals of the input source component, and set the input source component appropriately so that the component outputs the bitstream audio signals directly...
Owners Manual
Page 80
... setup 54 AUDIO 1/2, rear panel 5 Audio and video player connection 15 AUDIO jack 13 Audio jack 13 AUDIO L/R jack, front panel 4 AUDIO OUT, rear panel 5 Audio Output, 1 HDMI, function setup ......... 54 Audio player connection 16 Auto Delay, 2 Lipsync, sound setup 54 Auto Preset, OPTION menu 45 Auto Setup (YPAO), troubleshooting 69 Automatic setup 19 AV 1-6, rear panel 5 AV OUT, rear panel 5 ■B B)Level, speaker setup 53 Basic operation, setup menu 51 BI-AMP connection switch, advanced setup 60 Bluetooth component playback 42 Bluetooth wireless audio receiver connection...
... setup 54 AUDIO 1/2, rear panel 5 Audio and video player connection 15 AUDIO jack 13 Audio jack 13 AUDIO L/R jack, front panel 4 AUDIO OUT, rear panel 5 Audio Output, 1 HDMI, function setup ......... 54 Audio player connection 16 Auto Delay, 2 Lipsync, sound setup 54 Auto Preset, OPTION menu 45 Auto Setup (YPAO), troubleshooting 69 Automatic setup 19 AV 1-6, rear panel 5 AV OUT, rear panel 5 ■B B)Level, speaker setup 53 Basic operation, setup menu 51 BI-AMP connection switch, advanced setup 60 Bluetooth component playback 42 Bluetooth wireless audio receiver connection...
Owners Manual
Page 81
... SCENE, front panel 4 SCENE, remote control 7 Sci-Fi, sound field program 25 Selecting SCENE 22 Setting remote control code 59 Setting the Parental Lock, SIRIUS satellite radio 38 Set-top box connection 15 Setup menu 50 Setup menu basic operation 51 SETUP, remote control 7 Shuffle playback, iPod 41 Shuffle, OPTION menu 45 Signal Info parameter 44 Signal Info, OPTION menu 44 SILENT CINEMA 28 SIRIUS indicator, front panel display 6 SIRIUS Satellite Radio tuning 35 SIRIUS Satellite Radio, troubleshooting .......66 SIRIUS terminal, rear panel 5 SL Level, sound field parameter 49...
... SCENE, front panel 4 SCENE, remote control 7 Sci-Fi, sound field program 25 Selecting SCENE 22 Setting remote control code 59 Setting the Parental Lock, SIRIUS satellite radio 38 Set-top box connection 15 Setup menu 50 Setup menu basic operation 51 SETUP, remote control 7 Shuffle playback, iPod 41 Shuffle, OPTION menu 45 Signal Info parameter 44 Signal Info, OPTION menu 44 SILENT CINEMA 28 SIRIUS indicator, front panel display 6 SIRIUS Satellite Radio tuning 35 SIRIUS Satellite Radio, troubleshooting .......66 SIRIUS terminal, rear panel 5 SL Level, sound field parameter 49...
Owners Manual
Page 95
...its operating instructions. • We recommend that supports the HDMI control function to an AV amplifier. AV1 input is connected via the HDMI connection except for some models). y • The HDMI control-compatible components include Panasonic VIERA Link compatible TV, DVD player/recorder and Blu-ray Disc player. • When a DVD recorder/Blu-ray recorder/HD DVD recorder that supports the HDMI control function is enabled - Standby Through - On Enables the HDMI control function. For details on the front panel display lights up /down, mute) • Switching the sound output...
...its operating instructions. • We recommend that supports the HDMI control function to an AV amplifier. AV1 input is connected via the HDMI connection except for some models). y • The HDMI control-compatible components include Panasonic VIERA Link compatible TV, DVD player/recorder and Blu-ray Disc player. • When a DVD recorder/Blu-ray recorder/HD DVD recorder that supports the HDMI control function is enabled - Standby Through - On Enables the HDMI control function. For details on the front panel display lights up /down, mute) • Switching the sound output...
Hookup Example
Page 2
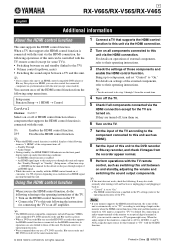
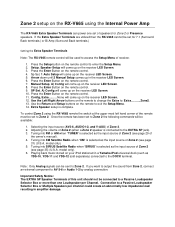
... Bi Amp (Surround Back terminals.) Setting the Extra Speaker Terminals Note: The RX-V665 remote control will come up on the remote control. 9. Selecting the input source (AV5-6, AUDIO1-2, and V-AUX) of Zone 2. 2. model only). 6. If you want to output the sound from Zone 2, connect an external component to the EXTRA SP jack). 3. Press the Enter Button on the remote control. 7. Press the Enter Button on the remote control. 4. Manual Setup, A) Config will be used to access the Setup Menu of receiver. 1. Extra Speaker setup is selected...
... Bi Amp (Surround Back terminals.) Setting the Extra Speaker Terminals Note: The RX-V665 remote control will come up on the remote control. 9. Selecting the input source (AV5-6, AUDIO1-2, and V-AUX) of Zone 2. 2. model only). 6. If you want to output the sound from Zone 2, connect an external component to the EXTRA SP jack). 3. Press the Enter Button on the remote control. 7. Press the Enter Button on the remote control. 4. Manual Setup, A) Config will be used to access the Setup Menu of receiver. 1. Extra Speaker setup is selected...


