

CISSCA V3.0 Users Manual
Page 1
CISSCA User's Manual V3.0: April2019 About CISSCA Commercial Installation Solutions Speaker Calculator (CISSCA) is a software application that estimates the number of required speakers based on room and target conditions that you want to facilitate and speed up the estimation process. Certain conditions have been simplified to specify conditions in more detail, please use Y-S3. 1 If you specify. It can also create reports containing the conditions and calculation results, which can be used to suggest speaker systems to customers.
CISSCA User's Manual V3.0: April2019 About CISSCA Commercial Installation Solutions Speaker Calculator (CISSCA) is a software application that estimates the number of required speakers based on room and target conditions that you want to facilitate and speed up the estimation process. Certain conditions have been simplified to specify conditions in more detail, please use Y-S3. 1 If you specify. It can also create reports containing the conditions and calculation results, which can be used to suggest speaker systems to customers.
CISSCA V3.0 Users Manual
Page 2
... to as the Software). If you the rights to use the software program and data files (hereafter referred to the terms and conditions outlined below. The backup copy must be accompanied by using the Software belong to a third party but do not download, install, copy, or otherwise use the software in a machinereadable format only for which backup is protected by Yamaha or Yamaha's licensors. Be sure...
... to as the Software). If you the rights to use the software program and data files (hereafter referred to the terms and conditions outlined below. The backup copy must be accompanied by using the Software belong to a third party but do not download, install, copy, or otherwise use the software in a machinereadable format only for which backup is protected by Yamaha or Yamaha's licensors. Be sure...

CISSCA V3.0 Users Manual
Page 3
... to that effect. Under no event shall Yamaha be terminated even if Yamaha does not send you paid to purchase the Software. 3 In particular, warranties of fitness for any direct, consequential, incidental or indirect damages whatsoever (including, without Yamaha's written permission. ・ Termination This agreement takes effect on the day you the use the Software without limitation, lost data, lost profits...
... to that effect. Under no event shall Yamaha be terminated even if Yamaha does not send you paid to purchase the Software. 3 In particular, warranties of fitness for any direct, consequential, incidental or indirect damages whatsoever (including, without Yamaha's written permission. ・ Termination This agreement takes effect on the day you the use the Software without limitation, lost data, lost profits...
CISSCA V3.0 Users Manual
Page 4
... Third Party Software. ・ Yamaha disclaims all risks arising from the use of, improper use of this agreement. If there is accompanied by and construed in the manual accompanying the Software that indicates that may provide third party software programs, data files and related documentation (hereafter referred to warranties of Third Party Software's merchantability and fitness for any direct, consequential, incidental...
... Third Party Software. ・ Yamaha disclaims all risks arising from the use of, improper use of this agreement. If there is accompanied by and construed in the manual accompanying the Software that indicates that may provide third party software programs, data files and related documentation (hereafter referred to warranties of Third Party Software's merchantability and fitness for any direct, consequential, incidental...
CISSCA V3.0 Users Manual
Page 5
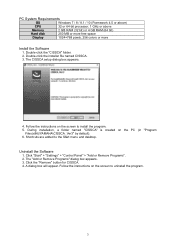
..." folder. 2. During installation, a folder named "CISSCA" is created on the screen to uninstall the program. 5 Uninstall the Software 1. Click the "Remove" button for CISSCA. 4. Follow the instructions on the PC (in "Program Files(x86)\YAMAHA\CISSCA_Ver3" by default). 6. PC System Requirements OS Windows 7 / 8 / 8.1 / 10 (Framework 4.5 or above) CPU 32 or 64-bit processor, 1 GHz or above Memory 2 GB RAM (32...
..." folder. 2. During installation, a folder named "CISSCA" is created on the screen to uninstall the program. 5 Uninstall the Software 1. Click the "Remove" button for CISSCA. 4. Follow the instructions on the PC (in "Program Files(x86)\YAMAHA\CISSCA_Ver3" by default). 6. PC System Requirements OS Windows 7 / 8 / 8.1 / 10 (Framework 4.5 or above) CPU 32 or 64-bit processor, 1 GHz or above Memory 2 GB RAM (32...

CISSCA V3.0 Users Manual
Page 6
... a Project...8 1-3. Configuring Speaker Density...12 2-3. Surface mount speakers...19 2-5-3. Subwoofers...20 2-6. Viewing Settings ...21 2-7. Editing a Project ...9 1-4. Entering Room Conditions ...10 2-2. Adjusting Speaker Output...16 2-5-1. Generating Reports ...24 6 Index of Contents About CISSCA...1 PC System Requirements ...5 Install the Software ...5 Uninstall the Software ...5 1. Starting CISSCA...7 1-1. Data Entry...10 2-1. Screen Operations...7 1-2. Ceiling speakers ...16 2-5-2. Common Features...9 2. Selecting the Speaker ...13 2-4. Viewing Results...
... a Project...8 1-3. Configuring Speaker Density...12 2-3. Surface mount speakers...19 2-5-3. Subwoofers...20 2-6. Viewing Settings ...21 2-7. Editing a Project ...9 1-4. Entering Room Conditions ...10 2-2. Adjusting Speaker Output...16 2-5-1. Generating Reports ...24 6 Index of Contents About CISSCA...1 PC System Requirements ...5 Install the Software ...5 Uninstall the Software ...5 1. Starting CISSCA...7 1-1. Data Entry...10 2-1. Screen Operations...7 1-2. Ceiling speakers ...16 2-5-2. Common Features...9 2. Selecting the Speaker ...13 2-4. Viewing Results...
CISSCA V3.0 Users Manual
Page 7
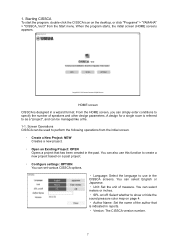
... CISSCA version number. 7 When the program starts, the initial screen (HOME screen) appears. You can select meters or inches. ・ SPL on/off: Select whether to perform the following operations from the Start menu. A design for a single room is indicated in the past project. ・ Configure settings: OPTION You can be managed like a file. 1-1. You can also use this function to...
... CISSCA version number. 7 When the program starts, the initial screen (HOME screen) appears. You can select meters or inches. ・ SPL on/off: Select whether to perform the following operations from the Start menu. A design for a single room is indicated in the past project. ・ Configure settings: OPTION You can be managed like a file. 1-1. You can also use this function to...

CISSCA V3.0 Users Manual
Page 8
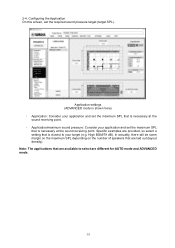
...; 2.4: Configure the application • 2.6: View settings • 2.7: View results • 2.8: Generate report [ADVANCED configuration method] • 2.1: Enter room conditions • 2.3: Select the speaker • 2.4: Configure the application • 2.5: Adjust speaker output • 2.6: View settings • 2.7: View results • 2.8: Generate report On each condition entry screen, pressing the NEXT button will return to change the values that have been entered. 8 1-2.
...; 2.4: Configure the application • 2.6: View settings • 2.7: View results • 2.8: Generate report [ADVANCED configuration method] • 2.1: Enter room conditions • 2.3: Select the speaker • 2.4: Configure the application • 2.5: Adjust speaker output • 2.6: View settings • 2.7: View results • 2.8: Generate report On each condition entry screen, pressing the NEXT button will return to change the values that have been entered. 8 1-2.

CISSCA V3.0 Users Manual
Page 9
1-3. Common Features After a project is created, you can save it at any time (SAVE). Other common features are as follows: • NEW: Creates a new project. • OPEN: Opens an existing project. • SAVE: Saves the ...current project with another name. • Export CSV: Saves the project content to open the Select Previous Project File screen. 1-4. Editing a Project Select "OPEN" on the initial screen (HOME screen) to a CSV (comma-separated text) file. • OPTIONS: Set various CISSCA options. • Help: Opens the PDF manual. • Quit: Closes the application. 9
1-3. Common Features After a project is created, you can save it at any time (SAVE). Other common features are as follows: • NEW: Creates a new project. • OPEN: Opens an existing project. • SAVE: Saves the ...current project with another name. • Export CSV: Saves the project content to open the Select Previous Project File screen. 1-4. Editing a Project Select "OPEN" on the initial screen (HOME screen) to a CSV (comma-separated text) file. • OPTIONS: Set various CISSCA options. • Help: Opens the PDF manual. • Quit: Closes the application. 9
CISSCA V3.0 Users Manual
Page 10
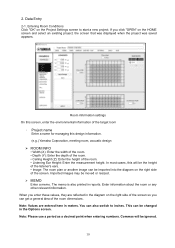
... ignored. 10 Room information settings On this screen, enter the environmental information of the target room ・ Project name Enter a name for managing this will be imported into the diagram on the right side of the room dimensions. Note: Please use a period as a decimal point when entering numbers. This can also switch to start a new project. The memo...
... ignored. 10 Room information settings On this screen, enter the environmental information of the target room ・ Project name Enter a name for managing this will be imported into the diagram on the right side of the room dimensions. Note: Please use a period as a decimal point when entering numbers. This can also switch to start a new project. The memo...

CISSCA V3.0 Users Manual
Page 11
...Moving it to the center. Once the scale has been set to a value of the image. Note: Please use the mouse to move an imported image. Imported images may...by entering a scale value or by dragging the scale slider. After you enter the values, press the NEXT button to move the slider again. ・ Delete: Deletes the imported image. Commas will appear as shown in the... be moved or resized as a decimal point when entering numbers. You can be set , the slider resets to the right expands it. Image operations ・ Move: Press the Move button to use a period as follows.
...Moving it to the center. Once the scale has been set to a value of the image. Note: Please use the mouse to move an imported image. Imported images may...by entering a scale value or by dragging the scale slider. After you enter the values, press the NEXT button to move the slider again. ・ Delete: Deletes the imported image. Commas will appear as shown in the... be moved or resized as a decimal point when entering numbers. You can be set , the slider resets to the right expands it. Image operations ・ Move: Press the Move button to use a period as follows.

CISSCA V3.0 Users Manual
Page 12
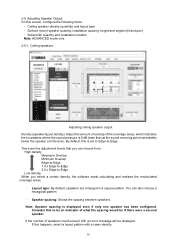
After you configure the speaker density, press the NEXT button to move to ceiling speaker and cannot be changed). Note: AUTO mode only (the speaker type is set to the next step. 12 2-2. Speaker density settings ・ Density: Configure the number of speakers (layout density). * Explanations for each setting are shown in the Settings screen. Configuring Speaker Density On this screen, configure the speaker density.
After you configure the speaker density, press the NEXT button to move to ceiling speaker and cannot be changed). Note: AUTO mode only (the speaker type is set to the next step. 12 2-2. Speaker density settings ・ Density: Configure the number of speakers (layout density). * Explanations for each setting are shown in the Settings screen. Configuring Speaker Density On this screen, configure the speaker density.

CISSCA V3.0 Users Manual
Page 13
... connection method. Selecting the Speaker On this screen, configure the impedance and the speaker to the next step. 13 When you configure the speaker, press the NEXT button to move to use . impedance connection). ・ Speaker: Select the speaker to select, depending on the right side of the screen. Impedance and speaker settings ・ Impedance: Select the speaker connection method (high-impedance connection or low- Note: ADVANCED mode...
... connection method. Selecting the Speaker On this screen, configure the impedance and the speaker to the next step. 13 When you configure the speaker, press the NEXT button to move to use . impedance connection). ・ Speaker: Select the speaker to select, depending on the right side of the screen. Impedance and speaker settings ・ Impedance: Select the speaker connection method (high-impedance connection or low- Note: ADVANCED mode...
CISSCA V3.0 Users Manual
Page 14
... depending on the number of speakers that is closest to select are different for AUTO mode and ADVANCED mode. 14 Note: The applications that is necessary at the sound receiving point. ・ Application/maximum sound pressure: Consider your application and set the maximum SPL that are available to your target (e.g. Specific examples are provided, so select a setting that are laid...
... depending on the number of speakers that is closest to select are different for AUTO mode and ADVANCED mode. 14 Note: The applications that is necessary at the sound receiving point. ・ Application/maximum sound pressure: Consider your application and set the maximum SPL that are available to your target (e.g. Specific examples are provided, so select a setting that are laid...
CISSCA V3.0 Users Manual
Page 16
... and installation location Note: ADVANCED mode only. 2-5-1. By default, this to -Edge Low density When you select a certain density, the software starts calculating and redraws the recalculated coverage areas. ・ Layout type: By default, speakers are five adjustment levels that you can also choose a hexagonal pattern. ・ Speaker spacing: Shows the spacing between speakers. Ceiling speakers Adjusting ceiling speaker output Density (speaker layout density): Adjust the...
... and installation location Note: ADVANCED mode only. 2-5-1. By default, this to -Edge Low density When you select a certain density, the software starts calculating and redraws the recalculated coverage areas. ・ Layout type: By default, speakers are five adjustment levels that you can also choose a hexagonal pattern. ・ Speaker spacing: Shows the spacing between speakers. Ceiling speakers Adjusting ceiling speaker output Density (speaker layout density): Adjust the...
CISSCA V3.0 Users Manual
Page 19
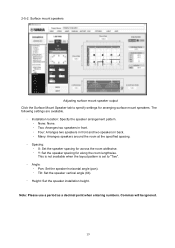
... widthwise. ・ Y: Set the speaker spacing for arranging surface mount speakers. Commas will be ignored. 19 Note: Please use a period as a decimal point when entering numbers. 2-5-2. Surface mount speakers Adjusting surface mount speaker output Click the Surface Mount Speaker tab to "Two". ・ Angle: ・ Pan: Set the speaker horizontal angle (pan). ・ Tilt: Set the speaker vertical angle (tilt). ・ Height: Set the speaker installation height.
... widthwise. ・ Y: Set the speaker spacing for arranging surface mount speakers. Commas will be ignored. 19 Note: Please use a period as a decimal point when entering numbers. 2-5-2. Surface mount speakers Adjusting surface mount speaker output Click the Surface Mount Speaker tab to "Two". ・ Angle: ・ Pan: Set the speaker horizontal angle (pan). ・ Tilt: Set the speaker vertical angle (tilt). ・ Height: Set the speaker installation height.

CISSCA V3.0 Users Manual
Page 20
2-5-3. You can install up to two subwoofers. ・ Height: Set the height of the room). Select "Ceiling" or "Floor". The following settings are available. ・ Installation location: Select the installation location from the nine available choices (corners or near the center of the installation location. After you configure the output, press the NEXT button to move to specify settings for arranging subwoofers. Subwoofers Adjusting subwoofer speaker output Click the Subwoofer tab to the next step. 20
2-5-3. You can install up to two subwoofers. ・ Height: Set the height of the room). Select "Ceiling" or "Floor". The following settings are available. ・ Installation location: Select the installation location from the nine available choices (corners or near the center of the installation location. After you configure the output, press the NEXT button to move to specify settings for arranging subwoofers. Subwoofers Adjusting subwoofer speaker output Click the Subwoofer tab to the next step. 20
CISSCA V3.0 Users Manual
Page 21
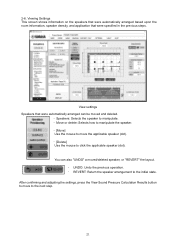
... and adjusting the settings, press the View Sound Pressure Calculation Results button to move the applicable speaker (dot). ・ [Delete] Use the mouse to click the applicable speaker (dot). 2-6. Viewing Settings This screen shows information on the speakers that were automatically arranged based upon the room information, speaker density, and application that were automatically arranged can also "UNDO" a moved/deleted speaker, or...
... and adjusting the settings, press the View Sound Pressure Calculation Results button to move the applicable speaker (dot). ・ [Delete] Use the mouse to click the applicable speaker (dot). 2-6. Viewing Settings This screen shows information on the speakers that were automatically arranged based upon the room information, speaker density, and application that were automatically arranged can also "UNDO" a moved/deleted speaker, or...
CISSCA V3.0 Users Manual
Page 22
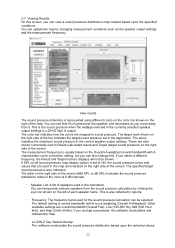
... used for the sound pressure calculation can view a sound pressure distribution map created based upon the selected values. 22 If SPL on/off (sound pressure map display option) is output. This is the sound pressure when the wattage selected in the currently selected speaker output settings (Lo-Z/Hi-Z Tap) is set in the current speaker output settings. If you change this screen, you move away from the sound...
... used for the sound pressure calculation can view a sound pressure distribution map created based upon the selected values. 22 If SPL on/off (sound pressure map display option) is output. This is the sound pressure when the wattage selected in the currently selected speaker output settings (Lo-Z/Hi-Z Tap) is set in the current speaker output settings. If you change this screen, you move away from the sound...

CISSCA V3.0 Users Manual
Page 25
... image. [JPG] SPL MAP Outputs the sound pressure map of output reports. If this is displayed in the "SPEAKER LAYOUT" section of the measurement frequency [LOW, [LOW, 125 Hz-500 Hz] 125 Hz-500 Hz] to "hidden" using the image adjustment settings, and then output the report. 25 Note: If SPL on /off (sound pressure map display option) is set the image to a JPEG...
... image. [JPG] SPL MAP Outputs the sound pressure map of output reports. If this is displayed in the "SPEAKER LAYOUT" section of the measurement frequency [LOW, [LOW, 125 Hz-500 Hz] 125 Hz-500 Hz] to "hidden" using the image adjustment settings, and then output the report. 25 Note: If SPL on /off (sound pressure map display option) is set the image to a JPEG...


