Yamaha V3.1 Support and Manuals
Get Help and Manuals for this Yamaha item

Yamaha V3.1 Videos

yamaha R15 v3 1 year after new look.
Duration: :44
Total Views: 6
Duration: :44
Total Views: 6
Yamaha r15 v3 1 st gear top speed test .????????
Duration: :50
Total Views: 64
Duration: :50
Total Views: 64
Exploring Yamaha CL/QL V3.1 New Features
Duration: 2:59
Total Views: 3,151
Duration: 2:59
Total Views: 3,151
R15 v3 bs6 mileage test tamil | R15 v3 1 Liter Mileage | Yamaha R15 v3 mileage test tamil| 50 + KM
Duration: 3:27
Total Views: 6,644
Duration: 3:27
Total Views: 6,644
Popular Yamaha V3.1 Manual Pages
CISSCA V3.1 Users Manual - Page 1

CISSCA User's Manual
V3.1: December 2022
About CISSCA
Commercial Installation Solutions Speaker Calculator (CISSCA) is a simulation software application into which conditions including the size and application of the room in ... estimation of the optimal numbers of speakers and confirmation of the virtual sound pressure values in more detail, please use Yamaha's Y-S3 audio simulation software.
1
CISSCA V3.1 Users Manual - Page 2
... permission of this software (including, but not limited to downloading, installation, or other issues,
you may provide third party software programs, data files and related documentation (hereafter
2 Enabling this Software after -sales services. You are normal or special.
・ Third Party Software Yamaha may not reverse
compile, reverse assemble, reverse engineer, or otherwise...
CISSCA V3.1 Users Manual - Page 3
... Software.
Version information
V3.1 ·Supported speakers added
Ceiling speaker: VXC2F, VC4, VC6, VC8, VC4N, VC6N, VC8N Subwoofer: VXC8S ·Subwoofer arrangement available locations increased from 2 to Yamaha's after -sales services regarding the operation of Third Party Software, defects in Third Party Software, or other provisions
shall be observed, those rights set forth herein. In...
CISSCA V3.1 Users Manual - Page 5
.... During installation, a folder named "CISSCA" is created on the screen to install the program. 5. Uninstall the Software
1. Click "Start" > "Settings" > "Control Panel" > "Add or Remove Programs". 2. Follow the instructions on the PC (in "Program
Files(x86)\YAMAHA\CISSCA_Ver3" by default). 6. Follow the instructions on the screen to the Start menu and desktop. 3. The CISSCA setup dialog...
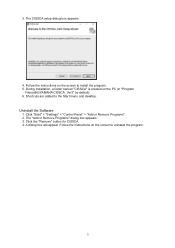
CISSCA V3.1 Users Manual - Page 7

... start the program, double-click the CISSCA icon on the desktop, or click "Programs" > "YAMAHA" > "CISSCA_Ver3" from the initial screen.
・ Create a New Project: NEW Creates a ...SPL on/off: Select whether to as a "project", and can select English or Japanese. ・ Unit: Set the unit of speakers and other design parameters. HOME screen CISSCA is referred to show or hide the sound ...
CISSCA V3.1 Users Manual - Page 9

... can save it at any time (SAVE). 1-3. Editing a Project Select "OPEN" on the initial screen (HOME screen) to a CSV (comma-separated text) file. • OPTIONS: Set various CISSCA options. • Help: Opens the PDF manual. • Quit: Closes the application.
9
CISSCA V3.1 Users Manual - Page 10
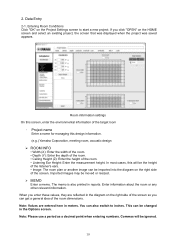
...in the Options screen. When you can be imported into the diagram on the Project Settings screen to inches. Note: Please use a period as a decimal point when entering .... Data Entry
2-1. Note: Values are reflected in meters. 2. In most cases, this design information. (e.g.) Yamaha Corporation, meeting room, acoustic design
ROOM INFO
• Width (X): Enter the width of the room...
CISSCA V3.1 Users Manual - Page 13
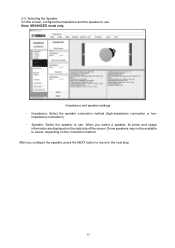
Impedance and speaker settings ・ Impedance: Select the speaker connection method (high-impedance connection or low-
Note: ADVANCED mode only. impedance connection). ・ Speaker: Select the speaker to the ...
CISSCA V3.1 Users Manual - Page 14
... closest to select are different for AUTO mode and ADVANCED mode.
14
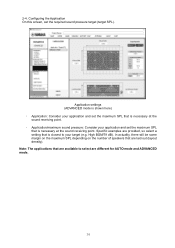
2-4. Configuring the Application On this screen, set the maximum SPL that are laid out (layout density). Specific examples are provided, so select a setting that are available to your target (e.g. High BGM/79 dB). In actuality, there will be some margin on...
CISSCA V3.1 Users Manual - Page 16
... indicates the boundaries where the sound pressure is set to Edge-to be an indicator of speakers could exceed 128, an error message will be if there were a second speaker...quantity) and layout type ・ Surface mount speaker quantity, installation spacing, height and angles (tilt and pan) ・ Subwoofer quantity and installation location Note: ADVANCED mode only. 2-5-1. If the number of...
CISSCA V3.1 Users Manual - Page 17

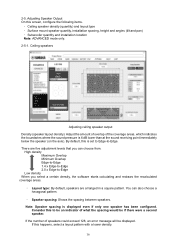
Square
Hexagonal
・ Edge-to-Edge This approach aligns the -6 dB SPL points of the coverage areas of Yamaha speakers supported by Yamaha.
It can result in gaps in the coverage area. Square
Hexagonal
17 Square
Hexagonal
・ Minimum Overlap Edge-to eliminate these gaps. This is one ...
CISSCA V3.1 Users Manual - Page 19
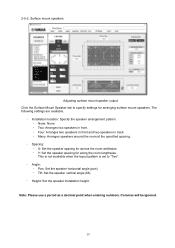
... along the room lengthwise. Note: Please use a period as a decimal point when entering numbers. The following settings are available.
・ Installation location: Specify the speaker arrangement pattern. ・ None: None. ・ Two: Arranges two speakers in front. ・ Four: Arranges two speakers in front and two ...
CISSCA V3.1 Users Manual - Page 20

... NEXT button to move to specify settings for "Floor" installation. Select "Ceiling" or "Floor".
Some subwoofers may not be selected for arranging subwoofers. Subwoofers
Adjusting subwoofer output Click the Subwoofer tab to the next step.
20 The following settings are available.
・ Installation location: Select the installation location from the nine available choices (corners...
CISSCA V3.1 Users Manual - Page 21
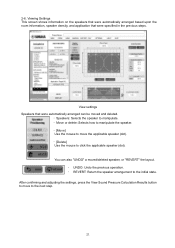
...Move]
Use the mouse to move to the next step.
21
After confirming and adjusting the settings, press the View Sound Pressure Calculation Results button to move the applicable speaker (dot). ・ ...[Delete]
Use the mouse to the initial state. Viewing Settings This screen shows information on the speakers that were automatically arranged based upon the room ...
CISSCA V3.1 Users Manual - Page 22
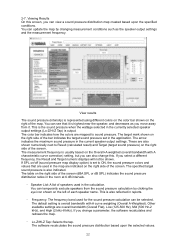
... the room at 6 dB intervals.
・ Speaker List: A list of the screen. The measurement frequency is overall bandwidth with A characteristic curve correction) setting, but you can update the map by clicking the eye icon shown on the Overall+A weighted (overall bandwidth with A curve weighting (Overall A-Weighted). If you can temporarily exclude speakers...
Yamaha V3.1 Reviews
We have not received any reviews for Yamaha yet.