Owner's Manual
Page 4
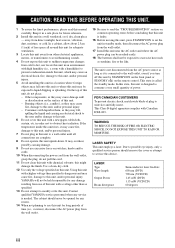
...state is designed to consume a very small quantity of plug to modify or fix this unit, and/or personal injury. - Contact qualified YAMAHA service personnel when any damage resulting from use of this unit with chemical solvents; CAUTION: READ THIS BEFORE OPERATING THIS UNIT. WARNING TO ...DVD) 1.13 mW (VCD/CD) 60 degrees iii in a well ventilated, cool, dry, clean place - do not place: - The unit is dangerous and may overheat, possibly causing damage. 9 Do not use this unit for future reference. 2 Install this unit by STANDBY/ON on the front panel or STANDBY ( ) on the remote...
...state is designed to consume a very small quantity of plug to modify or fix this unit, and/or personal injury. - Contact qualified YAMAHA service personnel when any damage resulting from use of this unit with chemical solvents; CAUTION: READ THIS BEFORE OPERATING THIS UNIT. WARNING TO ...DVD) 1.13 mW (VCD/CD) 60 degrees iii in a well ventilated, cool, dry, clean place - do not place: - The unit is dangerous and may overheat, possibly causing damage. 9 Do not use this unit for future reference. 2 Install this unit by STANDBY/ON on the front panel or STANDBY ( ) on the remote...

Owner's Manual
Page 5
English CONTENTS INTRODUCTION 3 Playable disc formats 3 DVD region codes 3 Patent information 4 Cleaning discs 4 Supplied accessories 4 FUNCTIONAL OVERVIEW 5 Front panel 5 Front panel display 6 Rear panel 7 Remote control 8 CONNECTIONS 10 General notes on connections 10 Audio connections 10 Connecting a stereo ... input jacks 10 Video connections 11 Connecting the power cable 12 GETTING STARTED 13 Step 1: Inserting batteries into the remote control 13 Using the remote control 13 Step 2: Turning on the power 13 Step 3: Setting a TV type 14 Step 4: Setting a language...
English CONTENTS INTRODUCTION 3 Playable disc formats 3 DVD region codes 3 Patent information 4 Cleaning discs 4 Supplied accessories 4 FUNCTIONAL OVERVIEW 5 Front panel 5 Front panel display 6 Rear panel 7 Remote control 8 CONNECTIONS 10 General notes on connections 10 Audio connections 10 Connecting a stereo ... input jacks 10 Video connections 11 Connecting the power cable 12 GETTING STARTED 13 Step 1: Inserting batteries into the remote control 13 Using the remote control 13 Step 2: Turning on the power 13 Step 3: Setting a TV type 14 Step 4: Setting a language...

Owner's Manual
Page 10
... internal decoder. 4 MULTI indicator Lights up when playing the multi-channel audio source. 5 D.MIX indicator (DVD-Audio only) Lights up when playing the disc that allows down mixing of the front panel display using DIMMER on the remote control. 6 En FUNCTIONAL OVERVIEW Front panel display 1 2 3 45 2 SVCD WMA P.SCAN TITLE GROUP CHP...
... internal decoder. 4 MULTI indicator Lights up when playing the multi-channel audio source. 5 D.MIX indicator (DVD-Audio only) Lights up when playing the disc that allows down mixing of the front panel display using DIMMER on the remote control. 6 En FUNCTIONAL OVERVIEW Front panel display 1 2 3 45 2 SVCD WMA P.SCAN TITLE GROUP CHP...

Owner's Manual
Page 12
.../ 33l) Moves to low only during playback. 3 HDMI Switches the HDMI mode on or off. 4 GROUP Selects the DVD-Audio group. 5 PAGE (+/-) Selects the DVD-Audio still picture. 6 Numeric buttons (0-9) Select numbered items in the currently displayed menu. 7 CLEAR Clear the mode or ...setting. 8 SETUP Accesses or exits from three different levels of this unit. 9 STOP ( 7 ) Stops playback. 0 PAUSE ( 8 ) Pauses playback temporarily. y z 1 LIGHT Lights up the remote ...
.../ 33l) Moves to low only during playback. 3 HDMI Switches the HDMI mode on or off. 4 GROUP Selects the DVD-Audio group. 5 PAGE (+/-) Selects the DVD-Audio still picture. 6 Numeric buttons (0-9) Select numbered items in the currently displayed menu. 7 CLEAR Clear the mode or ...setting. 8 SETUP Accesses or exits from three different levels of this unit. 9 STOP ( 7 ) Stops playback. 0 PAUSE ( 8 ) Pauses playback temporarily. y z 1 LIGHT Lights up the remote ...

Owner's Manual
Page 14
... (U.K. and Europe models) CENTER L COAXIAL L R R SURROUND SUBWOOFER FRONT MIXED 2CH AUDIO OUT OPTICAL DIGITAL HDMI AV IN VIDEO ON OFF OUT REMOTE C PR / CR PB / CB Y S VIDEO COMPONENT VIDEO OUT FRONT LR CENTER SUBWOOFER SURROUND RL AV receiver Speakers Audio pin cable (supplied...) Stereo amplifier Subwoofer CD / DVD RL Left speaker Right speaker 10 En R SURROUND SUBWOOFER FRONT AUDIO OUT R MIXED 2CH OPTICAL DIGITAL HDMI AV VIDEO ON OFF OUT REMOTE C PR / CR PB / CB Y S VIDEO COMPONENT VIDEO OUT Connecting...
... (U.K. and Europe models) CENTER L COAXIAL L R R SURROUND SUBWOOFER FRONT MIXED 2CH AUDIO OUT OPTICAL DIGITAL HDMI AV IN VIDEO ON OFF OUT REMOTE C PR / CR PB / CB Y S VIDEO COMPONENT VIDEO OUT FRONT LR CENTER SUBWOOFER SURROUND RL AV receiver Speakers Audio pin cable (supplied...) Stereo amplifier Subwoofer CD / DVD RL Left speaker Right speaker 10 En R SURROUND SUBWOOFER FRONT AUDIO OUT R MIXED 2CH OPTICAL DIGITAL HDMI AV VIDEO ON OFF OUT REMOTE C PR / CR PB / CB Y S VIDEO COMPONENT VIDEO OUT Connecting...
Owner's Manual
Page 16
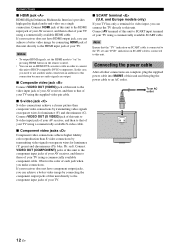
... jack, you make connections. CONNECTIONS ■ HDMI jack HDMI (High-Definition Multimedia Interface) provides high quality digital audio and video on the remote control. • You can achieve a better video image by connecting the component output jacks of this unit directly to an AC outlet.... Notes • To output HDMI signals, set and "DVD" indication on separate wires for luminance (Y: green) and chrominance (PB: blue, PR: red). Connecting the power cable After all other connections are...
... jack, you make connections. CONNECTIONS ■ HDMI jack HDMI (High-Definition Multimedia Interface) provides high quality digital audio and video on the remote control. • You can achieve a better video image by connecting the component output jacks of this unit directly to an AC outlet.... Notes • To output HDMI signals, set and "DVD" indication on separate wires for luminance (Y: green) and chrominance (PB: blue, PR: red). Connecting the power cable After all other connections are...
Owner's Manual
Page 20
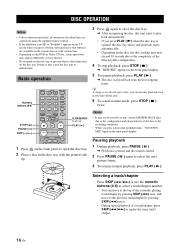
...the same track/ chapter. 16 En DISC OPERATION DISC OPERATION Notes • Unless otherwise specified, all operations described here are carried out using the supplied remote control. • If the inhibition icon ( or "Prohibit") appears on the TV screen when you press a button, the function for that button ...is not available on the current disc or at the current time. • Depending on the DVD or Video CD disc, some operations may operate differently or be possible to play certain MP3/JPEG/DivX discs due to the configuration and characteristics...
...the same track/ chapter. 16 En DISC OPERATION DISC OPERATION Notes • Unless otherwise specified, all operations described here are carried out using the supplied remote control. • If the inhibition icon ( or "Prohibit") appears on the TV screen when you press a button, the function for that button ...is not available on the current disc or at the current time. • Depending on the DVD or Video CD disc, some operations may operate differently or be possible to play certain MP3/JPEG/DivX discs due to the configuration and characteristics...

Owner's Manual
Page 39
...An angle mark appears for the audio, subtitles and disc menus recorded on the component you want to the best setting automatically based on the DVD. This function is only available when this unit to display an angle mark. Auto Select this to set this unit is set playback control ...are displayed. • Select [Time Interval] in [DISC] menu. Selecting the PBC (playback control) function You can also use the MENU button on the remote control to [Auto] or [PCM], digital output signals are muted. An angle mark is available only on Video CD 2.0 with the playback control (PBC) ...
...An angle mark appears for the audio, subtitles and disc menus recorded on the component you want to the best setting automatically based on the DVD. This function is only available when this unit to display an angle mark. Auto Select this to set this unit is set playback control ...are displayed. • Select [Time Interval] in [DISC] menu. Selecting the PBC (playback control) function You can also use the MENU button on the remote control to [Auto] or [PCM], digital output signals are muted. An angle mark is available only on Video CD 2.0 with the playback control (PBC) ...
Owner's Manual
Page 41
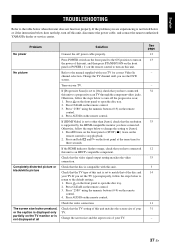
...Check the video connection. Otherwise, follow the steps below to change the setting to [Auto]; 1. If you see the DVD screen. Press CLEAR on the remote control to stop playback. 2. Check that the TV type of this unit. English TROUBLESHOOTING TROUBLESHOOTING Refer to the table below...and then press STANDBY/ON on the front panel or POWER ( l ) on the remote control to the manual supplied with this unit, disconnect the power cable, and contact the nearest authorized YAMAHA dealer or service center. Problem Solution No power Connect the AC power cable properly.
...Check the video connection. Otherwise, follow the steps below to change the setting to [Auto]; 1. If you see the DVD screen. Press CLEAR on the remote control to stop playback. 2. Check that the TV type of this unit. English TROUBLESHOOTING TROUBLESHOOTING Refer to the table below...and then press STANDBY/ON on the front panel or POWER ( l ) on the remote control to the manual supplied with this unit, disconnect the power cable, and contact the nearest authorized YAMAHA dealer or service center. Problem Solution No power Connect the AC power cable properly.
Owner's Manual
Page 42
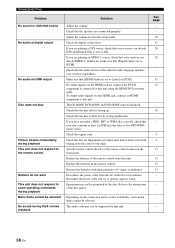
... and DVD-R/RW must be supported by the disc. See page - - 30 11 28 28 - 35 12 - 16 - - 3 4 13 13 13 13 - - - - 38 En Otherwise, make sure that [HDMI Audio] is connected to [PCM]. Adjust the volume level in the remote control. No audio signals via the HDMI jack.... If you are playing a DTS source, check that the audio format of the selected audio language matches your disc contains at the remote control sensor on the connection status or disc availability, some operating commands during playback Menu items cannot be selected No sound during playback This...
... and DVD-R/RW must be supported by the disc. See page - - 30 11 28 28 - 35 12 - 16 - - 3 4 13 13 13 13 - - - - 38 En Otherwise, make sure that [HDMI Audio] is connected to [PCM]. Adjust the volume level in the remote control. No audio signals via the HDMI jack.... If you are playing a DTS source, check that the audio format of the selected audio language matches your disc contains at the remote control sensor on the connection status or disc availability, some operating commands during playback Menu items cannot be selected No sound during playback This...


