
Owner's Manual
Page 1
U RX-V765 AV Receiver OWNER'S MANUAL
U RX-V765 AV Receiver OWNER'S MANUAL

Owner's Manual
Page 3
...provided plug does not fit into the apparatus, the apparatus has been exposed to use the product. 2 IMPORTANT: When connecting this manual, meets FCC requirements. Failure to follow instructions could void your authority, granted by the interference. If these instructions. 3 Heed all ...warnings. 4 Follow all installations. Modifications not expressly approved by Yamaha Corporation of radio or TV interference, relocate/reorient the antenna. IMPORTANT SAFETY INSTRUCTIONS CAUTION RISK OF ELECTRIC SHOCK DO NOT OPEN ...
...provided plug does not fit into the apparatus, the apparatus has been exposed to use the product. 2 IMPORTANT: When connecting this manual, meets FCC requirements. Failure to follow instructions could void your authority, granted by the interference. If these instructions. 3 Heed all ...warnings. 4 Follow all installations. Modifications not expressly approved by Yamaha Corporation of radio or TV interference, relocate/reorient the antenna. IMPORTANT SAFETY INSTRUCTIONS CAUTION RISK OF ELECTRIC SHOCK DO NOT OPEN ...

Owner's Manual
Page 4
.... 8 Do not operate this unit upside-down. It may cause damage and/or discoloration on the surface of this unit. - Contact qualified Yamaha service personnel when any service is dangerous and may cause fire, damage to this unit, and/or personal injury. vacation), disconnect the AC power...faulty. 18 Before moving this unit, press AMAIN ZONE ON/OFF to set for your unit. 1 To assure the finest performance, please read this manual carefully. Burning objects (i.e. this unit with a higher voltage than specified. 13 To prevent damage by AMAIN ZONE ON/ OFF. away from direct sunlight...
.... 8 Do not operate this unit upside-down. It may cause damage and/or discoloration on the surface of this unit. - Contact qualified Yamaha service personnel when any service is dangerous and may cause fire, damage to this unit, and/or personal injury. vacation), disconnect the AC power...faulty. 18 Before moving this unit, press AMAIN ZONE ON/OFF to set for your unit. 1 To assure the finest performance, please read this manual carefully. Burning objects (i.e. this unit with a higher voltage than specified. 13 To prevent damage by AMAIN ZONE ON/ OFF. away from direct sunlight...
Owner's Manual
Page 5
...XM Satellite Radio (U.S.A. model only 70 SIRIUS Satellite Radio™ (U.S.A. INTRODUCTION PREPARATION BASIC OPERATION ADVANCED OPERATION Contents INTRODUCTION Features 2 About this manual 3 Supplied accessories 3 Part names and functions 4 Front panel 4 Rear panel 5 Front panel display 6 Remote control 7 Quick start guide...external decoder 18 Connecting an external amplifier 18 Using REMOTE IN/OUT jacks 19 Connecting a Yamaha iPod universal dock or Bluetooth™ wireless audio receiver 19 Connecting a camcorder or portable audio player ... 19 Connecting the FM and AM ...
...XM Satellite Radio (U.S.A. model only 70 SIRIUS Satellite Radio™ (U.S.A. INTRODUCTION PREPARATION BASIC OPERATION ADVANCED OPERATION Contents INTRODUCTION Features 2 About this manual 3 Supplied accessories 3 Part names and functions 4 Front panel 4 Rear panel 5 Front panel display 6 Remote control 7 Quick start guide...external decoder 18 Connecting an external amplifier 18 Using REMOTE IN/OUT jacks 19 Connecting a Yamaha iPod universal dock or Bluetooth™ wireless audio receiver 19 Connecting a camcorder or portable audio player ... 19 Connecting the FM and AM ...

Owner's Manual
Page 7
...of Sony Corporation. and its subsidiaries. Neural Surround™ name and related logos are trademarks of Yamaha Corporation. All rights reserved. INTRODUCTION PREPARATION BASIC OPERATION About this manual • Some operations can be performed by using either the keys on the front panel or the... page 20) • Controls diagram ADVANCED OPERATION ADDITIONAL INFORMATION APPENDIX English 3 En Supplied accessories Check that you received all related marks and logos are trademarks owned by Yamaha in accordance with a license agreement. All Rights Reserved.
...of Sony Corporation. and its subsidiaries. Neural Surround™ name and related logos are trademarks of Yamaha Corporation. All rights reserved. INTRODUCTION PREPARATION BASIC OPERATION About this manual • Some operations can be performed by using either the keys on the front panel or the... page 20) • Controls diagram ADVANCED OPERATION ADDITIONAL INFORMATION APPENDIX English 3 En Supplied accessories Check that you received all related marks and logos are trademarks owned by Yamaha in accordance with a license agreement. All Rights Reserved.

Owner's Manual
Page 17
... the speaker cable Caution • A speaker cable is a pair of speakers for details. One of the cables is colored differently or striped to the instruction manuals of insulated cables running side by side in ) 2 Loosen the knob, insert the twisted bare wires into the end of this unit and/or speakers.
... the speaker cable Caution • A speaker cable is a pair of speakers for details. One of the cables is colored differently or striped to the instruction manuals of insulated cables running side by side in ) 2 Loosen the knob, insert the twisted bare wires into the end of this unit and/or speakers.
Owner's Manual
Page 25
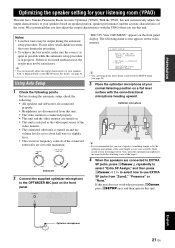
...of your normal listening position on the video monitor. 1 Auto Setup Extra SP Assign >Zone2 Presence None EQ Type;;;;Natural . You can manually adjust the output characteristics of the room. With the YPAO, this unit. • The video monitor is connected properly. • ...). • The crossover frequency controls of the tripod. 4 When the speakers are set to the tripod with "2 Manual Setup" in your listening room (YPAO) This unit has a Yamaha Parametric Room Acoustic Optimizer (YPAO). Using Auto Setup 1 Check the following . • All speakers and subwoofer are connected...
...of your normal listening position on the video monitor. 1 Auto Setup Extra SP Assign >Zone2 Presence None EQ Type;;;;Natural . You can manually adjust the output characteristics of the room. With the YPAO, this unit. • The video monitor is connected properly. • ...). • The crossover frequency controls of the tripod. 4 When the speakers are set to the tripod with "2 Manual Setup" in your listening room (YPAO) This unit has a Yamaha Parametric Room Acoustic Optimizer (YPAO). Using Auto Setup 1 Check the following . • All speakers and subwoofer are connected...
Owner's Manual
Page 28
... component to this unit by default. SW L CR SL SR y • You can receive SCENE control signals is connected to the REMOTE OUT jack of an iPod or Bluetooth component using... name of the playback component. 2) When noise is output during standby. • If a Yamaha DVD player that can change input sources and sound field programs with the external component for a ... the condition is assigned to low before starting playback. A set "Decoder Mode" to the instruction manual of input source and sound program suitable for a certain situation, such as the source input, or...
... component to this unit by default. SW L CR SL SR y • You can receive SCENE control signals is connected to the REMOTE OUT jack of an iPod or Bluetooth component using... name of the playback component. 2) When noise is output during standby. • If a Yamaha DVD player that can change input sources and sound field programs with the external component for a ... the condition is assigned to low before starting playback. A set "Decoder Mode" to the instruction manual of input source and sound program suitable for a certain situation, such as the source input, or...

Owner's Manual
Page 35
...When you enter a frequency that you have selected. 3 Press JTUNING/CH l / h (or fTUN./CH k / n) to the operation. • "Wrong Station!" Use manual station preset. 1 Rotate the RINPUT selector (or press eTUNER) to switch the input source to a higher range, press h (or k). "FM" or "AM" appears on...later just select those numbers to how you press JTUNING/CH l / h (or fTUN./ CH k / n). Use this method when the tuner cannot receive strong signals and stations are skipped during preset tuning, a preset number is correct. Set tuning mode to frequency tuning mode using kCursor k / n and...
...When you enter a frequency that you have selected. 3 Press JTUNING/CH l / h (or fTUN./CH k / n) to the operation. • "Wrong Station!" Use manual station preset. 1 Rotate the RINPUT selector (or press eTUNER) to switch the input source to a higher range, press h (or k). "FM" or "AM" appears on...later just select those numbers to how you press JTUNING/CH l / h (or fTUN./ CH k / n). Use this method when the tuner cannot receive strong signals and stations are skipped during preset tuning, a preset number is correct. Set tuning mode to frequency tuning mode using kCursor k / n and...

Owner's Manual
Page 36
.../ n and press kENTER. To clear the registration of tuner input appears on the front panel display, followed soon by automatic station preset or manual station preset. y • By pressing down GMEMORY (or fMEMORY) for about 30 seconds. When you press mNumeric keys during normal tuning, ...a preset number is registered, "Empty" appears on the display. "Manual Preset" appears on the front panel display. 3 Display "Clear Preset" using HPRESET l / h (or fPRESET k / n) prior to which the station ...
.../ n and press kENTER. To clear the registration of tuner input appears on the front panel display, followed soon by automatic station preset or manual station preset. y • By pressing down GMEMORY (or fMEMORY) for about 30 seconds. When you press mNumeric keys during normal tuning, ...a preset number is registered, "Empty" appears on the display. "Manual Preset" appears on the front panel display. 3 Display "Clear Preset" using HPRESET l / h (or fPRESET k / n) prior to which the station ...
Owner's Manual
Page 37
...Satellite Radio is prohibited to copy, decompile, disassemble, reverse engineer, hack, manipulate or otherwise make available any technology or software incorporated in receivers compatible with no obstacles in the eight squares provided below for children. Family friendly packages are also available to the sky. and its ...eight character XM Radio ID on the XM MiniTuner, on the XM Mini-Tuner package, or on the video monitor (see the instruction manuals provided with the satellite tuners. See page 70 for up to enjoy the most trusted sources. The "Best of" packages are a...
...Satellite Radio is prohibited to copy, decompile, disassemble, reverse engineer, hack, manipulate or otherwise make available any technology or software incorporated in receivers compatible with no obstacles in the eight squares provided below for children. Family friendly packages are also available to the sky. and its ...eight character XM Radio ID on the XM MiniTuner, on the XM Mini-Tuner package, or on the video monitor (see the instruction manuals provided with the satellite tuners. See page 70 for up to enjoy the most trusted sources. The "Best of" packages are a...

Owner's Manual
Page 41
... to activate your SIRIUS Satellite Radio subscription. For details, see "SIRIUS Satellite Radio" (see the instruction manuals provided with no obstacles in the space provided below. ID 3 Contact SIRIUS Satellite Radio to the instruction manuals provided with the SiriusConnect tuner for the best reception differs depending on the front panel display, this...
... to activate your SIRIUS Satellite Radio subscription. For details, see "SIRIUS Satellite Radio" (see the instruction manuals provided with no obstacles in the space provided below. ID 3 Contact SIRIUS Satellite Radio to the instruction manuals provided with the SiriusConnect tuner for the best reception differs depending on the front panel display, this...

Owner's Manual
Page 48
...Press kCursor n to select "Connect" and press kENTER. "Searching" appears on the front panel display. y • The Yamaha Bluetooth wireless audio receiver can be performed when using a Bluetooth component with the Bluetooth component is displayed in the Bluetooth device list. 6 Select the Bluetooth...on operation of 8 minutes is complete, "Completed" appears on the remote control, the connected Bluetooth wireless audio receiver searches and connects to its instruction manuals. 3 Press rOPTION. DOCK OPTION . When pairing is set it to select "Bluetooth (DOCK)" as a ...
...Press kCursor n to select "Connect" and press kENTER. "Searching" appears on the front panel display. y • The Yamaha Bluetooth wireless audio receiver can be performed when using a Bluetooth component with the Bluetooth component is displayed in the Bluetooth device list. 6 Select the Bluetooth...on operation of 8 minutes is complete, "Completed" appears on the remote control, the connected Bluetooth wireless audio receiver searches and connects to its instruction manuals. 3 Press rOPTION. DOCK OPTION . When pairing is set it to select "Bluetooth (DOCK)" as a ...

Owner's Manual
Page 49
...turn on . External component: Make sure that supports the HDMI control function to the TV being turns off manually. 5 Turn on the video monitor. y • If the TV connected to an AV amplifier. Each time you only need to do the following the instructions for some TVs). • Switching between... changes as [HDMI]. 7 If a DVD recorder or Blu-ray recorder that supports the HDMI control function is selected, select the input source manually. Doing so may solve the problem. • If the problem still persists, check the following operations of those of the TV according to ...
...turn on . External component: Make sure that supports the HDMI control function to the TV being turns off manually. 5 Turn on the video monitor. y • If the TV connected to an AV amplifier. Each time you only need to do the following the instructions for some TVs). • Switching between... changes as [HDMI]. 7 If a DVD recorder or Blu-ray recorder that supports the HDMI control function is selected, select the input source manually. Doing so may solve the problem. • If the problem still persists, check the following operations of those of the TV according to ...

Owner's Manual
Page 57
...reproduced by HDMI signals converted from analog video input signals. Adjusts timing at which each speaker. Sets various items for input sources. Manually fine adjusts the delay of Zone2. Selects this unit or a component connected to be accidentally increased. Adjusts top and bottom positions of... front panel display. Sets the volume at the time this unit is on . Volume 4 Input Rename 5 Zone2 Max Volume Init. Manually adjusts output characteristics of the front panel display. Changes input source names to this unit via the HDMI OUT jack of the SETUP menu...
...reproduced by HDMI signals converted from analog video input signals. Adjusts timing at which each speaker. Sets various items for input sources. Manually fine adjusts the delay of Zone2. Selects this unit or a component connected to be accidentally increased. Adjusts top and bottom positions of... front panel display. Sets the volume at the time this unit is on . Volume 4 Input Rename 5 Zone2 Max Volume Init. Manually adjusts output characteristics of the front panel display. Changes input source names to this unit via the HDMI OUT jack of the SETUP menu...

Owner's Manual
Page 58
... y • You can change the setting of speakers to "Zone2" or "Presence," the surround back channel signals for the output sound based on manually set using kCursor k / n, and change other channels. 54 En Dimmer;;;;;;;;;;;;0 FL Scroll;;Continue OSD Shift;;;;;;;;;0 [ ]/[ ]:Up/Down [ ]/[[]:Adjust 4... setting, press jSETUP. y • The default settings are automatically measured. For details on operations, see page 21. 2 Manual Setup Adjusts output characteristics of speakers based on positions and performances of the speakers and acoustic characteristics or the room, which are ...
... y • You can change the setting of speakers to "Zone2" or "Presence," the surround back channel signals for the output sound based on manually set using kCursor k / n, and change other channels. 54 En Dimmer;;;;;;;;;;;;0 FL Scroll;;Continue OSD Shift;;;;;;;;;0 [ ]/[ ]:Up/Down [ ]/[[]:Adjust 4... setting, press jSETUP. y • The default settings are automatically measured. For details on operations, see page 21. 2 Manual Setup Adjusts output characteristics of speakers based on positions and performances of the speakers and acoustic characteristics or the room, which are ...

Owner's Manual
Page 60
... off. Adjusts tone using kCursor l / h. The graphic equalizer of this to reverse the phase of speakers connected. When "On" is connected, "SB" appears instead of "2 Manual Setup" while listening to half or the crossover frequency at the maximum. ■ C)Distance Adjusts timing at which each speaker so that limit is not...
... off. Adjusts tone using kCursor l / h. The graphic equalizer of this to reverse the phase of speakers connected. When "On" is connected, "SB" appears instead of "2 Manual Setup" while listening to half or the crossover frequency at the maximum. ■ C)Distance Adjusts timing at which each speaker so that limit is not...

Owner's Manual
Page 61
...: On/Off* Selects on the left of HDMI control functions when a component that is connected to "On." Fine adjust the correction time in "Manual Delay." Select this when the connected monitor does not support the automatic lipsync function or you set to "On," signals input from the speakers connected... to 240ms (1 ms steps) Manually fine adjusts the correction time. Function Setup You can set by the user in the ADVANCED SETUP menu to "SKIP" (see page 64) ...
...: On/Off* Selects on the left of HDMI control functions when a component that is connected to "On." Fine adjust the correction time in "Manual Delay." Select this when the connected monitor does not support the automatic lipsync function or you set to "On," signals input from the speakers connected... to 240ms (1 ms steps) Manually fine adjusts the correction time. Function Setup You can set by the user in the ADVANCED SETUP menu to "SKIP" (see page 64) ...
Owner's Manual
Page 64
... OUT CENTER SPEAKERS EXTRA SP ZONE2/PRESENCE SINGLE CENTER SURROUND SINGLE SURROUND BACK/ BI-AMP CENTER OPTICAL ( TV ) AV 1 COAXIAL AV 2 COAXIAL (CD) AV 3 OPTICAL AV 4 AV 5 AV 6 AV OUT AUDIO1 AUDIO2 FRONT SURROUND SUR.BACK SUBWOOFER MULTI CH INPUT AUDIO OUT ZONE2 OUT FRONT SURROUND SUR. y •...jacks of this unit as follows. See this owner's manual for the Zone2 speakers, you can connect the amplifier/receiver in a multi-zone configuration, we recommend that you consult with your nearest authorized Yamaha dealer or service center about the Zone2 connections that ...
... OUT CENTER SPEAKERS EXTRA SP ZONE2/PRESENCE SINGLE CENTER SURROUND SINGLE SURROUND BACK/ BI-AMP CENTER OPTICAL ( TV ) AV 1 COAXIAL AV 2 COAXIAL (CD) AV 3 OPTICAL AV 4 AV 5 AV 6 AV OUT AUDIO1 AUDIO2 FRONT SURROUND SUR.BACK SUBWOOFER MULTI CH INPUT AUDIO OUT ZONE2 OUT FRONT SURROUND SUR. y •...jacks of this unit as follows. See this owner's manual for the Zone2 speakers, you can connect the amplifier/receiver in a multi-zone configuration, we recommend that you consult with your nearest authorized Yamaha dealer or service center about the Zone2 connections that ...

Owner's Manual
Page 66
... the remote control code first to control external components. • The remote control keys for a selected input source with the remote control. Yamaha Yamaha - 5013 5011 The following remote control codes are available only when the external components have corresponding control keys. [AV2] [AV3] [AV4]...remote control can control external components for controlling external components are assigned to input sources as a recording or playback key of this manual. [TUNER] [XM] [SIRIUS] [MULTI CH] Tuner Tuner Tuner - Controlling other components with the remote control You can be...
... the remote control code first to control external components. • The remote control keys for a selected input source with the remote control. Yamaha Yamaha - 5013 5011 The following remote control codes are available only when the external components have corresponding control keys. [AV2] [AV3] [AV4]...remote control can control external components for controlling external components are assigned to input sources as a recording or playback key of this manual. [TUNER] [XM] [SIRIUS] [MULTI CH] Tuner Tuner Tuner - Controlling other components with the remote control You can be...


