
Owner's Manual
Page 1
U RX-V465 AV Receiver OWNER'S MANUAL
U RX-V465 AV Receiver OWNER'S MANUAL

Owner's Manual
Page 3
... of important operating and maintenance (servicing) instructions in the users manual, may void your outlet, consult an electrician for replacement of the obsolete outlet. 10 Protect the power cord from being affected by Yamaha Corporation of assurance that your FCC authorization to use only high... your authority, granted by the manufacturer, or sold with the manufacturer's instructions. 8 Do not install near water. 6 Clean only with this manual, meets FCC requirements. Install in to eliminate the problem by turning the unit "OFF" and "ON", please try to coaxial type cable. ...
... of important operating and maintenance (servicing) instructions in the users manual, may void your outlet, consult an electrician for replacement of the obsolete outlet. 10 Protect the power cord from being affected by Yamaha Corporation of assurance that your FCC authorization to use only high... your authority, granted by the manufacturer, or sold with the manufacturer's instructions. 8 Do not install near water. 6 Clean only with this manual, meets FCC requirements. Install in to eliminate the problem by turning the unit "OFF" and "ON", please try to coaxial type cable. ...

Owner's Manual
Page 4
... sunshine, fire or like. 21 Excessive sound pressure from earphones and headphones can be reached easily. 17 Be sure to read this manual carefully. Using this unit with high humidity (i.e. POUR LES CONSOMMATEURS CANADIENS Pour éviter les chocs électriques, introduire la lame...the "Troubleshooting" section on common operating errors before operating your local main voltage BEFORE plugging into the AC wall outlet. Contact qualified Yamaha service personnel when any damage resulting from use batteries of this unit. - On the top of this unit with a voltage other ...
... sunshine, fire or like. 21 Excessive sound pressure from earphones and headphones can be reached easily. 17 Be sure to read this manual carefully. Using this unit with high humidity (i.e. POUR LES CONSOMMATEURS CANADIENS Pour éviter les chocs électriques, introduire la lame...the "Troubleshooting" section on common operating errors before operating your local main voltage BEFORE plugging into the AC wall outlet. Contact qualified Yamaha service personnel when any damage resulting from use batteries of this unit. - On the top of this unit with a voltage other ...
Owner's Manual
Page 5
INTRODUCTION PREPARATION BASIC OPERATION ADVANCED OPERATION Contents INTRODUCTION Features 2 About this manual 3 Supplied accessories 3 Part names and functions 4 Front panel 4 Rear panel 5 Front panel display 6 Remote control 7 Quick start guide 8 L PREPARATION Preparing remote ... Information on jacks and cable plugs 13 Connecting a TV monitor or projector 14 Connecting other components 15 Connecting a Yamaha iPod universal dock or Bluetooth™ wireless audio receiver 16 Using the VIDEO AUX jacks on the front panel .... 16 Connecting the FM and AM antennas 17 Connecting ...
INTRODUCTION PREPARATION BASIC OPERATION ADVANCED OPERATION Contents INTRODUCTION Features 2 About this manual 3 Supplied accessories 3 Part names and functions 4 Front panel 4 Rear panel 5 Front panel display 6 Remote control 7 Quick start guide 8 L PREPARATION Preparing remote ... Information on jacks and cable plugs 13 Connecting a TV monitor or projector 14 Connecting other components 15 Connecting a Yamaha iPod universal dock or Bluetooth™ wireless audio receiver 16 Using the VIDEO AUX jacks on the front panel .... 16 Connecting the FM and AM antennas 17 Connecting ...
Owner's Manual
Page 7
...license from Dolby Laboratories. and other U.S. INTRODUCTION PREPARATION About this manual for your operation. • Some operations can be performed by Yamaha in accordance with a license agreement. In case the key names differ between the manual and product, the product has priority. • "ASTANDBY/ON... each position of the parts. • ☞ indicates the page describing the related information. Supplied accessories Check that you received all of HDMI Licensing LLC. Bluetooth™ Bluetooth is used by using either the keys on the front panel or the ones...
...license from Dolby Laboratories. and other U.S. INTRODUCTION PREPARATION About this manual for your operation. • Some operations can be performed by Yamaha in accordance with a license agreement. In case the key names differ between the manual and product, the product has priority. • "ASTANDBY/ON... each position of the parts. • ☞ indicates the page describing the related information. Supplied accessories Check that you received all of HDMI Licensing LLC. Bluetooth™ Bluetooth is used by using either the keys on the front panel or the ones...

Owner's Manual
Page 22
...the procedure. • To achieve the best results, make sure the room is as quiet as your listening room (YPAO) This unit has a Yamaha Parametric Acoustic Optimizer (YPAO). UT OPTIMIZER MIC h VIDEO AUX VIDEO AUDIO PORTABLE Using Auto Setup Optimizer microphone 1 Check the following . • All...recommended that you use this unit. y • See page 39 for your ears would be satisfactory. Optimizing the speaker setting for the "Manual Setup" procedure. 2 Connect the supplied optimizer microphone to the OPTIMIZER MIC jack on the front panel. With the YPAO, this unit via an...
...the procedure. • To achieve the best results, make sure the room is as quiet as your listening room (YPAO) This unit has a Yamaha Parametric Acoustic Optimizer (YPAO). UT OPTIMIZER MIC h VIDEO AUX VIDEO AUDIO PORTABLE Using Auto Setup Optimizer microphone 1 Check the following . • All...recommended that you use this unit. y • See page 39 for your ears would be satisfactory. Optimizing the speaker setting for the "Manual Setup" procedure. 2 Connect the supplied optimizer microphone to the OPTIMIZER MIC jack on the front panel. With the YPAO, this unit via an...
Owner's Manual
Page 32
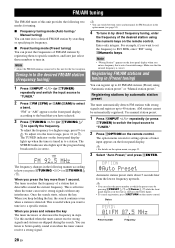
... (or hTUNING k / n) to specify the frequency. Use this unit for tuning. ■ Frequency tuning mode (Auto tuning / Manual tuning) You can receive strong signals without any interference. Make sure that is detected. Registering stations by registering them to specific numbers, and later just select those...!" appears on the remote control. Note • Adjust the FM/AM antennas connected to this method when the tuner cannot receive strong signals and stations are skipped during the search. Auto Preset Automatic station preset starts about 5 seconds later from the lowest...
... (or hTUNING k / n) to specify the frequency. Use this unit for tuning. ■ Frequency tuning mode (Auto tuning / Manual tuning) You can receive strong signals without any interference. Make sure that is detected. Registering stations by registering them to specific numbers, and later just select those...!" appears on the remote control. Note • Adjust the FM/AM antennas connected to this method when the tuner cannot receive strong signals and stations are skipped during the search. Auto Preset Automatic station preset starts about 5 seconds later from the lowest...

Owner's Manual
Page 33
...state. When registration is complete, the screen returns to which the station will be registered. "Wrong Num." When registration is registered. "Manual Preset" appears on the front panel display, followed soon by pressing nRETURN on the display. When you want to which the station ...• Preset numbers to which no stations are registered will be registered. The option menu screen for about 30 seconds. y • You can manually register AM stations or FM stations with weak signals. 1 Tune in to a station referring to "Tuning in Memory" is cleared. When you enter...
...state. When registration is complete, the screen returns to which the station will be registered. "Wrong Num." When registration is registered. "Manual Preset" appears on the front panel display, followed soon by pressing nRETURN on the display. When you want to which the station ...• Preset numbers to which no stations are registered will be registered. The option menu screen for about 30 seconds. y • You can manually register AM stations or FM stations with weak signals. 1 Tune in to a station referring to "Tuning in Memory" is cleared. When you enter...

Owner's Manual
Page 42
... Menu/Submenu Speaker Setup 1 Auto Setup (YPAO) 2 Manual Setup A)Config B)Level C)Distance D)Equalizer E)Test Tone Sound Setup 1 D. Range 2 Lipsync HDMI Auto Auto Manual Func. Automatically adjusts output characteristics of speakers. Manually adjusts output characteristics of speakers. Separately adjusts volume of speakers... Fine adjusts a delay time of automatic adjustments for the sound field programs. Protects some settings against accidental alteration. Manually fine adjusts the delay of audio and visual output. Set items for volumes. Sets items for the front panel display...
... Menu/Submenu Speaker Setup 1 Auto Setup (YPAO) 2 Manual Setup A)Config B)Level C)Distance D)Equalizer E)Test Tone Sound Setup 1 D. Range 2 Lipsync HDMI Auto Auto Manual Func. Automatically adjusts output characteristics of speakers. Manually adjusts output characteristics of speakers. Separately adjusts volume of speakers... Fine adjusts a delay time of automatic adjustments for the sound field programs. Protects some settings against accidental alteration. Manually fine adjusts the delay of audio and visual output. Set items for volumes. Sets items for the front panel display...

Owner's Manual
Page 43
... 1 Auto Setup Automatically adjusts output characteristics of the selected menu are available. y • The speaker configuration includes items for manual adjustment. For example, the following screen appears when you select "2 Display." One is "Auto Setup (YPAO)" for automatic adjustment...previous screen by repeating step 4. 5 To finish the setting, press lSETUP. For details on operations, see page 18. 2 Manual Setup Adjusts output characteristics of speakers based on the remote control. INTRODUCTION PREPARATION BASIC OPERATION Operating various settings for this unit (...
... 1 Auto Setup Automatically adjusts output characteristics of the selected menu are available. y • The speaker configuration includes items for manual adjustment. For example, the following screen appears when you select "2 Display." One is "Auto Setup (YPAO)" for automatic adjustment...previous screen by repeating step 4. 5 To finish the setting, press lSETUP. For details on operations, see page 18. 2 Manual Setup Adjusts output characteristics of speakers based on the remote control. INTRODUCTION PREPARATION BASIC OPERATION Operating various settings for this unit (...

Owner's Manual
Page 45
... for Dolby TrueHD signals. (Auto) Adjusts the dynamic range for reproducing bitstream signals. PEQ Uses a parametric equalizer selected in "Manual." To turn on the volume or balance setting of this unit. On Generates test tones. Off Select this when the connected ...GEQ Choices: 63Hz/160Hz/400Hz/1kHz/2.5kHz/ 6.3kHz/16kHz Adjustable range: -6.0dB to 0dB* to +6.0dB (0.5 dB step) Adjusts sound quality of "2 Manual Setup" while listening to a test tone. The graphic equalizer of the external amplifier. ■ D)Equalizer Adjusts sound quality and tone using nCursor l /...
... for Dolby TrueHD signals. (Auto) Adjusts the dynamic range for reproducing bitstream signals. PEQ Uses a parametric equalizer selected in "Manual." To turn on the volume or balance setting of this unit. On Generates test tones. Off Select this when the connected ...GEQ Choices: 63Hz/160Hz/400Hz/1kHz/2.5kHz/ 6.3kHz/16kHz Adjustable range: -6.0dB to 0dB* to +6.0dB (0.5 dB step) Adjusts sound quality of "2 Manual Setup" while listening to a test tone. The graphic equalizer of the external amplifier. ■ D)Equalizer Adjusts sound quality and tone using nCursor l /...

Owner's Manual
Page 46
... of a TV connected to a monitor component. Note • The brightness of display does not become bright in conjunction with the volume level. Manual Adjustable range: 0* to scroll the screen when a total number of characters exceed a display area of the front panel display. Function Setup You ... Adjusts the dynamic range automatically. Operating various settings for this unit (Setup menu) Auto Adjustable range: 0 to 240ms (1 ms step) Enables manual fine adjustment of the correction time when "HDMI Auto" is set to the HDMI OUT jack. Select this unit. On Outputs the HDMI signals...
... of a TV connected to a monitor component. Note • The brightness of display does not become bright in conjunction with the volume level. Manual Adjustable range: 0* to scroll the screen when a total number of characters exceed a display area of the front panel display. Function Setup You ... Adjusts the dynamic range automatically. Operating various settings for this unit (Setup menu) Auto Adjustable range: 0 to 240ms (1 ms step) Enables manual fine adjustment of the correction time when "HDMI Auto" is set to the HDMI OUT jack. Select this unit. On Outputs the HDMI signals...

Owner's Manual
Page 48
...available remote control codes, refer to "List of remote control codes" at the end of this manual. ■ Default remote control code settings Input source Category Manufacturer Default code [HDMI1] Blu-ray Disc Yamaha 2018 [HDMI2] - - - [HDMI3] - - - For a complete list of available ... 1 Press cCODE SET on the remote control using a pointed object such as a tip of a ballpoint pen. If it fails, bTRANSMIT blinks six times. Yamaha - - - - - 5013 - - 2 Press lSETUP on the remote control. 3 Enter "9981" using sNumeric keys. rExternal component operation keys Function as...
...available remote control codes, refer to "List of remote control codes" at the end of this manual. ■ Default remote control code settings Input source Category Manufacturer Default code [HDMI1] Blu-ray Disc Yamaha 2018 [HDMI2] - - - [HDMI3] - - - For a complete list of available ... 1 Press cCODE SET on the remote control using a pointed object such as a tip of a ballpoint pen. If it fails, bTRANSMIT blinks six times. Yamaha - - - - - 5013 - - 2 Press lSETUP on the remote control. 3 Enter "9981" using sNumeric keys. rExternal component operation keys Function as...

Owner's Manual
Page 51
.... Turn on the remote control to Display Speaker Setup in the Setup menu and adjust 41 minimum in Speaker Setup in the Setup the volume (Manual Setup→B)Level). If the problem persists, 11 not connected properly. Output from that the speaker wires are output from certain Try another speaker and...
.... Turn on the remote control to Display Speaker Setup in the Setup menu and adjust 41 minimum in Speaker Setup in the Setup the volume (Manual Setup→B)Level). If the problem persists, 11 not connected properly. Output from that the speaker wires are output from certain Try another speaker and...

Owner's Manual
Page 52
... audio signal format. If the problem persists, the cables may results from the playback component. Consult the manufacturer of the setup menu (Speaker Setup→Manual Setup→A)Config) is set to "SWFR" or "Front" when a 2-channel source is being played. "On." "CHECK SP WIRES!" Set "Bass... does not contain low frequency signals. Make sure all speaker cables are short-circuited. "Bass Out" of the setup menu (Speaker Setup→Manual Setup→A)Config) is set to "Off," or an input signal does not contain a surround back flag with "EXTD Surround" set to ...
... audio signal format. If the problem persists, the cables may results from the playback component. Consult the manufacturer of the setup menu (Speaker Setup→Manual Setup→A)Config) is set to "SWFR" or "Front" when a 2-channel source is being played. "On." "CHECK SP WIRES!" Set "Bass... does not contain low frequency signals. Make sure all speaker cables are short-circuited. "Bass Out" of the setup menu (Speaker Setup→Manual Setup→A)Config) is set to "Off," or an input signal does not contain a surround back flag with "EXTD Surround" set to ...
Owner's Manual
Page 53
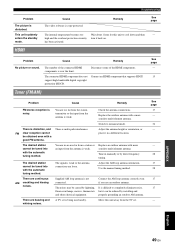
... is not connected. Tune in a different location. Adjust the AM loop antenna orientation. high and the overheat protection circuitry turn it in manually or by lightning, fluorescent lamps, motors, thermostats and other electrical equipment. Problem Cause Remedy No picture or sound. The desired station cannot ...be tuned into with a more sensitive multi element antenna. Adjust the antenna height or orientation, or place it back on. Use the manual tuning method. See page 17 - 34 - - 28 17 28 17 17 - The number of the HDMI components. Connect an HDMI component...
... is not connected. Tune in a different location. Adjust the AM loop antenna orientation. high and the overheat protection circuitry turn it in manually or by lightning, fluorescent lamps, motors, thermostats and other electrical equipment. Problem Cause Remedy No picture or sound. The desired station cannot ...be tuned into with a more sensitive multi element antenna. Adjust the antenna height or orientation, or place it back on. Use the manual tuning method. See page 17 - 34 - - 28 17 28 17 17 - The number of the HDMI components. Connect an HDMI component...

Owner's Manual
Page 54
... not work or function properly. Problem Cause Remedy See page Loading... Direct sunlight or lighting (from the Yamaha Place your iPod in the Yamaha iPod universal dock 16 and then place it back in the Yamaha iPod universal dock. 16 iPod universal dock. 50 En Adjust the lighting angle or reposition this unit... of acquiring song lists from the front panel. This unit is in the middle of recognizing the connection with the signal path Turn off this manual. universal dock to the DOCK terminal of 6 m (20 ft) and no more than 30 degrees offaxis from your iPod. this...
... not work or function properly. Problem Cause Remedy See page Loading... Direct sunlight or lighting (from the Yamaha Place your iPod in the Yamaha iPod universal dock 16 and then place it back in the Yamaha iPod universal dock. 16 iPod universal dock. 50 En Adjust the lighting angle or reposition this unit... of acquiring song lists from the front panel. This unit is in the middle of recognizing the connection with the signal path Turn off this manual. universal dock to the DOCK terminal of 6 m (20 ft) and no more than 30 degrees offaxis from your iPod. this...

Owner's Manual
Page 59
...When CPPM copy-protected DVD-Audio is played back, video and audio signals may not be enjoyed on headphones. ■ Virtual CINEMA DSP Yamaha has developed a Virtual CINEMA DSP algorithm that allows you can play back the audio commentaries of the Blu-ray Disc or HD DVD contents...compatible with the audio commentaries mixed down by using the DIGITAL INPUT OPTICAL (or COAXIAL) connections. • Refer to the supplied instruction manuals of the input source component, and set the input source component appropriately so that the component outputs the bitstream audio signals directly (does...
...When CPPM copy-protected DVD-Audio is played back, video and audio signals may not be enjoyed on headphones. ■ Virtual CINEMA DSP Yamaha has developed a Virtual CINEMA DSP algorithm that allows you can play back the audio commentaries of the Blu-ray Disc or HD DVD contents...compatible with the audio commentaries mixed down by using the DIGITAL INPUT OPTICAL (or COAXIAL) connections. • Refer to the supplied instruction manuals of the input source component, and set the input source component appropriately so that the component outputs the bitstream audio signals directly (does...

Owner's Manual
Page 61
... panel 5 AV OUT, rear panel 5 ■B B)Level, speaker setup 41 Basic operation, setup menu 39 Bass Out, A)Config, speaker setup 39 Bluetooth component playback 32 Bluetooth wireless audio receiver connection 16 Bluetooth, troubleshooting 51 ■C C)Distance, speaker setup 41 C.Image, ... batteries, remote control 9 iPod playback 30 iPod universal dock connection 16 iPod, troubleshooting 50 ■L Low frequency sound adjustment 22 ■M Manual, 2 Lipsync, sound setup 42 MaxVol, 3 Volume, function setup 43 Memory guard, setup menu 43 MEMORY, front panel 4 MONITOR OUT...
... panel 5 AV OUT, rear panel 5 ■B B)Level, speaker setup 41 Basic operation, setup menu 39 Bass Out, A)Config, speaker setup 39 Bluetooth component playback 32 Bluetooth wireless audio receiver connection 16 Bluetooth, troubleshooting 51 ■C C)Distance, speaker setup 41 C.Image, ... batteries, remote control 9 iPod playback 30 iPod universal dock connection 16 iPod, troubleshooting 50 ■L Low frequency sound adjustment 22 ■M Manual, 2 Lipsync, sound setup 42 MaxVol, 3 Volume, function setup 43 Memory guard, setup menu 43 MEMORY, front panel 4 MONITOR OUT...


