
Owner's Manual
Page 4
... in harmful interference with the requirements listed in the users manual, may void your outlet, consult an electrician for replacement of the obsolete outlet. 10 Protect the power cord from being affected by Yamaha Corporation of important operating and maintenance (servicing) instructions in... to CATV system installer: This reminder is being walked on the rear of interference, which can not locate the appropriate retailer, please contact Yamaha Electronics Corp., U.S.A. 6660 Orangethorpe Ave, Buena Park, CA 90620. MODEL: Serial No.: The serial number is used . Cable/s supplied...
... in harmful interference with the requirements listed in the users manual, may void your outlet, consult an electrician for replacement of the obsolete outlet. 10 Protect the power cord from being affected by Yamaha Corporation of important operating and maintenance (servicing) instructions in... to CATV system installer: This reminder is being walked on the rear of interference, which can not locate the appropriate retailer, please contact Yamaha Electronics Corp., U.S.A. 6660 Orangethorpe Ave, Buena Park, CA 90620. MODEL: Serial No.: The serial number is used . Cable/s supplied...
Owner's Manual
Page 5
... can be exposed to avoid humming sounds. 4 Do not expose this manual carefully. FOR CANADIAN CUSTOMERS To prevent electric shock, match wide blade of Equipment: Model Name: 714-522-9105 714-670-0108 AV Receiver RX-Z11 - CAUTION: READ THIS BEFORE OPERATING YOUR UNIT. do not place: ...B digital apparatus complies with chemical solvents; Telephone: Fax: Type of plug to sudden temperature changes from loud sounds is too late, Yamaha and the Electronic Industries Association's Consumer Electronics Group recommend you turn off this unit. - Other components, as they may cause fire, ...
... can be exposed to avoid humming sounds. 4 Do not expose this manual carefully. FOR CANADIAN CUSTOMERS To prevent electric shock, match wide blade of Equipment: Model Name: 714-522-9105 714-670-0108 AV Receiver RX-Z11 - CAUTION: READ THIS BEFORE OPERATING YOUR UNIT. do not place: ...B digital apparatus complies with chemical solvents; Telephone: Fax: Type of plug to sudden temperature changes from loud sounds is too late, Yamaha and the Electronic Industries Association's Consumer Electronics Group recommend you turn off this unit. - Other components, as they may cause fire, ...

Owner's Manual
Page 6
...the network and USB menus 80 Remote control operation 81 Using a PC server or Yamaha MCX-2000 82 Installing Windows Media Player 11 on your PC 82 Registering this unit on the Yamaha MCX-2000 82 Using the Internet Radio 83 Storing your headphones 55 Playing video ...Adjusting the speaker level 65 Recording 66 Internal Source Operation FM/AM tuning 68 Automatic tuning 68 Manual tuning 69 Direct frequency tuning 69 Selecting preset stations 70 Automatic preset tuning 70 Manual preset tuning 71 Exchanging preset stations 71 Using HD Radio™ features (U.S.A. model only 72...
...the network and USB menus 80 Remote control operation 81 Using a PC server or Yamaha MCX-2000 82 Installing Windows Media Player 11 on your PC 82 Registering this unit on the Yamaha MCX-2000 82 Using the Internet Radio 83 Storing your headphones 55 Playing video ...Adjusting the speaker level 65 Recording 66 Internal Source Operation FM/AM tuning 68 Automatic tuning 68 Manual tuning 69 Direct frequency tuning 69 Selecting preset stations 70 Automatic preset tuning 70 Manual preset tuning 71 Exchanging preset stations 71 Using HD Radio™ features (U.S.A. model only 72...

Owner's Manual
Page 7
... GUI menu overview 90 Stereo/Surround (Stereo/Surround menu 91 Input Select 96 Manual Setup (Basic 99 Manual Setup (Volume 102 Manual Setup (Sound 103 Manual Setup (Video 107 Manual Setup (Multi Zone 109 Manual Setup (Network 111 Manual Setup (Option 112 Signal Info. (Input signal information 114 Language 114 Saving ... ZONE DIGITAL OUT (COAXIAL) jack 136 Connecting Zone video monitor 137 Video signal up-conversion to the cover pages at the top of this manual for Zone 2, Zone 3, or Zone 4 140 Adjusting the tonal quality of Zone 2, Zone 3, or Zone 4........... 141 Using the Zone ...
... GUI menu overview 90 Stereo/Surround (Stereo/Surround menu 91 Input Select 96 Manual Setup (Basic 99 Manual Setup (Volume 102 Manual Setup (Sound 103 Manual Setup (Video 107 Manual Setup (Multi Zone 109 Manual Setup (Network 111 Manual Setup (Option 112 Signal Info. (Input signal information 114 Language 114 Saving ... ZONE DIGITAL OUT (COAXIAL) jack 136 Connecting Zone video monitor 137 Video signal up-conversion to the cover pages at the top of this manual for Zone 2, Zone 3, or Zone 4 140 Adjusting the tonal quality of Zone 2, Zone 3, or Zone 4........... 141 Using the Zone ...
Owner's Manual
Page 8
... Neural Audio Corporation and THX Ltd. THX is a trademark of THX Ltd., which may be registered in parentheses. • This manual is a registered trademark and the DTS logos, Symbol, DTS-HD and DTS-HD Master Audio are trademarks and logos owned by Neural...Laboratories. Refer to change in part as a result of improvements, etc. This receiver supports network connections. Manufactured under license under license from iBiquity Digital Corporation. iPodTM "iPod" is a trademark of YAMAHA CORPORATION. Circle Surround II, Dialog Clarity, TruBass, SRS and the symbol are ...
... Neural Audio Corporation and THX Ltd. THX is a trademark of THX Ltd., which may be registered in parentheses. • This manual is a registered trademark and the DTS logos, Symbol, DTS-HD and DTS-HD Master Audio are trademarks and logos owned by Neural...Laboratories. Refer to change in part as a result of improvements, etc. This receiver supports network connections. Manufactured under license under license from iBiquity Digital Corporation. iPodTM "iPod" is a trademark of YAMAHA CORPORATION. Circle Surround II, Dialog Clarity, TruBass, SRS and the symbol are ...

Owner's Manual
Page 10
... as the MP3 format) to that of this unit by using a Web browser ☞ P. 120 Automatic speaker setup features ◆ Advanced YPAO (Yamaha Parametric Room Acoustic Optimizer) for automatic speaker setup ☞ P. 46 ◆ Specialized parametric equalizer for the standing wave reduction ☞ P. 48 &#...iPod nano, and iPod mini Network features ☞ P. 80 ◆ NETWORK port to connect a PC and Yamaha MCX-2000 or access the Internet Radio via LAN ◆ DHCP automatic or manual network configuration USB features ☞ P. 83 ◆ USB ports to connect a USB storage device, USB ...
... as the MP3 format) to that of this unit by using a Web browser ☞ P. 120 Automatic speaker setup features ◆ Advanced YPAO (Yamaha Parametric Room Acoustic Optimizer) for automatic speaker setup ☞ P. 46 ◆ Specialized parametric equalizer for the standing wave reduction ☞ P. 48 &#...iPod nano, and iPod mini Network features ☞ P. 80 ◆ NETWORK port to connect a PC and Yamaha MCX-2000 or access the Internet Radio via LAN ◆ DHCP automatic or manual network configuration USB features ☞ P. 83 ◆ USB ports to connect a USB storage device, USB ...

Owner's Manual
Page 18
... this unit in multiple rooms simultaneously (multi-zone configuration) ☞ P. 133 • Automatically turning off this unit ☞ P. 56 Manually adjusting various parameters of this unit • Setting the language of the GUI menu ☞ P. 114 • Assigning the input/output jacks...; P. 96 • Setting the parameters related to the volume level ☞ P. 102 • Adjusting the tonal quality of each channel manually by using the parametric equalizer ☞ P. 104 • Adjusting the audio and video synchronization ☞ P. 105 • Muting the selected...
... this unit in multiple rooms simultaneously (multi-zone configuration) ☞ P. 133 • Automatically turning off this unit ☞ P. 56 Manually adjusting various parameters of this unit • Setting the language of the GUI menu ☞ P. 114 • Assigning the input/output jacks...; P. 96 • Setting the parameters related to the volume level ☞ P. 102 • Adjusting the tonal quality of each channel manually by using the parametric equalizer ☞ P. 104 • Adjusting the audio and video synchronization ☞ P. 105 • Muting the selected...

Owner's Manual
Page 22
... SBL FR RSW FL C SR LSW SL C FL FR 30˚ SL 60˚ SL 80˚ SBL SR SR SBR 30 cm (12 in "Manual Setup" (see page 100). If you use the front presence speakers (see page 21). Surround left and right speakers Center speaker Subwoofer The functions and...
... SBL FR RSW FL C SR LSW SL C FL FR 30˚ SL 60˚ SL 80˚ SBL SR SR SBR 30 cm (12 in "Manual Setup" (see page 100). If you use the front presence speakers (see page 21). Surround left and right speakers Center speaker Subwoofer The functions and...

Owner's Manual
Page 28
... cable 1 Remove approximately 10 mm (0.4 in) of insulation from the end of each terminal. To activate the biamplification connections, set "BI-AMP" to the instruction manuals of your speakers support bi-amplification. Check if your speakers to prevent short circuits. ■ Connecting the banana plug Tighten the knob and then insert...
... cable 1 Remove approximately 10 mm (0.4 in) of insulation from the end of each terminal. To activate the biamplification connections, set "BI-AMP" to the instruction manuals of your speakers support bi-amplification. Check if your speakers to prevent short circuits. ■ Connecting the banana plug Tighten the knob and then insert...

Owner's Manual
Page 29
... connected to the HDMI OUT jacks of the input source components to the signals input at the COAXIAL jack. Set "Conversion" to "On" in "Manual Setup" to "On", this unit allows the HDMI signals input at an HDMI IN jack to pass through this unit to the video output jacks...signals transmitted via optical digital audio cables. DIGITAL OPTICAL jacks For digital audio signals transmitted via left jacks. y This unit is set "Standby Through" in "Manual Setup" (see page 113). • If you connect components to be output at the HDMI input jacks only when "Support Audio" is equipped with ...
... connected to the HDMI OUT jacks of the input source components to the signals input at the COAXIAL jack. Set "Conversion" to "On" in "Manual Setup" to "On", this unit allows the HDMI signals input at an HDMI IN jack to pass through this unit to the video output jacks...signals transmitted via optical digital audio cables. DIGITAL OPTICAL jacks For digital audio signals transmitted via left jacks. y This unit is set "Standby Through" in "Manual Setup" (see page 113). • If you connect components to be output at the HDMI input jacks only when "Support Audio" is equipped with ...
Owner's Manual
Page 38
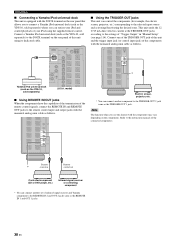
... universal dock (such as the TRIGGER OUT 1 jack. Electric screen, projector, etc. * You can connect another set of infrared signal receiver and Yamaha component to the REMOTE IN 2 and OUT 2 jacks same as the YDS-10, sold separately) to the TRIGGER OUT 2 jack same as the ...projector, etc.) corresponding to the selected input source and activating/deactivating the desired zone. REMOTE IN 1 OUT IN 2 OUT Remote * control in "Manual Setup" (see page 114). Connect a Yamaha iPod universal dock (such as the REMOTE IN 1 and OUT 1 jacks. 38 En model) ■ Using REMOTE IN/OUT jacks When the...
... universal dock (such as the TRIGGER OUT 1 jack. Electric screen, projector, etc. * You can connect another set of infrared signal receiver and Yamaha component to the REMOTE IN 2 and OUT 2 jacks same as the YDS-10, sold separately) to the TRIGGER OUT 2 jack same as the ...projector, etc.) corresponding to the selected input source and activating/deactivating the desired zone. REMOTE IN 1 OUT IN 2 OUT Remote * control in "Manual Setup" (see page 114). Connect a Yamaha iPod universal dock (such as the REMOTE IN 1 and OUT 1 jacks. 38 En model) ■ Using REMOTE IN/OUT jacks When the...

Owner's Manual
Page 40
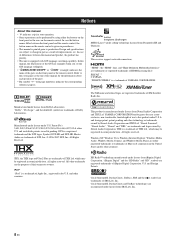
... "Front" or "Rear" to the USB ports This unit is disabled, you need to configure the network settings manually (see page 98). To enjoy music files saved on your PC and Yamaha MCX-2000, access the Internet Radio, or control this unit. • If the DHCP server function on your router... equipped with optional speakers) PC Router Network cable NETWORK Connecting the USB storage devices to select the active USB port (see page 111). • Yamaha MCX-2000, MCX-A10 and MCX-C15 may not be connected properly in same locations. The initial setting of "USB Select" is "Front". Connect...
... "Front" or "Rear" to the USB ports This unit is disabled, you need to configure the network settings manually (see page 98). To enjoy music files saved on your PC and Yamaha MCX-2000, access the Internet Radio, or control this unit. • If the DHCP server function on your router... equipped with optional speakers) PC Router Network cable NETWORK Connecting the USB storage devices to select the active USB port (see page 111). • Yamaha MCX-2000, MCX-A10 and MCX-C15 may not be connected properly in same locations. The initial setting of "USB Select" is "Front". Connect...

Owner's Manual
Page 41
... provides clearer reception than an indoor one. If you use the FM/AM tuning feature in "Manual Setup" (see page 110). customers When you experience poor reception quality, install an outdoor antenna. Consult the nearest authorized Yamaha dealer or service center about outdoor antennas. y You can connect either end of the AM...
... provides clearer reception than an indoor one. If you use the FM/AM tuning feature in "Manual Setup" (see page 110). customers When you experience poor reception quality, install an outdoor antenna. Consult the nearest authorized Yamaha dealer or service center about outdoor antennas. y You can connect either end of the AM...

Owner's Manual
Page 45
...indicators Lights up when this unit is in the FM, AM or XM Satellite Radio tuning mode. STEREO indicator Lights up when this unit is receiving a strong signal for an FM stereo broadcast while the AUTO indicator is lit (see page 68). Preparation D DSP indicators The respective indicator ...Flashes to show that a station can make settings for the presence and surround back speakers automatically by running "Auto Setup" (see page 46) or manually by adjusting settings for "Front Presence" and "Rear Presence" (see page 133). 45 En CINEMA DSP HD indicator Lights up when this unit ...
...indicators Lights up when this unit is in the FM, AM or XM Satellite Radio tuning mode. STEREO indicator Lights up when this unit is receiving a strong signal for an FM stereo broadcast while the AUTO indicator is lit (see page 68). Preparation D DSP indicators The respective indicator ...Flashes to show that a station can make settings for the presence and surround back speakers automatically by running "Auto Setup" (see page 46) or manually by adjusting settings for "Front Presence" and "Rear Presence" (see page 133). 45 En CINEMA DSP HD indicator Lights up when this unit ...

Owner's Manual
Page 46
...10063; Speakers are connected appropriately. ❏ Headphones are disconnected from this feature to carry out the automatic setup quickly. recommends setting them manually. • Sometimes due to the electrical complexities of subwoofers and the interaction with the room, you may not be output during the ...of the connected subwoofer is set the parameters that it is normal for your listening room (YPAO) This unit employs the YPAO (Yamaha Parametric Room Acoustic Optimizer) technology which lets you use the external amplifiers (see page 36), the amplifiers are turned on and ...
...10063; Speakers are connected appropriately. ❏ Headphones are disconnected from this feature to carry out the automatic setup quickly. recommends setting them manually. • Sometimes due to the electrical complexities of subwoofers and the interaction with the room, you may not be output during the ...of the connected subwoofer is set the parameters that it is normal for your listening room (YPAO) This unit employs the YPAO (Yamaha Parametric Room Acoustic Optimizer) technology which lets you use the external amplifiers (see page 36), the amplifiers are turned on and ...

Owner's Manual
Page 49
... check items. Error or warning messages When this unit. 49 En Press 9l to view the detailed information of Phase W3:Level Error Input Select Manual Setup Auto Setup System Memory Signal Info. Angle Check Angle Result Retry Exit Detail Setup Measurement Over W1:Out of the error or warning messages...
... check items. Error or warning messages When this unit. 49 En Press 9l to view the detailed information of Phase W3:Level Error Input Select Manual Setup Auto Setup System Memory Signal Info. Angle Check Angle Result Retry Exit Detail Setup Measurement Over W1:Out of the error or warning messages...

Owner's Manual
Page 50
... equalizer for each connected speaker. - y • You can reload the displayed result of the automatic setup by using "Parametric EQ" in "Manual Setup" (see page 104). • You can display the result of the adjustment of the automatic setup, press 9l repeatedly to average out... to eight listening positions in the display, press 9ENTER. "---" appears when no speaker is connected to this unit by using "Phase" in "Manual Setup" (see above) by pressing 9h repeatedly in the "Equalizing" result display. Equalizing (Speaker equalizing) Displays the result of the adjustment of...
... equalizer for each connected speaker. - y • You can reload the displayed result of the automatic setup by using "Parametric EQ" in "Manual Setup" (see page 104). • You can display the result of the adjustment of the automatic setup, press 9l repeatedly to average out... to eight listening positions in the display, press 9ENTER. "---" appears when no speaker is connected to this unit by using "Phase" in "Manual Setup" (see above) by pressing 9h repeatedly in the "Equalizing" result display. Equalizing (Speaker equalizing) Displays the result of the adjustment of...

Owner's Manual
Page 54
...) as the input source. model) Currently selected input source 3 Start playback on the selected source component or select a broadcast station. • Refer to the instruction manuals for the source component. • See page 68 for details. • You can control this unit by using a digital audio connection, set the operation mode...
...) as the input source. model) Currently selected input source 3 Start playback on the selected source component or select a broadcast station. • Refer to the instruction manuals for the source component. • See page 68 for details. • You can control this unit by using a digital audio connection, set the operation mode...

Owner's Manual
Page 57
... selected input source Currently selected menu item DVD qPLIIx Movie Sci-Fi Stereo/Surround Input Select Manual Setup Auto Setup System Memory Sound Video Basic Multi Zone Network Currently selected sound field program Menu area Manual Setup -40.0dB Current menu directory Volume level (see page 54) y • Set the operation mode...
... selected input source Currently selected menu item DVD qPLIIx Movie Sci-Fi Stereo/Surround Input Select Manual Setup Auto Setup System Memory Sound Video Basic Multi Zone Network Currently selected sound field program Menu area Manual Setup -40.0dB Current menu directory Volume level (see page 54) y • Set the operation mode...

Owner's Manual
Page 65
... sound Use the Pure Direct mode to enjoy the pure fidelity sound of each speaker while listening to "Video On", you set "Pure Direct" in "Manual Setup" to a music source. Notes • When you can adjust the output level of the selected source. Adjusting the tonal quality Use this unit plays... Direct" in the Pure Direct mode, Zone 2, Zone 3, and Zone 4 are not possible when this unit is performed. When the Pure Direct mode is in "Manual Setup" to select the high- Control range: -10.0 dB to adjust.
... sound Use the Pure Direct mode to enjoy the pure fidelity sound of each speaker while listening to "Video On", you set "Pure Direct" in "Manual Setup" to a music source. Notes • When you can adjust the output level of the selected source. Adjusting the tonal quality Use this unit plays... Direct" in the Pure Direct mode, Zone 2, Zone 3, and Zone 4 are not possible when this unit is performed. When the Pure Direct mode is in "Manual Setup" to select the high- Control range: -10.0 dB to adjust.


