
MCXSP10 Manual
Page 7
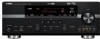
...9670; 4 original SCENE templates for customizing capability ◆ Controlling Yamaha SCENE control signal support component (some models only) working with ...output power (20 Hz to connect a Yamaha iPod universal dock (such as the YDS...◆ Battery charging capability Other features ◆ YPAO (Yamaha Parametric Room Acoustic Optimizer) for automatic speaker setup ◆... TV POWER AV STANDBY POWER CD DVD DOCK V-... XM DVR VCR PHONO TV VOL TV CH AMP VOLUME SOURCE TV TV MUTE TV INPUT MUTE ...Sound field programs ◆ Proprietary Yamaha technology for the creation of sound...
...9670; 4 original SCENE templates for customizing capability ◆ Controlling Yamaha SCENE control signal support component (some models only) working with ...output power (20 Hz to connect a Yamaha iPod universal dock (such as the YDS...◆ Battery charging capability Other features ◆ YPAO (Yamaha Parametric Room Acoustic Optimizer) for automatic speaker setup ◆... TV POWER AV STANDBY POWER CD DVD DOCK V-... XM DVR VCR PHONO TV VOL TV CH AMP VOLUME SOURCE TV TV MUTE TV INPUT MUTE ...Sound field programs ◆ Proprietary Yamaha technology for the creation of sound...

MCXSP10 Manual
Page 10
...TRIGGER OUT DVD DTV/CBL IN DVR OUT VIDEO SPEAKERS FRONT A CENTER R L IN VCR OUT MONITOR OUT SURROUND R L SURROUND BACK/ BI-AMP R SINGLE L REMOTE +12V 15mA MAX. Be sure to connect the left speaker Be sure to the corresponding speaker terminal of this unit. ... Connect the plain cable to the "-" (black) terminals. 3 Connect each speaker cable to connect the "+" (red) and "-" (black) properly. Subwoofer AV receiver 6 En Input jack Subwoofer cable SUBWOOFER PRE OUT jack IN OUT AC OUTLETS 1 Place your speaker. Connect the striped (grooved, etc.) cable to each ...
...TRIGGER OUT DVD DTV/CBL IN DVR OUT VIDEO SPEAKERS FRONT A CENTER R L IN VCR OUT MONITOR OUT SURROUND R L SURROUND BACK/ BI-AMP R SINGLE L REMOTE +12V 15mA MAX. Be sure to connect the left speaker Be sure to the corresponding speaker terminal of this unit. ... Connect the plain cable to the "-" (black) terminals. 3 Connect each speaker cable to connect the "+" (red) and "-" (black) properly. Subwoofer AV receiver 6 En Input jack Subwoofer cable SUBWOOFER PRE OUT jack IN OUT AC OUTLETS 1 Place your speaker. Connect the striped (grooved, etc.) cable to each ...
MCXSP10 Manual
Page 11
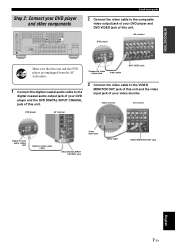
AV receiver DVD player Make sure that this unit. INTRODUCTION Step 2: Connect your video monitor. BACK SUBWOOFER VIDEO S VIDEO MD/CD-R 2 DVD 3 DTV /CBL IN2 DTV/CBL 4 ... OUT DVD DTV/CBL IN DVR OUT VIDEO SPEAKERS FRONT A CENTER R L IN VCR OUT MONITOR OUT SURROUND R L SURROUND BACK/ BI-AMP R SINGLE L REMOTE +12V 15mA MAX. Video monitor AV receiver DVD player AV receiver Digital coaxial audio output jack Digital coaxial audio cable Video input jack Video cable DVD DIGITAL INPUT COAXIAL jack VIDEO MONITOR...
AV receiver DVD player Make sure that this unit. INTRODUCTION Step 2: Connect your video monitor. BACK SUBWOOFER VIDEO S VIDEO MD/CD-R 2 DVD 3 DTV /CBL IN2 DTV/CBL 4 ... OUT DVD DTV/CBL IN DVR OUT VIDEO SPEAKERS FRONT A CENTER R L IN VCR OUT MONITOR OUT SURROUND R L SURROUND BACK/ BI-AMP R SINGLE L REMOTE +12V 15mA MAX. Video monitor AV receiver DVD player AV receiver Digital coaxial audio output jack Digital coaxial audio cable Video input jack Video cable DVD DIGITAL INPUT COAXIAL jack VIDEO MONITOR...
MCXSP10 Manual
Page 15
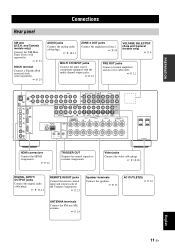
... audio cable plugs. ☞ P. 19-21 REMOTE IN/OUT jacks Connect the remote control input and output jacks of the Yamaha components. ☞ P. 23 Speaker terminals Connect the speakers. ☞ P. 13 AC OUTLET(S) ☞ P. 24 ANTENNA ... 11 En and Canada models only) Connect the XM MiniTuner Dock (sold separately). ☞ P. 53 DOCK terminal Connect a Yamaha iPod universal dock (sold separately). ☞ P. 23 AUDIO jacks Connect the analog audio cable plugs. ☞ P. 18-21...CENTER R L IN VCR OUT MONITOR OUT SURROUND R L SURROUND BACK/ BI-AMP R SINGLE L REMOTE +12V 15mA MAX.
... audio cable plugs. ☞ P. 19-21 REMOTE IN/OUT jacks Connect the remote control input and output jacks of the Yamaha components. ☞ P. 23 Speaker terminals Connect the speakers. ☞ P. 13 AC OUTLET(S) ☞ P. 24 ANTENNA ... 11 En and Canada models only) Connect the XM MiniTuner Dock (sold separately). ☞ P. 53 DOCK terminal Connect a Yamaha iPod universal dock (sold separately). ☞ P. 23 AUDIO jacks Connect the analog audio cable plugs. ☞ P. 18-21...CENTER R L IN VCR OUT MONITOR OUT SURROUND R L SURROUND BACK/ BI-AMP R SINGLE L REMOTE +12V 15mA MAX.

MCXSP10 Manual
Page 17
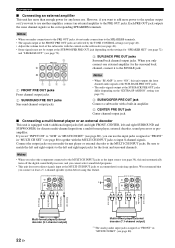
... using this unit. • Use the magnetically shielded speakers. Subwoofer PRE OUT SUBWOOFER FRONT B/ZONE2/ PRESENCE R EXTRA SP L SPEAKERS FRONT A CENTER R L SURROUND R L SURROUND BACK/ BI-AMP R SINGLE L English Center speaker Right Left Front speakers (FRONT A) Right Left Surround speakers Right Left Surround back speakers When you turn on this unit (see...
... using this unit. • Use the magnetically shielded speakers. Subwoofer PRE OUT SUBWOOFER FRONT B/ZONE2/ PRESENCE R EXTRA SP L SPEAKERS FRONT A CENTER R L SURROUND R L SURROUND BACK/ BI-AMP R SINGLE L English Center speaker Right Left Front speakers (FRONT A) Right Left Surround speakers Right Left Surround back speakers When you turn on this unit (see...

MCXSP10 Manual
Page 18
Red: positive (+) Black: negative (-) Red: positive (+) Black: negative (-) 3 Insert one speaker system. FRONT A R L SURROUND BACK/ BI-AMP R SINGLE L 14 En This unit Note When you to make bi-amplification connections to one bare wire into the hole on the side of each.... Check if your speakers to separate the LPF (low pass filter) and HPF (high pass filter) crossovers. To activate the bi-amplification connections, set "BI-AMP" to "ON" in ) 2 Loosen the knob. Front speakers Right Left 4 Tighten the knob to the instruction manuals of the speakers for details. Refer to secure...
Red: positive (+) Black: negative (-) Red: positive (+) Black: negative (-) 3 Insert one speaker system. FRONT A R L SURROUND BACK/ BI-AMP R SINGLE L 14 En This unit Note When you to make bi-amplification connections to one bare wire into the hole on the side of each.... Check if your speakers to separate the LPF (low pass filter) and HPF (high pass filter) crossovers. To activate the bi-amplification connections, set "BI-AMP" to "ON" in ) 2 Loosen the knob. Front speakers Right Left 4 Tighten the knob to the instruction manuals of the speakers for details. Refer to secure...
MCXSP10 Manual
Page 26
... discrete multi-channel input from a multi-format player, external decoder, sound processor or preamplifier. If you set to "ON", this feature. Notes • When "BI-AMP" is equipped with the MULTI CH INPUT jacks to input 8-channel signals. Notes • When you select the component connected to the MULTI CH INPUT...
... discrete multi-channel input from a multi-format player, external decoder, sound processor or preamplifier. If you set to "ON", this feature. Notes • When "BI-AMP" is equipped with the MULTI CH INPUT jacks to input 8-channel signals. Notes • When you select the component connected to the MULTI CH INPUT...
MCXSP10 Manual
Page 31
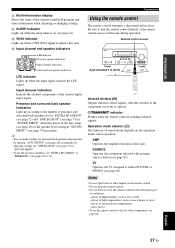
Connections Using the remote control The remote control transmits a directional infrared ray. AMP Operates the amplifier function of this window at the remote control sensor on (see page 86). Remote control sensor Approximately 6 m (20 ft) 30 30 Infrared ...
Connections Using the remote control The remote control transmits a directional infrared ray. AMP Operates the amplifier function of this window at the remote control sensor on (see page 86). Remote control sensor Approximately 6 m (20 ft) 30 30 Infrared ...

MCXSP10 Manual
Page 33
... page 12) Select "PRESENCE" to set , the "AUTO:RESULT" display appears in the OSD. Parametric equalizer type EQ Parametric equalizer adjusts the level of "BI-AMP" in the advanced setup (see page 96) or "EXTRA SP ASSIGN" in the auto setup procedure. Choices: NATURAL, FLAT, FRONT • Select "NATURAL" to... speakers. • When you do not perform any operation on this unit. • We recommend that you cannot select "PRESENCE" or "ZONE2" in "BI-AMP" (see page 91) Select "ZONE2" to set the function of your other speakers. 7 Press Dn to select "START" and then press DENTER to start the...
... page 12) Select "PRESENCE" to set , the "AUTO:RESULT" display appears in the OSD. Parametric equalizer type EQ Parametric equalizer adjusts the level of "BI-AMP" in the advanced setup (see page 96) or "EXTRA SP ASSIGN" in the auto setup procedure. Choices: NATURAL, FLAT, FRONT • Select "NATURAL" to... speakers. • When you do not perform any operation on this unit. • We recommend that you cannot select "PRESENCE" or "ZONE2" in "BI-AMP" (see page 91) Select "ZONE2" to set the function of your other speakers. 7 Press Dn to select "START" and then press DENTER to start the...
MCXSP10 Manual
Page 43
y • We recommend that the current status is displayed in the OSD by using the "OSD-AMP" parameter in "OPTION MENU" (see page 83). Press HAUDIO SELECT (or IAUDIO SEL) repeatedly to switch between input jacks when more than one input jack ...
y • We recommend that the current status is displayed in the OSD by using the "OSD-AMP" parameter in "OPTION MENU" (see page 83). Press HAUDIO SELECT (or IAUDIO SEL) repeatedly to switch between input jacks when more than one input jack ...

MCXSP10 Manual
Page 65
... some of the parameters to KAMP and then press ODISPLAY on more than the initial factory settings, an asterisk mark (*) appears by using the "OSD-AMP" parameter in the OSD. STATUS VOL:-40.0dB MOVIE Sci-Fi INPUT: DVD A.SEL: HDMI NIGHT: OFF 4 Press Dk / n to select the desired sound field...
... some of the parameters to KAMP and then press ODISPLAY on more than the initial factory settings, an asterisk mark (*) appears by using the "OSD-AMP" parameter in the OSD. STATUS VOL:-40.0dB MOVIE Sci-Fi INPUT: DVD A.SEL: HDMI NIGHT: OFF 4 Press Dk / n to select the desired sound field...

MCXSP10 Manual
Page 76
... the location of the SOUND MENU parameters are muted and this feature to turn FRONT A and B on , all the speakers including the subwoofer in "BI-AMP" (see page 96), you use the presence speakers (see page 91) Select "ZONE2" to set "EXTRA SP ASSIGN" to prioritize either the presence or the...
... the location of the SOUND MENU parameters are muted and this feature to turn FRONT A and B on , all the speakers including the subwoofer in "BI-AMP" (see page 96), you use the presence speakers (see page 91) Select "ZONE2" to set "EXTRA SP ASSIGN" to prioritize either the presence or the...

MCXSP10 Manual
Page 82
.... - when this setting will be used if the initial settings of the speakers and the input sources. • 6.1/7.1-channel playback is being played. - when "BI-AMP" is set to "ON" (see page 96). • When this unit is turned off, this unit is in the stereo playback, Compressed Music Enhancer (see...
.... - when this setting will be used if the initial settings of the speakers and the input sources. • 6.1/7.1-channel playback is being played. - when "BI-AMP" is set to "ON" (see page 96). • When this unit is turned off, this unit is in the stereo playback, Compressed Music Enhancer (see...

MCXSP10 Manual
Page 85
... convert the signals even if you must make the same type of the parameter setting in the OSD. DIMMER;;;;;;;;;0 OSD-SHIFT;;;;;;0 OSD-SOURCE;;;30s OSD-AMP;;;;;;30s FL SCROLL;;;CONT [ ]/[ ]:Up/Down [ ]/[[]:Select [ [ y As a result of video connections between 480 line video signals and 576 line video signals. • The analog...
... convert the signals even if you must make the same type of the parameter setting in the OSD. DIMMER;;;;;;;;;0 OSD-SHIFT;;;;;;0 OSD-SOURCE;;;30s OSD-AMP;;;;;;30s FL SCROLL;;;CONT [ ]/[ ]:Up/Down [ ]/[[]:Select [ [ y As a result of video connections between 480 line video signals and 576 line video signals. • The analog...

MCXSP10 Manual
Page 86
...; Press Dh to make any adjustments to "HDMI ASP". • When "HDMI ASP" is selected as the input source. Amplifier function OSD display time OSD-AMP Use this feature to "THRGH" (see page 81), you perform a certain operation. Notes • When "HDMI UP-SCALING" is set the amount of "HDMI ASP...
...; Press Dh to make any adjustments to "HDMI ASP". • When "HDMI ASP" is selected as the input source. Amplifier function OSD display time OSD-AMP Use this feature to "THRGH" (see page 81), you perform a certain operation. Notes • When "HDMI UP-SCALING" is set the amount of "HDMI ASP...

MCXSP10 Manual
Page 89
... components made by using the remote control. In this unit and the input source component by Yamaha and other components, you must set the input source of the SCENE template on the remote ...Setting the input source of the selected SCENE template. * CODE SET TRANSMIT POWER TV POWER AV STANDBY POWER CD DVD DOCK V-AUX MD CD-R CBL DTV MULTI CH IN AUDIO SEL TUNER XM... DVR VCR PHONO TV VOL TV CH AMP VOLUME SOURCE TV TV MUTE TV INPUT MUTE CLASSICAL LIVE/CLUB ENTERTAIN MOVIE 1 2 3 4 STEREO ENHANCER STRAIGHT ...
... components made by using the remote control. In this unit and the input source component by Yamaha and other components, you must set the input source of the SCENE template on the remote ...Setting the input source of the selected SCENE template. * CODE SET TRANSMIT POWER TV POWER AV STANDBY POWER CD DVD DOCK V-AUX MD CD-R CBL DTV MULTI CH IN AUDIO SEL TUNER XM... DVR VCR PHONO TV VOL TV CH AMP VOLUME SOURCE TV TV MUTE TV INPUT MUTE CLASSICAL LIVE/CLUB ENTERTAIN MOVIE 1 2 3 4 STEREO ENHANCER STRAIGHT ...

MCXSP10 Manual
Page 90
...DVR VCR PHONO TV VOL TV CH AMP VOLUME SOURCE TV TV MUTE TV INPUT MUTE CLASSICAL LIVE/CLUB ENTERTAIN MOVIE 1 2 3 4 STEREO ENHANCER STRAIGHT PURE DIRECT 5 6 7 8 SUR. DISPLAY REC SCENE 1 2 3 4 *1 *2 *1 *1 CODE SET TRANSMIT POWER TV POWER AV STANDBY POWER CD DVD DOCK V-AUX MD... CD-R CBL DTV MULTI CH IN AUDIO SEL TUNER XM DVR VCR PHONO TV VOL TV CH AMP VOLUME SOURCE TV TV MUTE TV INPUT MUTE CLASSICAL LIVE/CLUB ENTERTAIN MOVIE...
...DVR VCR PHONO TV VOL TV CH AMP VOLUME SOURCE TV TV MUTE TV INPUT MUTE CLASSICAL LIVE/CLUB ENTERTAIN MOVIE 1 2 3 4 STEREO ENHANCER STRAIGHT PURE DIRECT 5 6 7 8 SUR. DISPLAY REC SCENE 1 2 3 4 *1 *2 *1 *1 CODE SET TRANSMIT POWER TV POWER AV STANDBY POWER CD DVD DOCK V-AUX MD... CD-R CBL DTV MULTI CH IN AUDIO SEL TUNER XM DVR VCR PHONO TV VOL TV CH AMP VOLUME SOURCE TV TV MUTE TV INPUT MUTE CLASSICAL LIVE/CLUB ENTERTAIN MOVIE...

MCXSP10 Manual
Page 91
...for each input selector button. l Left Left Preset down (1-8) Down A-E/CAT. DISPLAY REC SCENE 1 2 3 4 7 8 9 Remote control DVD player/ recorder 1 AV POWER Power *1 2 1-9, 0, +10 Numeric buttons 3 TITLE Title 4 PRESET/CH k Up VCR Power *1 Numeric buttons Digital TV/ Cable TV LD player CD ... POWER CD DVD DOCK V-AUX MD CD-R CBL DTV MULTI CH IN AUDIO SEL TUNER XM DVR VCR PHONO TV VOL TV CH AMP VOLUME SOURCE TV TV MUTE TV INPUT MUTE CLASSICAL LIVE/CLUB ENTERTAIN MOVIE 1 2 3 4 2 3 4 5 6 CLASSICAL LIVE/CLUB ENTERTAIN MOVIE 1 2 3 4 STEREO ...
...for each input selector button. l Left Left Preset down (1-8) Down A-E/CAT. DISPLAY REC SCENE 1 2 3 4 7 8 9 Remote control DVD player/ recorder 1 AV POWER Power *1 2 1-9, 0, +10 Numeric buttons 3 TITLE Title 4 PRESET/CH k Up VCR Power *1 Numeric buttons Digital TV/ Cable TV LD player CD ... POWER CD DVD DOCK V-AUX MD CD-R CBL DTV MULTI CH IN AUDIO SEL TUNER XM DVR VCR PHONO TV VOL TV CH AMP VOLUME SOURCE TV TV MUTE TV INPUT MUTE CLASSICAL LIVE/CLUB ENTERTAIN MOVIE 1 2 3 4 2 3 4 5 6 CLASSICAL LIVE/CLUB ENTERTAIN MOVIE 1 2 3 4 STEREO ...

MCXSP10 Manual
Page 98
... code is set to "00001". • Select "ID2" when the remote control AMP ID code is set the AMP ID of each speaker must be 8 Ω or higher. CODE SET TRANSMIT POWER TV POWER AV STANDBY POWER TRANSMIT Flashes 6Ω MIN Front Center Surround Surround back If you use one set (A or B), the... impedance of each speaker must be 6 Ω or higher. * The Canada model cannot use one set (A or B), the impedance of this unit and the other Yamaha receivers/ amplifiers in the same room separately.
... code is set to "00001". • Select "ID2" when the remote control AMP ID code is set the AMP ID of each speaker must be 8 Ω or higher. CODE SET TRANSMIT POWER TV POWER AV STANDBY POWER TRANSMIT Flashes 6Ω MIN Front Center Surround Surround back If you use one set (A or B), the... impedance of each speaker must be 6 Ω or higher. * The Canada model cannot use one set (A or B), the impedance of this unit and the other Yamaha receivers/ amplifiers in the same room separately.
MCXSP10 Manual
Page 100
.... 96 En Choices: YES, CANCEL ■ Monitor check MON.CHK Use this feature to activate or deactivate the monitor check function of this unit receives the information of the advanced setup. ■ SCENE IR code setting SCENE IR Use this feature to output the remote control signals at the SURROUND... you can only select "FRONT B" or "NONE" in "EXTRA SP ASSIGN" (see page 14). Note When "BI-AMP" is set the tuner frequency step according to the REMOTE OUT jack is not the Yamaha component and does not have the capability of the SCENE control signals. Choices: ON, OFF • Select "ON...
.... 96 En Choices: YES, CANCEL ■ Monitor check MON.CHK Use this feature to activate or deactivate the monitor check function of this unit receives the information of the advanced setup. ■ SCENE IR code setting SCENE IR Use this feature to output the remote control signals at the SURROUND... you can only select "FRONT B" or "NONE" in "EXTRA SP ASSIGN" (see page 14). Note When "BI-AMP" is set the tuner frequency step according to the REMOTE OUT jack is not the Yamaha component and does not have the capability of the SCENE control signals. Choices: ON, OFF • Select "ON...


