MCXSP10 Manual
Page 5
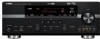
... of this manual for the SCENE feature .... 85 Controlling this unit, a TV, or other components.... 86 Setting remote control codes 88 Resetting all remote control codes 89 Using multi-zone configuration 90 Connecting Zone 2 90 Controlling Zone 2 91 Advanced setup 93 Using the...program information 107 Parametric equalizer information 108 Specifications 109 Index 111 APPENDIX (at the end of this manual) Front panel i Remote control ii List of remote control codes iii "1SPEAKER" or "ADVD" (example) indicates the name of the parts. ADDITIONAL INFORMATION APPENDIX English 1 En...
... of this manual for the SCENE feature .... 85 Controlling this unit, a TV, or other components.... 86 Setting remote control codes 88 Resetting all remote control codes 89 Using multi-zone configuration 90 Connecting Zone 2 90 Controlling Zone 2 91 Advanced setup 93 Using the...program information 107 Parametric equalizer information 108 Specifications 109 Index 111 APPENDIX (at the end of this manual) Front panel i Remote control ii List of remote control codes iii "1SPEAKER" or "ADVD" (example) indicates the name of the parts. ADDITIONAL INFORMATION APPENDIX English 1 En...
MCXSP10 Manual
Page 6
... annoying blaring or distortion - Design and specifications are registered trademarks of improvements, etc. We Want You Listening For A Lifetime Yamaha and the Electronic Industries Association's Consumer Electronics Group want you to production. Manufactured under license from excessive volume levels. Product "DTS... of your sensitive hearing. "SILENT CINEMA" is a trademark of the parts on the remote control is given in parentheses. • This manual is too late, Yamaha and the Electronic Industries Association's Consumer Electronics Group recommend you to change in the U.S. ...
... annoying blaring or distortion - Design and specifications are registered trademarks of improvements, etc. We Want You Listening For A Lifetime Yamaha and the Electronic Industries Association's Consumer Electronics Group want you to production. Manufactured under license from excessive volume levels. Product "DTS... of your sensitive hearing. "SILENT CINEMA" is a trademark of the parts on the remote control is given in parentheses. • This manual is too late, Yamaha and the Electronic Industries Association's Consumer Electronics Group recommend you to change in the U.S. ...

MCXSP10 Manual
Page 7
...Radio ◆ XM Satellite Radio tuning capability (using ZONE CONTROL ◆ Bi-amplification connection capability ◆ Sleep timer Check that allow you received all of the following parts. DISPLAY REC SCENE 1 2 3 4 Batteries (2) (AA, R6, UM-3) Optimizer microphone AM loop antenna Indoor ... charging capability Other features ◆ YPAO (Yamaha Parametric Room Acoustic Optimizer) for automatic speaker setup ◆ 192-kHz/24-bit D/A converter ◆ OSD (on the models. 3 En Remote control CODE SET TRANSMIT POWER TV POWER AV STANDBY POWER CD DVD DOCK V-AUX MD CD...
...Radio ◆ XM Satellite Radio tuning capability (using ZONE CONTROL ◆ Bi-amplification connection capability ◆ Sleep timer Check that allow you received all of the following parts. DISPLAY REC SCENE 1 2 3 4 Batteries (2) (AA, R6, UM-3) Optimizer microphone AM loop antenna Indoor ... charging capability Other features ◆ YPAO (Yamaha Parametric Room Acoustic Optimizer) for automatic speaker setup ◆ 192-kHz/24-bit D/A converter ◆ OSD (on the models. 3 En Remote control CODE SET TRANSMIT POWER TV POWER AV STANDBY POWER CD DVD DOCK V-AUX MD CD...
MCXSP10 Manual
Page 8
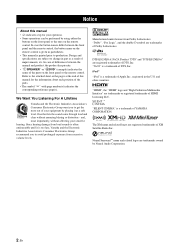
...and manganese batteries) together. the VTRANSMIT indicator does not flash or its light becomes dim. • Do not use different types of the remote control decreases. - Voltages are as these different types of batteries may cause damage to the correct position using a straight slot screwdriver. Rotate ...110/120/220/230-240 V AC, 50/60 Hz VOLTAGE SELECTOR 230240V Voltage indication Notes • Change all of them correctly in the remote control, the contents of this unit and create a potential fire hazard. Improper setting of the VOLTAGE SELECTOR may have the same shape and ...
...and manganese batteries) together. the VTRANSMIT indicator does not flash or its light becomes dim. • Do not use different types of the remote control decreases. - Voltages are as these different types of batteries may cause damage to the correct position using a straight slot screwdriver. Rotate ...110/120/220/230-240 V AC, 50/60 Hz VOLTAGE SELECTOR 230240V Voltage indication Notes • Change all of them correctly in the remote control, the contents of this unit and create a potential fire hazard. Improper setting of the VOLTAGE SELECTOR may have the same shape and ...

MCXSP10 Manual
Page 10
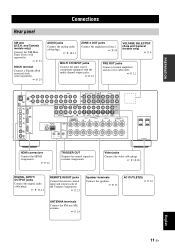
... BACK/ BI-AMP R SINGLE L REMOTE +12V 15mA MAX. Connect the plain cable to the "-" (black) terminals. 3 Connect each other. 4 Do not let the bare speaker wires touch any metal part of this unit. 5 Connect the subwoofer cable to the SUBWOOFER PRE OUT jack of the subwoofer. Subwoofer AV receiver 6 En Input jack Subwoofer...
... BACK/ BI-AMP R SINGLE L REMOTE +12V 15mA MAX. Connect the plain cable to the "-" (black) terminals. 3 Connect each other. 4 Do not let the bare speaker wires touch any metal part of this unit. 5 Connect the subwoofer cable to the SUBWOOFER PRE OUT jack of the subwoofer. Subwoofer AV receiver 6 En Input jack Subwoofer...
MCXSP10 Manual
Page 11
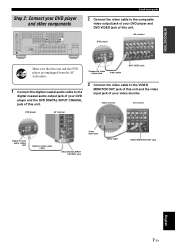
...CBL IN DVR OUT VIDEO SPEAKERS FRONT A CENTER R L IN VCR OUT MONITOR OUT SURROUND R L SURROUND BACK/ BI-AMP R SINGLE L REMOTE +12V 15mA MAX. AV receiver DVD player Make sure that this unit. IN OUT AC OUTLETS Quick start guide 2 Connect the video cable to the VIDEO MONITOR OUT jack...and the video input jack of this unit and the DVD player are unplugged from the AC wall outlets. Video monitor AV receiver DVD player AV receiver Digital coaxial audio output jack Digital coaxial audio cable Video input jack Video cable DVD DIGITAL INPUT COAXIAL jack VIDEO MONITOR OUT...
...CBL IN DVR OUT VIDEO SPEAKERS FRONT A CENTER R L IN VCR OUT MONITOR OUT SURROUND R L SURROUND BACK/ BI-AMP R SINGLE L REMOTE +12V 15mA MAX. AV receiver DVD player Make sure that this unit. IN OUT AC OUTLETS Quick start guide 2 Connect the video cable to the VIDEO MONITOR OUT jack...and the video input jack of this unit and the DVD player are unplugged from the AC wall outlets. Video monitor AV receiver DVD player AV receiver Digital coaxial audio output jack Digital coaxial audio cable Video input jack Video cable DVD DIGITAL INPUT COAXIAL jack VIDEO MONITOR OUT...
MCXSP10 Manual
Page 12
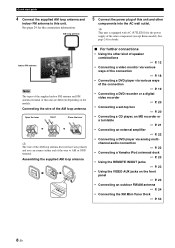
...; P. 21 • Connecting an external amplifier ☞ P. 22 • Connecting a DVD player via analog multichannel audio connection ☞ P. 22 • Connecting a Yamaha iPod universal dock ☞ P. 23 • Using the REMOTE IN/OUT jacks ☞ P. 23 • Using the VIDEO AUX jacks on the models. See page 24 for details. Quick start...
...; P. 21 • Connecting an external amplifier ☞ P. 22 • Connecting a DVD player via analog multichannel audio connection ☞ P. 22 • Connecting a Yamaha iPod universal dock ☞ P. 23 • Using the REMOTE IN/OUT jacks ☞ P. 23 • Using the VIDEO AUX jacks on the models. See page 24 for details. Quick start...
MCXSP10 Manual
Page 13
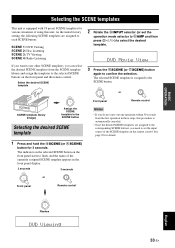
... SCENE button to watch a TV program..." y The indicator on your player. Note To use the "TV Viewing" template (Case B), you must connect a satellite receiver, a cable TV receiver or an HDTV decoder to select "TV Viewing". Refer to the instruction manual of the desired sources. If the speakers are 6 ohm speakers, set... 4 ohm speakers can automatically activate the DVD player and start playback when you change the input source or sound field program, the SCENE mode is a Yamaha product and has capability of the SCENE control signals with the REMOTE OUT jack of the connected speakers.
... SCENE button to watch a TV program..." y The indicator on your player. Note To use the "TV Viewing" template (Case B), you must connect a satellite receiver, a cable TV receiver or an HDTV decoder to select "TV Viewing". Refer to the instruction manual of the desired sources. If the speakers are 6 ohm speakers, set... 4 ohm speakers can automatically activate the DVD player and start playback when you change the input source or sound field program, the SCENE mode is a Yamaha product and has capability of the SCENE control signals with the REMOTE OUT jack of the connected speakers.
MCXSP10 Manual
Page 14
...y If you cannot find the desired situation, you have to a music program of power in order to select "Radio Listening". Press FSCENE4 (or FSCENE4) to receive infrared signals from the standby mode, press the desired FSCENE buttons (or FSCENE) or AMAIN ZONE ON/OFF on the front panel (or HPOWER on... this unit ☞ P. 41 10 En To turn on the remote control). See page 25 for details. ■ Adjusting the parameters of this unit • Automatically optimizing the speaker parameters for your iPod with this unit...
...y If you cannot find the desired situation, you have to a music program of power in order to select "Radio Listening". Press FSCENE4 (or FSCENE4) to receive infrared signals from the standby mode, press the desired FSCENE buttons (or FSCENE) or AMAIN ZONE ON/OFF on the front panel (or HPOWER on... this unit ☞ P. 41 10 En To turn on the remote control). See page 25 for details. ■ Adjusting the parameters of this unit • Automatically optimizing the speaker parameters for your iPod with this unit...
MCXSP10 Manual
Page 15
... video cable plugs. ☞ P. 18-20 DIGITAL INPUT/ OUTPUT jacks Connect the digital audio cable plugs. ☞ P. 19-21 REMOTE IN/OUT jacks Connect the remote control input and output jacks of the Yamaha components. ☞ P. 23 Speaker terminals Connect the speakers. ☞ P. 13 AC OUTLET(S) ☞ P. 24 ANTENNA terminals Connect the FM...
... video cable plugs. ☞ P. 18-20 DIGITAL INPUT/ OUTPUT jacks Connect the digital audio cable plugs. ☞ P. 19-21 REMOTE IN/OUT jacks Connect the remote control input and output jacks of the Yamaha components. ☞ P. 23 Speaker terminals Connect the speakers. ☞ P. 13 AC OUTLET(S) ☞ P. 24 ANTENNA terminals Connect the FM...

MCXSP10 Manual
Page 27
...other components before making connections. ■ Using REMOTE IN/OUT jacks When the components are the Yamaha products and have the capability of the SCENE control signals, this unit and the remote control input jack of the components to control ... OPTICAL REMOTE IN OUT S VIDEO VIDEO L AUDIO R OPTICAL Remote control out Remote control in the advanced setup menu to "OFF" (see page 96). PREPARATION ■ Connecting a Yamaha iPod universal dock This unit is not the Yamaha product, set "SCENE IR" in S V L R O Infrared signal receiver or Yamaha component Yamaha component ...
...other components before making connections. ■ Using REMOTE IN/OUT jacks When the components are the Yamaha products and have the capability of the SCENE control signals, this unit and the remote control input jack of the components to control ... OPTICAL REMOTE IN OUT S VIDEO VIDEO L AUDIO R OPTICAL Remote control out Remote control in the advanced setup menu to "OFF" (see page 96). PREPARATION ■ Connecting a Yamaha iPod universal dock This unit is not the Yamaha product, set "SCENE IR" in S V L R O Infrared signal receiver or Yamaha component Yamaha component ...
MCXSP10 Manual
Page 29
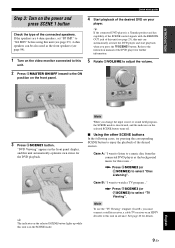
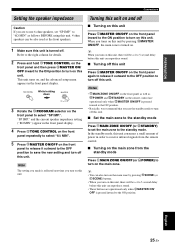
... turn on . TONE CONTROL While holding down MASTER ON OFF 3 Rotate the DPROGRAM selector on , and the advanced setup menu appears in order to receive infrared signals from the remote control. ■ Turning on the main zone from the standby mode Press AMAIN ZONE ON/OFF (or HPOWER) to turn on the... remote control are operational only when BMASTER ON/ OFF is turned off this unit. This unit turns on the front panel to select "SP IMP.". When ...
... turn on . TONE CONTROL While holding down MASTER ON OFF 3 Rotate the DPROGRAM selector on , and the advanced setup menu appears in order to receive infrared signals from the remote control. ■ Turning on the main zone from the standby mode Press AMAIN ZONE ON/OFF (or HPOWER) to turn on the... remote control are operational only when BMASTER ON/ OFF is turned off this unit. This unit turns on the front panel to select "SP IMP.". When ...
MCXSP10 Manual
Page 31
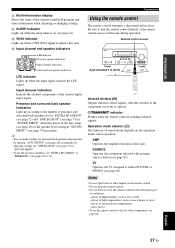
...by running "AUTO SETUP" (see page 28) or manually by adjusting settings for other components, see page 74) procedure. Connections Using the remote control The remote control transmits a directional infrared ray. TV Operates the TV assigned to operate. places of high temperatures, such as near a heater or ...contains the LFE signal. SOURCE Operates the component selected with an input selector button (see page 41). Be sure to aim the remote control directly at the component you want to either DTV/CBL or PHONO (see pages 29 or 72). PREPARATION L Multi-information ...
...by running "AUTO SETUP" (see page 28) or manually by adjusting settings for other components, see page 74) procedure. Connections Using the remote control The remote control transmits a directional infrared ray. TV Operates the TV assigned to operate. places of high temperatures, such as near a heater or ...contains the LFE signal. SOURCE Operates the component selected with an input selector button (see page 41). Be sure to aim the remote control directly at the component you want to either DTV/CBL or PHONO (see pages 29 or 72). PREPARATION L Multi-information ...
MCXSP10 Manual
Page 32
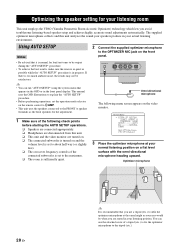
...fix the optimizer microphone to about half way (or slightly less). ❏ The crossover frequency controls of the following menu screen appears on the remote control to KAMP. • This unit uses the speakers connected to the OPTIMIZER MIC jack on a flat level surface with the omni-directional ... position on the front panel. • Be advised that appears in the OSD or in your listening room This unit employs the YPAO (Yamaha Parametric Room Acoustic Optimizer) technology which lets you are turned on. ❏ The connected subwoofer is turned on and the volume level is ...
...fix the optimizer microphone to about half way (or slightly less). ❏ The crossover frequency controls of the following menu screen appears on the remote control to KAMP. • This unit uses the speakers connected to the OPTIMIZER MIC jack on a flat level surface with the omni-directional ... position on the front panel. • Be advised that appears in the OSD or in your listening room This unit employs the YPAO (Yamaha Parametric Room Acoustic Optimizer) technology which lets you are turned on. ❏ The connected subwoofer is turned on and the volume level is ...
MCXSP10 Manual
Page 37
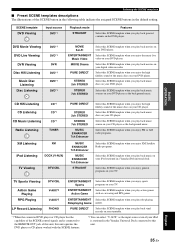
...to flash, and the name of the SCENE template on the front panel starts to the SCENE button Selecting the desired SCENE template Front panel Remote control Notes • If you can select the desired SCENE templates from the last operation in the front panel display. 3 seconds 3 ...seconds 1 or 1 Front panel Remote control English 1 Flashes DVD Viewing 33 En As the initial factory setting, the following SCENE templates are assigned to each SCENE button: SCENE 1:...
...to flash, and the name of the SCENE template on the front panel starts to the SCENE button Selecting the desired SCENE template Front panel Remote control Notes • If you can select the desired SCENE templates from the last operation in the front panel display. 3 seconds 3 ...seconds 1 or 1 Front panel Remote control English 1 Flashes DVD Viewing 33 En As the initial factory setting, the following SCENE templates are assigned to each SCENE button: SCENE 1:...
MCXSP10 Manual
Page 39
... template when you enjoy the music live video on your iPod is stationed in the Yamaha Universal Dock connected to the REMOTE OUT jack of the SCENE button in the following table indicate the assigned SCENE buttons in a Yamaha iPod universal dock. Select this SCENE template when you play action games Action Game...
... template when you enjoy the music live video on your iPod is stationed in the Yamaha Universal Dock connected to the REMOTE OUT jack of the SCENE button in the following table indicate the assigned SCENE buttons in a Yamaha iPod universal dock. Select this SCENE template when you play action games Action Game...
MCXSP10 Manual
Page 40
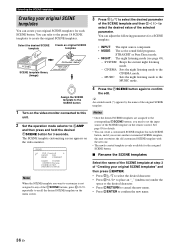
... the CINEMA mode. − MUSIC: Sets the night listening mode to the MUSIC mode. 1 Assign the SCENE template to the SCENE button 1 Turn on the remote control. The SCENE template customizing screen appears on the menu screen. 4 Press the FSCENE button again to confirm the edit. You can adjust the following...
... the CINEMA mode. − MUSIC: Sets the night listening mode to the MUSIC mode. 1 Assign the SCENE template to the SCENE button 1 Turn on the remote control. The SCENE template customizing screen appears on the menu screen. 4 Press the FSCENE button again to confirm the edit. You can adjust the following...

MCXSP10 Manual
Page 41
... VCR DVR V-AUX DTV/CBL DVD MD/CD-R TUNER CD XM PHONO INPUT: DVD Currently selected input source y The corresponding input selector button on the remote control for the currently selected input source lights up for approximately 5 seconds after you press any buttons on the..." before you play back a CD encoded in DTS. y To play DTS-encoded CDs when using a digital audio connection, set the operation mode selector on the remote control to KAMP. y • See page 48 to adjust the level of the input selector buttons (A)) to select the desired input source. BASIC OPERATION Playback...
... VCR DVR V-AUX DTV/CBL DVD MD/CD-R TUNER CD XM PHONO INPUT: DVD Currently selected input source y The corresponding input selector button on the remote control for the currently selected input source lights up for approximately 5 seconds after you press any buttons on the..." before you play back a CD encoded in DTS. y To play DTS-encoded CDs when using a digital audio connection, set the operation mode selector on the remote control to KAMP. y • See page 48 to adjust the level of the input selector buttons (A)) to select the desired input source. BASIC OPERATION Playback...
MCXSP10 Manual
Page 43
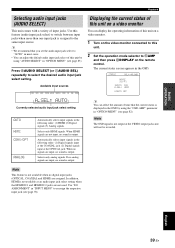
... desired audio input jack select setting. BASIC OPERATION Playback Selecting audio input jacks (AUDIO SELECT) This unit comes with a variety of this unit on the remote control.
... desired audio input jack select setting. BASIC OPERATION Playback Selecting audio input jacks (AUDIO SELECT) This unit comes with a variety of this unit on the remote control.

MCXSP10 Manual
Page 44
... When you can combine a video image from a video source with a stereo analog audio cable plug to exit from the video source on the remote control to the left and right headphone channels. y • You can display the format, sampling frequency, channel, bit rate and flag data ...from the front panel display when the audio output is resumed. Displaying the input source information You can also rotate 0VOLUME on the remote control. Muting the audio output Press LMUTE on the video monitor. Playback Using your headphones Connect a pair of headphones with sound from...
... When you can combine a video image from a video source with a stereo analog audio cable plug to exit from the video source on the remote control to the left and right headphone channels. y • You can display the format, sampling frequency, channel, bit rate and flag data ...from the front panel display when the audio output is resumed. Displaying the input source information You can also rotate 0VOLUME on the remote control. Muting the audio output Press LMUTE on the video monitor. Playback Using your headphones Connect a pair of headphones with sound from...

