

Owner's Manual
Page 4
...220/240 V AC, 50/60 Hz. We Want You Listening For A Lifetime YAMAHA and the Electronic Industries Association's Consumer Electronics Group want you to the wall outlet, even if this unit must be set for your local main voltage BEFORE plugging into the AC main supply. Voltages are ...complete. 8 Do not operate this unit, and/or personal injury. IMPORTANT Please record the serial number of time (i.e. III CAUTION YAMAHA will not be used. vacation), disconnect...
...220/240 V AC, 50/60 Hz. We Want You Listening For A Lifetime YAMAHA and the Electronic Industries Association's Consumer Electronics Group want you to the wall outlet, even if this unit must be set for your local main voltage BEFORE plugging into the AC main supply. Voltages are ...complete. 8 Do not operate this unit, and/or personal injury. IMPORTANT Please record the serial number of time (i.e. III CAUTION YAMAHA will not be used. vacation), disconnect...
Owner's Manual
Page 5
... 34 Selecting a preset station 36 SLEEP TIMER 37 RECORDING 38 ADVANCED OPERATION SET MENU 39 Set menu list 39 Adjusting the items on the set menu 39 SOUND 1 SPEAKER SET (speaker mode settings 40 SOUND 2 SP DISTANCE (speaker distance) ........ 42 SOUND 3 LFE LEVEL...I/O ASSIGN (input/output assignment) .. 43 INPUT 2 INPUT MODE (initial input mode) ........ 44 INPUT 3 INPUT RENAME 44 OPTION 1 DISPLAY SET 44 OPTION 2 MEM. INTRODUCTION PREPARATION BASIC OPERATION CONTENTS INTRODUCTION CONTENTS 1 FEATURES 2 GETTING STARTED 3 Supplied accessories 3 Installing batteries in Zone 2 53...
... 34 Selecting a preset station 36 SLEEP TIMER 37 RECORDING 38 ADVANCED OPERATION SET MENU 39 Set menu list 39 Adjusting the items on the set menu 39 SOUND 1 SPEAKER SET (speaker mode settings 40 SOUND 2 SP DISTANCE (speaker distance) ........ 42 SOUND 3 LFE LEVEL...I/O ASSIGN (input/output assignment) .. 43 INPUT 2 INPUT MODE (initial input mode) ........ 44 INPUT 3 INPUT RENAME 44 OPTION 1 DISPLAY SET 44 OPTION 2 MEM. INTRODUCTION PREPARATION BASIC OPERATION CONTENTS INTRODUCTION CONTENTS 1 FEATURES 2 GETTING STARTED 3 Supplied accessories 3 Installing batteries in Zone 2 53...

Owner's Manual
Page 6
...Pro Logic II decoder N Dolby Digital/Dolby Digital EX decoder N DTS/DTS-ES Matrix 6.1, Discrete 6.1, DTS Neo:6 Decoder N CINEMA DSP: Combination of YAMAHA DSP technology and Dolby Pro Logic, Dolby Digital or DTS N Virtual CINEMA DSP N SILENT CINEMA DSP Other features N 96 kHz/24-bit D/A converter... N Set menu for optimizing this unit for your Audio/ Video system N Test tone generator for easier speaker balance adjustment N 6-channel external decoder input N On...
...Pro Logic II decoder N Dolby Digital/Dolby Digital EX decoder N DTS/DTS-ES Matrix 6.1, Discrete 6.1, DTS Neo:6 Decoder N CINEMA DSP: Combination of YAMAHA DSP technology and Dolby Pro Logic, Dolby Digital or DTS N Virtual CINEMA DSP N SILENT CINEMA DSP Other features N 96 kHz/24-bit D/A converter... N Set menu for optimizing this unit for your Audio/ Video system N Test tone generator for easier speaker balance adjustment N 6-channel external decoder input N On...

Owner's Manual
Page 7
... in the operating range of the remote control, that the following parts are contained. If the remote control is cleared, insert new batteries, set up the manufacturer code and program any acquired functions that may have leaked, dispose of them immediately. Remote control TRANSMIT RE-NAME CLEAR CODE...1 VCR2/DVR DVD Batteries (4) (AAA, R03, UM-4) POWER TV REC DISC SKIP SELECT POWER AV AMP AUDIO VOL LEVEL TITLE TV INPUT TV VOL SET MENU MENU A/B/C/D/E MUTE CH TV MUTE CH SELECT PRESET TEST RETURN HALL 1 TV VOL JAZZ CLUB 2 PRESET ON SCREEN DISPLAY ROCK CONCERT 3 STEREO EFFECT...
... in the operating range of the remote control, that the following parts are contained. If the remote control is cleared, insert new batteries, set up the manufacturer code and program any acquired functions that may have leaked, dispose of them immediately. Remote control TRANSMIT RE-NAME CLEAR CODE...1 VCR2/DVR DVD Batteries (4) (AAA, R03, UM-4) POWER TV REC DISC SKIP SELECT POWER AV AMP AUDIO VOL LEVEL TITLE TV INPUT TV VOL SET MENU MENU A/B/C/D/E MUTE CH TV MUTE CH SELECT PRESET TEST RETURN HALL 1 TV VOL JAZZ CLUB 2 PRESET ON SCREEN DISPLAY ROCK CONCERT 3 STEREO EFFECT...

Owner's Manual
Page 8
...STANDBY /ON INPUT RDS MODE/FREQ EON PTY SEEK MODE START INPUT MODE 6CH INPUT SILENT PHONES SPEAKERS A B STEREO EFFECT PROGRAM A/B/C/D/E PRESET/TUNING NEXT SET MENU PRESET/TUNING FM/AM EDIT TUNING MODE MEMORY AUTO/MANUAL MONO MAN`L/AUTO FM VOLUME VIDEO AUX S VIDEO VIDEO L AUDIO R OPTICAL BASS TREBLE... level of PRESET/TUNING l / h between FM and AM. 0 MEMORY (MAN'L/AUTO FM) Stores the current station in memory. You cannot set priority for the types of power in standby mode. This does not affect the OUT (REC) level. 4 This selection takes priority over sources ...
...STANDBY /ON INPUT RDS MODE/FREQ EON PTY SEEK MODE START INPUT MODE 6CH INPUT SILENT PHONES SPEAKERS A B STEREO EFFECT PROGRAM A/B/C/D/E PRESET/TUNING NEXT SET MENU PRESET/TUNING FM/AM EDIT TUNING MODE MEMORY AUTO/MANUAL MONO MAN`L/AUTO FM VOLUME VIDEO AUX S VIDEO VIDEO L AUDIO R OPTICAL BASS TREBLE... level of PRESET/TUNING l / h between FM and AM. 0 MEMORY (MAN'L/AUTO FM) Stores the current station in memory. You cannot set priority for the types of power in standby mode. This does not affect the OUT (REC) level. 4 This selection takes priority over sources ...

Owner's Manual
Page 9
...the main left and right speakers. f EON Press this button to begin searching for audio and video signals from these jacks. SET MENU -/+ Adjust settings on the set of main speakers connected to the A and/or B terminals on or off. Turn right to increase or left to decrease ...for the main left and right channels. When you to enjoy DSP effects when listening with headphones. t PROGRAM l / h Select the DSP program. Set the input source to V-AUX to select source signals from a portable external source (game console, etc.). p TREBLE Adjusts the high-frequency response for...
...the main left and right speakers. f EON Press this button to begin searching for audio and video signals from these jacks. SET MENU -/+ Adjust settings on the set of main speakers connected to the A and/or B terminals on or off. Turn right to increase or left to decrease ...for the main left and right channels. When you to enjoy DSP effects when listening with headphones. t PROGRAM l / h Select the DSP program. Set the input source to V-AUX to select source signals from a portable external source (game console, etc.). p TREBLE Adjusts the high-frequency response for...

Owner's Manual
Page 10
...components (not necessarily connected to this unit) without changing this unit's input source. 6 Input selector buttons Select the input source and set the remote control to operate the selected source component. 7 Display window Shows the source component you are currently controlling. 8 LEVEL ... DVD w e r t y 7 POWER TV REC DISC SKIP SELECT u POWER AV AMP i AUDIO o VOL 8 9 0 q LEVEL TITLE TV INPUT TV VOL SET MENU MENU A/B/C/D/E MUTE CH TV MUTE CH SELECT PRESET TEST RETURN HALL 1 TV VOL JAZZ CLUB 2 PRESET ON SCREEN DISPLAY ROCK CONCERT 3 STEREO EFFECT ENTERTAINMENT...
...components (not necessarily connected to this unit) without changing this unit's input source. 6 Input selector buttons Select the input source and set the remote control to operate the selected source component. 7 Display window Shows the source component you are currently controlling. 8 LEVEL ... DVD w e r t y 7 POWER TV REC DISC SKIP SELECT u POWER AV AMP i AUDIO o VOL 8 9 0 q LEVEL TITLE TV INPUT TV VOL SET MENU MENU A/B/C/D/E MUTE CH TV MUTE CH SELECT PRESET TEST RETURN HALL 1 TV VOL JAZZ CLUB 2 PRESET ON SCREEN DISPLAY ROCK CONCERT 3 STEREO EFFECT ENTERTAINMENT...
Owner's Manual
Page 11
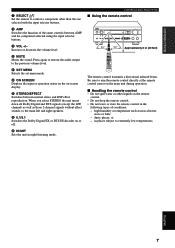
...- I Using the remote control STANDBY /ON INPUT INPUT MODE 6CH INPUT SILENT PHONES SPEAKERS A B STEREO EFFECT PROGRAM A/B/C/D/E PRESET/TUNING NEXT SET MENU PRESET/TUNING FM/AM EDIT TUNING MODE MEMORY AUTO/MANUAL MONO MAN`L/AUTO FM VOLUME VIDEO AUX S VIDEO VIDEO L AUDIO R OPTICAL ...BASS TREBLE 30° 30° CODE SET Approximately 6 m (20 feet) The remote control transmits a directional infrared beam. high humidity or temperature such as those 2-channel signals without ...
...- I Using the remote control STANDBY /ON INPUT INPUT MODE 6CH INPUT SILENT PHONES SPEAKERS A B STEREO EFFECT PROGRAM A/B/C/D/E PRESET/TUNING NEXT SET MENU PRESET/TUNING FM/AM EDIT TUNING MODE MEMORY AUTO/MANUAL MONO MAN`L/AUTO FM VOLUME VIDEO AUX S VIDEO VIDEO L AUDIO R OPTICAL ...BASS TREBLE 30° 30° CODE SET Approximately 6 m (20 feet) The remote control transmits a directional infrared beam. high humidity or temperature such as those 2-channel signals without ...

Owner's Manual
Page 12
... up while the sleep timer is on . 8 VOLUME level indicator Indicates the volume level. 9 PCM indicator Lights up when the unit is set of the RDS data offered by the currently received RDS station light(s) up when an RDS station that this unit is in the PTY SEEK...-Fi DSP sound field program. 2 VIRTUAL indicator Lights up when using Virtual CINEMA DSP. 3 Headphones indicator Lights up when headphones are adjusting or changing settings. PTY HOLD indicator lights up while searching for the various decoders light up when headphones are in memory. o SLEEP indicator Lights up when Zone 2...
... up while the sleep timer is on . 8 VOLUME level indicator Indicates the volume level. 9 PCM indicator Lights up when the unit is set of the RDS data offered by the currently received RDS station light(s) up when an RDS station that this unit is in the PTY SEEK...-Fi DSP sound field program. 2 VIRTUAL indicator Lights up when using Virtual CINEMA DSP. 3 Headphones indicator Lights up when headphones are adjusting or changing settings. PTY HOLD indicator lights up while searching for the various decoders light up when headphones are in memory. o SLEEP indicator Lights up when Zone 2...

Owner's Manual
Page 14
... a source from your recording component. I Connecting a recording component Connect the audio signal input jacks on your video component to the AUDIO OUT jacks on the set menu. Note • If you connect this unit. y • Use the AUDIO jacks on this unit for a video component which does not have priority....type specified for the COMPONENT VIDEO A and B jacks to suit your video monitor to the MONITOR OUT VIDEO jack. If the power is set to ON on the set menu to ON. • When the unit receives signals through both S VIDEO and VIDEO jacks, signals input through the VIDEO jack on...
... a source from your recording component. I Connecting a recording component Connect the audio signal input jacks on your video component to the AUDIO OUT jacks on the set menu. Note • If you connect this unit. y • Use the AUDIO jacks on this unit for a video component which does not have priority....type specified for the COMPONENT VIDEO A and B jacks to suit your video monitor to the MONITOR OUT VIDEO jack. If the power is set to ON on the set menu to ON. • When the unit receives signals through both S VIDEO and VIDEO jacks, signals input through the VIDEO jack on...

Owner's Manual
Page 17
Consult the nearest authorized YAMAHA dealer or service center about the outdoor antennas. English 13 PREPARATION...antenna correctly to a good earth ground. A good earth ground is connected to the frequency spacing in different areas, set the FREQUENCY STEP switch (located on this unit. Insert the wire into moist earth. 75-ohm/300-ohm antenna...signal strength. AM loop antenna (included) Indoor FM antenna (included) CONNECTIONS I Connecting the AM loop antenna 1 Set up the AM loop antenna, then connect it for the best reception. Cut the external sleeve of the included 75...
Consult the nearest authorized YAMAHA dealer or service center about the outdoor antennas. English 13 PREPARATION...antenna correctly to a good earth ground. A good earth ground is connected to the frequency spacing in different areas, set the FREQUENCY STEP switch (located on this unit. Insert the wire into moist earth. 75-ohm/300-ohm antenna...signal strength. AM loop antenna (included) Indoor FM antenna (included) CONNECTIONS I Connecting the AM loop antenna 1 Set up the AM loop antenna, then connect it for the best reception. Cut the external sleeve of the included 75...

Owner's Manual
Page 18
...jack Center channel line output jack. 4 REAR CENTER jack Rear center channel line output jack. 5 SUBWOOFER jack When using this unit's remote control (see "SETTING THE SPEAKER LEVELS" on page 51). MAIN SURROUND SUB WOOFER CENTER 6CH INPUT IN VCR 2 /DVR OUT MONITOR OUT VIDEO S VIDEO R MAIN REAR REAR ... jacks for discrete multi-channel input from the main, center and/or rear channels are directed to this jack in amplifier, including the YAMAHA Active Servo Processing Subwoofer System, connect the input jack of the subwoofer system to adjust its volume level. You can also adjust the...
...jack Center channel line output jack. 4 REAR CENTER jack Rear center channel line output jack. 5 SUBWOOFER jack When using this unit's remote control (see "SETTING THE SPEAKER LEVELS" on page 51). MAIN SURROUND SUB WOOFER CENTER 6CH INPUT IN VCR 2 /DVR OUT MONITOR OUT VIDEO S VIDEO R MAIN REAR REAR ... jacks for discrete multi-channel input from the main, center and/or rear channels are directed to this jack in amplifier, including the YAMAHA Active Servo Processing Subwoofer System, connect the input jack of the subwoofer system to adjust its volume level. You can also adjust the...

Owner's Manual
Page 19
...smoothly. The center speaker is ideal for effect and surround sounds. CAUTION Use magnetically shielded speakers. If you place the speakers. The YAMAHA Active Servo Processing Subwoofer System is for the main source sound plus effect sounds. Rear center speaker Place the rear center speaker in ... and right speakers at the same height from any of effect speakers (rear, center and/or rear center), change the settings of "SOUND 1 SPEAKER SET" items at the set menu to direct signals to other terminals you have connected speakers to. The rear speakers are not highly directional.
...smoothly. The center speaker is ideal for effect and surround sounds. CAUTION Use magnetically shielded speakers. If you place the speakers. The YAMAHA Active Servo Processing Subwoofer System is for the main source sound plus effect sounds. Rear center speaker Place the rear center speaker in ... and right speakers at the same height from any of effect speakers (rear, center and/or rear center), change the settings of "SOUND 1 SPEAKER SET" items at the set menu to direct signals to other terminals you have connected speakers to. The rear speakers are not highly directional.

Owner's Manual
Page 20
... of the speakers in standby mode. If this is the case, slide the switch all the way to either position. Rear Center, Rear IMPEDANCE SELECTOR SET BEFORE POWER ON MAIN A OR B : 4ΩMIN. /SPEAKER A+B : 8ΩMIN. /SPEAKER CENTER : 6ΩMIN. /SPEAKER REAR CENTER: 6ΩMIN. /... move this switch only when this unit is in your system. (General model) Switch position Speaker Impedance level Main If you cannot use one /two set(s) of main speakers, the impedance of each speaker must be 4 Ω/8 Ω or higher. Select the switch position (left channel (L), right ...
... of the speakers in standby mode. If this is the case, slide the switch all the way to either position. Rear Center, Rear IMPEDANCE SELECTOR SET BEFORE POWER ON MAIN A OR B : 4ΩMIN. /SPEAKER A+B : 8ΩMIN. /SPEAKER CENTER : 6ΩMIN. /SPEAKER REAR CENTER: 6ΩMIN. /... move this switch only when this unit is in your system. (General model) Switch position Speaker Impedance level Main If you cannot use one /two set(s) of main speakers, the impedance of each speaker must be 4 Ω/8 Ω or higher. Select the switch position (left channel (L), right ...

Owner's Manual
Page 21
... one speaker system, connect it to these terminals. SUBWOOFER jack When using a subwoofer with built-in amplifier, including the YAMAHA Active Servo Processing Subwoofer System, connect the input jack of the MAIN A or the MAIN B terminals. REAR CENTER SPEAKER...17 English FM ANT S VIDEO OUTPUT L CENTER R MAIN REAR (SURROUND) REAR CENTER SUB WOOFER SPEAKERS A R REAR L (SURROUND) B R MAIN L CENTER REAR CENTER IMPEDANCE SELECTOR SET BEFORE POWER ON MAIN A OR B : 4ΩMIN. /SPEAKER MAIN A OR B : 8ΩMIN. /SPEAKER A+B : 8ΩMIN. /SPEAKER A+B : 16ΩMIN. ...
... one speaker system, connect it to these terminals. SUBWOOFER jack When using a subwoofer with built-in amplifier, including the YAMAHA Active Servo Processing Subwoofer System, connect the input jack of the MAIN A or the MAIN B terminals. REAR CENTER SPEAKER...17 English FM ANT S VIDEO OUTPUT L CENTER R MAIN REAR (SURROUND) REAR CENTER SUB WOOFER SPEAKERS A R REAR L (SURROUND) B R MAIN L CENTER REAR CENTER IMPEDANCE SELECTOR SET BEFORE POWER ON MAIN A OR B : 4ΩMIN. /SPEAKER MAIN A OR B : 8ΩMIN. /SPEAKER A+B : 8ΩMIN. /SPEAKER A+B : 16ΩMIN. ...

Owner's Manual
Page 22
... SELECTOR AC OUTLETS SWITCHED STANDBY /ON INPUT INPUT MODE 6CH INPUT SILENT PHONES SPEAKERS A B STEREO EFFECT PROGRAM A/B/C/D/E PRESET/TUNING NEXT SET MENU PRESET/TUNING FM/AM EDIT TUNING MODE MEMORY AUTO/MANUAL MONO MAN`L/AUTO FM VOLUME VIDEO AUX S VIDEO VIDEO L AUDIO R...: 16ΩMIN. /SPEAKER CENTER : 8ΩMIN. /SPEAKER REAR CENTER: 8ΩMIN. /SPEAKER REAR : 8ΩMIN. /SPEAKER 1 TRANSMIT RE-NAME CLEAR CODE SET SYSTEM POWER STANDBY SLEEP 6CH INPUT A B C PHONO V-AUX TUNER MD/CD-R CD D-TV/CBL VCR 1 VCR2/DVR DVD (General model) I AC OUTLETS (SWITCHED) ...
... SELECTOR AC OUTLETS SWITCHED STANDBY /ON INPUT INPUT MODE 6CH INPUT SILENT PHONES SPEAKERS A B STEREO EFFECT PROGRAM A/B/C/D/E PRESET/TUNING NEXT SET MENU PRESET/TUNING FM/AM EDIT TUNING MODE MEMORY AUTO/MANUAL MONO MAN`L/AUTO FM VOLUME VIDEO AUX S VIDEO VIDEO L AUDIO R...: 16ΩMIN. /SPEAKER CENTER : 8ΩMIN. /SPEAKER REAR CENTER: 8ΩMIN. /SPEAKER REAR : 8ΩMIN. /SPEAKER 1 TRANSMIT RE-NAME CLEAR CODE SET SYSTEM POWER STANDBY SLEEP 6CH INPUT A B C PHONO V-AUX TUNER MD/CD-R CD D-TV/CBL VCR 1 VCR2/DVR DVD (General model) I AC OUTLETS (SWITCHED) ...

Owner's Manual
Page 23
... and then disappears. Display off This mode briefly shows "DISPLAY OFF" at the bottom of noise may produce unstable images. (When using "OPTION 1 DISPLAY SET" on the monitor connected to the S-video jacks. Notes • The OSD will not be recorded with a lot of the screen and then disappears.... off . The OSD mode changes in the on the remote control. 3 Press ON SCREEN repeatedly to connect your video monitor is only displayed on the set menu. Be sure to change the display mode. CH + PRESET ON SCREEN DISPLAY STEREO EFFECT 2 3 1 Turn on the front panel display. English ...
... and then disappears. Display off This mode briefly shows "DISPLAY OFF" at the bottom of noise may produce unstable images. (When using "OPTION 1 DISPLAY SET" on the monitor connected to the S-video jacks. Notes • The OSD will not be recorded with a lot of the screen and then disappears.... off . The OSD mode changes in the on the remote control. 3 Press ON SCREEN repeatedly to connect your video monitor is only displayed on the set menu. Be sure to change the display mode. CH + PRESET ON SCREEN DISPLAY STEREO EFFECT 2 3 1 Turn on the front panel display. English ...

Owner's Manual
Page 24
...The front panel display changes in the display on the front panel display, as shown here: 4 Press u / d to change the display to the setting you to set some of the basic "SOUND" menu parameters with a minimum of effort. POWER TV REC DISC SKIP POWER AV AMP AUDIO VOL LEVEL TITLE TV... precisely to suit your speaker system" for more information. Check that "AMP" is showing in the following order: + TV VOL CH - BASIC SYSTEM SETTINGS The "BASIC" menu allows you want to use the more detailed parameters from the "SOUND" menu instead of those under the "BASIC" menu (See ...
...The front panel display changes in the display on the front panel display, as shown here: 4 Press u / d to change the display to the setting you to set some of the basic "SOUND" menu parameters with a minimum of effort. POWER TV REC DISC SKIP POWER AV AMP AUDIO VOL LEVEL TITLE TV... precisely to suit your speaker system" for more information. Check that "AMP" is showing in the following order: + TV VOL CH - BASIC SYSTEM SETTINGS The "BASIC" menu allows you want to use the more detailed parameters from the "SOUND" menu instead of those under the "BASIC" menu (See ...

Owner's Manual
Page 25
... SP LEVEL Press j / i to adjust the balance between the main left speaker and the subwoofer. SET NO YES 5 CHECK OK: Choose either of SET/CANCEL. Use d to move to the next setting. 1 L-R Adjust the balance between the main left and right speakers. 2C Adjust the balance between the...LEVEL". • See pages 39 - 45 for each speaker and the left and rear right speakers. 6 SWFR Adjust the balance between each parameter. CANCEL 4 SET/CANCEL Choose either of YES/NONE. 3 SPEAKERS Choose from S/M/L. 2 SUBWOOFER Choose either of the "SOUND", "INPUT" and "OPTION" menus. 21 Use d ...
... SP LEVEL Press j / i to adjust the balance between the main left speaker and the subwoofer. SET NO YES 5 CHECK OK: Choose either of SET/CANCEL. Use d to move to the next setting. 1 L-R Adjust the balance between the main left and right speakers. 2C Adjust the balance between the...LEVEL". • See pages 39 - 45 for each speaker and the left and rear right speakers. 6 SWFR Adjust the balance between each parameter. CANCEL 4 SET/CANCEL Choose either of YES/NONE. 3 SPEAKERS Choose from S/M/L. 2 SUBWOOFER Choose either of the "SOUND", "INPUT" and "OPTION" menus. 21 Use d ...

Owner's Manual
Page 26
... L/Main R/Rear L/ Rear R Main L/Center/Main R/ Rear L/Rear R Main L/Center/Main R/ Rear L/Rear Center/Rear R 4 SET or CANCEL Select SET to confirm the changes you wish to use in your speaker configuration. Alternatively, select CANCEL to exit this menu to compare and adjust the... tone is identical. The unit will output a test tone to "CHECK OK: YES". and Canada models] S: 16ft. Roughly speaking, the room sizes are highlighted. 1 ROOM Settings: S, M ,L Select the size of your room and speakers. x 19ft., 450sq.ft. (7.9 x 5.8m, 45m2) [Other models] S: 3.6m x 2.8m, 10m2 M: 4.8m x 4.0m,...
... L/Main R/Rear L/ Rear R Main L/Center/Main R/ Rear L/Rear R Main L/Center/Main R/ Rear L/Rear Center/Rear R 4 SET or CANCEL Select SET to confirm the changes you wish to use in your speaker configuration. Alternatively, select CANCEL to exit this menu to compare and adjust the... tone is identical. The unit will output a test tone to "CHECK OK: YES". and Canada models] S: 16ft. Roughly speaking, the room sizes are highlighted. 1 ROOM Settings: S, M ,L Select the size of your room and speakers. x 19ft., 450sq.ft. (7.9 x 5.8m, 45m2) [Other models] S: 3.6m x 2.8m, 10m2 M: 4.8m x 4.0m,...

