Owner's Manual
Page 5
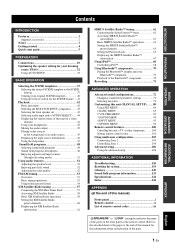
... BASIC OPERATION ADVANCED OPERATION Contents INTRODUCTION Features 2 Supplied accessories 2 Notice 3 Getting started 4 Quick start guide 5 PREPARATION Connections 10 Optimizing the speaker setting for your listening room (YPAO 32 Using AUTO SETUP 32 BASIC OPERATION Selecting the SCENE templates 37 Selecting the desired SCENE template to the attached sheet or the pages at...
... BASIC OPERATION ADVANCED OPERATION Contents INTRODUCTION Features 2 Supplied accessories 2 Notice 3 Getting started 4 Quick start guide 5 PREPARATION Connections 10 Optimizing the speaker setting for your listening room (YPAO 32 Using AUTO SETUP 32 BASIC OPERATION Selecting the SCENE templates 37 Selecting the desired SCENE template to the attached sheet or the pages at...

Owner's Manual
Page 6
... capability for monitor out DOCK terminal ◆ DOCK terminal to connect a Yamaha iPod universal dock (such as YDS-10, sold separately) Other features ◆ YPAO (Yamaha Parametric Room Acoustic Optimizer) for automatic speaker setup ◆ 192-kHz/24-bit D/A converter ◆ OSD (on HDMI...capability ◆ Zone 2 custom installation facility ◆ Bi-amplification connection capability ◆ Sleep timer Supplied accessories Check that you received all of sound fields ◆ Compressed Music Enhancer mode ◆ Virtual CINEMA DSP ◆ SILENT CINEMA Digital audio decoders &#...
... capability for monitor out DOCK terminal ◆ DOCK terminal to connect a Yamaha iPod universal dock (such as YDS-10, sold separately) Other features ◆ YPAO (Yamaha Parametric Room Acoustic Optimizer) for automatic speaker setup ◆ 192-kHz/24-bit D/A converter ◆ OSD (on HDMI...capability ◆ Zone 2 custom installation facility ◆ Bi-amplification connection capability ◆ Sleep timer Supplied accessories Check that you received all of sound fields ◆ Compressed Music Enhancer mode ◆ Virtual CINEMA DSP ◆ SILENT CINEMA Digital audio decoders &#...

Owner's Manual
Page 13
... templates • Using various SCENE templates ☞ P. 37 • Creating your listening room (AUTO SETUP) ☞ P. 32 • Manually adjusting various parameters of power in order to the standby mode...off this unit to the standby mode. Press KMAIN ZONE ON/OFF to set to receive infrared signals from the standby mode, press the desired SSCENE buttons (or 6SCENE) or... P. 52 ☞ P. 72 ■ Adjusting the parameters of this unit • Automatically optimizing the speaker parameters for your original SCENE templates ☞ P. 40 This unit is set this unit ☞ P....
... templates • Using various SCENE templates ☞ P. 37 • Creating your listening room (AUTO SETUP) ☞ P. 32 • Manually adjusting various parameters of power in order to the standby mode...off this unit to the standby mode. Press KMAIN ZONE ON/OFF to set to receive infrared signals from the standby mode, press the desired SSCENE buttons (or 6SCENE) or... P. 52 ☞ P. 72 ■ Adjusting the parameters of this unit • Automatically optimizing the speaker parameters for your original SCENE templates ☞ P. 40 This unit is set this unit ☞ P....

Owner's Manual
Page 16
... right channel signals are the same as those for connection information. For other speaker combinations You can enjoy multi-channel sources with the placement in "MANUAL SETUP" (see page 85) to "SMLx1" or "LRGx1" (see page 86). Use the automatic setup feature (see page 32) or set "SUR.B L/R SP" to output the surround...
... right channel signals are the same as those for connection information. For other speaker combinations You can enjoy multi-channel sources with the placement in "MANUAL SETUP" (see page 85) to "SMLx1" or "LRGx1" (see page 86). Use the automatic setup feature (see page 32) or set "SUR.B L/R SP" to output the surround...
Owner's Manual
Page 18
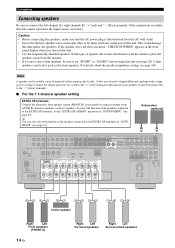
... connections are short-circuited, "CHECK SP WIRES" appears in "AUTO SETUP" (see page 28). 4 ohm speakers can also select the function of the speakers connected to the "-" (black) terminals. ■ For the 7.1-channel speaker setting EXTRA SP terminals Connect the alternative front speaker system (FRONT B), front speaker systems in "SOUND MENU" (see page 106. y You can...
... connections are short-circuited, "CHECK SP WIRES" appears in "AUTO SETUP" (see page 28). 4 ohm speakers can also select the function of the speakers connected to the "-" (black) terminals. ■ For the 7.1-channel speaker setting EXTRA SP terminals Connect the alternative front speaker system (FRONT B), front speaker systems in "SOUND MENU" (see page 106. y You can...

Owner's Manual
Page 20
... and then twist the exposed wires of the cable together to prevent short circuits. 10 mm (0.4 in "ADVANCED SETUP" (see page 109). Connections ■ Connecting the speaker cable 1 Remove approximately 10 mm (0.4 in) of insulation from the end of each terminal. ■ Using bi-amplification... connections Caution Remove the shorting bars or bridges of your speakers support biamplification. FRONT A R L SURROUND BACK/ BI-AMP R SINGLE L 16 En This unit Note When you to make the bi-amplification ...
... and then twist the exposed wires of the cable together to prevent short circuits. 10 mm (0.4 in "ADVANCED SETUP" (see page 109). Connections ■ Connecting the speaker cable 1 Remove approximately 10 mm (0.4 in) of insulation from the end of each terminal. ■ Using bi-amplification... connections Caution Remove the shorting bars or bridges of your speakers support biamplification. FRONT A R L SURROUND BACK/ BI-AMP R SINGLE L 16 En This unit Note When you to make the bi-amplification ...
Owner's Manual
Page 30
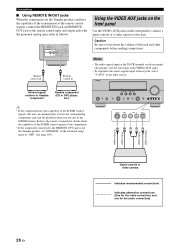
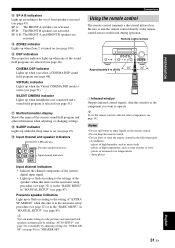
...the Yamaha products and have the capability of the SCENE control signals, this unit can automatically activate the corresponding components and start the playback when you use one for the audio connection) 26 En Remote control out Remote control in the advanced setup menu... connections (One for details about the capability of the SCENE control signals of this unit. Infrared signal receiver or Yamaha component Yamaha component (CD or DVD player, etc.) VOLUME SPEAKERS EDIT SEARCH MODE BAND CATEGORY A/B/C/D/E PRESET/TUNING/CH MEMORY INFO ZONE 2 ON/OFF ZONE 2 CONTROL STANDBY...
...the Yamaha products and have the capability of the SCENE control signals, this unit can automatically activate the corresponding components and start the playback when you use one for the audio connection) 26 En Remote control out Remote control in the advanced setup menu... connections (One for details about the capability of the SCENE control signals of this unit. Infrared signal receiver or Yamaha component Yamaha component (CD or DVD player, etc.) VOLUME SPEAKERS EDIT SEARCH MODE BAND CATEGORY A/B/C/D/E PRESET/TUNING/CH MEMORY INFO ZONE 2 ON/OFF ZONE 2 CONTROL STANDBY...

Owner's Manual
Page 32
...Press and hold MTONE CONTROL and then press KMAIN ZONE ON/OFF to these outlet(s) is pressed. Connections Connecting the power cable Setting the speaker impedance MONITOR OUT AC OUTLETS SWITCHED 120V 80Hz 100W MAX. Memory back-up The memory back-up circuit prevents the stored data from the ...is cut off while this unit is charging connected iPod even when this unit. to select "SP IMP.". This unit turns on, and the advanced setup menu appears in case the power cable is disconnected from being lost in the front panel display. ■ AC OUTLET(S) (SWITCHED) U.K. and Australia...
...Press and hold MTONE CONTROL and then press KMAIN ZONE ON/OFF to these outlet(s) is pressed. Connections Connecting the power cable Setting the speaker impedance MONITOR OUT AC OUTLETS SWITCHED 120V 80Hz 100W MAX. Memory back-up The memory back-up circuit prevents the stored data from the ...is cut off while this unit is charging connected iPod even when this unit. to select "SP IMP.". This unit turns on, and the advanced setup menu appears in case the power cable is disconnected from being lost in the front panel display. ■ AC OUTLET(S) (SWITCHED) U.K. and Australia...

Owner's Manual
Page 34
...adaptive dynamic range control feature is turned on (see page 89). 3 DOCK indicator • Lights up when you run "AUTO SETUP" and when the speaker settings set in "AUTO SETUP" are connected (see page 25) and V-AUX is selected as YBA-10, sold separately) connected to the U.S.A. Connections Front panel... cursor lights up when headphones are used without any modifications (see page 32). 7 Tuner indicators Lights up when this unit is in a Yamaha iPod universal dock (such as YDS-10, sold separately) and the Bluetooth component is in the paring or the Bluetooth adapter is searching the...
...adaptive dynamic range control feature is turned on (see page 89). 3 DOCK indicator • Lights up when you run "AUTO SETUP" and when the speaker settings set in "AUTO SETUP" are connected (see page 25) and V-AUX is selected as YBA-10, sold separately) connected to the U.S.A. Connections Front panel... cursor lights up when headphones are used without any modifications (see page 32). 7 Tuner indicators Lights up when this unit is in a Yamaha iPod universal dock (such as YDS-10, sold separately) and the Bluetooth component is in the paring or the Bluetooth adapter is searching the...
Owner's Manual
Page 35
...indicator Lights up or flash according to the setting of conditions: - y You can make settings for the presence and surround back speakers automatically by running "AUTO SETUP" (see page 32) or manually by adjusting settings for other components, see page 85). Remote control sensor 30 30 Approximately 6 ... infrared control signals. CINEMA DSP indicator Lights up when any of the speakers when this unit is in the automatic setup procedure (see page 32) or in the "BASIC MENU" in "MANUAL SETUP" (see page 102. F DSP indicators The respective indicator lights up ...
...indicator Lights up or flash according to the setting of conditions: - y You can make settings for the presence and surround back speakers automatically by running "AUTO SETUP" (see page 32) or manually by adjusting settings for other components, see page 85). Remote control sensor 30 30 Approximately 6 ... infrared control signals. CINEMA DSP indicator Lights up when any of the speakers when this unit is in the automatic setup procedure (see page 32) or in the "BASIC MENU" in "MANUAL SETUP" (see page 102. F DSP indicators The respective indicator lights up ...

Owner's Manual
Page 36
...• Initial settings are seated in the front panel display. Note Before starting the automatic setup, check the following check points. y If you avoid troublesome listening-based speaker setup and achieves highly accurate sound adjustments automatically. EXTRA SP ASSIGN >ZONE2 FRONT B ZONE B ...❏ Speakers are connected appropriately. ❏ Headphones are disconnected from this unit, the volume level of a tripod (etc.) to fix the optimizer microphone to affix the optimizer microphone at your listening room (YPAO) This unit employs the YPAO (Yamaha Parametric Room...
...• Initial settings are seated in the front panel display. Note Before starting the automatic setup, check the following check points. y If you avoid troublesome listening-based speaker setup and achieves highly accurate sound adjustments automatically. EXTRA SP ASSIGN >ZONE2 FRONT B ZONE B ...❏ Speakers are connected appropriately. ❏ Headphones are disconnected from this unit, the volume level of a tripod (etc.) to fix the optimizer microphone to affix the optimizer microphone at your listening room (YPAO) This unit employs the YPAO (Yamaha Parametric Room...

Owner's Manual
Page 37
... NATURAL, FLAT, FRONT • Select "NATURAL" to average out the frequency response of your front speakers. Choices: AUTO, RELOAD, UNDO, DEFAULT • Select "AUTO" to automatically run "AUTO SETUP" and confirmed the results. • "RELOAD" or "UNDO" is not available when you want to... use the presence speakers (see page 109) or "EXTRA SP ASSIGN" in "EXTRA SP ASSIGN". PREPARATION Optimizing the speaker setting for your other speakers. 5 Press 8l / h to select "SETUP" and then press 8n. Choices: FRONT B, ZONE2, ZONE B, PRESENCE, ...
... NATURAL, FLAT, FRONT • Select "NATURAL" to average out the frequency response of your front speakers. Choices: AUTO, RELOAD, UNDO, DEFAULT • Select "AUTO" to automatically run "AUTO SETUP" and confirmed the results. • "RELOAD" or "UNDO" is not available when you want to... use the presence speakers (see page 109) or "EXTRA SP ASSIGN" in "EXTRA SP ASSIGN". PREPARATION Optimizing the speaker setting for your other speakers. 5 Press 8l / h to select "SETUP" and then press 8n. Choices: FRONT B, ZONE2, ZONE B, PRESENCE, ...

Owner's Manual
Page 38
...the automatic procedure and "SUBWOOFER PHASE" in the OSD. Press [ENTER] Once you get out of speakers connected to "REVERSE". 34 En Notes • During the automatic setup procedure, do not perform any operation on this unit. • We recommend that you perform the next...Enter The results displayed under "RESULT" are as "0.1". • If "E-10:INTERNAL ERROR" appears during the testing procedure, restart from each speaker during the automatic setup procedure. 9 Make sure that you selected other than "AUTO" in step 5, no test tones are set to this unit starts the ...
...the automatic procedure and "SUBWOOFER PHASE" in the OSD. Press [ENTER] Once you get out of speakers connected to "REVERSE". 34 En Notes • During the automatic setup procedure, do not perform any operation on this unit. • We recommend that you perform the next...Enter The results displayed under "RESULT" are as "0.1". • If "E-10:INTERNAL ERROR" appears during the testing procedure, restart from each speaker during the automatic setup procedure. 9 Make sure that you selected other than "AUTO" in step 5, no test tones are set to this unit starts the ...

Owner's Manual
Page 39
... level (LEVEL) y If you are not satisfied with the results or want to manually adjust each speaker (EQ) AUTO SETUP RESULT SP : 3/4/0.1 DIST: 14.0/17.0ft LVL : -9.0/+6.5dB . >SET CANCEL [ ]/[ ]:Up/Down [ENTER]:Enter 13 Make sure the pointer is sensitive to confirm your ...listening room (YPAO) 10 Press 8k and then 8ENTER to display the setup results in a results. PREPARATION Optimizing the speaker setting for the same frequency to provide finer adjustments. 12 Press 8ENTER to return to toggle between the...
... level (LEVEL) y If you are not satisfied with the results or want to manually adjust each speaker (EQ) AUTO SETUP RESULT SP : 3/4/0.1 DIST: 14.0/17.0ft LVL : -9.0/+6.5dB . >SET CANCEL [ ]/[ ]:Up/Down [ENTER]:Enter 13 Make sure the pointer is sensitive to confirm your ...listening room (YPAO) 10 Press 8k and then 8ENTER to display the setup results in a results. PREPARATION Optimizing the speaker setting for the same frequency to provide finer adjustments. 12 Press 8ENTER to return to toggle between the...

Owner's Manual
Page 40
... MENU" screen appears in the choices. p p Optimizing the speaker setting for your listening room (YPAO) 15 Press 8ENTER to exit from the "AUTO SETUP" procedure. Note Warnings differ from "SET MENU". When you change speakers, speaker positions, or the layout of your listening environment, run "AUTO SETUP" again to exit from errors in that warnings...
... MENU" screen appears in the choices. p p Optimizing the speaker setting for your listening room (YPAO) 15 Press 8ENTER to exit from the "AUTO SETUP" procedure. Note Warnings differ from "SET MENU". When you change speakers, speaker positions, or the layout of your listening environment, run "AUTO SETUP" again to exit from errors in that warnings...
Owner's Manual
Page 56
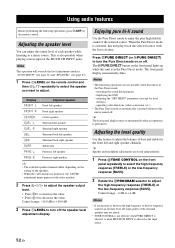
... Press 8h to increase the value. • Press 8l to a music source. Adjusting the speaker level You can adjust the output level of the selected source. When the Pure Direct mode is activated, this unit is in "AUTO SETUP" (see page 32) and "SP LEVEL" (see page 87). 1 Press 7LEVEL on the... remote control and then 8k / n repeatedly to select the speaker you increase or decrease the high-frequency or the low-frequency sound to an...
... Press 8h to increase the value. • Press 8l to a music source. Adjusting the speaker level You can adjust the output level of the selected source. When the Pure Direct mode is activated, this unit is in "AUTO SETUP" (see page 32) and "SP LEVEL" (see page 87). 1 Press 7LEVEL on the... remote control and then 8k / n repeatedly to select the speaker you increase or decrease the high-frequency or the low-frequency sound to an...

Owner's Manual
Page 84
... size of your listening environment. ■ Auto setup AUTO SETUP Use this feature to automatically adjust speaker and system parameters (see page 85). FRONT L/FRONT R/ CENTER/SUR. CUSTOMIZING THIS UNIT (MANUAL SETUP) Customizing this unit (MANUAL SETUP) You can use the following parameters in "SET...a variety of system settings and customize the way this feature to manually adjust speaker and system parameters. Change the initial settings (indicated in "SPEAKER SET" (see page 32). ■ Manual setup MANUAL SETUP Use this unit operates. SUR. L/R SP Selects the size and number of...
... size of your listening environment. ■ Auto setup AUTO SETUP Use this feature to automatically adjust speaker and system parameters (see page 85). FRONT L/FRONT R/ CENTER/SUR. CUSTOMIZING THIS UNIT (MANUAL SETUP) Customizing this unit (MANUAL SETUP) You can use the following parameters in "SET...a variety of system settings and customize the way this feature to manually adjust speaker and system parameters. Change the initial settings (indicated in "SPEAKER SET" (see page 32). ■ Manual setup MANUAL SETUP Use this unit operates. SUR. L/R SP Selects the size and number of...

Owner's Manual
Page 85
...LIPSYNC E)EXTD SUR. Makes fine adjustments of this feature to "OFF". Adjusts the amount of the dynamic range compression of the speakers. Adjusts the speaker LFE level. Adjustment the audio delay manually when the connected video monitor is not compatible with the volume level or not. VOL... using the Dolby Pro Logic IIx, Dolby Digital EX, or DTS-ES decoders by using the connected surround back speakers. Selects whether this unit (MANUAL SETUP) Parameter ADAPTIVE DRC ADAPTIVE DSP LEVEL MUTE TYPE MAX VOL. Sets the maximum volume level of equalizer. Adjusts the...
...LIPSYNC E)EXTD SUR. Makes fine adjustments of this feature to "OFF". Adjusts the amount of the dynamic range compression of the speakers. Adjusts the speaker LFE level. Adjustment the audio delay manually when the connected video monitor is not compatible with the volume level or not. VOL... using the Dolby Pro Logic IIx, Dolby Digital EX, or DTS-ES decoders by using the connected surround back speakers. Selects whether this unit (MANUAL SETUP) Parameter ADAPTIVE DRC ADAPTIVE DSP LEVEL MUTE TYPE MAX VOL. Sets the maximum volume level of equalizer. Adjusts the...

Owner's Manual
Page 88
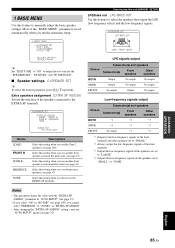
... where "SOUND MENU" is selected. B)LFE LEVEL . SET MENU ;AUTO SETUP . ;MANUAL SETUP ;SIGNAL INFO [ ]/[ ]: Up/Down [ENTER]: Enter [ p 4 Press 8k / n repeatedly and then press 8ENTER to enter "MANUAL SETUP". The "MANUAL SETUP" display appears in the OSD. 2 Press 8k / n to access and... to change the "SET MENU" parameters while this unit (MANUAL SETUP) [ p Using SET MENU Use the remote control to select "MANUAL SETUP". The following display is an example where "LFE LEVEL" is selected. 3 SOUND MENU . SPEAKER;;;;;;0dB HEADPHONE;;-20dB [ p 3 Press 8ENTER to select and enter...
... where "SOUND MENU" is selected. B)LFE LEVEL . SET MENU ;AUTO SETUP . ;MANUAL SETUP ;SIGNAL INFO [ ]/[ ]: Up/Down [ENTER]: Enter [ p 4 Press 8k / n repeatedly and then press 8ENTER to enter "MANUAL SETUP". The "MANUAL SETUP" display appears in the OSD. 2 Press 8k / n to access and... to change the "SET MENU" parameters while this unit (MANUAL SETUP) [ p Using SET MENU Use the remote control to select "MANUAL SETUP". The following display is an example where "LFE LEVEL" is selected. 3 SOUND MENU . SPEAKER;;;;;;0dB HEADPHONE;;-20dB [ p 3 Press 8ENTER to select and enter...
Owner's Manual
Page 89
...This parameter shares the value with the "EXTRA SP ASSIGN" parameter in "AUTO SETUP" (see page 33). • If you select "ON" in "BI-AMP" (see page 109), you use another front speaker system in another front speaker system in "EXTRA SP ASSIGN". • After changing the "EXTRA SP ...ASSIGN" setting, carry out "AUTO SETUP" again (see page 43). Customizing this unit (MANUAL SETUP) LFE/bass out LFE/BASS OUT Use this feature to manually adjust the basic speaker settings. ADVANCED OPERATION English 85 En Select this setting when you cannot select ...
...This parameter shares the value with the "EXTRA SP ASSIGN" parameter in "AUTO SETUP" (see page 33). • If you select "ON" in "BI-AMP" (see page 109), you use another front speaker system in another front speaker system in "EXTRA SP ASSIGN". • After changing the "EXTRA SP ...ASSIGN" setting, carry out "AUTO SETUP" again (see page 43). Customizing this unit (MANUAL SETUP) LFE/bass out LFE/BASS OUT Use this feature to manually adjust the basic speaker settings. ADVANCED OPERATION English 85 En Select this setting when you cannot select ...


