Owner's Manual
Page 5
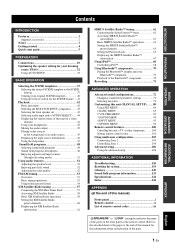
... 41 Playback 42 Basic procedure 42 Selecting the MULTI CH INPUT component......... 43 Selecting the front speaker set 43 Selecting audio input jacks (AUDIO SELECT)...... 44 Displaying the current status of this unit on a video monitor 44 Using your headphones 45 Muting the audio ...BASIC MENU 85 2 VOLUME MENU 89 3 SOUND MENU 90 4 INPUT MENU 93 5 OPTION MENU 96 Remote control features 100 Controlling this unit, a TV, or other components.......... 100 Setting remote control codes 102 Using multi-zone configuration 103 Connecting Zone 2 103 Controlling Zone 2 104 Advanced setup 106...
... 41 Playback 42 Basic procedure 42 Selecting the MULTI CH INPUT component......... 43 Selecting the front speaker set 43 Selecting audio input jacks (AUDIO SELECT)...... 44 Displaying the current status of this unit on a video monitor 44 Using your headphones 45 Muting the audio ...BASIC MENU 85 2 VOLUME MENU 89 3 SOUND MENU 90 4 INPUT MENU 93 5 OPTION MENU 96 Remote control features 100 Controlling this unit, a TV, or other components.......... 100 Setting remote control codes 102 Using multi-zone configuration 103 Connecting Zone 2 103 Controlling Zone 2 104 Advanced setup 106...

Owner's Manual
Page 6
...preset remote control codes capability ◆ Zone 2 custom installation facility ◆ Bi-amplification connection capability ◆ Sleep timer Supplied accessories Check that you received ...capability ◆ iPod controlling capability ◆ Remote control with the SCENE function Sound field programs ◆ Proprietary Yamaha technology for discrete multi- High definition digital...suit your individual audiovisual system ◆ 5.1 or 7.1-channel additional input jacks for the creation of the following parts. ❏ Remote control ❏ Batteries (2) (AAA, R03, UM-4) ❏...
...preset remote control codes capability ◆ Zone 2 custom installation facility ◆ Bi-amplification connection capability ◆ Sleep timer Supplied accessories Check that you received ...capability ◆ iPod controlling capability ◆ Remote control with the SCENE function Sound field programs ◆ Proprietary Yamaha technology for discrete multi- High definition digital...suit your individual audiovisual system ◆ 5.1 or 7.1-channel additional input jacks for the creation of the following parts. ❏ Remote control ❏ Batteries (2) (AAA, R03, UM-4) ❏...
Owner's Manual
Page 10
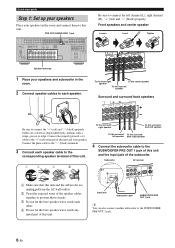
...REMOTE TRIGGER OUT +12V IN OUT 15mA MAX. TOTAL 0.8A MAX. Connect the striped (grooved, etc.) cable to the SUBWOOFER PRE OUT 2 jack. 6 En Input jack Subwoofer cable SUBWOOFER PRE OUT 1 jack y You can also connect another subwoofer to the "+" (red) terminals of this unit and your speaker. Subwoofer AV receiver... PRE OUSTINGLE CENTER DOCK VIDE RROUND SUR. PRE OUT SUBWOOFER 1 jack AUDIO L MULTI CH INPUT FRONT (8CH) CENTER PRE OUT SINGLE CENTER R IN MD...
...REMOTE TRIGGER OUT +12V IN OUT 15mA MAX. TOTAL 0.8A MAX. Connect the striped (grooved, etc.) cable to the SUBWOOFER PRE OUT 2 jack. 6 En Input jack Subwoofer cable SUBWOOFER PRE OUT 1 jack y You can also connect another subwoofer to the "+" (red) terminals of this unit and your speaker. Subwoofer AV receiver... PRE OUSTINGLE CENTER DOCK VIDE RROUND SUR. PRE OUT SUBWOOFER 1 jack AUDIO L MULTI CH INPUT FRONT (8CH) CENTER PRE OUT SINGLE CENTER R IN MD...
Owner's Manual
Page 11
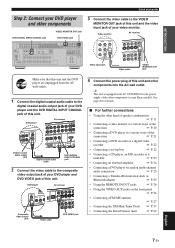
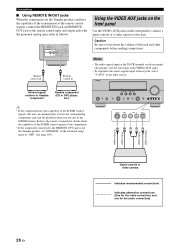
... analog multi-channel audio connection ☞ P. 25 • Connecting a Yamaha iPod universal dock or Bluetooth adapter ☞ P. 25 • Using the REMOTE IN/OUT jacks ☞ P. 26 • Using the VIDEO AUX jacks on the front panel ☞ P. 26 • Connecting a FM/AM... antenna ☞ P. 27 • Connecting the XM Mini-Tuner Dock ☞ P. 57 • Connecting the SiriusConnect tuner ☞ P. 62 English 7 En DVD player AV receiver...
... analog multi-channel audio connection ☞ P. 25 • Connecting a Yamaha iPod universal dock or Bluetooth adapter ☞ P. 25 • Using the REMOTE IN/OUT jacks ☞ P. 26 • Using the VIDEO AUX jacks on the front panel ☞ P. 26 • Connecting a FM/AM... antenna ☞ P. 27 • Connecting the XM Mini-Tuner Dock ☞ P. 57 • Connecting the SiriusConnect tuner ☞ P. 62 English 7 En DVD player AV receiver...

Owner's Manual
Page 14
... AC OUTLETS SWITCHED 120V 80Hz 100W MAX. and Canada models only) 2 AUDIO jacks DIGITAL INPUT/OUTPUT jacks 3 MULTI CH INPUT jacks 4 ZONE2 OUT jacks 5 PRE OUT jacks 6 DOCK terminal 7 Video component jacks (VIDEO and S VIDEO) COMPONENT VIDEO jacks 8 ANTENNA terminals 9 REMOTE IN/OUT jacks 0 Speaker terminals A HDMI jacks B VOLTAGE SELECTOR (Asia and General models only) C AC OUTLET(S) Page 57 62...
... AC OUTLETS SWITCHED 120V 80Hz 100W MAX. and Canada models only) 2 AUDIO jacks DIGITAL INPUT/OUTPUT jacks 3 MULTI CH INPUT jacks 4 ZONE2 OUT jacks 5 PRE OUT jacks 6 DOCK terminal 7 Video component jacks (VIDEO and S VIDEO) COMPONENT VIDEO jacks 8 ANTENNA terminals 9 REMOTE IN/OUT jacks 0 Speaker terminals A HDMI jacks B VOLTAGE SELECTOR (Asia and General models only) C AC OUTLET(S) Page 57 62...

Owner's Manual
Page 25
...the AC wall outlets. To record a source, make the same type of video connections between each DIGITAL INPUT or DIGITAL OUTPUT jack, select the corresponding setting for the audio connection) English 21 En TOTAL C DVR indicates recommended connections indicates alternative connections (One ...CBL 1 2 OPTICAL DIGITAL INPUT FRONT B/ZONE B/ ZONE 2/PRESENCE R EXTRA SP L CD DVD 3 4 COAXIAL FRONT A R L FM 75Ω UNBAL. REMOTE TRIGGER OUT +12V IN OUT 15mA MAX. DVD IN1 DTV/CBL IN2 SPEAKERS CENTER SURROUND R L OUT SURROUND BACK/BI-AMP R L DOCK VIDEO VIDEO S ...
...the AC wall outlets. To record a source, make the same type of video connections between each DIGITAL INPUT or DIGITAL OUTPUT jack, select the corresponding setting for the audio connection) English 21 En TOTAL C DVR indicates recommended connections indicates alternative connections (One ...CBL 1 2 OPTICAL DIGITAL INPUT FRONT B/ZONE B/ ZONE 2/PRESENCE R EXTRA SP L CD DVD 3 4 COAXIAL FRONT A R L FM 75Ω UNBAL. REMOTE TRIGGER OUT +12V IN OUT 15mA MAX. DVD IN1 DTV/CBL IN2 SPEAKERS CENTER SURROUND R L OUT SURROUND BACK/BI-AMP R L DOCK VIDEO VIDEO S ...

Owner's Manual
Page 27
... audio components Connections Notes • To make a digital connection to a component other than the default component assigned to each the DIGITAL INPUT jack, select the corresponding setting for the audio connection) English 23 En DVD DTV/CBL IN1 IN2 SPEAKERS CENTER SURROUND R L OUT SURROUND BACK/... 1 2 OPTICAL DIGITAL INPUT FRONT B/ZONE B/ ZONE 2/PRESENCE R EXTRA SP L CD DVD 3 4 COAXIAL FRONT A R L FM 75Ω UNBAL. REMOTE TRIGGER OUT +12V IN OUT 15mA MAX. CD recorder, MD recorder or tape deck Audio out Audio in "I/O ASSIGNMENT" (see page 93). • When...
... audio components Connections Notes • To make a digital connection to a component other than the default component assigned to each the DIGITAL INPUT jack, select the corresponding setting for the audio connection) English 23 En DVD DTV/CBL IN1 IN2 SPEAKERS CENTER SURROUND R L OUT SURROUND BACK/... 1 2 OPTICAL DIGITAL INPUT FRONT B/ZONE B/ ZONE 2/PRESENCE R EXTRA SP L CD DVD 3 4 COAXIAL FRONT A R L FM 75Ω UNBAL. REMOTE TRIGGER OUT +12V IN OUT 15mA MAX. CD recorder, MD recorder or tape deck Audio out Audio in "I/O ASSIGNMENT" (see page 93). • When...
Owner's Manual
Page 30
... owner's manuals for the video connection, and one of the SCENE buttons. Connections ■ Using REMOTE IN/OUT jacks When the components are the Yamaha products and have the capability of the SCENE control signals, this unit and other components before making ...connections. FM 75Ω UNBAL. Remote control out Remote control in the advanced setup menu to "OFF" (see page 109). Infrared signal receiver or Yamaha component Yamaha...
... owner's manuals for the video connection, and one of the SCENE buttons. Connections ■ Using REMOTE IN/OUT jacks When the components are the Yamaha products and have the capability of the SCENE control signals, this unit and other components before making ...connections. FM 75Ω UNBAL. Remote control out Remote control in the advanced setup menu to "OFF" (see page 109). Infrared signal receiver or Yamaha component Yamaha...
Owner's Manual
Page 43
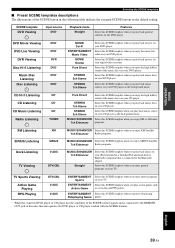
...templates ■ Preset SCENE templates descriptions The illustrations of the SCENE button in the following table indicate the assigned SCENE buttons in a Yamaha iPod universal dock or Bluetooth component that is connected to the Bluetooth adapter. Select this SCENE template when you enjoy sports programs on ...games. * When the connected DVD player or CD player has the capability of the SCENE control signals and is connected to the REMOTE OUT jack of this unit, this unit operates the DVD player or CD player worked with the SCENE features. Straight Select this SCENE template when...
...templates ■ Preset SCENE templates descriptions The illustrations of the SCENE button in the following table indicate the assigned SCENE buttons in a Yamaha iPod universal dock or Bluetooth component that is connected to the Bluetooth adapter. Select this SCENE template when you enjoy sports programs on ...games. * When the connected DVD player or CD player has the capability of the SCENE control signals and is connected to the REMOTE OUT jack of this unit, this unit operates the DVD player or CD player worked with the SCENE features. Straight Select this SCENE template when...
Owner's Manual
Page 46
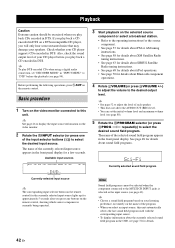
...selector (or press BPROG l / h repeatedly) to select the desired sound field program. Before performing the following operations, press 5AMP on the remote control for the currently selected input source lights up for details. 42 En Basic procedure 1 Turn on the video monitor connected to this unit... unit. PLAYBACK Playback Caution Extreme caution should be selected when the component connected to the MULTI CH INPUT jacks is currently being operated. 3 Start playback on the remote control, showing which source component is selected as the input source (see page 43). If you play ...
...selector (or press BPROG l / h repeatedly) to select the desired sound field program. Before performing the following operations, press 5AMP on the remote control for the currently selected input source lights up for details. 42 En Basic procedure 1 Turn on the video monitor connected to this unit... unit. PLAYBACK Playback Caution Extreme caution should be selected when the component connected to the MULTI CH INPUT jacks is currently being operated. 3 Start playback on the remote control, showing which source component is selected as the input source (see page 43). If you play ...

Owner's Manual
Page 47
...the RINPUT selector to the EXTRA SP speaker terminals in "INPUT MENU" to the MULTI CH INPUT jacks (see page 95). Selecting the front speaker set Use this feature to the MULTI CH INPUT jacks is set the parameters for MULTI CH INPUT (see page 25) as follows. Note Sound field ... active front speaker set "EXTRA SP ASSIGN" to "ZONE B" (see page 51). "MULTI CH" appears in the main room are muted. Press ASPEAKERS on the remote control. y Use "MULTI CH" menu in another room (Zone B). Note If you activate the Zone B speakers, all the speakers in the front panel display. ...
...the RINPUT selector to the EXTRA SP speaker terminals in "INPUT MENU" to the MULTI CH INPUT jacks (see page 95). Selecting the front speaker set Use this feature to the MULTI CH INPUT jacks is set the parameters for MULTI CH INPUT (see page 25) as follows. Note Sound field ... active front speaker set "EXTRA SP ASSIGN" to "ZONE B" (see page 51). "MULTI CH" appears in the main room are muted. Press ASPEAKERS on the remote control. y Use "MULTI CH" menu in another room (Zone B). Note If you activate the Zone B speakers, all the speakers in the front panel display. ...
Owner's Manual
Page 48
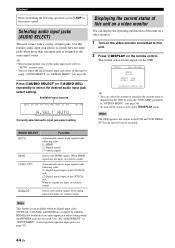
...signals are not used. Use "I/O ASSIGNMENT" in the OSD. Selecting audio input jacks (AUDIO SELECT) This unit comes with a variety of this feature (audio input jack select) to this unit. 2 Press ODISPLAY on the remote control. Available input sources MULTI CH VCR DVR V-AUX DTV/CBL DVD MD/..." (see page 93). 44 En Playback Before performing the following operations, press 5AMP on the remote control. y • We recommend that you set the audio input jack select to select the desired audio input jack select setting. In addition, HDMI is not available as an audio input...
...signals are not used. Use "I/O ASSIGNMENT" in the OSD. Selecting audio input jacks (AUDIO SELECT) This unit comes with a variety of this feature (audio input jack select) to this unit. 2 Press ODISPLAY on the remote control. Available input sources MULTI CH VCR DVR V-AUX DTV/CBL DVD MD/..." (see page 93). 44 En Playback Before performing the following operations, press 5AMP on the remote control. y • We recommend that you set the audio input jack select to select the desired audio input jack select setting. In addition, HDMI is not available as an audio input...

Owner's Manual
Page 49
... display when the audio output is muted and disappears from a video source with a stereo analog audio cable plug to the PHONES jack on the remote control to resume the audio output. BASIC OPERATION Playback Using your headphones Before performing the following operations, press 5AMP on the.../CBL DVR V-AUX/DOCK VCR Video sources DVD DTV/CBL DVR V-AUX/DOCK VCR Video sources Muting the audio output Press JMUTE on the remote control. Press JMUTE again to select a video source and then an audio source. STANDBY /ON VOLUME SPEAKERS EDIT SEARCH MODE BAND CATEGORY A/B/C/D/E...
... display when the audio output is muted and disappears from a video source with a stereo analog audio cable plug to the PHONES jack on the remote control to resume the audio output. BASIC OPERATION Playback Using your headphones Before performing the following operations, press 5AMP on the.../CBL DVR V-AUX/DOCK VCR Video sources DVD DTV/CBL DVR V-AUX/DOCK VCR Video sources Muting the audio output Press JMUTE on the remote control. Press JMUTE again to select a video source and then an audio source. STANDBY /ON VOLUME SPEAKERS EDIT SEARCH MODE BAND CATEGORY A/B/C/D/E...

Owner's Manual
Page 50
...ANALOG RES. Notes "---" appears when this unit cannot display the corresponding information. Resolution of the analog video signals output at the HDMI OUT jack of this unit cannot detect a digital signal, it automatically switches to select "SIGNAL INFO" and then press 8ENTER. The top "SET MENU...input source information You can display the audio and video information of the current input signal. 1 Press 5AMP and then press MMENU on the remote control again to exit from a continuous signal to automatically switch decoders ("Surround EX", etc.). Flag data encoded in the OSD. 3 Press 8l...
...ANALOG RES. Notes "---" appears when this unit cannot display the corresponding information. Resolution of the analog video signals output at the HDMI OUT jack of this unit cannot detect a digital signal, it automatically switches to select "SIGNAL INFO" and then press 8ENTER. The top "SET MENU...input source information You can display the audio and video information of the current input signal. 1 Press 5AMP and then press MMENU on the remote control again to exit from a continuous signal to automatically switch decoders ("Surround EX", etc.). Flag data encoded in the OSD. 3 Press 8l...

Owner's Manual
Page 55
... programs without surround speakers. Note Virtual CINEMA DSP will not activate even when "SUR. when this unit is turned back on the remote control. Sound field programs Before performing the following cases: - The sound effect is in the following operation, press 5AMP on . ...does not activate when the component connected to sound field programs (see page 48). SILENT CINEMA activates automatically whenever you set to the PHONES jack. - It creates virtual speakers to select "Straight". ■ Deactivating the "Straight" mode Press OSTRAIGHT (or CSTRAIGHT) so that "Straight"...
... programs without surround speakers. Note Virtual CINEMA DSP will not activate even when "SUR. when this unit is turned back on the remote control. Sound field programs Before performing the following cases: - The sound effect is in the following operation, press 5AMP on . ...does not activate when the component connected to sound field programs (see page 48). SILENT CINEMA activates automatically whenever you set to the PHONES jack. - It creates virtual speakers to select "Straight". ■ Deactivating the "Straight" mode Press OSTRAIGHT (or CSTRAIGHT) so that "Straight"...
Owner's Manual
Page 56
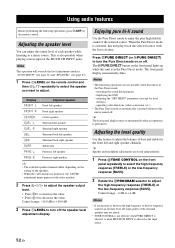
... and treble for level settings) - When the Pure Direct mode is also possible when playing sources input at the MULTI CH INPUT jacks. displaying the OSD - Adjusting the tonal quality Use this feature to a music source. This is activated, this unit is in ...speaker CENTER Center speaker SUR. L Surround left speaker PRNS R Presence right speaker y • The available speaker channels differ depending on the remote control. y The front panel display turns on or off. USING AUDIO FEATURES Using audio features Before performing the following operations are stored independently....
... and treble for level settings) - When the Pure Direct mode is also possible when playing sources input at the MULTI CH INPUT jacks. displaying the OSD - Adjusting the tonal quality Use this feature to a music source. This is activated, this unit is in ...speaker CENTER Center speaker SUR. L Surround left speaker PRNS R Presence right speaker y • The available speaker channels differ depending on the remote control. y The front panel display turns on or off. USING AUDIO FEATURES Using audio features Before performing the following operations are stored independently....

Owner's Manual
Page 67
...in the OSD, see below . Write the Sirius ID below ). ■ Displaying the Sirius ID of your SiriusConnect tuner 1 Press KSIRIUS on the remote control to FSOURCE. 1 Rotate the RINPUT selector (or press KSIRIUS) to select "SIRIUS" as the input source. For details, see "Direct number ... UPDATED" appears. Notes • The SIRIUS Satellite Radio signals cannot be output at the AUDIO OUT (REC) jacks. • When you can set the operation mode selector on the remote control. 2 Press G0 and then TENT to display the Sirius ID of your SiriusConnect tuner. SIRIUS Satellite Radio...
...in the OSD, see below . Write the Sirius ID below ). ■ Displaying the Sirius ID of your SiriusConnect tuner 1 Press KSIRIUS on the remote control to FSOURCE. 1 Rotate the RINPUT selector (or press KSIRIUS) to select "SIRIUS" as the input source. For details, see "Direct number ... UPDATED" appears. Notes • The SIRIUS Satellite Radio signals cannot be output at the AUDIO OUT (REC) jacks. • When you can set the operation mode selector on the remote control. 2 Press G0 and then TENT to display the Sirius ID of your SiriusConnect tuner. SIRIUS Satellite Radio...
Owner's Manual
Page 72
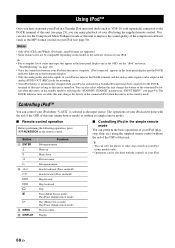
... of your iPod can be output at the analog AUDIO OUT (REC) jacks for recording. • Your iPod battery is automatically charged when your iPod...controls on your iPod is stationed in a Yamaha iPod universal dock connected to the DOCK terminal of this unit as long as this unit is turned on the remote control. The DOCK indicator turns on the ... OSD of this unit. Controlling iPod™ You can control your iPod using the supplied remote control without it (simple remote mode). ■ Remote control operation Before performing the following operations, press 4V-AUX/DOCK on . y •...
... of your iPod can be output at the analog AUDIO OUT (REC) jacks for recording. • Your iPod battery is automatically charged when your iPod...controls on your iPod is stationed in a Yamaha iPod universal dock connected to the DOCK terminal of this unit as long as this unit is turned on the remote control. The DOCK indicator turns on the ... OSD of this unit. Controlling iPod™ You can control your iPod using the supplied remote control without it (simple remote mode). ■ Remote control operation Before performing the following operations, press 4V-AUX/DOCK on . y •...

Owner's Manual
Page 97
...more components. TRIM START PAIRING Customizing this unit (MANUAL SETUP) Input/output assignment I/O ASSIGNMENT Use this feature to assign the input/output jacks according to the component to be available for all input sources and some parameters are reassigned, you can select the corresponding component by ...using the RINPUT selector on the front panel (or the input selector buttons on the remote control). TRIM INPUT RENAME VOL. TRIM BGV INPUT CH FRONT INPUT RENAME VOL. Change the parameter to your needs. and Canada models ...
...more components. TRIM START PAIRING Customizing this unit (MANUAL SETUP) Input/output assignment I/O ASSIGNMENT Use this feature to assign the input/output jacks according to the component to be available for all input sources and some parameters are reassigned, you can select the corresponding component by ...using the RINPUT selector on the front panel (or the input selector buttons on the remote control). TRIM INPUT RENAME VOL. TRIM BGV INPUT CH FRONT INPUT RENAME VOL. Change the parameter to your needs. and Canada models ...

Owner's Manual
Page 107
... zone DVD player (etc.) This unit Infrared signal emitter Amplifier Second zone (Zone 2) Remote control Infrared signal receiver From the REMOTE OUT jack From the REMOTE IN jack Note To avoid unexpected noise, DO NOT USE the Zone 2 feature with your nearest authorized Yamaha dealer or service center about the Zone 2 connections that best meet your requirements...
... zone DVD player (etc.) This unit Infrared signal emitter Amplifier Second zone (Zone 2) Remote control Infrared signal receiver From the REMOTE OUT jack From the REMOTE IN jack Note To avoid unexpected noise, DO NOT USE the Zone 2 feature with your nearest authorized Yamaha dealer or service center about the Zone 2 connections that best meet your requirements...


