MCXSP10 Manual
Page 3
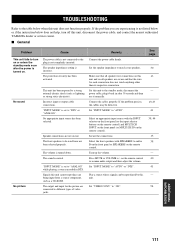
... a reasonable level of the following the operating instructions. d) If the product does not operate normally by following measures: Relocate either this manual, meets FCC requirements. NATIONAL ELECTRICAL CODE ANTENNA LEAD IN WIRE ANTENNA DISCHARGE UNIT (NEC SECTION 810-20) GROUNDING CONDUCTORS (NEC SECTION 810-21) GROUND CLAMPS POWER SERVICE GROUNDING ELECTRODE SYSTEM (NEC ART 250. Modifications not expressly approved by Yamaha may...
... a reasonable level of the following the operating instructions. d) If the product does not operate normally by following measures: Relocate either this manual, meets FCC requirements. NATIONAL ELECTRICAL CODE ANTENNA LEAD IN WIRE ANTENNA DISCHARGE UNIT (NEC SECTION 810-20) GROUNDING CONDUCTORS (NEC SECTION 810-21) GROUND CLAMPS POWER SERVICE GROUNDING ELECTRODE SYSTEM (NEC ART 250. Modifications not expressly approved by Yamaha may...

MCXSP10 Manual
Page 5
... Connecting a YAMAHA iPod universal dock ........ 24 Connecting an external amplifier 25 Connecting a multi-format player or an external decoder 26 Connecting a game console, a video camera or a portable audio player 27 Connecting the FM and AM antennas 28 Connecting the power cable 29 Setting the speaker impedance 30 Turning on and off the power 31 AUTO SETUP 32 Connecting the optimizer microphone 32 Using AUTO SETUP 33 BASIC OPERATION PLAYBACK 38 USING AUDIO FEATURES 40 Using SILENT CINEMA 40 Muting the audio output 40 Selecting the night listening mode 40 Selecting the input...
... Connecting a YAMAHA iPod universal dock ........ 24 Connecting an external amplifier 25 Connecting a multi-format player or an external decoder 26 Connecting a game console, a video camera or a portable audio player 27 Connecting the FM and AM antennas 28 Connecting the power cable 29 Setting the speaker impedance 30 Turning on and off the power 31 AUTO SETUP 32 Connecting the optimizer microphone 32 Using AUTO SETUP 33 BASIC OPERATION PLAYBACK 38 USING AUDIO FEATURES 40 Using SILENT CINEMA 40 Muting the audio output 40 Selecting the night listening mode 40 Selecting the input...

MCXSP10 Manual
Page 6
...9670; Optical and coaxial digital audio signal jacks ◆ Sleep timer ◆ Cinema and music night listening modes ◆ Remote control with preset remote control codes, backlighting input selector buttons, and an iPod (stationed in parentheses. • This manual is printed prior to suit your individual audiovisual system ◆ 8 additional input jacks for discrete multi-channel input ◆ Pure Direct mode for pure hi-fie stereo sound with analog and PCM sources ◆ S-video signal input/output capability ◆ Component video input/output capability (3 COMPONENT VIDEO INs...
...9670; Optical and coaxial digital audio signal jacks ◆ Sleep timer ◆ Cinema and music night listening modes ◆ Remote control with preset remote control codes, backlighting input selector buttons, and an iPod (stationed in parentheses. • This manual is printed prior to suit your individual audiovisual system ◆ 8 additional input jacks for discrete multi-channel input ◆ Pure Direct mode for pure hi-fie stereo sound with analog and PCM sources ◆ S-video signal input/output capability ◆ Component video input/output capability (3 COMPONENT VIDEO INs...
MCXSP10 Manual
Page 8
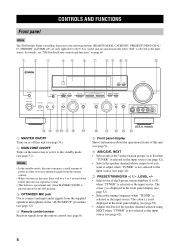
... EDIT SEARCH MODE A/B/C/D/E NEXT CATEGORY PROGRAM l PRESET/TUNING/CH h MEMORY TUNING MODE MAN'L/AUTO FM AUTO/MAN'L LEVEL INPUT DISPLAY STRAIGHT TONE CONTROL INPUT MODE MULTI CH INPUT PURE DIRECT SILENT CINEMA EFFECT S VIDEO VIDEO AUX VIDEO L AUDIO R OPTICAL C D EF G H I 1 MASTER ON/OFF Turns on or off this unit (see page 31). 2 MAIN ZONE ON/OFF Turns on this unit, there will be a 4 to 5-second delay before this unit consumes a small amount of power in order to receive infrared signals from the remote control. •...
... EDIT SEARCH MODE A/B/C/D/E NEXT CATEGORY PROGRAM l PRESET/TUNING/CH h MEMORY TUNING MODE MAN'L/AUTO FM AUTO/MAN'L LEVEL INPUT DISPLAY STRAIGHT TONE CONTROL INPUT MODE MULTI CH INPUT PURE DIRECT SILENT CINEMA EFFECT S VIDEO VIDEO AUX VIDEO L AUDIO R OPTICAL C D EF G H I 1 MASTER ON/OFF Turns on or off this unit (see page 31). 2 MAIN ZONE ON/OFF Turns on this unit, there will be a 4 to 5-second delay before this unit consumes a small amount of power in order to receive infrared signals from the remote control. •...

MCXSP10 Manual
Page 9
...). L MULTI CH INPUT Selects the component connected to the standby mode (see page 106). Note This button is operational only when MASTER ON/OFF is selected as the input source (see page 39). A ZONE CONTROL Switches the zone you connect headphones, no signals are output at the VIDEO AUX jacks. 5 y This does not affect the AUDIO OUT (REC) level. Notes • When you want to the FRONT A and/or B terminals on . H PROGRAM selector Selects sound field programs or adjusts the bass...
...). L MULTI CH INPUT Selects the component connected to the standby mode (see page 106). Note This button is operational only when MASTER ON/OFF is selected as the input source (see page 39). A ZONE CONTROL Switches the zone you connect headphones, no signals are output at the VIDEO AUX jacks. 5 y This does not affect the AUDIO OUT (REC) level. Notes • When you want to the FRONT A and/or B terminals on . H PROGRAM selector Selects sound field programs or adjusts the bass...

MCXSP10 Manual
Page 10
... currently being operated. 4 Sound field program selector buttons Select sound field programs (see page 42). 6 PURE DIRECT 5 6 7 8 SPEAKERS 9 LEVEL TITLE BAND ENHANCER 0 NIGHT 10 PRESET/CH STRAIGHT ENT. DISPLAY ON SCREEN AUDIO K 5 SPEAKERS Turns on or off the set up for the currently selected input source lights up remote control codes (see page 49). - CONTROLS AND FUNCTIONS Remote control This section describes the function of each control on the remote control used to the U.S.A. RETURN XM MEMORY REC DISC SKIP A-E/CAT. EFFECT SET MENU MENU SRCH MODE ENTER...
... currently being operated. 4 Sound field program selector buttons Select sound field programs (see page 42). 6 PURE DIRECT 5 6 7 8 SPEAKERS 9 LEVEL TITLE BAND ENHANCER 0 NIGHT 10 PRESET/CH STRAIGHT ENT. DISPLAY ON SCREEN AUDIO K 5 SPEAKERS Turns on or off the set up for the currently selected input source lights up remote control codes (see page 49). - CONTROLS AND FUNCTIONS Remote control This section describes the function of each control on the remote control used to the U.S.A. RETURN XM MEMORY REC DISC SKIP A-E/CAT. EFFECT SET MENU MENU SRCH MODE ENTER...

MCXSP10 Manual
Page 37
... p p 2 Press u / d to enter "AUTO SETUP". p p SET MENU . ;AUTO SETUP ;MANUAL SETUP . ;SIGNAL INFO [ ]/[ ]:Up/Down [ENTER]:Enter VOLUME CROSSOVER HIGH CUT MIN MAX MIN MAX Subwoofer TV CD DVD V-AUX AV MD CD-R CBL DTV DVR SLEEP XM TUNER MULTI CH IN VCR PHONO TV VOL TV CH AMP VOLUME SOURCE TV 1 TV MUTE TV INPUT MUTE STEREO MUSIC ENTERTAIN MOVIE (U.S.A. ENTER A-E/CAT. model) STEREO 1 MUSIC ENTERTAIN MOVIE 2 3 4 STANDARD SELECT EXTD SUR. PURE DIRECT 5 6 7 8 SPEAKERS 9 LEVEL TITLE BAND ENHANCER...
... p p 2 Press u / d to enter "AUTO SETUP". p p SET MENU . ;AUTO SETUP ;MANUAL SETUP . ;SIGNAL INFO [ ]/[ ]:Up/Down [ENTER]:Enter VOLUME CROSSOVER HIGH CUT MIN MAX MIN MAX Subwoofer TV CD DVD V-AUX AV MD CD-R CBL DTV DVR SLEEP XM TUNER MULTI CH IN VCR PHONO TV VOL TV CH AMP VOLUME SOURCE TV 1 TV MUTE TV INPUT MUTE STEREO MUSIC ENTERTAIN MOVIE (U.S.A. ENTER A-E/CAT. model) STEREO 1 MUSIC ENTERTAIN MOVIE 2 3 4 STANDARD SELECT EXTD SUR. PURE DIRECT 5 6 7 8 SPEAKERS 9 LEVEL TITLE BAND ENHANCER...

MCXSP10 Manual
Page 43
...; Speaker and headphone adjustments are stored independently. • When "TONE BYPASS" is set to "AUTO" (see page 91), and "BASS" and "TREBLE" are sampled down to the MULTI CH INPUT jacks is selected as the input source (see page 44). • To enjoy multi-channel sources in the OSD. TONE CONTROL PROGRAM Front panel or STEREO 1 MUSIC ENTERTAIN MOVIE 2 3 4 STANDARD SELECT EXTD SUR. PURE DIRECT 5 6 7 8 SPEAKERS 9 ENHANCER 0 NIGHT 10 STRAIGHT ENT. EFFECT Remote control VCR DVR V-AUX...
...; Speaker and headphone adjustments are stored independently. • When "TONE BYPASS" is set to "AUTO" (see page 91), and "BASS" and "TREBLE" are sampled down to the MULTI CH INPUT jacks is selected as the input source (see page 44). • To enjoy multi-channel sources in the OSD. TONE CONTROL PROGRAM Front panel or STEREO 1 MUSIC ENTERTAIN MOVIE 2 3 4 STANDARD SELECT EXTD SUR. PURE DIRECT 5 6 7 8 SPEAKERS 9 ENHANCER 0 NIGHT 10 STRAIGHT ENT. EFFECT Remote control VCR DVR V-AUX...

MCXSP10 Manual
Page 45
... by using a digital audio connection, be sure to set to "AUTO", this unit is detected. Refer to "AUTO" in effectiveness depending on the selected source component or select a broadcast station. when the Pure Direct mode (see page 44). - y • We recommend setting "INPUT MODE" to the operating instructions for details about tuning instructions. BASIC OPERATION y "NIGHT:CINEMA" and "NIGHT:MUSIC" adjustments are going to select the desired input source. when the component connected to the MULTI CH INPUT jacks is selected as the input source (see...
... by using a digital audio connection, be sure to set to "AUTO", this unit is detected. Refer to "AUTO" in effectiveness depending on the selected source component or select a broadcast station. when the Pure Direct mode (see page 44). - y • We recommend setting "INPUT MODE" to the operating instructions for details about tuning instructions. BASIC OPERATION y "NIGHT:CINEMA" and "NIGHT:MUSIC" adjustments are going to select the desired input source. when the component connected to the MULTI CH INPUT jacks is selected as the input source (see...

MCXSP10 Manual
Page 46
... VOLUME dB L R The SLEEP indicator turns off, and "SLEEP OFF" disappears from the front panel display after a few seconds. Once the sleep timer is also possible when playing sources input at the MULTI CH INPUT jacks. y This operation can adjust the output level of each speaker while listening to a music source. RETURN XM MEMORY REC DISC SKIP DISPLAY ON SCREEN AUDIO (U.S.A. model) 3 2 1 Set the component selector switch to AMP and then press LEVEL on the remote control repeatedly to select...
... VOLUME dB L R The SLEEP indicator turns off, and "SLEEP OFF" disappears from the front panel display after a few seconds. Once the sleep timer is also possible when playing sources input at the MULTI CH INPUT jacks. y This operation can adjust the output level of each speaker while listening to a music source. RETURN XM MEMORY REC DISC SKIP DISPLAY ON SCREEN AUDIO (U.S.A. model) 3 2 1 Set the component selector switch to AMP and then press LEVEL on the remote control repeatedly to select...

MCXSP10 Manual
Page 51
... panel display. 1 Turn on the video monitor connected to this unit. 2 Set the component selector switch to AMP and then press DISPLAY on the remote control repeatedly to "OFF" (see page 94) to display the OSD. • To display the OSD with the component video signals output at the MULTI CH INPUT jacks together with sound from the video source on the video monitor. P02 MUSIC . BASIC OPERATION Selecting the OSD mode You can combine a video image from a video source with a video source, first select...
... panel display. 1 Turn on the video monitor connected to this unit. 2 Set the component selector switch to AMP and then press DISPLAY on the remote control repeatedly to "OFF" (see page 94) to display the OSD. • To display the OSD with the component video signals output at the MULTI CH INPUT jacks together with sound from the video source on the video monitor. P02 MUSIC . BASIC OPERATION Selecting the OSD mode You can combine a video image from a video source with a video source, first select...
MCXSP10 Manual
Page 55
... MIC SPEAKERS A B PRESET/TUNING FM/AM EDIT SEARCH MODE A/B/C/D/E NEXT CATEGORY PROGRAM l PRESET/TUNING/CH h MEMORY TUNING MODE MAN'L/AUTO FM AUTO/MAN'L LEVEL INPUT DISPLAY STRAIGHT TONE CONTROL INPUT MODE MULTI CH INPUT PURE DIRECT SILENT CINEMA EFFECT S VIDEO VIDEO AUX VIDEO L AUDIO R OPTICAL 2 2 CODE SET TRANSMIT POWER TV POWER AV STANDBY POWER CD DVD V-AUX MD CD-R CBL DTV DVR SLEEP XM TUNER MULTI CH IN VCR PHONO TV VOL TV CH AMP VOLUME SOURCE TV 1 (U.S.A. Therefore, if your VCR. • Digital signals input at the DIGITAL INPUT jacks...
... MIC SPEAKERS A B PRESET/TUNING FM/AM EDIT SEARCH MODE A/B/C/D/E NEXT CATEGORY PROGRAM l PRESET/TUNING/CH h MEMORY TUNING MODE MAN'L/AUTO FM AUTO/MAN'L LEVEL INPUT DISPLAY STRAIGHT TONE CONTROL INPUT MODE MULTI CH INPUT PURE DIRECT SILENT CINEMA EFFECT S VIDEO VIDEO AUX VIDEO L AUDIO R OPTICAL 2 2 CODE SET TRANSMIT POWER TV POWER AV STANDBY POWER CD DVD V-AUX MD CD-R CBL DTV DVR SLEEP XM TUNER MULTI CH IN VCR PHONO TV VOL TV CH AMP VOLUME SOURCE TV 1 (U.S.A. Therefore, if your VCR. • Digital signals input at the DIGITAL INPUT jacks...

MCXSP10 Manual
Page 56
... PROGRAM l PRESET/TUNING/CH h MEMORY TUNING MODE MAN'L/AUTO FM AUTO/MAN'L LEVEL INPUT DISPLAY STRAIGHT TONE CONTROL INPUT MODE MULTI CH INPUT PURE DIRECT SILENT CINEMA EFFECT S VIDEO VIDEO AUX VIDEO L AUDIO R OPTICAL VCR A DVR V-AUX SP A AM DTV/CBL DVD MD/CD-R pTUNER CD XM PHONO AUTO TUNED VOLUME dB 1440 kHz L R 32 4 1 3 1 Rotate the INPUT selector to turn the colon (:) off. INPUT No colon (:) Lights up in each other. Press PRESET/TUNING (EDIT) to select "TUNER" as the input source. model) 3 Press TUNING MODE (AUTO/MAN'L) so that the AUTO indicator lights...
... PROGRAM l PRESET/TUNING/CH h MEMORY TUNING MODE MAN'L/AUTO FM AUTO/MAN'L LEVEL INPUT DISPLAY STRAIGHT TONE CONTROL INPUT MODE MULTI CH INPUT PURE DIRECT SILENT CINEMA EFFECT S VIDEO VIDEO AUX VIDEO L AUDIO R OPTICAL VCR A DVR V-AUX SP A AM DTV/CBL DVD MD/CD-R pTUNER CD XM PHONO AUTO TUNED VOLUME dB 1440 kHz L R 32 4 1 3 1 Rotate the INPUT selector to turn the colon (:) off. INPUT No colon (:) Lights up in each other. Press PRESET/TUNING (EDIT) to select "TUNER" as the input source. model) 3 Press TUNING MODE (AUTO/MAN'L) so that the AUTO indicator lights...
MCXSP10 Manual
Page 87
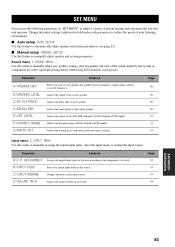
...low-frequency signal output, and the crossover frequency. D)VOLUME TRIM Adjusts the output volume of each jack. Page 92 93 93 94 ADVANCED OPERATION 83 Adjusts the delay time of each speaker. B)INPUT MODE Selects the initial input mode of the input source. Parameter A)SPEAKER SET B)SPEAKER LEVEL C)SP DISTANCE D)EQUALIZER E)LFE LEVEL F)DYNAMIC RANGE G)AUDIO SET Features Selects the size of each speaker, the speakers for Dolby Digital or DTS signals. C)INPUT RENAME Changes the name of the source. Sound menu 1 SOUND MENU Use this feature to be used. Adjusts the output...
...low-frequency signal output, and the crossover frequency. D)VOLUME TRIM Adjusts the output volume of each jack. Page 92 93 93 94 ADVANCED OPERATION 83 Adjusts the delay time of each speaker. B)INPUT MODE Selects the initial input mode of the input source. Parameter A)SPEAKER SET B)SPEAKER LEVEL C)SP DISTANCE D)EQUALIZER E)LFE LEVEL F)DYNAMIC RANGE G)AUDIO SET Features Selects the size of each speaker, the speakers for Dolby Digital or DTS signals. C)INPUT RENAME Changes the name of the source. Sound menu 1 SOUND MENU Use this feature to be used. Adjusts the output...
MCXSP10 Manual
Page 90
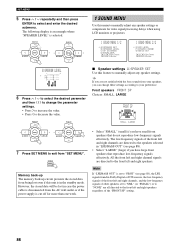
... Dolby Digital or DTS sources, the low-frequency signals of the front left and right channels, and the low-frequency signals of the "FRONT SP" setting. 86 E)LFE LEVEL F)DYNAMIC RANGE G)AUDIO SET [ ]/[ ]:Up/Down [ENTER]:Enter B)SPEAKER LEVEL FL;;;;;;;;;; PRESET/CH PRESET/CH ■ Speaker settings A)SPEAKER SET Use this feature to manually adjust any speaker settings or compensate for more than one week. • Select "SMALL" (small) if you have small front speakers that reproduce low-frequency signals effectively. SET MENU MENU SRCH MODE...
... Dolby Digital or DTS sources, the low-frequency signals of the front left and right channels, and the low-frequency signals of the "FRONT SP" setting. 86 E)LFE LEVEL F)DYNAMIC RANGE G)AUDIO SET [ ]/[ ]:Up/Down [ENTER]:Enter B)SPEAKER LEVEL FL;;;;;;;;;; PRESET/CH PRESET/CH ■ Speaker settings A)SPEAKER SET Use this feature to manually adjust any speaker settings or compensate for more than one week. • Select "SMALL" (small) if you have small front speakers that reproduce low-frequency signals effectively. SET MENU MENU SRCH MODE...

MCXSP10 Manual
Page 103
... SELECT EXTD SUR. DISPLAY ON SCREEN AUDIO *2 (U.S.A. model) Notes *1 These buttons always control this unit only when the component selector switch is set for DTV/CBL. *1 CODE SET TRANSMIT POWER TV POWER AV STANDBY POWER CD DVD V-AUX MD CD-R CBL DTV DVR SLEEP XM TUNER MULTI CH IN VCR PHONO TV VOL TV CH AMP VOLUME SOURCE TV TV MUTE TV INPUT MUTE STEREO 1 MUSIC ENTERTAIN MOVIE 2 3 4 STANDARD SELECT EXTD SUR. TV VOL +/- Remote control Digital TV/Cable TV TV POWER Turns on...
... SELECT EXTD SUR. DISPLAY ON SCREEN AUDIO *2 (U.S.A. model) Notes *1 These buttons always control this unit only when the component selector switch is set for DTV/CBL. *1 CODE SET TRANSMIT POWER TV POWER AV STANDBY POWER CD DVD V-AUX MD CD-R CBL DTV DVR SLEEP XM TUNER MULTI CH IN VCR PHONO TV VOL TV CH AMP VOLUME SOURCE TV TV MUTE TV INPUT MUTE STEREO 1 MUSIC ENTERTAIN MOVIE 2 3 4 STANDARD SELECT EXTD SUR. TV VOL +/- Remote control Digital TV/Cable TV TV POWER Turns on...

MCXSP10 Manual
Page 104
... ENTER A-E/CAT. Be advised that some buttons may not correctly operate the selected component. 1 CODE SET TRANSMIT POWER TV POWER AV STANDBY POWER CD DVD V-AUX MD CD-R CBL DTV DVR SLEEP XM TUNER MULTI CH IN VCR PHONO TV VOL TV CH AMP VOLUME SOURCE TV TV MUTE TV INPUT MUTE STEREO 1 MUSIC ENTERTAIN MOVIE 2 3 4 (U.S.A. model) 2 3 4 5 6 U U U STEREO 1 MUSIC ENTERTAIN MOVIE 2 3 4 STANDARD SELECT EXTD SUR. EFFECT SET MENU MENU SRCH MODE A-E/CAT. You must set the appropriate remote control code for each input selector button.
... ENTER A-E/CAT. Be advised that some buttons may not correctly operate the selected component. 1 CODE SET TRANSMIT POWER TV POWER AV STANDBY POWER CD DVD V-AUX MD CD-R CBL DTV DVR SLEEP XM TUNER MULTI CH IN VCR PHONO TV VOL TV CH AMP VOLUME SOURCE TV TV MUTE TV INPUT MUTE STEREO 1 MUSIC ENTERTAIN MOVIE 2 3 4 (U.S.A. model) 2 3 4 5 6 U U U STEREO 1 MUSIC ENTERTAIN MOVIE 2 3 4 STANDARD SELECT EXTD SUR. EFFECT SET MENU MENU SRCH MODE A-E/CAT. You must set the appropriate remote control code for each input selector button.
MCXSP10 Manual
Page 115
... or VOLUME +/- Make sure that the wire for the picture are connected to the standby mode, disconnect the power cable, plug it back in DTS. The front speakers to "ON". to be used have not been selected properly. Incorrect input or output cable connections. Set "INPUT MODE" to turn off this unit does not function properly. Select the front speakers with the INPUT selector on the front panel (or the input selector buttons on the remote control) and MULTI CH INPUT on...
... or VOLUME +/- Make sure that the wire for the picture are connected to the standby mode, disconnect the power cable, plug it back in DTS. The front speakers to "ON". to be used have not been selected properly. Incorrect input or output cable connections. Set "INPUT MODE" to turn off this unit does not function properly. Select the front speakers with the INPUT selector on the front panel (or the input selector buttons on the remote control) and MULTI CH INPUT on...
MCXSP10 Manual
Page 118
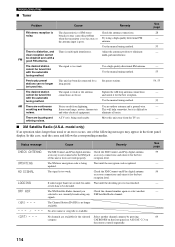
... updated. No channels are buzzing and A TV set . - Use the manual tuning method. 53 There is distortion, and There is weak or the antenna Tighten the AM loop antenna connections - FM be tuned into with the automatic tuning method. Set preset stations 54, 55 The desired station The signal is multi-path interference. and other electrical equipment. model only) If an operation takes longer than four seconds for the best...
... updated. No channels are buzzing and A TV set . - Use the manual tuning method. 53 There is distortion, and There is weak or the antenna Tighten the AM loop antenna connections - FM be tuned into with the automatic tuning method. Set preset stations 54, 55 The desired station The signal is multi-path interference. and other electrical equipment. model only) If an operation takes longer than four seconds for the best...
MCXSP10 Manual
Page 120
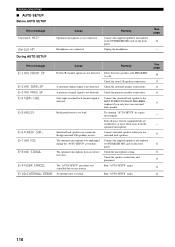
... MIC E-8:NO SIGNAL E-9:USER CANCEL E-10:INTERNAL ERROR Front L/R channel signals are connected. A presence channel signal is not connected. Background noise is not detected. The optimizer microphone does not detect test tones. Check the surround speaker connections. Unplug HP! The "AUTO SETUP" procedure was unplugged during the "AUTO SETUP" procedure. Check the presence speaker connections. Connect the supplied optimizer microphone to the OPTIMIZER MIC jack on the front panel. Check the microphone setting. Unplug the headphones. Select the front speakers...
... MIC E-8:NO SIGNAL E-9:USER CANCEL E-10:INTERNAL ERROR Front L/R channel signals are connected. A presence channel signal is not connected. Background noise is not detected. The optimizer microphone does not detect test tones. Check the surround speaker connections. Unplug HP! The "AUTO SETUP" procedure was unplugged during the "AUTO SETUP" procedure. Check the presence speaker connections. Connect the supplied optimizer microphone to the OPTIMIZER MIC jack on the front panel. Check the microphone setting. Unplug the headphones. Select the front speakers...


