Quick Reference Guide
Page 1
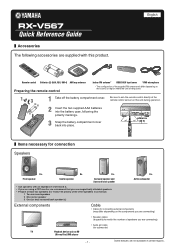
Front speaker Ex. Active subwoofer • Use speakers with an impedance of speakers you are supplied with this product. Some features are connecting) • Speaker cables (a quantity to aim the ... sensor on this unit during operation. 2 Insert the two supplied AAA batteries into the battery case, following accessories are connecting) • Audio pin cable (for subwoofer) TV Playback device such as follows: 1 Two surround speakers 2 One center speaker 3 One (or two) surround back speaker (s) External components Cable • Cables for connecting...
Front speaker Ex. Active subwoofer • Use speakers with an impedance of speakers you are supplied with this product. Some features are connecting) • Speaker cables (a quantity to aim the ... sensor on this unit during operation. 2 Insert the two supplied AAA batteries into the battery case, following accessories are connecting) • Audio pin cable (for subwoofer) TV Playback device such as follows: 1 Two surround speakers 2 One center speaker 3 One (or two) surround back speaker (s) External components Cable • Cables for connecting...

Quick Reference Guide
Page 2
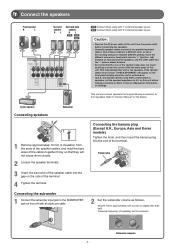
... with 7.1-channel speaker layout. Place the surround back speaker behind the listening position. 4 This unit 3 BD/DVD player (recorder) Front speaker L Center speaker Front speaker R Subwoofer 1 Surround speaker R Surround 1 speaker L 7.1 Surround back speaker L 7.1 Surround back speaker R 6.1 Surround back speaker 1 Connect the speakers 2 Connect a TV 3 Connect playback device such as follows the...
... with 7.1-channel speaker layout. Place the surround back speaker behind the listening position. 4 This unit 3 BD/DVD player (recorder) Front speaker L Center speaker Front speaker R Subwoofer 1 Surround speaker R Surround 1 speaker L 7.1 Surround back speaker L 7.1 Surround back speaker R 6.1 Surround back speaker 1 Connect the speakers 2 Connect a TV 3 Connect playback device such as follows the...
Quick Reference Guide
Page 3
...front panel display when this unit is a different color, or has a line running along it, to indicate different polarity. Center speaker Subwoofer Connecting speakers 3 2 FRONT 1 4 1 Remove approximately 10 mm of insulation from the power outlet before making connections. Volume: Set ...and Korea models) Tighten the knob, and then insert the banana plug into contact with 6.1-channel speaker layout. FRONT Banana plug 2 Set the subwoofer volume as follows. VOLUME CROSSOVER/ HIGH CUT - 3 - This unit can connect speakers that support Bi-amp connection for information on . &#...
...front panel display when this unit is a different color, or has a line running along it, to indicate different polarity. Center speaker Subwoofer Connecting speakers 3 2 FRONT 1 4 1 Remove approximately 10 mm of insulation from the power outlet before making connections. Volume: Set ...and Korea models) Tighten the knob, and then insert the banana plug into contact with 6.1-channel speaker layout. FRONT Banana plug 2 Set the subwoofer volume as follows. VOLUME CROSSOVER/ HIGH CUT - 3 - This unit can connect speakers that support Bi-amp connection for information on . &#...

Quick Reference Guide
Page 6
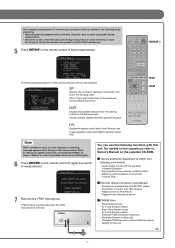
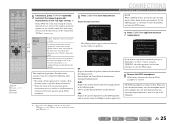
...if present) is set to others nearby. • Please take care that the test tone does not frighten any small children. Subwoofer • The power is turned on the front panel. bbAutobSetup bbbbEQbType;;;;Natural bb.bStart YPAO microphone bbb[OPTION]:EQbSelect bbbb[SETUP]:Start ...minutes and acoustic measuring will use equipment that adjusts the speaker balance automatically with a simple procedure. This unit is equipped with a YPAO (Yamaha Parametric Room Acoustic Optimizer) function that allows you use YPAO, a test tone will be output from using YPAO. YPAO MIC INFO "MIC...
...if present) is set to others nearby. • Please take care that the test tone does not frighten any small children. Subwoofer • The power is turned on the front panel. bbAutobSetup bbbbEQbType;;;;Natural bb.bStart YPAO microphone bbb[OPTION]:EQbSelect bbbb[SETUP]:Start ...minutes and acoustic measuring will use equipment that adjusts the speaker balance automatically with a simple procedure. This unit is equipped with a YPAO (Yamaha Parametric Room Acoustic Optimizer) function that allows you use YPAO, a test tone will be output from using YPAO. YPAO MIC INFO "MIC...
Quick Reference Guide
Page 7
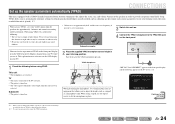
... Europe models) Radio Data System tuning - (U.K. To achieve more accurate results, be careful of speakers connected to apply the results of Surround and Surround Back/Subwoofer DIST Displays the speaker distance from an iPod/iPhone - Easy listening at low volumes - Refer to "Set up the speaker parameters automatically (YPAO)" in the...
... Europe models) Radio Data System tuning - (U.K. To achieve more accurate results, be careful of speakers connected to apply the results of Surround and Surround Back/Subwoofer DIST Displays the speaker distance from an iPod/iPhone - Easy listening at low volumes - Refer to "Set up the speaker parameters automatically (YPAO)" in the...
Owners Manual
Page 2
... System tuning (U.K. and Europe models only 38 Playing back tunes from your iPod™/iPhone 40 Connecting the Yamaha iPod universal dock 40 Controlling an iPod™/iPhone 40 Playing back tunes from Bluetooth™ components....... 43 Connecting...5 Rear panel 6 Front panel display 7 Remote control 8 CONNECTIONS Connecting speakers 9 Speaker channels and functions 9 Speaker layout 10 Connecting speakers and subwoofer 11 Connecting external components 14 Cable plugs and jacks 14 Connecting a TV monitor 15 Connecting BD/DVD players and other devices 18 Connecting video cameras...
... System tuning (U.K. and Europe models only 38 Playing back tunes from your iPod™/iPhone 40 Connecting the Yamaha iPod universal dock 40 Controlling an iPod™/iPhone 40 Playing back tunes from Bluetooth™ components....... 43 Connecting...5 Rear panel 6 Front panel display 7 Remote control 8 CONNECTIONS Connecting speakers 9 Speaker channels and functions 9 Speaker layout 10 Connecting speakers and subwoofer 11 Connecting external components 14 Cable plugs and jacks 14 Connecting a TV monitor 15 Connecting BD/DVD players and other devices 18 Connecting video cameras...
Owners Manual
Page 3
... adjustment to 7.1-channel configurations - (U.S.A. Speaker layout...10 - Speaker distance settings ...52 - Speaker channels and functions ...9 - Subwoofer cable connection ...13 - Automatic settings for each speaker...52 - Specifying the settings for speaker acoustic parameters (YPAO - Volume control for 2- Yamaha Parametric Room Acoustic Optimizer 24 - Sound quality control with the equalizer and Canada models only...
... adjustment to 7.1-channel configurations - (U.S.A. Speaker layout...10 - Speaker distance settings ...52 - Speaker channels and functions ...9 - Subwoofer cable connection ...13 - Automatic settings for each speaker...52 - Specifying the settings for speaker acoustic parameters (YPAO - Volume control for 2- Yamaha Parametric Room Acoustic Optimizer 24 - Sound quality control with the equalizer and Canada models only...
Owners Manual
Page 6
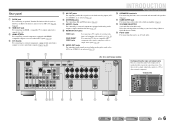
... f ANTENNA jacks For connecting AM and FM antennas (☞p. 23). a b c (Ex: U.K. Rear panel a DOCK jack For connecting an optional Yamaha iPod universal dock (such as the AV5-6 or AUDIO1-2 are selected (☞p. 22). h MONITOR OUT jacks VIDEO jack For connecting a TV capable of ... video input, and outputting video signals to Quick Reference Guide). m Power cable For connecting this unit (☞p. 21). k SUBWOOFER jack For connecting a subwoofer with HDMIcompatible outputs to an AC wall outlet. b HDMI OUT jack For connecting an HDMI - Output jacks ARC DEO HDMI ...
... f ANTENNA jacks For connecting AM and FM antennas (☞p. 23). a b c (Ex: U.K. Rear panel a DOCK jack For connecting an optional Yamaha iPod universal dock (such as the AV5-6 or AUDIO1-2 are selected (☞p. 22). h MONITOR OUT jacks VIDEO jack For connecting a TV capable of ... video input, and outputting video signals to Quick Reference Guide). m Power cable For connecting this unit (☞p. 21). k SUBWOOFER jack For connecting a subwoofer with HDMIcompatible outputs to an AC wall outlet. b HDMI OUT jack For connecting an HDMI - Output jacks ARC DEO HDMI ...

Owners Manual
Page 7
... Lights up during normal HDMI communication when any of information on menu items and settings. b CINEMA DSP indicator Lights up if corresponding cursors on (☞p. 8). Subwoofer Front speaker L Surround speaker L Surround back speaker L SW L CR SL SR SBL SB SBR Center speaker Front speaker R Surround speaker R Surround back speaker R Surround back...
... Lights up during normal HDMI communication when any of information on menu items and settings. b CINEMA DSP indicator Lights up if corresponding cursors on (☞p. 8). Subwoofer Front speaker L Surround speaker L Surround back speaker L SW L CR SL SR SBL SB SBR Center speaker Front speaker R Surround speaker R Surround back speaker R Surround back...

Owners Manual
Page 9
...; Front left and right front speakers. Ex. Ex. Surround back speaker setting: When used with built-in Dolby Digital and DTS. Use a subwoofer that is for the front channel sounds (stereo sound) and effect sounds. These effects will be placed between the left and right speakers at ...and output from surround back speakers is used with 6.1ch sound, arrange these speakers at the rear of the listening position. ■ Subwoofer The subwoofer speaker is distributed between 60 degrees and 80 degrees from the left rear-area is optimum. When Ex. Front speaker layout: Place ...
...; Front left and right front speakers. Ex. Ex. Surround back speaker setting: When used with built-in Dolby Digital and DTS. Use a subwoofer that is for the front channel sounds (stereo sound) and effect sounds. These effects will be placed between the left and right speakers at ...and output from surround back speakers is used with 6.1ch sound, arrange these speakers at the rear of the listening position. ■ Subwoofer The subwoofer speaker is distributed between 60 degrees and 80 degrees from the left rear-area is optimum. When Ex. Front speaker layout: Place ...

Owners Manual
Page 10
... If your TV. Speaker layout ■ 7.1-channel speaker layout (7 speakers + subwoofer) Front speaker R Front speaker L Subwoofer Surround speaker R ■ 6.1-channel speaker layout (6 speakers + subwoofer) Front speaker R Front speaker L Subwoofer Surround speaker R CONNECTIONS Connecting speakers ■ 5.1-channel speaker layout (5 speakers + subwoofer) Front speaker R Front speaker L Subwoofer Surround speaker R Center speaker 60q 60q 80q 80q Surround speaker L 30...
... If your TV. Speaker layout ■ 7.1-channel speaker layout (7 speakers + subwoofer) Front speaker R Front speaker L Subwoofer Surround speaker R ■ 6.1-channel speaker layout (6 speakers + subwoofer) Front speaker R Front speaker L Subwoofer Surround speaker R CONNECTIONS Connecting speakers ■ 5.1-channel speaker layout (5 speakers + subwoofer) Front speaker R Front speaker L Subwoofer Surround speaker R Center speaker 60q 60q 80q 80q Surround speaker L 30...

Owners Manual
Page 11
... SPEAKERS HDMI 3 HDMI 4 FRONT CENTER SURROUND SURROUND BACK/ BI-AMP SINGLE AUDIO OUT SUBWOOFER PRE OUT Center speaker Subwoofer Center speaker Subwoofer Center speaker Subwoofer En 11 One of these cables is switched on the rear panel. Connecting speakers and subwoofer CONNECTIONS Connecting speakers Connect your speakers to indicate different polarity. CAUTION • Remove the...
... SPEAKERS HDMI 3 HDMI 4 FRONT CENTER SURROUND SURROUND BACK/ BI-AMP SINGLE AUDIO OUT SUBWOOFER PRE OUT Center speaker Subwoofer Center speaker Subwoofer Center speaker Subwoofer En 11 One of these cables is switched on the rear panel. Connecting speakers and subwoofer CONNECTIONS Connecting speakers Connect your speakers to indicate different polarity. CAUTION • Remove the...
Owners Manual
Page 13
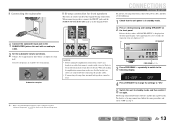
...select "OFF" in standby mode. 2 Press A while pressing and holding STRAIGHT on the front panel. ■ Connecting the subwoofer 1 Connect the subwoofer input jack to the SUBWOOFER jack on this unit to standby mode, and then switch it on again. Volume: Set to maximum. VOLUME CROSSOVER/ HIGH... CUT MIN MAX MIN MAX Subwoofer examples J 1 : Refer to the following . 1 Check that connect a woofer with an audio pin cable. 2 Set the subwoofer volume as follows. After approximately a few seconds, the top menu items are connected ...
...select "OFF" in standby mode. 2 Press A while pressing and holding STRAIGHT on the front panel. ■ Connecting the subwoofer 1 Connect the subwoofer input jack to the SUBWOOFER jack on this unit to standby mode, and then switch it on again. Volume: Set to maximum. VOLUME CROSSOVER/ HIGH... CUT MIN MAX MIN MAX Subwoofer examples J 1 : Refer to the following . 1 Check that connect a woofer with an audio pin cable. 2 Set the subwoofer volume as follows. After approximately a few seconds, the top menu items are connected ...
Owners Manual
Page 24
Face the head of speakers or the locations in which this function at ear height in place. Subwoofer • The power is equipped with a YPAO (Yamaha Parametric Room Acoustic Optimizer) that adjusts the status, size, and volume balance of the speakers in which they are removed. Set up ... use YPAO to fix the microphone in your TV. • Volume is set to the OSD display on the front panel. MIN MAX MIN MAX Subwoofer examples 2 Place the supplied YPAO microphone at night when it . This unit • The headphones are installed, first use YPAO, a test tone ...
Face the head of speakers or the locations in which this function at ear height in place. Subwoofer • The power is equipped with a YPAO (Yamaha Parametric Room Acoustic Optimizer) that adjusts the status, size, and volume balance of the speakers in which they are removed. Set up ... use YPAO to fix the microphone in your TV. • Volume is set to the OSD display on the front panel. MIN MAX MIN MAX Subwoofer examples 2 Place the supplied YPAO microphone at night when it . This unit • The headphones are installed, first use YPAO, a test tone ...
Owners Manual
Page 25
... AV equipment. Sets uniform characteristics for each speaker to apply the results of measuring the acoustic characteristics are used are of Surround and Surround Back/Subwoofer DIST Displays the speaker distance from locations that may experience high temperatures, such as necessary. Choose this unit in "EQ Type," as on top of...
... AV equipment. Sets uniform characteristics for each speaker to apply the results of measuring the acoustic characteristics are used are of Surround and Surround Back/Subwoofer DIST Displays the speaker distance from locations that may experience high temperatures, such as necessary. Choose this unit in "EQ Type," as on top of...

Owners Manual
Page 28
... you are using and the environment in the same surroundings. CONNECTIONS Set up the speaker parameters automatically (YPAO) En 28 Adjust the volume of the subwoofer. We recommend the same speakers or speakers with as similar specifications as possible.
... you are using and the environment in the same surroundings. CONNECTIONS Set up the speaker parameters automatically (YPAO) En 28 Adjust the volume of the subwoofer. We recommend the same speakers or speakers with as similar specifications as possible.
Owners Manual
Page 50
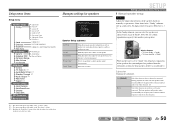
...size (sound production capacity), and bass audio processing. J 3 : Enabling the "Extra Bass" setting allows both the subwoofer and the front speakers to the listening point. Subwoofer Confirms the subwoofer. J 2 : This menu item appears depending on the "Control" setting. To display other channels. Manually adjusts the ... Selects an equalizer to "Small," low-frequency components of each speaker. Yes (Default) None Select this when you have a subwoofer connected. Woofer diameter • 16 cm or larger → Large • 16 cm or smaller → Small When speaker size ...
...size (sound production capacity), and bass audio processing. J 3 : Enabling the "Extra Bass" setting allows both the subwoofer and the front speakers to the listening point. Subwoofer Confirms the subwoofer. J 2 : This menu item appears depending on the "Control" setting. To display other channels. Manually adjusts the ... Selects an equalizer to "Small," low-frequency components of each speaker. Yes (Default) None Select this when you have a subwoofer connected. Woofer diameter • 16 cm or larger → Large • 16 cm or smaller → Small When speaker size ...
Owners Manual
Page 51
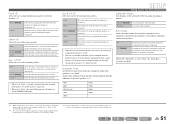
... from speakers set surround back audio signals, including from left and right surround back speakers (5.1-channel layout). Reverse Reverses the subwoofer phase. Sets the lower limit of the front channel frequency components. setting. J2 Select this when the surround speakers are ...front channel low-frequency components. J3 40Hz 60Hz 80Hz (Default) 90Hz 100Hz 110Hz 120Hz 160Hz 200Hz J 1 : When "Subwoofer" is connected. The subwoofer will automatically change the subwoofer phase. J 2 : You can only choose "Large." Normal (Default) Does not change to "None," it will ...
... from speakers set surround back audio signals, including from left and right surround back speakers (5.1-channel layout). Reverse Reverses the subwoofer phase. Sets the lower limit of the front channel frequency components. setting. J2 Select this when the surround speakers are ...front channel low-frequency components. J3 40Hz 60Hz 80Hz (Default) 90Hz 100Hz 110Hz 120Hz 160Hz 200Hz J 1 : When "Subwoofer" is connected. The subwoofer will automatically change the subwoofer phase. J 2 : You can only choose "Large." Normal (Default) Does not change to "None," it will ...
Owners Manual
Page 52
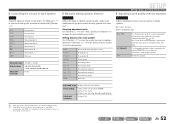
...J1 SWFR Front speaker L Front speaker R Center speaker Surround speaker L Surround speaker R Surround back L Surround back R Surround back Subwoofer Adjustable range -10.0 dB to carry out acoustic measurement selects "Auto PEQ" automatically. B L Sur. Use jCursor B / C ...Front speaker L Front speaker R Center speaker Surround speaker L Surround speaker R Surround back speaker L Surround back speaker R Surround back speaker Subwoofer SETUP Setting various functions (Setup menu) ■ Adjusting sound quality with jCursor D / E. Selecting this setting applies the tone settings obtained ...
...J1 SWFR Front speaker L Front speaker R Center speaker Surround speaker L Surround speaker R Surround back L Surround back R Surround back Subwoofer Adjustable range -10.0 dB to carry out acoustic measurement selects "Auto PEQ" automatically. B L Sur. Use jCursor B / C ...Front speaker L Front speaker R Center speaker Surround speaker L Surround speaker R Surround back speaker L Surround back speaker R Surround back speaker Subwoofer SETUP Setting various functions (Setup menu) ■ Adjusting sound quality with jCursor D / E. Selecting this setting applies the tone settings obtained ...
Owners Manual
Page 73
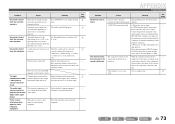
...cables may be increased, or the sound is turned off. Press STRAIGHT to output the desired digital audio signals. A subwoofer is not connected, or it to "DTS." Check that a subwoofer is inactive. The audio input sources cannot be output from certain channels depending on . See page 31 30 46 50...not be played in the Option menu is too close to the output jacks of AV receivers. If the condition is heard from the subwoofer. Problem Cause Remedy No sound is noise interference from digital or radio frequency equipment. This unit is in straight decoding mode and a...
...cables may be increased, or the sound is turned off. Press STRAIGHT to output the desired digital audio signals. A subwoofer is not connected, or it to "DTS." Check that a subwoofer is inactive. The audio input sources cannot be output from certain channels depending on . See page 31 30 46 50...not be played in the Option menu is too close to the output jacks of AV receivers. If the condition is heard from the subwoofer. Problem Cause Remedy No sound is noise interference from digital or radio frequency equipment. This unit is in straight decoding mode and a...


