
Quick Reference Guide
Page 6
... adjust the height (such as a tripod) as a microphone stand. bbAutobSetup bbbbEQbType;;;;Natural bb.bStart YPAO microphone bbb[OPTION]:EQbSelect bbbb[SETUP]:Start Continues to the YPAO MIC jack on the TV screen. 1 Check the following before using YPAO. This explanation will be a... is turned on the TV screen. 5 Set up the speaker parameters automatically (YPAO) When connection is equipped with a YPAO (Yamaha Parametric Room Acoustic Optimizer) function that adjusts the speaker balance automatically with a simple procedure. When using this unit has been selected. ...
... adjust the height (such as a tripod) as a microphone stand. bbAutobSetup bbbbEQbType;;;;Natural bb.bStart YPAO microphone bbb[OPTION]:EQbSelect bbbb[SETUP]:Start Continues to the YPAO MIC jack on the TV screen. 1 Check the following before using YPAO. This explanation will be a... is turned on the TV screen. 5 Set up the speaker parameters automatically (YPAO) When connection is equipped with a YPAO (Yamaha Parametric Room Acoustic Optimizer) function that adjusts the speaker balance automatically with a simple procedure. When using this unit has been selected. ...
Quick Reference Guide
Page 7
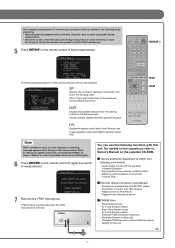
...solve the problem, and carry out YPAO again. 6 Press ENTER on the remote control to start measurement. Auto Setup AUTO SETUP Finished Disconnect Microphone PRESS [ENTER] [SETUP]:Exit 7 Remove the YPAO microphone. YPAO MIC INFO You can use the following functions with the equalizer - For ... the supplied CD-ROM. ˙ Various parameter adjustment to this unit. DECODE MUSIC STEREO STRAIGHT DIRECT BD DVD SETUP SCENE TV CD RADIO OPTION RECEIVER A SETUP ENTER VOLUME RETURN DISPLAY TOP MENU REC POP-UP MENU MUTE ENTER 1 2 3 4 5 6 7 8 9 INPUT MUTE 0 10 TV TV VOL...
...solve the problem, and carry out YPAO again. 6 Press ENTER on the remote control to start measurement. Auto Setup AUTO SETUP Finished Disconnect Microphone PRESS [ENTER] [SETUP]:Exit 7 Remove the YPAO microphone. YPAO MIC INFO You can use the following functions with the equalizer - For ... the supplied CD-ROM. ˙ Various parameter adjustment to this unit. DECODE MUSIC STEREO STRAIGHT DIRECT BD DVD SETUP SCENE TV CD RADIO OPTION RECEIVER A SETUP ENTER VOLUME RETURN DISPLAY TOP MENU REC POP-UP MENU MUTE ENTER 1 2 3 4 5 6 7 8 9 INPUT MUTE 0 10 TV TV VOL...

Quick Reference Guide
Page 8
...CR SL SR SBL SBR 5 Mutes the sound The indicator blinks while the sound is in those from other channels. ©2010 Yamaha Corporation - 8 - Connect the headphones when adjusting the headphone tone control. - VOL. Selects sound field programs optimized for compressed audio.... set the tone control for faithful reproduction of the selected input source appears on the front panel display. DECODE MUSIC STEREO STRAIGHT DIRECT BD DVD SETUP SCENE TV CD RADIO OPTION ᶄ ᶅ ᶈ ENTER VOLUME RETURN DISPLAY TOP MENU REC POP-UP MENU MUTE ᶆ ᶇ 1 2 3...
...CR SL SR SBL SBR 5 Mutes the sound The indicator blinks while the sound is in those from other channels. ©2010 Yamaha Corporation - 8 - Connect the headphones when adjusting the headphone tone control. - VOL. Selects sound field programs optimized for compressed audio.... set the tone control for faithful reproduction of the selected input source appears on the front panel display. DECODE MUSIC STEREO STRAIGHT DIRECT BD DVD SETUP SCENE TV CD RADIO OPTION ᶄ ᶅ ᶈ ENTER VOLUME RETURN DISPLAY TOP MENU REC POP-UP MENU MUTE ᶆ ᶇ 1 2 3...
Owners Manual
Page 2
... Bluetooth™ components....... 43 Connecting a Yamaha Bluetooth wireless audio receiver 43 Pairing Bluetooth™ components 43 Using Bluetooth™ components 44 SETUP Configuring the settings specific for each input source (Option menu 45 Option menu display and setup 45 Option menu items 45 Setting various functions (Setup menu 49 Setup menu display and settings 49...
... Bluetooth™ components....... 43 Connecting a Yamaha Bluetooth wireless audio receiver 43 Pairing Bluetooth™ components 43 Using Bluetooth™ components 44 SETUP Configuring the settings specific for each input source (Option menu 45 Option menu display and setup 45 Option menu items 45 Setting various functions (Setup menu 49 Setup menu display and settings 49...

Owners Manual
Page 8
... you are displayed, or ends the menu display. J1 l Numeric keys Enter numbers. Sleep 120min. Sleep 60min. J1 DOCK A Yamaha iPod universal dock or Bluetooth wireless audio receiver connected to AM. Sets the FM/AM tuner band to the DOCK TUNER jack. Changes...f INFO Cycles the information displayed on and standby mode. Press this key to operate with a single button (☞p. 30). i SETUP Displays a detailed Setup menu for each input in standby mode, press this key repeatedly to standby mode automatically after a specified period of the currently selected input...
... you are displayed, or ends the menu display. J1 l Numeric keys Enter numbers. Sleep 120min. Sleep 60min. J1 DOCK A Yamaha iPod universal dock or Bluetooth wireless audio receiver connected to AM. Sets the FM/AM tuner band to the DOCK TUNER jack. Changes...f INFO Cycles the information displayed on and standby mode. Press this key to operate with a single button (☞p. 30). i SETUP Displays a detailed Setup menu for each input in standby mode, press this key repeatedly to standby mode automatically after a specified period of the currently selected input...

Owners Manual
Page 12
.... is displayed on the front panel. After approximately a few seconds, the top menu items are displayed. Release the keys when "ADVANCED SETUP" is displayed on the side of the terminal. 4 Tighten the terminal. The power turns on, when the settings you made has been ...cable into the end of the cables together firmly so that "SP IMP." J 1 : Refer to the "Extended functionality that can be configured as needed (Advanced Setup menu)" (☞p. 66) for 8Ω speakers as the factory setting. ■ (U.S.A. SP IMP. -8 MIN 1 Remove approximately 10 mm of insulation from ...
.... is displayed on the front panel. After approximately a few seconds, the top menu items are displayed. Release the keys when "ADVANCED SETUP" is displayed on the side of the terminal. 4 Tighten the terminal. The power turns on, when the settings you made has been ...cable into the end of the cables together firmly so that "SP IMP." J 1 : Refer to the "Extended functionality that can be configured as needed (Advanced Setup menu)" (☞p. 66) for 8Ω speakers as the factory setting. ■ (U.S.A. SP IMP. -8 MIN 1 Remove approximately 10 mm of insulation from ...
Owners Manual
Page 13
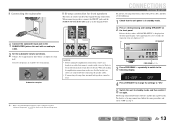
... h repeatedly to switch to the following . 1 Check that the brackets or cables are displayed. En 13 Release the keys when "ADVANCED SETUP" is powered on. When not making bi-amplification connections, remove any brackets or cables that support bi-amp connections. After approximately a few seconds...speaker cables. • If connecting a bi-amp, then surround back speakers cannot be configured as needed (Advanced Setup menu)" (☞p. 66) for details on the Advanced Setup menu. ■ Bi-amp connection for details. Volume: Set to maximum. OFF 4 Press STRAIGHT to change ...
... h repeatedly to switch to the following . 1 Check that the brackets or cables are displayed. En 13 Release the keys when "ADVANCED SETUP" is powered on. When not making bi-amplification connections, remove any brackets or cables that support bi-amp connections. After approximately a few seconds...speaker cables. • If connecting a bi-amp, then surround back speakers cannot be configured as needed (Advanced Setup menu)" (☞p. 66) for details on the Advanced Setup menu. ■ Bi-amp connection for details. Volume: Set to maximum. OFF 4 Press STRAIGHT to change ...
Owners Manual
Page 18
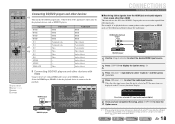
... close the Option menu. HDMI1 OPTION Audio In;;;;;;AV1 If you have selected AV1 input audio (optical digital) 5 Once you have completed the setup, press qOPTION to select the audio input source. Video Audio input HDMI HDMI HDMI HDMI Optical digital Coaxial digital Coaxial digital Optical digital Analog ... other devices with HDMI Connect the device with an HDMI cable to for details on the front panel. DECODE MUSIC STEREO STRAIGHT DIRECT BD DVD SETUP SCENE TV CD RADIO OPTION ENTER VOLUME RETURN DISPLAY TOP MENU REC POP-UP MENU MUTE 1 2 3 4 5 6 7 8 9 INPUT MUTE 0 10...
... close the Option menu. HDMI1 OPTION Audio In;;;;;;AV1 If you have selected AV1 input audio (optical digital) 5 Once you have completed the setup, press qOPTION to select the audio input source. Video Audio input HDMI HDMI HDMI HDMI Optical digital Coaxial digital Coaxial digital Optical digital Analog ... other devices with HDMI Connect the device with an HDMI cable to for details on the front panel. DECODE MUSIC STEREO STRAIGHT DIRECT BD DVD SETUP SCENE TV CD RADIO OPTION ENTER VOLUME RETURN DISPLAY TOP MENU REC POP-UP MENU MUTE 1 2 3 4 5 6 7 8 9 INPUT MUTE 0 10...
Owners Manual
Page 19
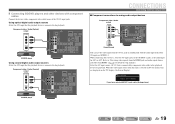
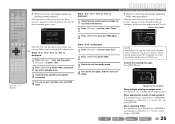
... for playback. Refer to "Receiving video signals from the HDMI jack and audio signals from this unit is connected to the playback device for detailed setup guidance.
... for playback. Refer to "Receiving video signals from the HDMI jack and audio signals from this unit is connected to the playback device for detailed setup guidance.
Owners Manual
Page 24
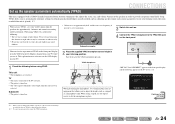
...TV. • Volume is set to which this unit has been selected. J2 Auto Setup EQ Type;;;;Natural . Set up the speaker parameters automatically (YPAO) CONNECTIONS This unit is equipped with a YPAO (Yamaha Parametric Room Acoustic Optimizer) that adjusts the status, size, and volume balance of the ...The power is set to approximately half, and the cross-over frequency (if present) is turned on the TV screen. Start [OPTION]:EQ Select [SETUP]:Start Continues to the next page J 1 : When you use the tripod screws to others nearby. • Please take care that allows you to...
...TV. • Volume is set to which this unit has been selected. J2 Auto Setup EQ Type;;;;Natural . Set up the speaker parameters automatically (YPAO) CONNECTIONS This unit is equipped with a YPAO (Yamaha Parametric Room Acoustic Optimizer) that adjusts the status, size, and volume balance of the ...The power is set to approximately half, and the cross-over frequency (if present) is turned on the TV screen. Start [OPTION]:EQ Select [SETUP]:Start Continues to the next page J 1 : When you use the tripod screws to others nearby. • Please take care that allows you to...
Owners Manual
Page 25
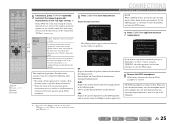
...This completes preparations. Display during measurement or leave it entirely, to give a unified sound field. Auto Setup AUTO SETUP Finished Disconnect Microphone PRESS [ENTER] [SETUP]:Exit If you can change the setting using the cursor keys. After this when all speaker sound ... 3 4 AUDIO 6 1 2 V-AUX [ A ] [ B ] DOCK TUNER FM AM PRESET TUNING INFO MEMORY MOVIE ENHANCER SUR. DECODE MUSIC STEREO STRAIGHT DIRECT BD DVD SETUP SCENE TV CD RADIO OPTION ENTER VOLUME RETURN DISPLAY TOP MENU REC POP-UP MENU MUTE 1 2 3 4 5 6 7 8 9 INPUT MUTE 0 10 TV TV VOL...
...This completes preparations. Display during measurement or leave it entirely, to give a unified sound field. Auto Setup AUTO SETUP Finished Disconnect Microphone PRESS [ENTER] [SETUP]:Exit If you can change the setting using the cursor keys. After this when all speaker sound ... 3 4 AUDIO 6 1 2 V-AUX [ A ] [ B ] DOCK TUNER FM AM PRESET TUNING INFO MEMORY MOVIE ENHANCER SUR. DECODE MUSIC STEREO STRAIGHT DIRECT BD DVD SETUP SCENE TV CD RADIO OPTION ENTER VOLUME RETURN DISPLAY TOP MENU REC POP-UP MENU MUTE 1 2 3 4 5 6 7 8 9 INPUT MUTE 0 10 TV TV VOL...
Owners Manual
Page 26
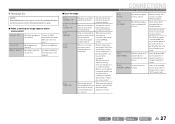
DECODE MUSIC STEREO STRAIGHT DIRECT BD DVD SETUP SCENE TV CD RADIO OPTION ENTER VOLUME RETURN DISPLAY TOP MENU REC POP-UP MENU MUTE 1 2 3 4 5 6 7 8 9 INPUT MUTE 0 10 TV TV VOL TV CH ENT [ ... message is suitable for accurate measurement. 2 Press jCursor C once to select "Retry." ■ When a warning message appears after measurement Check the content of messages Auto Setup 3 Press jENTER to select "Cancel," and press jENTER. CONNECTIONS Set up the speaker parameters automatically (YPAO) When "E-5," "E-7," "E-8" or "E-9" is displayed: 1 Check that the ...
DECODE MUSIC STEREO STRAIGHT DIRECT BD DVD SETUP SCENE TV CD RADIO OPTION ENTER VOLUME RETURN DISPLAY TOP MENU REC POP-UP MENU MUTE 1 2 3 4 5 6 7 8 9 INPUT MUTE 0 10 TV TV VOL TV CH ENT [ ... message is suitable for accurate measurement. 2 Press jCursor C once to select "Retry." ■ When a warning message appears after measurement Check the content of messages Auto Setup 3 Press jENTER to select "Cancel," and press jENTER. CONNECTIONS Set up the speaker parameters automatically (YPAO) When "E-5," "E-7," "E-8" or "E-9" is displayed: 1 Check that the ...
Owners Manual
Page 27
Unplug HP! The YPAO microphone is detected. The settings of this unit, or the nearest Yamaha service center. SP E-4: SBR.SBL E-5: NOISY E-6: CHECK SUR. Measure again in the Setup menu to "Off" (☞p. 59). ■ Error message E-1: NO FRONT SP E-2: NO SUR. CONNECTIONS Set up the ...unit by, for example, adjusting the volume. E-10: An internal error has INTERNAL ERROR occurred. The headphones are connected. Contact a Yamaha service center if "E-10" appears again. When using surround back speakers, connection of the surround channels. Turn off any devices in the...
Unplug HP! The YPAO microphone is detected. The settings of this unit, or the nearest Yamaha service center. SP E-4: SBR.SBL E-5: NOISY E-6: CHECK SUR. Measure again in the Setup menu to "Off" (☞p. 59). ■ Error message E-1: NO FRONT SP E-2: NO SUR. CONNECTIONS Set up the ...unit by, for example, adjusting the volume. E-10: An internal error has INTERNAL ERROR occurred. The headphones are connected. Contact a Yamaha service center if "E-10" appears again. When using surround back speakers, connection of the surround channels. Turn off any devices in the...
Owners Manual
Page 29
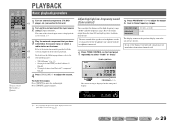
...; "Playing back tunes from Bluetooth™ components" (☞p. 43) 4 Press rVOLUME +/- If you release the key. En 29 DECODE MUSIC STEREO STRAIGHT DIRECT BD DVD SETUP SCENE TV CD RADIO OPTION ENTER VOLUME RETURN DISPLAY TOP MENU REC POP-UP MENU MUTE 1 2 3 4 5 6 7 8 9 INPUT MUTE 0 10 TV TV VOL TV CH ENT...
...; "Playing back tunes from Bluetooth™ components" (☞p. 43) 4 Press rVOLUME +/- If you release the key. En 29 DECODE MUSIC STEREO STRAIGHT DIRECT BD DVD SETUP SCENE TV CD RADIO OPTION ENTER VOLUME RETURN DISPLAY TOP MENU REC POP-UP MENU MUTE 1 2 3 4 5 6 7 8 9 INPUT MUTE 0 10 TV TV VOL TV CH ENT...

Owners Manual
Page 30
... you playback DTS-HD sources with CINEMA DSP, the DTS decoder is applied again. • When you playback DTS Express sources or audio signals with a Yamaha digital sound field processing (DSP) chip. Enjoying sound field programs 1 2 3 4 5 6 7 8 9 INPUT MUTE 0 10 TV TV VOL TV CH ENT d ...sound decoders. Choose a sound field program that the remote control operates (☞p. 63). DECODE MUSIC STEREO STRAIGHT DIRECT BD DVD SETUP SCENE TV CD RADIO OPTION ENTER VOLUME RETURN DISPLAY TOP MENU REC POP-UP MENU MUTE Changing input settings with one key. ...
... you playback DTS-HD sources with CINEMA DSP, the DTS decoder is applied again. • When you playback DTS Express sources or audio signals with a Yamaha digital sound field processing (DSP) chip. Enjoying sound field programs 1 2 3 4 5 6 7 8 9 INPUT MUTE 0 10 TV TV VOL TV CH ENT d ...sound decoders. Choose a sound field program that the remote control operates (☞p. 63). DECODE MUSIC STEREO STRAIGHT DIRECT BD DVD SETUP SCENE TV CD RADIO OPTION ENTER VOLUME RETURN DISPLAY TOP MENU REC POP-UP MENU MUTE Changing input settings with one key. ...

Owners Manual
Page 31
... mode: Press gSTRAIGHT Switches Direct mode (☞p. 32): Press gDIRECT Sound field program categories MOVIE Sci-Fi VOL. DECODE MUSIC STEREO STRAIGHT DIRECT BD DVD SETUP SCENE TV CD RADIO OPTION ENTER VOLUME RETURN DISPLAY TOP MENU REC POP-UP MENU MUTE 1 2 3 4 5 6 7 8 9 INPUT MUTE 0 10 TV TV VOL TV CH ENT...
... mode: Press gSTRAIGHT Switches Direct mode (☞p. 32): Press gDIRECT Sound field program categories MOVIE Sci-Fi VOL. DECODE MUSIC STEREO STRAIGHT DIRECT BD DVD SETUP SCENE TV CD RADIO OPTION ENTER VOLUME RETURN DISPLAY TOP MENU REC POP-UP MENU MUTE 1 2 3 4 5 6 7 8 9 INPUT MUTE 0 10 TV TV VOL TV CH ENT...

Owners Manual
Page 32
... a "7ch Stereo" sound field program is selected. • When direct mode or straight decoding mode is selected. DECODE MUSIC STEREO STRAIGHT DIRECT BD DVD SETUP SCENE TV CD RADIO OPTION ENTER VOLUME RETURN DISPLAY TOP MENU REC POP-UP MENU MUTE 1 2 3 4 5 6 7 8 9 INPUT MUTE 0 10..., SILENT CINEMA mode is not available in order to this unit plays back the selected source with just a minimal configuration of the Option menu and Setup menu J 4 : While direct mode is selected. L R g DIRECT To disable direct mode, press gDIRECT again. J 3 : The following features are...
... a "7ch Stereo" sound field program is selected. • When direct mode or straight decoding mode is selected. DECODE MUSIC STEREO STRAIGHT DIRECT BD DVD SETUP SCENE TV CD RADIO OPTION ENTER VOLUME RETURN DISPLAY TOP MENU REC POP-UP MENU MUTE 1 2 3 4 5 6 7 8 9 INPUT MUTE 0 10..., SILENT CINEMA mode is not available in order to this unit plays back the selected source with just a minimal configuration of the Option menu and Setup menu J 4 : While direct mode is selected. L R g DIRECT To disable direct mode, press gDIRECT again. J 3 : The following features are...

Owners Manual
Page 34
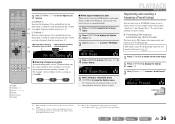
...-channel signals are input, they are connected. Use this program to output sound from all speakers. You can playback 2-channel sound sources in "Speaker Setup" of the Setup menu is ideal for background music at parties, etc. ■ Category: ENHNCR (Compressed music enhancer) Suitable for listening to compressed audio, such as MP3...
...-channel signals are input, they are connected. Use this program to output sound from all speakers. You can playback 2-channel sound sources in "Speaker Setup" of the Setup menu is ideal for background music at parties, etc. ■ Category: ENHNCR (Compressed music enhancer) Suitable for listening to compressed audio, such as MP3...

Owners Manual
Page 35
...to the next page J 1 : Refer to the standby mode. 2 Press A while pressing and holding STRAIGHT on again. DECODE MUSIC STEREO STRAIGHT DIRECT BD DVD SETUP SCENE TV CD RADIO OPTION ENTER VOLUME RETURN DISPLAY TOP MENU REC POP-UP MENU MUTE 1 2 3 4 5 6 7 8 9 INPUT MUTE 0 10 TV... country or region where the unit is displayed on , with frequencies used . Preset tuning (☞p. 36) You can be configured as needed (Advanced Setup menu)" (☞p. 66) for reception (Normal tuning) TU - and Europe models. 1 Press dTUNER to switch to the tuner input. 2 Press...
...to the next page J 1 : Refer to the standby mode. 2 Press A while pressing and holding STRAIGHT on again. DECODE MUSIC STEREO STRAIGHT DIRECT BD DVD SETUP SCENE TV CD RADIO OPTION ENTER VOLUME RETURN DISPLAY TOP MENU REC POP-UP MENU MUTE 1 2 3 4 5 6 7 8 9 INPUT MUTE 0 10 TV... country or region where the unit is displayed on , with frequencies used . Preset tuning (☞p. 36) You can be configured as needed (Advanced Setup menu)" (☞p. 66) for reception (Normal tuning) TU - and Europe models. 1 Press dTUNER to switch to the tuner input. 2 Press...
Owners Manual
Page 36
... has started. J2 For example, enter as preset stations. SW L CR SL SR SBL SBR Continues to receive. DECODE MUSIC STEREO STRAIGHT DIRECT BD DVD SETUP SCENE TV CD RADIO OPTION ENTER VOLUME RETURN DISPLAY TOP MENU REC POP-UP MENU MUTE 1 2 3 4 5 6 7 8 9 INPUT MUTE 0 10 TV TV VOL TV CH ENT...
... has started. J2 For example, enter as preset stations. SW L CR SL SR SBL SBR Continues to receive. DECODE MUSIC STEREO STRAIGHT DIRECT BD DVD SETUP SCENE TV CD RADIO OPTION ENTER VOLUME RETURN DISPLAY TOP MENU REC POP-UP MENU MUTE 1 2 3 4 5 6 7 8 9 INPUT MUTE 0 10 TV TV VOL TV CH ENT...


