Owner's Manual
Page 5
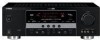
...video signal flow 15 Connecting video components 16 Connecting other components 17 Connecting audio components 19 Connecting a Yamaha iPod™ universal dock or Bluetooth™ adapter 20 Using REMOTE IN/OUT jacks 20 Using the VIDEO AUX jacks on the front panel .... 21 Connecting the FM... SETUP 26 BASIC OPERATION Selecting the SCENE templates 30 Selecting the desired SCENE template 30 Creating your original SCENE templates 33 Using remote control on the SCENE feature........... 34 Playback 35 Basic operations 35 Selecting audio input jacks (AUDIO SELECT 36 Selecting the MULTI CH...
...video signal flow 15 Connecting video components 16 Connecting other components 17 Connecting audio components 19 Connecting a Yamaha iPod™ universal dock or Bluetooth™ adapter 20 Using REMOTE IN/OUT jacks 20 Using the VIDEO AUX jacks on the front panel .... 21 Connecting the FM... SETUP 26 BASIC OPERATION Selecting the SCENE templates 30 Selecting the desired SCENE template 30 Creating your original SCENE templates 33 Using remote control on the SCENE feature........... 34 Playback 35 Basic operations 35 Selecting audio input jacks (AUDIO SELECT 36 Selecting the MULTI CH...
Owner's Manual
Page 6
...RMS output power [U.S.A. "HDMI", the "HDMI" logo and "High-Definition Multimedia Interface" are trademarks owned by Yamaha in accordance with preset remote control codes ◆ Zone 2 custom installation facility ◆ Bi-amplification connection capability Manufactured under license from ...function ◆ Preset SCENE templates for various situations ◆ SCENE template customizing capability Decoders and DSP circuits ◆ Proprietary Yamaha technology for standard, enhanced or high-definition video (includes 1080p video signal transmission) as well as YBA-10, sold separately...
...RMS output power [U.S.A. "HDMI", the "HDMI" logo and "High-Definition Multimedia Interface" are trademarks owned by Yamaha in accordance with preset remote control codes ◆ Zone 2 custom installation facility ◆ Bi-amplification connection capability Manufactured under license from ...function ◆ Preset SCENE templates for various situations ◆ SCENE template customizing capability Decoders and DSP circuits ◆ Proprietary Yamaha technology for standard, enhanced or high-definition video (includes 1080p video signal transmission) as well as YBA-10, sold separately...

Owner's Manual
Page 7
... a straight slot screwdriver. We Want You Listening For A Lifetime Yamaha and the Electronic Industries Association's Consumer Electronics Group want you notice that the operation range of the remote control decreases. • Do not use an old battery and ...a new one together. • Do not use different types of batteries (such as alkaline and manganese batteries) together. Since hearing damage from excessive volume levels. INTRODUCTION Getting started Getting started ■ Supplied accessories Check that you received...
... a straight slot screwdriver. We Want You Listening For A Lifetime Yamaha and the Electronic Industries Association's Consumer Electronics Group want you notice that the operation range of the remote control decreases. • Do not use an old battery and ...a new one together. • Do not use different types of batteries (such as alkaline and manganese batteries) together. Since hearing damage from excessive volume levels. INTRODUCTION Getting started Getting started ■ Supplied accessories Check that you received...
Owner's Manual
Page 9
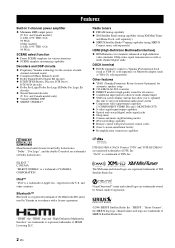
... surround right speaker left channel (L), right channel (R), "+" (red) and "-" (black) properly. COAXIAL OPTICAL SPEAKERS DVD IN1 DTV/CBL IN2 HDMI REMOTE IN OUT +12V 15mA MAX. Connect the striped (grooved, etc.) cable to the "+" (red) terminals of this unit. IN OUT DVR CD...1 Place your speaker. INTRODUCTION Step 1: Set up your speakers Place your speakers in the room. 2 Connect speaker cables to each speaker. Subwoofer AV receiver Input jack Subwoofer cable SUBWOOFER OUTPUT jack 5 En English VIDEO TRIGGER OUT L DVD DTV/CBL R IN MD/ OUT (PLAY) CD-R (REC)...
... surround right speaker left channel (L), right channel (R), "+" (red) and "-" (black) properly. COAXIAL OPTICAL SPEAKERS DVD IN1 DTV/CBL IN2 HDMI REMOTE IN OUT +12V 15mA MAX. Connect the striped (grooved, etc.) cable to the "+" (red) terminals of this unit. IN OUT DVR CD...1 Place your speaker. INTRODUCTION Step 1: Set up your speakers Place your speakers in the room. 2 Connect speaker cables to each speaker. Subwoofer AV receiver Input jack Subwoofer cable SUBWOOFER OUTPUT jack 5 En English VIDEO TRIGGER OUT L DVD DTV/CBL R IN MD/ OUT (PLAY) CD-R (REC)...
Owner's Manual
Page 10
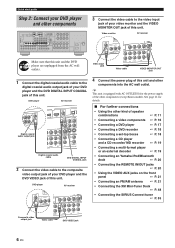
...is equipped with AC OUTLET(S) for details. ■ For further connections • Using the other components into the AC wall outlet. DVD player AV receiver 4 Connect the power plug of this unit and other kind of speaker combinations ☞ P. 11 • Connecting a video components ☞ ...9758; P. 19 • Connecting a multi-format player or an external decoder ☞ P. 19 • Connecting an Yamaha iPod/Bluetooth dock ☞ P. 20 • Connecting the REMOTE IN/OUT jacks ☞ P. 20 • Using the VIDEO AUX jacks on the front panel ☞ P. 21 &#...
...is equipped with AC OUTLET(S) for details. ■ For further connections • Using the other components into the AC wall outlet. DVD player AV receiver 4 Connect the power plug of this unit and other kind of speaker combinations ☞ P. 11 • Connecting a video components ☞ ...9758; P. 19 • Connecting a multi-format player or an external decoder ☞ P. 19 • Connecting an Yamaha iPod/Bluetooth dock ☞ P. 20 • Connecting the REMOTE IN/OUT jacks ☞ P. 20 • Using the VIDEO AUX jacks on the front panel ☞ P. 21 &#...

Owner's Manual
Page 12
... to the standby mode. Quick start guide ■ After using this unit consumes a small amount of this unit ☞ P. 63 • Setting the remote control ☞ P. 76 • Adjusting the advanced parameters ☞ P. 82 ■ Additional features Automatically turning off this unit to the standby mode....☞ P. 30 • Creating your listening room (AUTO SETUP) ☞ P. 26 • Manually adjusting various parameters of power in order to receive infrared signals from the standby mode, press AMAIN ZONE ON/OFF (or HPOWER). In the standby mode, this unit...
... to the standby mode. Quick start guide ■ After using this unit consumes a small amount of this unit ☞ P. 63 • Setting the remote control ☞ P. 76 • Adjusting the advanced parameters ☞ P. 82 ■ Additional features Automatically turning off this unit to the standby mode....☞ P. 30 • Creating your listening room (AUTO SETUP) ☞ P. 26 • Manually adjusting various parameters of power in order to receive infrared signals from the standby mode, press AMAIN ZONE ON/OFF (or HPOWER). In the standby mode, this unit...
Owner's Manual
Page 13
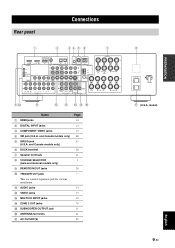
... 1 HDMI jacks 2 DIGITAL INPUT jacks 3 COMPONENT VIDEO jacks 4 XM jack (U.S.A. and Canada models only) 6 DOCK terminal 7 Speaker terminals 8 VOLTAGE SELECTOR (Asia and General models only) 9 REMOTE IN/OUT jacks 0 TRIGGER OUT jack This is a control expansion jack for custom installation. model) English 9 En PREPARATION Rear panel Connections 1 2 34 5 6 7 COAXIAL OPTICAL SPEAKERS...
... 1 HDMI jacks 2 DIGITAL INPUT jacks 3 COMPONENT VIDEO jacks 4 XM jack (U.S.A. and Canada models only) 6 DOCK terminal 7 Speaker terminals 8 VOLTAGE SELECTOR (Asia and General models only) 9 REMOTE IN/OUT jacks 0 TRIGGER OUT jack This is a control expansion jack for custom installation. model) English 9 En PREPARATION Rear panel Connections 1 2 34 5 6 7 COAXIAL OPTICAL SPEAKERS...
Owner's Manual
Page 15
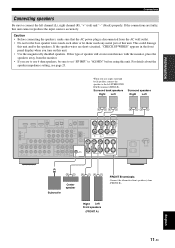
.... If this unit and/or the speakers. Surround back speakers Right Left Surround speakers Right Left COAXIAL OPTICAL SPEAKERS DVD IN1 DTV/CBL IN2 HDMI REMOTE IN OUT +12V 15mA MAX. IN OUT DVR CD L CENTER R SUB WOOFER FRONT(6CH) SUB SB(8CH) SURROUND WOOFER MULTI CH INPUT ZONE 2 OUT OUTPUT...
.... If this unit and/or the speakers. Surround back speakers Right Left Surround speakers Right Left COAXIAL OPTICAL SPEAKERS DVD IN1 DTV/CBL IN2 HDMI REMOTE IN OUT +12V 15mA MAX. IN OUT DVR CD L CENTER R SUB WOOFER FRONT(6CH) SUB SB(8CH) SURROUND WOOFER MULTI CH INPUT ZONE 2 OUT OUTPUT...

Owner's Manual
Page 21
... DVD player S-video out PREPARATION Component video out Coaxial out Audio out Video out V RL C PR PB Y S COAXIAL OPTICAL DVD IN1 DTV/CBL IN2 HDMI REMOTE IN OUT +12V 15mA MAX. Notes • When "VIDEO CONV." is given to the VIDEO jacks. • When "VIDEO CONV."
... DVD player S-video out PREPARATION Component video out Coaxial out Audio out Video out V RL C PR PB Y S COAXIAL OPTICAL DVD IN1 DTV/CBL IN2 HDMI REMOTE IN OUT +12V 15mA MAX. Notes • When "VIDEO CONV." is given to the VIDEO jacks. • When "VIDEO CONV."
Owner's Manual
Page 22
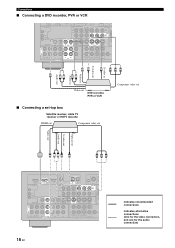
... S V RL RL S PR PB Y Video out DVD recorder, PVR or VCR Component video out ■ Connecting a set-top box Satellite receiver, cable TV receiver or HDTV decoder HDMI out Component video out Optical out S-video out Audio out Video out V LRS O PR PB Y COAXIAL OPTICAL DVD IN1 DTV.../CBL IN2 HDMI REMOTE IN OUT +12V 15mA MAX. Connections ■ Connecting a DVD recorder, PVR or VCR DVD IN1 DTV/CBL IN2 HDMI REMOTE ...
... S V RL RL S PR PB Y Video out DVD recorder, PVR or VCR Component video out ■ Connecting a set-top box Satellite receiver, cable TV receiver or HDTV decoder HDMI out Component video out Optical out S-video out Audio out Video out V LRS O PR PB Y COAXIAL OPTICAL DVD IN1 DTV.../CBL IN2 HDMI REMOTE IN OUT +12V 15mA MAX. Connections ■ Connecting a DVD recorder, PVR or VCR DVD IN1 DTV/CBL IN2 HDMI REMOTE ...
Owner's Manual
Page 23
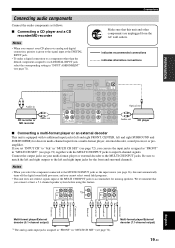
... you can use the input jacks assigned as "FRONT" in CD recorder or MD recorder L R Audio out COAXIAL OPTICAL DVD IN1 DTV/CBL IN2 HDMI REMOTE IN DVD DTV/CBL CD OUT 1 2 3 DIGITAL INPUT DVD PR COMPONENT VIDEO PB Y PR A OUT +12V 15mA MAX. If you set "INPUT CH" to "8ch...
... you can use the input jacks assigned as "FRONT" in CD recorder or MD recorder L R Audio out COAXIAL OPTICAL DVD IN1 DTV/CBL IN2 HDMI REMOTE IN DVD DTV/CBL CD OUT 1 2 3 DIGITAL INPUT DVD PR COMPONENT VIDEO PB Y PR A OUT +12V 15mA MAX. If you set "INPUT CH" to "8ch...

Owner's Manual
Page 24
...its dedicated cable. This unit is not the Yamaha product, set "SCENE IR" in XM PB SIRIUS DTV/CBL Y B DVR C DOCK ANTENNA AM GND SURROUND BAC R Yamaha iPod universal dock or Bluetooth adapter Infrared signal receiver or Yamaha component Yamaha component (CD or DVD player, etc.) y ...• If the components have the capability of the transmission of the remote control signals, connect the REMOTE IN jack and REMOTE OUT jack to the remote control...
...its dedicated cable. This unit is not the Yamaha product, set "SCENE IR" in XM PB SIRIUS DTV/CBL Y B DVR C DOCK ANTENNA AM GND SURROUND BAC R Yamaha iPod universal dock or Bluetooth adapter Infrared signal receiver or Yamaha component Yamaha component (CD or DVD player, etc.) y ...• If the components have the capability of the transmission of the remote control signals, connect the REMOTE IN jack and REMOTE OUT jack to the remote control...
Owner's Manual
Page 27
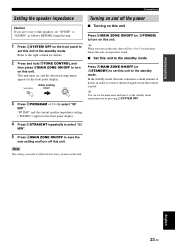
...) to set this unit to the standby mode. English 23 En TONE CONTROL While holding down MAIN ZONE ON/OFF 3 Press OPROGRAM l / h to receive infrared signals from the remote control. Note The setting you made is reflected next time you are to turn off the power ■ Turning on this unit Press...
...) to set this unit to the standby mode. English 23 En TONE CONTROL While holding down MAIN ZONE ON/OFF 3 Press OPROGRAM l / h to receive infrared signals from the remote control. Note The setting you made is reflected next time you are to turn off the power ■ Turning on this unit Press...
Owner's Manual
Page 29
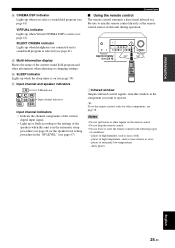
...8226; Indicate the channel components of the current digital input signal. • Light up when you want to operate. Be sure to aim the remote control directly at the component you select a sound field program (see page 41). PREPARATION D CINEMA DSP indicator Lights up or flash according to the... timer is selected (see page 39). y To set the remote control codes for other liquids on this window at the remote control sensor on the remote control. • Do not drop the remote control. • Do not leave or store the remote control in the "SP LEVEL" (see page 67). Aim ...
...8226; Indicate the channel components of the current digital input signal. • Light up when you want to operate. Be sure to aim the remote control directly at the component you select a sound field program (see page 41). PREPARATION D CINEMA DSP indicator Lights up or flash according to the... timer is selected (see page 39). y To set the remote control codes for other liquids on this window at the remote control sensor on the remote control. • Do not drop the remote control. • Do not leave or store the remote control in the "SP LEVEL" (see page 67). Aim ...
Owner's Manual
Page 34
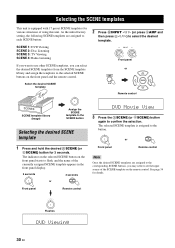
...flash, and the name of the currently assigned SCENE template appears in the front panel display. 3 seconds 3 seconds 1 or 1 Front panel Remote control DVD Movie View 3 Press the TSCENE (or 6SCENE) button again to set the input source of using this unit. SELECTING THE SCENE ...TEMPLATES Selecting the SCENE templates This unit is assigned to the button. 1 Front panel or 1 Remote control Note Once the desired SCENE templates are assigned to each SCENE button: SCENE 1: DVD Viewing SCENE 2: Disc Listening SCENE 3: TV Viewing SCENE...
...flash, and the name of the currently assigned SCENE template appears in the front panel display. 3 seconds 3 seconds 1 or 1 Front panel Remote control DVD Movie View 3 Press the TSCENE (or 6SCENE) button again to set the input source of using this unit. SELECTING THE SCENE ...TEMPLATES Selecting the SCENE templates This unit is assigned to the button. 1 Front panel or 1 Remote control Note Once the desired SCENE templates are assigned to each SCENE button: SCENE 1: DVD Viewing SCENE 2: Disc Listening SCENE 3: TV Viewing SCENE...

Owner's Manual
Page 36
...video games. * When the connected DVD player or CD player has the capability of the SCENE control signals and is connected to the REMOTE OUT jack of the music discs on your CD player. STEREO 2ch Stereo Select this SCENE template when you play back music source on...Select this SCENE template when you enjoy the high fidelity sound of the SCENE button in the following table indicate the assigned SCENE buttons in a Yamaha iPod universal dock or Bluetooth component that is connected to the Bluetooth adapter. SCENE template DVD Viewing 1 DVD Movie Viewing Input source DVD* ...
...video games. * When the connected DVD player or CD player has the capability of the SCENE control signals and is connected to the REMOTE OUT jack of the music discs on your CD player. STEREO 2ch Stereo Select this SCENE template when you play back music source on...Select this SCENE template when you enjoy the high fidelity sound of the SCENE button in the following table indicate the assigned SCENE buttons in a Yamaha iPod universal dock or Bluetooth component that is connected to the Bluetooth adapter. SCENE template DVD Viewing 1 DVD Movie Viewing Input source DVD* ...
Owner's Manual
Page 37
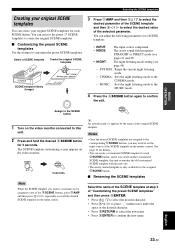
... assigned to any of the 6SCENE buttons, press 5AMP and then press 8l / h repeatedly to set the input source of the SCENE template on the remote control. AMP 1 3 seconds y An asterisk mark (*) appears by the name of the original SCENE template. BASIC OPERATION Selecting the SCENE templates Creating your original SCENE...
... assigned to any of the 6SCENE buttons, press 5AMP and then press 8l / h repeatedly to set the input source of the SCENE template on the remote control. AMP 1 3 seconds y An asterisk mark (*) appears by the name of the original SCENE template. BASIC OPERATION Selecting the SCENE templates Creating your original SCENE...
Owner's Manual
Page 38
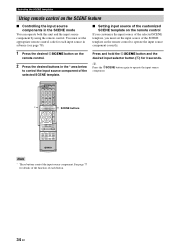
... SCENE feature ■ Controlling the input source components in the * area below to operate the input source component. * POWER POWER STANDBY POWER TV AV A XM SIRIUS MUTE CD MD/CD-R TUNER DVD DTV/CBL DVR TV CH V-AUX/DOCK B C AMP TV INPUT TV MUTE TV VOL SCENE... 1 2 3 4 BAND LEVEL TITLE SRCH MODE MENU VOLUME ENTER RETURN MEMORY REC DISPLAY INFO l PROG h 1 2 ENHANCER SUR. You must set the appropriate remote control code for 3 seconds. DECODE 3 4 STRAIGHT DIRECT 5 6 NIGHT PARAMETER 7 8 MULTI CH IN AUDIO SEL 9 0 SLEEP 10 ENT SCENE buttons Note * ...
... SCENE feature ■ Controlling the input source components in the * area below to operate the input source component. * POWER POWER STANDBY POWER TV AV A XM SIRIUS MUTE CD MD/CD-R TUNER DVD DTV/CBL DVR TV CH V-AUX/DOCK B C AMP TV INPUT TV MUTE TV VOL SCENE... 1 2 3 4 BAND LEVEL TITLE SRCH MODE MENU VOLUME ENTER RETURN MEMORY REC DISPLAY INFO l PROG h 1 2 ENHANCER SUR. You must set the appropriate remote control code for 3 seconds. DECODE 3 4 STRAIGHT DIRECT 5 6 NIGHT PARAMETER 7 8 MULTI CH IN AUDIO SEL 9 0 SLEEP 10 ENT SCENE buttons Note * ...

Owner's Manual
Page 47
..." (see page 66). • The available speaker channels differ depending on the setting of the speakers. • When the video monitor is turned on the remote control and then 8k / n to select the speaker you increase or decrease the high-frequency or the lowfrequency sound to an extreme level, the tonal...
..." (see page 66). • The available speaker channels differ depending on the setting of the speakers. • When the video monitor is turned on the remote control and then 8k / n to select the speaker you increase or decrease the high-frequency or the lowfrequency sound to an extreme level, the tonal...
Owner's Manual
Page 51
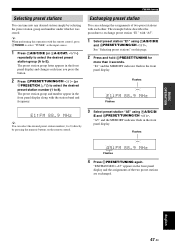
...exchange preset station "E1" with "A5". 1 Select preset station "E1" using FA/B/C/D/ E and GPRESET/TUNING/CH l / h. See "Selecting preset stations" on the remote control. 3 Select preset station "A5" using FA/B/C/D/E and GPRESET/TUNING/CH l / h. y When performing this page. 2 Press and hold DPRESET/TUNING for more than... Selecting preset stations You can tune into any desired station simply by pressing the numeric buttons on this operation with the remote control, press 4TUNER to E). Exchanging preset station You can exchange the assignments of the two preset stations are exchanged....
...exchange preset station "E1" with "A5". 1 Select preset station "E1" using FA/B/C/D/ E and GPRESET/TUNING/CH l / h. See "Selecting preset stations" on the remote control. 3 Select preset station "A5" using FA/B/C/D/E and GPRESET/TUNING/CH l / h. y When performing this page. 2 Press and hold DPRESET/TUNING for more than... Selecting preset stations You can tune into any desired station simply by pressing the numeric buttons on this operation with the remote control, press 4TUNER to E). Exchanging preset station You can exchange the assignments of the two preset stations are exchanged....

