

RX-V579/RX-V479 Owner s Manual
Page 2
... 4 FEATURES 5 What you can do with the unit 5 Part names and functions 7 Front panel 7 Front display (indicators 8 Rear panel 9 Remote control 10 PREPARATIONS 11 General setup procedure 11 1 Placing speakers 12 2 Connecting speakers 16 5.1-channel system 16 7.1-channel system 16 Connecting front speakers that support bi-amp connections 17 Connecting Zone...
... 4 FEATURES 5 What you can do with the unit 5 Part names and functions 7 Front panel 7 Front display (indicators 8 Rear panel 9 Remote control 10 PREPARATIONS 11 General setup procedure 11 1 Placing speakers 12 2 Connecting speakers 16 5.1-channel system 16 7.1-channel system 16 Connecting front speakers that support bi-amp connections 17 Connecting Zone...

RX-V579/RX-V479 Owner s Manual
Page 3
...radio 65 Registering favorite Internet radio stations (bookmarks 67 Playing back music in multiple rooms (RX-V579 only 68 Connecting Zone B speakers 68 Operating the Zone B 69 Useful functions 70...sources (Option menu 72 Option menu items 72 CONFIGURATIONS 76 Configuring various functions (Setup menu 76 Setup menu items 77 Speaker 80 HDMI 84 Sound 86 ECO 89 Function 90 Network ... 109 Glossary 110 Audio information 110 HDMI and video information 111 Network information 111 Yamaha technologies 112 Supported devices and file formats 112 Video signal flow 113 Information on ...
...radio 65 Registering favorite Internet radio stations (bookmarks 67 Playing back music in multiple rooms (RX-V579 only 68 Connecting Zone B speakers 68 Operating the Zone B 69 Useful functions 70...sources (Option menu 72 Option menu items 72 CONFIGURATIONS 76 Configuring various functions (Setup menu 76 Setup menu items 77 Speaker 80 HDMI 84 Sound 86 ECO 89 Function 90 Network ... 109 Glossary 110 Audio information 110 HDMI and video information 111 Network information 111 Yamaha technologies 112 Supported devices and file formats 112 Video signal flow 113 Information on ...

RX-V579/RX-V479 Owner s Manual
Page 4
"iPod" refers to both "iPod" and "iPhone" unless otherwise specified. • indicates precautions for better use of the RX-V579 (U.S.A. model), unless otherwise specified. • Some features are not available in this manual are of the unit and its feature limitations....indicates supplementary explanations for use . En 4 Within 6 m (20 ft) 30° 30° … YPAO microphone … CD-ROM (Owner's Manual) … Easy Setup Guide … Safety Brochure *One of the above is supplied depending on the region of purchase. • The illustrations of the main unit used in...
"iPod" refers to both "iPod" and "iPhone" unless otherwise specified. • indicates precautions for better use of the RX-V579 (U.S.A. model), unless otherwise specified. • Some features are not available in this manual are of the unit and its feature limitations....indicates supplementary explanations for use . En 4 Within 6 m (20 ft) 30° 30° … YPAO microphone … CD-ROM (Owner's Manual) … Easy Setup Guide … Safety Brochure *One of the above is supplied depending on the region of purchase. • The illustrations of the main unit used in...

RX-V579/RX-V479 Owner s Manual
Page 6
... Selection - Functions: - SCENE selection - Various setup assistance with illustrations. - Full of useful functions! ❑ Connecting various devices (p.21) A number of HDMI jacks and various input/output jacks on the unit allow you to create a 3-dimensional sound field that assists you with cable connections between the Yamaha AV receiver and Blu-ray player...
... Selection - Functions: - SCENE selection - Various setup assistance with illustrations. - Full of useful functions! ❑ Connecting various devices (p.21) A number of HDMI jacks and various input/output jacks on the unit allow you to create a 3-dimensional sound field that assists you with cable connections between the Yamaha AV receiver and Blu-ray player...

RX-V579/RX-V479 Owner s Manual
Page 7
Enters the wireless LAN connection setup (WPS button configuration) by holding down for 3 seconds (p.35). Also, turns on the unit when it is in standby mode under any of output sounds (p....
Enters the wireless LAN connection setup (WPS button configuration) by holding down for 3 seconds (p.35). Also, turns on the unit when it is in standby mode under any of output sounds (p....

RX-V579/RX-V479 Owner s Manual
Page 10
... USB jack (on the unit when it is selected as the input source (p.49). However, Yamaha does not assure the operation of time has elapsed (sleep timer). B VOLUME keys Adjust the...RADIO STRAIGHT DIRECT ENHANCER BASS PROGRAM k f g h i j FM/AM INPUT USB VOLUME NET BLUETOOTH MUTE SETUP ENTER OPTION RETURN TOP MENU HOME DISPLAY POP-UP/MENU RED GREEN YELLOW BLUE MEMORY TUNING PRESET TUNING l m... by pressing the following keys. D OPTION key Displays the option menu (p.72). (RX-V579) En 10 TUNING Select the radio frequency. Also, turn on the front panel...
... USB jack (on the unit when it is selected as the input source (p.49). However, Yamaha does not assure the operation of time has elapsed (sleep timer). B VOLUME keys Adjust the...RADIO STRAIGHT DIRECT ENHANCER BASS PROGRAM k f g h i j FM/AM INPUT USB VOLUME NET BLUETOOTH MUTE SETUP ENTER OPTION RETURN TOP MENU HOME DISPLAY POP-UP/MENU RED GREEN YELLOW BLUE MEMORY TUNING PRESET TUNING l m... by pressing the following keys. D OPTION key Displays the option menu (p.72). (RX-V579) En 10 TUNING Select the radio frequency. Also, turn on the front panel...

RX-V579/RX-V479 Owner s Manual
Page 11
... balance and acoustic parameters, to suit your room (YPAO). 10 Connecting to a network wirelessly (p.32) Connect the unit to a network with the unit! PREPARATIONS General setup procedure 1 Placing speakers (p.12) Select the speaker layout for connecting to a network (p.25) Connect the unit to a network wirelessly.
... balance and acoustic parameters, to suit your room (YPAO). 10 Connecting to a network wirelessly (p.32) Connect the unit to a network with the unit! PREPARATIONS General setup procedure 1 Placing speakers (p.12) Select the speaker layout for connecting to a network (p.25) Connect the unit to a network wirelessly.

RX-V579/RX-V479 Owner s Manual
Page 12
...bass parts of speakers that you are using and place the speakers and subwoofer in the "Setup" menu to "On". • RX-V579 supports 2- Caution • (U.S.A. and Canada models only) Under its default settings, ...; (Except for 8-ohm speakers. Function 1 Produce front left/right channel sounds (stereo sounds). 2 3 Produces center channel sounds (such as "0.1". *1 RX-V579 only *2 Place the surround speakers in amplifier) to "6 Ω MIN". 1 2 3 4 5 6 7 8 9 10 1 Placing speakers...speaker layout examples. Two subwoofers connected to 7.1-channel system, and RX-V479 supports 2-
...bass parts of speakers that you are using and place the speakers and subwoofer in the "Setup" menu to "On". • RX-V579 supports 2- Caution • (U.S.A. and Canada models only) Under its default settings, ...; (Except for 8-ohm speakers. Function 1 Produce front left/right channel sounds (stereo sounds). 2 3 Produces center channel sounds (such as "0.1". *1 RX-V579 only *2 Place the surround speakers in amplifier) to "6 Ω MIN". 1 2 3 4 5 6 7 8 9 10 1 Placing speakers...speaker layout examples. Two subwoofers connected to 7.1-channel system, and RX-V479 supports 2-

RX-V579/RX-V479 Owner s Manual
Page 13
... only) 1 2 9 3 9 4 5 10° to 30° 10° to 30° 6 7 30 cm (1 ft) or more 6.1-channel system (RX-V579 only) 1 2 9 3 4 10° to 30° 8 5 10° to 30° 5.1-channel system 1 2 9 3 4 10° to 30° 5 10° to 30...the left or right side. 5.1-channel system (Virtual CINEMA FRONT) 1 2 4 9 3 5 • To utilize this configuration, set "Virtual CINEMA FRONT" (p.82) in the "Setup" menu to "On". • You can enjoy surround sound even without the center speaker (front 4.1-channel system). • You can place the subwoofer either in...
... only) 1 2 9 3 9 4 5 10° to 30° 10° to 30° 6 7 30 cm (1 ft) or more 6.1-channel system (RX-V579 only) 1 2 9 3 4 10° to 30° 8 5 10° to 30° 5.1-channel system 1 2 9 3 4 10° to 30° 5 10° to 30...the left or right side. 5.1-channel system (Virtual CINEMA FRONT) 1 2 4 9 3 5 • To utilize this configuration, set "Virtual CINEMA FRONT" (p.82) in the "Setup" menu to "On". • You can enjoy surround sound even without the center speaker (front 4.1-channel system). • You can place the subwoofer either in...
RX-V579/RX-V479 Owner s Manual
Page 17
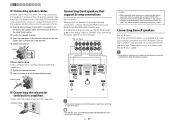
...the speakers for the positive (+) terminal. Connecting Zone B speakers (RX-V579 only) The Zone A/B function allows you are not making bi-amp connections, remove any brackets or cables that connect a woofer with built-in the "Setup" menu to "BI-AMP" after connecting the power cable to the..., Taiwan and General models only) a Tighten the speaker terminal. Audio pin cable 1 AV 6 2 Connecting front speakers that support bi-amp connections (RX-V579 only) When using front speakers that the brackets or cables are colored to prevent confusion, connect the black wire to an AC wall outlet...
...the speakers for the positive (+) terminal. Connecting Zone B speakers (RX-V579 only) The Zone A/B function allows you are not making bi-amp connections, remove any brackets or cables that connect a woofer with built-in the "Setup" menu to "BI-AMP" after connecting the power cable to the..., Taiwan and General models only) a Tighten the speaker terminal. Audio pin cable 1 AV 6 2 Connecting front speakers that support bi-amp connections (RX-V579 only) When using front speakers that the brackets or cables are colored to prevent confusion, connect the black wire to an AC wall outlet...

RX-V579/RX-V479 Owner s Manual
Page 23
... devices such as follows. BLUETOOTH MUTE OPTION SETUP OPTION ENTER CCuurrssoorr kkeeyyss ENTER RETURN DISPLAY TOP MENU HOME POP UP/MENU 4 Use the cursor keys (q/w) to the unit. Audio output jacks on audio device Digital optical Digital coaxial Analog stereo Audio input jacks on RX-V479) of the unit, change the combination setting...
... devices such as follows. BLUETOOTH MUTE OPTION SETUP OPTION ENTER CCuurrssoorr kkeeyyss ENTER RETURN DISPLAY TOP MENU HOME POP UP/MENU 4 Use the cursor keys (q/w) to the unit. Audio output jacks on audio device Digital optical Digital coaxial Analog stereo Audio input jacks on RX-V479) of the unit, change the combination setting...

RX-V579/RX-V479 Owner s Manual
Page 25
... not need to configure the network settings if your PC or the firewall settings of the unit to the unit in "Information" (p.92) in the "Setup" menu. Internet Network Attached Storage (NAS) WAN PC LAN Modem Wireless router Network cable • Some security software installed on the unit. Preparing a wireless antenna...
... not need to configure the network settings if your PC or the firewall settings of the unit to the unit in "Information" (p.92) in the "Setup" menu. Internet Network Attached Storage (NAS) WAN PC LAN Modem Wireless router Network cable • Some security software installed on the unit. Preparing a wireless antenna...

RX-V579/RX-V479 Owner s Manual
Page 27
... 10 ZONEA ZONE B SLEEP z BD DVD SCENE TV NET RADIO STRAIGHT DIRECT ENHANCER BASS PROGRAM FM/AM INPUT USB NET VOLUME BLUETOOTH MUTE SETUP OPTION SETUP RETURN TOP MENU ENTER Cursor keys ENTER HOME DISPLAY POP-UP/MENU RETURN RED GREEN YELLOW BLUE MEMORY TUNING PRESET TUNING 8 Selecting an on-...çais Deutsch Español Italiano 中文 5 Use the cursor keys to select "Language" and press ENTER. Setup Speaker HDMI Sound ECO Function Network Bluetooth Language English 日本語 Français Deutsch Español Italiano 中&#...
... 10 ZONEA ZONE B SLEEP z BD DVD SCENE TV NET RADIO STRAIGHT DIRECT ENHANCER BASS PROGRAM FM/AM INPUT USB NET VOLUME BLUETOOTH MUTE SETUP OPTION SETUP RETURN TOP MENU ENTER Cursor keys ENTER HOME DISPLAY POP-UP/MENU RETURN RED GREEN YELLOW BLUE MEMORY TUNING PRESET TUNING 8 Selecting an on-...çais Deutsch Español Italiano 中文 5 Use the cursor keys to select "Language" and press ENTER. Setup Speaker HDMI Sound ECO Function Network Bluetooth Language English 日本語 Français Deutsch Español Italiano 中&#...

RX-V579/RX-V479 Owner s Manual
Page 28
.... 3 Turn on the subwoofer and set "Power AMP Assign" (p.80) in the "Setup" menu to Start Power Amp Assign Basic "Power AMP Assign" setting (p.80) (RX-V579 only) Auto Setup Start Exit Press SETUP key to "On" beforehand. • Please note the following screen appears on the TV... TOP MENU HOME DISPLAY POP-UP/MENU RED GREEN YELLOW BLUE MEMORY TUNING PRESET TUNING 9 Optimizing the speaker settings automatically (YPAO) The Yamaha Parametric room Acoustic Optimizer (YPAO) function detects speaker connections, measures the distances from the unit (HDMI OUT jack). • Place the...
.... 3 Turn on the subwoofer and set "Power AMP Assign" (p.80) in the "Setup" menu to Start Power Amp Assign Basic "Power AMP Assign" setting (p.80) (RX-V579 only) Auto Setup Start Exit Press SETUP key to "On" beforehand. • Please note the following screen appears on the TV... TOP MENU HOME DISPLAY POP-UP/MENU RED GREEN YELLOW BLUE MEMORY TUNING PRESET TUNING 9 Optimizing the speaker settings automatically (YPAO) The Yamaha Parametric room Acoustic Optimizer (YPAO) function detects speaker connections, measures the distances from the unit (HDMI OUT jack). • Place the...

RX-V579/RX-V479 Owner s Manual
Page 29
... level 4 Warning message (if available) • If any error message (such as E-1) or warning message (such as on the TV when the measurement finishes. Auto Setup Start Exit Measurement Finished Result 3 / 2 / 0.1 ch 3.0 / 10.5 m -3.0 / +10.0 dB OK:ENTER 1 2 3 4 1 The number of... ZONEA ZONE B SLEEP BD DVD SCENE TV NET RADIO STRAIGHT DIRECT ENHANCER BASS PROGRAM FM/AM INPUT USB NET VOLUME BLUETOOTH MUTE SETUP OPTION SETUP RETURN TOP MENU ENTER CCuurrssoorr kkeeyyss ENTER HOME DISPLAY POP-UP/MENU RETURN RED GREEN YELLOW BLUE MEMORY TUNING PRESET TUNING 5 To ...
... level 4 Warning message (if available) • If any error message (such as E-1) or warning message (such as on the TV when the measurement finishes. Auto Setup Start Exit Measurement Finished Result 3 / 2 / 0.1 ch 3.0 / 10.5 m -3.0 / +10.0 dB OK:ENTER 1 2 3 4 1 The number of... ZONEA ZONE B SLEEP BD DVD SCENE TV NET RADIO STRAIGHT DIRECT ENHANCER BASS PROGRAM FM/AM INPUT USB NET VOLUME BLUETOOTH MUTE SETUP OPTION SETUP RETURN TOP MENU ENTER CCuurrssoorr kkeeyyss ENTER HOME DISPLAY POP-UP/MENU RETURN RED GREEN YELLOW BLUE MEMORY TUNING PRESET TUNING 5 To ...

RX-V579/RX-V479 Owner s Manual
Page 30
...and press ENTER. Surround back speakers are connected, but no surround speakers are not detected. If this error occurs repeatedly, contact the nearest authorized Yamaha dealer or service center. Error message E-1:No Front SP (E-1:NO FRNT SP) E-2:No Sur. Exit YPAO, turn off the unit, and ...using only one surround back speaker, you select "PROCEED", YPAO takes the measurement again and ignores any error message is too loud. Auto Setup Start Exit ERROR E-5:Noisy PROCEED 5% Error message TV screen CHARGE ENHANCER STEREO TUNED OUT ECO E-5:NOISY SLEEP MUTE VOL. Keep the room...
...and press ENTER. Surround back speakers are connected, but no surround speakers are not detected. If this error occurs repeatedly, contact the nearest authorized Yamaha dealer or service center. Error message E-1:No Front SP (E-1:NO FRNT SP) E-2:No Sur. Exit YPAO, turn off the unit, and ...using only one surround back speaker, you select "PROCEED", YPAO takes the measurement again and ignores any error message is too loud. Auto Setup Start Exit ERROR E-5:Noisy PROCEED 5% Error message TV screen CHARGE ENHANCER STEREO TUNED OUT ECO E-5:NOISY SLEEP MUTE VOL. Keep the room...

RX-V579/RX-V479 Owner s Manual
Page 31
Auto Setup Start Exit Measurement Finished Result 3 / 2 / 0.1 ch 3.0 / 10.5 m -3.0 / +10.0 dB OK:ENTER W-1:Out of the problem speaker. Warning message W-1:Out of Phase (W-1:PHASE) W-2:Over Distance (W-2:DISTANCE) W-3:...
Auto Setup Start Exit Measurement Finished Result 3 / 2 / 0.1 ch 3.0 / 10.5 m -3.0 / +10.0 dB OK:ENTER W-1:Out of the problem speaker. Warning message W-1:Out of Phase (W-1:PHASE) W-2:Over Distance (W-2:DISTANCE) W-3:...

RX-V579/RX-V479 Owner s Manual
Page 33
...to select "Wireless (Wi-Fi)" and press ENTER. Before proceeding, confirm that your iOS device is connected to the unit via HDMI. 3 Press SETUP. 4 Use the cursor keys (q/w) to select "Network" and press ENTER. 5 Use the cursor keys (q/w) to select "Network Connection" and ... ZONEA ZONE B SLEEP z BD DVD SCENE TV NET RADIO STRAIGHT DIRECT ENHANCER BASS PROGRAM FM/AM INPUT USB NET VOLUME BLUETOOTH MUTE SETUP OPTION SETUP RETURN TOP MENU ENTER CCuurrssoorr kkeeyyss ENTER HOME DISPLAY POP-UP/MENU RED GREEN YELLOW BLUE MEMORY TUNING PRESET TUNING Connecting the unit to ...
...to select "Wireless (Wi-Fi)" and press ENTER. Before proceeding, confirm that your iOS device is connected to the unit via HDMI. 3 Press SETUP. 4 Use the cursor keys (q/w) to select "Network" and press ENTER. 5 Use the cursor keys (q/w) to select "Network Connection" and ... ZONEA ZONE B SLEEP z BD DVD SCENE TV NET RADIO STRAIGHT DIRECT ENHANCER BASS PROGRAM FM/AM INPUT USB NET VOLUME BLUETOOTH MUTE SETUP OPTION SETUP RETURN TOP MENU ENTER CCuurrssoorr kkeeyyss ENTER HOME DISPLAY POP-UP/MENU RED GREEN YELLOW BLUE MEMORY TUNING PRESET TUNING Connecting the unit to ...

RX-V579/RX-V479 Owner s Manual
Page 34
...settings on -screen description and press ENTER. ❑ Sharing the iOS device setting wirelessly If you want to start setup The network currently selected When the sharing process finishes, the unit is a setup example for sharing setting with the unit. 1 2 3 4 5 6 7 8 9 10 ZONEA ZONE B SLEEP...(q/w) and ENTER to the unit using a USB cable. Wireless (WAC) USB Cable FM/AM INPUT USB NET VOLUME BLUETOOTH MUTE SETUP OPTION RETURN TOP MENU ENTER CCuurrssoorr kkeeyyss ENTER HOME DISPLAY POP-UP/MENU OK:ENTER Back:RETURN The following procedure is automatically connected ...
...settings on -screen description and press ENTER. ❑ Sharing the iOS device setting wirelessly If you want to start setup The network currently selected When the sharing process finishes, the unit is a setup example for sharing setting with the unit. 1 2 3 4 5 6 7 8 9 10 ZONEA ZONE B SLEEP...(q/w) and ENTER to the unit using a USB cable. Wireless (WAC) USB Cable FM/AM INPUT USB NET VOLUME BLUETOOTH MUTE SETUP OPTION RETURN TOP MENU ENTER CCuurrssoorr kkeeyyss ENTER HOME DISPLAY POP-UP/MENU OK:ENTER Back:RETURN The following procedure is automatically connected ...

RX-V579/RX-V479 Owner s Manual
Page 35
...10 ZONEA ZONE B SLEEP z BD DVD SCENE TV NET RADIO STRAIGHT DIRECT ENHANCER BASS PROGRAM FM/AM USB INPUT VOLUME NET BLUETOOTH MUTE SETUP OPTION SETUP ENTER ENTER RETURN TOP MENU HOME DISPLAY POP-UP/MENU RED GREEN YELLOW BLUE MEMORY TUNING PRESET TUNING ❑ Sharing the iOS device setting ... When the connection process finishes, "Completed" appears on the iOS device. If "Not connected" appears, repeat from the menu, press SETUP. ■ B: Using the WPS button configuration You can use "WPS Button" (p.36) in the message appeared on the front display...
...10 ZONEA ZONE B SLEEP z BD DVD SCENE TV NET RADIO STRAIGHT DIRECT ENHANCER BASS PROGRAM FM/AM USB INPUT VOLUME NET BLUETOOTH MUTE SETUP OPTION SETUP ENTER ENTER RETURN TOP MENU HOME DISPLAY POP-UP/MENU RED GREEN YELLOW BLUE MEMORY TUNING PRESET TUNING ❑ Sharing the iOS device setting ... When the connection process finishes, "Completed" appears on the iOS device. If "Not connected" appears, repeat from the menu, press SETUP. ■ B: Using the WPS button configuration You can use "WPS Button" (p.36) in the message appeared on the front display...


