
RX-V575/RX-V475 Owners Manual
Page 2
... 7.1-channel system 15 Connecting front speakers that support bi-amp connections 16 Connecting Zone B speakers 16 Input/output jacks and cables 17 3 Connecting a TV 18 4 Connecting playback devices 23 Connecting video devices (such as BD/DVD players 23 Connecting audio devices (such as CD players 26 Connecting to the jacks on the front panel 26 5 Connecting the FM/AM antennas 27 6 Connecting to a network 28 7 Connecting recording devices 29 8 Connecting the power cable 29 9 Selecting an on-screen menu language 30 10 Optimizing the speaker settings automatically...
... 7.1-channel system 15 Connecting front speakers that support bi-amp connections 16 Connecting Zone B speakers 16 Input/output jacks and cables 17 3 Connecting a TV 18 4 Connecting playback devices 23 Connecting video devices (such as BD/DVD players 23 Connecting audio devices (such as CD players 26 Connecting to the jacks on the front panel 26 5 Connecting the FM/AM antennas 27 6 Connecting to a network 28 7 Connecting recording devices 29 8 Connecting the power cable 29 9 Selecting an on-screen menu language 30 10 Optimizing the speaker settings automatically...
RX-V575/RX-V475 Owners Manual
Page 6
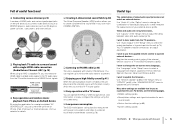
... HDMI Control signals. Use "Network Update" (p.88) in the "Setup" menu or "UPDATE" (p.84) in the "ADVANCED SETUP" menu to connect video devices (such as BD/DVD players), audio devices (such as presets. ❑ Enjoying pure high fidelity sound (p.41) When the direct playback mode is equipped with the unit En 6 Full of useful functions! ❑ Connecting various devices (p.23) A number of HDMI jacks and various input/output jacks on the unit allow you to update the unit's firmware. HDMI Control TV audio Video...
... HDMI Control signals. Use "Network Update" (p.88) in the "Setup" menu or "UPDATE" (p.84) in the "ADVANCED SETUP" menu to connect video devices (such as BD/DVD players), audio devices (such as presets. ❑ Enjoying pure high fidelity sound (p.41) When the direct playback mode is equipped with the unit En 6 Full of useful functions! ❑ Connecting various devices (p.23) A number of HDMI jacks and various input/output jacks on the unit allow you to update the unit's firmware. HDMI Control TV audio Video...
RX-V575/RX-V475 Owners Manual
Page 10
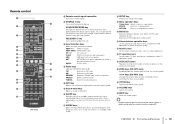
...H VOLUME keys Adjust the volume. RETURN Returns to AM radio. A MODE key Switches between "Stereo" and "Mono" for external devices (p.86). E CODE SET button Registers remote control codes of time has elapsed (sleep timer). C Numeric keys Let you select TV input and volume, and perform other operations for FM radio reception (p.43). Remote control 1 2 3 4 5 6 7 8 9 : A B C D CODE SET SOURCE RECEIVER HDMI 1 2 3 4 MHL 1 2 3 5 AV 4 5 6 A V-AUX AUDIO FM INFO USB NET TUNER AM MEMORY PRESET B ZONE TUNING MOVIE MUSIC SUR. RECEIVER z key Turns on...
...H VOLUME keys Adjust the volume. RETURN Returns to AM radio. A MODE key Switches between "Stereo" and "Mono" for external devices (p.86). E CODE SET button Registers remote control codes of time has elapsed (sleep timer). C Numeric keys Let you select TV input and volume, and perform other operations for FM radio reception (p.43). Remote control 1 2 3 4 5 6 7 8 9 : A B C D CODE SET SOURCE RECEIVER HDMI 1 2 3 4 MHL 1 2 3 5 AV 4 5 6 A V-AUX AUDIO FM INFO USB NET TUNER AM MEMORY PRESET B ZONE TUNING MOVIE MUSIC SUR. RECEIVER z key Turns on...
RX-V575/RX-V475 Owners Manual
Page 18
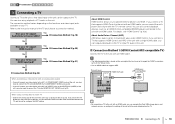
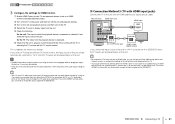
... as an HDMI Control-compatible BD/DVD player) connected to the unit with an analog video output • If you will receive TV broadcasts only from the set -top box to the unit in the "Setup" menu. • Use an HDMI cable that supports ARC. The unit (rear) HDMI OUT HDMI OUT jack HDMI OUT ARC HDMI 1 (BD/DVD) HDMI 2 ARC HDM HDMI ANTEN AM (RADIO PR PB Y COMPONENT VIDEO VIDEO HDMI input (ARC-compatible) HDMI ARC HDMI OPTICAL AV 1 COAXIAL AV 2 COAXIAL AV 3 OPTICAL ( TV ) AV...
... as an HDMI Control-compatible BD/DVD player) connected to the unit with an analog video output • If you will receive TV broadcasts only from the set -top box to the unit in the "Setup" menu. • Use an HDMI cable that supports ARC. The unit (rear) HDMI OUT HDMI OUT jack HDMI OUT ARC HDMI 1 (BD/DVD) HDMI 2 ARC HDM HDMI ANTEN AM (RADIO PR PB Y COMPONENT VIDEO VIDEO HDMI input (ARC-compatible) HDMI ARC HDMI OPTICAL AV 1 COAXIAL AV 2 COAXIAL AV 3 OPTICAL ( TV ) AV...
RX-V575/RX-V475 Owners Manual
Page 21
... 4" is set as a HDMI Control-compatible BD/DVD player). e Check the following. If you select a TV program with the menu displayed on the TV and playback devices (such as TV audio input at the factory. The unit (rear) HDMI OUT jack HDMI OUT ARC PR HDMI 1 (BD/DVD) HDMI OUT HDMI 2 HDMI 3 ARC HDMI ANTENNA AM (RADIO) FM HDMI input HDMI HDMI PB Y COMPONENT VIDEO VIDEO OPTICAL AV 1 COAXIAL AV 2 COAXIAL AV 3 OPTICAL ( TV ) AV 4 AV 5 OPTICAL AV 6 (TOVA) AV 4 OPTICAL O O AV 4 (OPTICAL) jack Audio output (digital optical) TV If you switch the input source of...
... 4" is set as a HDMI Control-compatible BD/DVD player). e Check the following. If you select a TV program with the menu displayed on the TV and playback devices (such as TV audio input at the factory. The unit (rear) HDMI OUT jack HDMI OUT ARC PR HDMI 1 (BD/DVD) HDMI OUT HDMI 2 HDMI 3 ARC HDMI ANTENNA AM (RADIO) FM HDMI input HDMI HDMI PB Y COMPONENT VIDEO VIDEO OPTICAL AV 1 COAXIAL AV 2 COAXIAL AV 3 OPTICAL ( TV ) AV 4 AV 5 OPTICAL AV 6 (TOVA) AV 4 OPTICAL O O AV 4 (OPTICAL) jack Audio output (digital optical) TV If you switch the input source of...
RX-V575/RX-V475 Owners Manual
Page 31
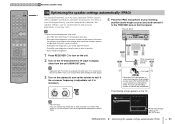
... MIC jack on the TV and switch the TV input to turn on the unit. 2 Turn on the front panel. During the measuring process, test tones are output at night when it may be a nuisance to the appropriate setting before starting YPAO. If the crossover frequency is connected to maximum. Also, refrain from using this function at high volume. The following when using bi-amp connection or Zone B speakers, set "Power Amp Assign" (p.71) in the "Setup" menu...
... MIC jack on the TV and switch the TV input to turn on the unit. 2 Turn on the front panel. During the measuring process, test tones are output at night when it may be a nuisance to the appropriate setting before starting YPAO. If the crossover frequency is connected to maximum. Also, refrain from using this function at high volume. The following when using bi-amp connection or Zone B speakers, set "Power Amp Assign" (p.71) in the "Setup" menu...
RX-V575/RX-V475 Owners Manual
Page 41
.... CODE SET SOURCE RECEIVER HDMI 1 2 3 4 MHL 1 2 3 5 AV 4 5 6 A V-AUX AUDIO FM INFO USB NET B ZONE TUNER AM MEMORY PRESET TUNING MOVIE MUSIC SUR. Use the Dolby Pro Logic II decoder (or Dolby Pro Logic IIx decoder) suitable for music. * RX-V575 only (RX-V575 only) • You cannot select the Dolby Pro Logic IIx decoders when headphones are not available. - Selecting sound programs - It allows you to reduce the electrical noise from 2-channel sources. DECODE STRAIGHT SLEEP BD DVD SETUP ENHANCER DIRECT...
.... CODE SET SOURCE RECEIVER HDMI 1 2 3 4 MHL 1 2 3 5 AV 4 5 6 A V-AUX AUDIO FM INFO USB NET B ZONE TUNER AM MEMORY PRESET TUNING MOVIE MUSIC SUR. Use the Dolby Pro Logic II decoder (or Dolby Pro Logic IIx decoder) suitable for music. * RX-V575 only (RX-V575 only) • You cannot select the Dolby Pro Logic IIx decoders when headphones are not available. - Selecting sound programs - It allows you to reduce the electrical noise from 2-channel sources. DECODE STRAIGHT SLEEP BD DVD SETUP ENHANCER DIRECT...
RX-V575/RX-V475 Owners Manual
Page 66
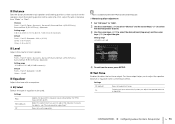
...) in the input signal (front/surround/LFE) For example, "3/2/0.1" means 3 front channels, 2 surround channels, and LFE. Default USB, SERVER, NET RADIO, AirPlay, TUNER: On (On) Others: Off (Off) ■ Volume Trim (Volume Trim) Fine-adjusts volume difference between input sources or subwoofer volume. ❑ Input Trim (In.Trim) Corrects volume differences between input sources, use ENHANCER on the front display, press the cursor keys (q/w) repeatedly. The number of samples per second of the input digital signal The amount of...
...) in the input signal (front/surround/LFE) For example, "3/2/0.1" means 3 front channels, 2 surround channels, and LFE. Default USB, SERVER, NET RADIO, AirPlay, TUNER: On (On) Others: Off (Off) ■ Volume Trim (Volume Trim) Fine-adjusts volume difference between input sources or subwoofer volume. ❑ Input Trim (In.Trim) Corrects volume differences between input sources, use ENHANCER on the front display, press the cursor keys (q/w) repeatedly. The number of samples per second of the input digital signal The amount of...

RX-V575/RX-V475 Owners Manual
Page 71
... settings manually. Settings Small (default) Large Select this option for small speakers. Select this option when a subwoofer is connected. Select this option when you configure the speaker size, select "Large" if the woofer diameter of the front channel frequency components. • "Front" is automatically set to "Large" when "Subwoofer" is set to the 5.1- The subwoofer will produce center channel audio. Select this option when no center speaker is connected. Setup Speaker HDMI Sound ECO Function Network Language Configuration Distance Level Equalizer Test Tone...
... settings manually. Settings Small (default) Large Select this option for small speakers. Select this option when a subwoofer is connected. Select this option when you configure the speaker size, select "Large" if the woofer diameter of the front channel frequency components. • "Front" is automatically set to "Large" when "Subwoofer" is set to the 5.1- The subwoofer will produce center channel audio. Select this option when no center speaker is connected. Setup Speaker HDMI Sound ECO Function Network Language Configuration Distance Level Equalizer Test Tone...
RX-V575/RX-V475 Owners Manual
Page 72
... "Power Amp Assign" is set to produce the front channel low-frequency components. Select this option when one small speaker is set the volume to half and crossover frequency to "None". Settings Normal (default) Reverse Does not reverse the subwoofer phase. Select this option when one large speaker is lacking or unclear, switch the subwoofer phase. Settings Small x1 Small x2 (default) Large x1 Large x2 None Select this option when no surround back speakers are connected...
... "Power Amp Assign" is set to produce the front channel low-frequency components. Select this option when one small speaker is set the volume to half and crossover frequency to "None". Settings Normal (default) Reverse Does not reverse the subwoofer phase. Select this option when one large speaker is lacking or unclear, switch the subwoofer phase. Settings Small x1 Small x2 (default) Large x1 Large x2 None Select this option when no surround back speakers are connected...
RX-V575/RX-V475 Owners Manual
Page 73
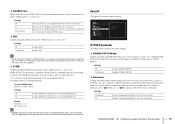
... the menu, press SETUP. ■ Test Tone Enables/disables the test tone output. CONFIGURATIONS ➤ Configuring various functions (Setup menu) En 73 Setting range -6.0 dB to adjust the gain. Test tone output helps you adjust the speaker balance or equalizer. First, select the unit of distance from the speakers reach the listening position at the same time. Choices Front L, Front R, Center, Surround L, Surround R, Surround Back L (RX-V575 only), Surround Back R (RX-V575 only), Subwoofer Setting range -10.0 dB to +10.0 dB (0.5 dB increments) Default Front...
... the menu, press SETUP. ■ Test Tone Enables/disables the test tone output. CONFIGURATIONS ➤ Configuring various functions (Setup menu) En 73 Setting range -6.0 dB to adjust the gain. Test tone output helps you adjust the speaker balance or equalizer. First, select the unit of distance from the speakers reach the listening position at the same time. Choices Front L, Front R, Center, Surround L, Surround R, Surround Back L (RX-V575 only), Surround Back R (RX-V575 only), Subwoofer Setting range -10.0 dB to +10.0 dB (0.5 dB increments) Default Front...
RX-V575/RX-V475 Owners Manual
Page 75
... do not need to "On", CINEMA DSP 3D functions with the selected sound programs (except 2ch Stereo and 7ch/5ch Stereo). On Enables SCENE link playback for the selected SCENE key. Setup Speaker HDMI Sound ECO Function Network Language DSP Parameter Lipsync Volume ■ DSP Parameter Configures the surround decoder settings. ❑ CINEMA DSP 3D Mode Enables/disables CINEMA DSP 3D (p.40). If this function is set to change this function is selected. Enables CINEMA DSP 3D. ❑ Panorama Enables/disables...
... do not need to "On", CINEMA DSP 3D functions with the selected sound programs (except 2ch Stereo and 7ch/5ch Stereo). On Enables SCENE link playback for the selected SCENE key. Setup Speaker HDMI Sound ECO Function Network Language DSP Parameter Lipsync Volume ■ DSP Parameter Configures the surround decoder settings. ❑ CINEMA DSP 3D Mode Enables/disables CINEMA DSP 3D (p.40). If this function is set to change this function is selected. Enables CINEMA DSP 3D. ❑ Panorama Enables/disables...
RX-V575/RX-V475 Owners Manual
Page 77
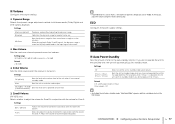
... . Sets the dynamic range for regular home use. Setup Speaker HDMI Sound ECO Function Network Language Auto Power Standby ECO Mode ■ Auto Power Standby Sets the amount of the unit when it for the auto-standby function. Optimizes the dynamic range for clear sound even at night or at low volumes. Settings Off (default) Sets the level to prevent excessive loudness. Sets the unit to standby mode when you do not operate the unit for the specified time, the unit will switch to adjust...
... . Sets the dynamic range for regular home use. Setup Speaker HDMI Sound ECO Function Network Language Auto Power Standby ECO Mode ■ Auto Power Standby Sets the amount of the unit when it for the auto-standby function. Optimizes the dynamic range for clear sound even at night or at low volumes. Settings Off (default) Sets the level to prevent excessive loudness. Sets the unit to standby mode when you do not operate the unit for the specified time, the unit will switch to adjust...
RX-V575/RX-V475 Owners Manual
Page 87
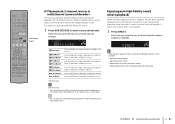
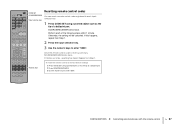
... to factory default settings a Press CODE SET using a pointed object such as the tip of a ballpoint pen. Perform each input selection key. 1 Press CODE SET using a pointed object such as the tip of a ballpoint pen. DECODE STRAIGHT SLEEP BD DVD SETUP ENHANCER DIRECT SCENE TV NET RADIO OPTION ENTER VOLUME RETURN DISPLAY TOP MENU MODE POP-UP MUTE MENU 1 2 3 4 5 6 7 8 9 INPUT MUTE 0 10 TV TV VOL TV CH ENT CODE SET SOURCE/RECEIVER Input selection keys Resetting remote control codes You can reset a remote control code...
... to factory default settings a Press CODE SET using a pointed object such as the tip of a ballpoint pen. Perform each input selection key. 1 Press CODE SET using a pointed object such as the tip of a ballpoint pen. DECODE STRAIGHT SLEEP BD DVD SETUP ENHANCER DIRECT SCENE TV NET RADIO OPTION ENTER VOLUME RETURN DISPLAY TOP MENU MODE POP-UP MUTE MENU 1 2 3 4 5 6 7 8 9 INPUT MUTE 0 10 TV TV VOL TV CH ENT CODE SET SOURCE/RECEIVER Input selection keys Resetting remote control codes You can reset a remote control code...
RX-V575/RX-V475 Owners Manual
Page 89
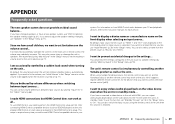
... time you like, use this function is in standby mode. APPENDIX Frequently asked questions En 89 If a small child accidentally operates the controls on the front display when selecting an input source... I want to control with HDMI, you have changed speakers or have small children, we have a new speaker system, use "Initial Volume" in the "Setup" menu to enjoy videos/audio played back on the unit (such as "Blu-ray" and "DVD"). The unit's remote control...
... time you like, use this function is in standby mode. APPENDIX Frequently asked questions En 89 If a small child accidentally operates the controls on the front display when selecting an input source... I want to control with HDMI, you have changed speakers or have small children, we have a new speaker system, use "Initial Volume" in the "Setup" menu to enjoy videos/audio played back on the unit (such as "Blu-ray" and "DVD"). The unit's remote control...
RX-V575/RX-V475 Owners Manual
Page 90
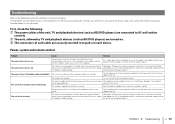
... experiencing is in to "Off" (p.77). The sleep timer worked. The unit enters standby mode automatically. menu to jacks on the unit and start playback again. The speaker impedance setting is not reacting. Twist the bare wires of a short circuit. AC wall outlet and plug it again.) The power turns off the unit, disconnect the power cable, and contact the nearest authorized Yamaha dealer or service center.
... experiencing is in to "Off" (p.77). The sleep timer worked. The unit enters standby mode automatically. menu to jacks on the unit and start playback again. The speaker impedance setting is not reacting. Twist the bare wires of a short circuit. AC wall outlet and plug it again.) The power turns off the unit, disconnect the power cable, and contact the nearest authorized Yamaha dealer or service center.
RX-V575/RX-V475 Owners Manual
Page 91
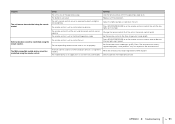
... is set properly. Adjust the lighting angle, or reposition the unit. Set the remote control code again (p.85). Reset the remote control code registered to the Zone A operation mode (p.62). Directly operate the mobile device itself. The batteries are not identical. The remote control is not set to HDMI 5. The corresponding remote control code is set the remote control to the Zone B operation mode. Replace with new batteries. Press SOURCE/RECEIVER to set to control external devices (the key lights up in green). APPENDIX ➤ Troubleshooting...
... is set properly. Adjust the lighting angle, or reposition the unit. Set the remote control code again (p.85). Reset the remote control code registered to the Zone A operation mode (p.62). Directly operate the mobile device itself. The batteries are not identical. The remote control is not set to HDMI 5. The corresponding remote control code is set the remote control to the Zone B operation mode. Replace with new batteries. Press SOURCE/RECEIVER to set to control external devices (the key lights up in green). APPENDIX ➤ Troubleshooting...

RX-V575/RX-V475 Owners Manual
Page 92
... , set to output the front channel low-frequency components from the subwoofer. Perform YPAO (p.31) or set "Subwoofer" in the "Option" menu to select a decoder to "Use" (p.71). Disable the auto-standby function of the unit. Some digital audio formats cannot be used (p.65). The cable connecting the unit and playback device is defective. If there is coming from the surround back speaker. Use "Extended Surround" in the "Setup" menu to be played back on the subwoofer. When "Power Amp Assign...
... , set to output the front channel low-frequency components from the subwoofer. Perform YPAO (p.31) or set "Subwoofer" in the "Option" menu to select a decoder to "Use" (p.71). Disable the auto-standby function of the unit. Some digital audio formats cannot be used (p.65). The cable connecting the unit and playback device is defective. If there is coming from the surround back speaker. Use "Extended Surround" in the "Setup" menu to be played back on the subwoofer. When "Power Amp Assign...
RX-V575/RX-V475 Owners Manual
Page 110
... Output (Signal Info, Option menu) 66 Over Distance (YPAO warning message) 34 P PAL (TV FORMAT, ADVANCED SETUP menu) 84 Panorama (DSP Parameter, Setup menu) 75 PC connection 28 PC content playback 54 PEQ (Equalizer, Setup menu) 73 Perform Update (Network Update, Setup menu) 82 PHONES jack 7 Playback device connection 23 Playback device operation (remote control) 86 Please wait (error indication) 96 Power Amp Assign (Speaker, Setup menu) 71 Power cable connection 29 Power management 77 Power Mode (DC OUT, Setup menu) 79 Preset station selection (FM/AM radio) 45 Program Service (Radio Data...
... Output (Signal Info, Option menu) 66 Over Distance (YPAO warning message) 34 P PAL (TV FORMAT, ADVANCED SETUP menu) 84 Panorama (DSP Parameter, Setup menu) 75 PC connection 28 PC content playback 54 PEQ (Equalizer, Setup menu) 73 Perform Update (Network Update, Setup menu) 82 PHONES jack 7 Playback device connection 23 Playback device operation (remote control) 86 Please wait (error indication) 96 Power Amp Assign (Speaker, Setup menu) 71 Power cable connection 29 Power management 77 Power Mode (DC OUT, Setup menu) 79 Preset station selection (FM/AM radio) 45 Program Service (Radio Data...
RX-V575/RX-V475 Owners Manual
Page 111
... error message) 33 V V IN (Signal Info, Option menu) 66 V OUT (Signal Info, Option menu) 66 VERSION (ADVANCED SETUP menu) 84 VIDEO AUX jack 7 Video device connection 23 VIDEO jack 17 Video Out (Option menu) 67 Video pin cable 17 Video signal flow 100 Video signal type setting 84 Video/audio input jack combination 25 Virtual CINEMA DSP 40 Virtual Presence Speaker (VPS) 6 Voltage selection 29 VOLTAGE SELECTOR 9 Volume (Sound, Setup menu) 77 Volume Interlock (Option menu) 67 Volume Trim (Option menu) 66 VPS (Virtual Presence Speaker) 6 vTuner ID (Information, Setup menu) 80 Y Yamaha...
... error message) 33 V V IN (Signal Info, Option menu) 66 V OUT (Signal Info, Option menu) 66 VERSION (ADVANCED SETUP menu) 84 VIDEO AUX jack 7 Video device connection 23 VIDEO jack 17 Video Out (Option menu) 67 Video pin cable 17 Video signal flow 100 Video signal type setting 84 Video/audio input jack combination 25 Virtual CINEMA DSP 40 Virtual Presence Speaker (VPS) 6 Voltage selection 29 VOLTAGE SELECTOR 9 Volume (Sound, Setup menu) 77 Volume Interlock (Option menu) 67 Volume Trim (Option menu) 66 VPS (Virtual Presence Speaker) 6 vTuner ID (Information, Setup menu) 80 Y Yamaha...


