Owner's Manual
Page 7
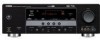
... leaked, dispose of the remote control decreases. - Notes • Change all of the batteries if you received all of this unit and create a potential fire hazard. When the memory is without batteries for your local... contact with general house waste; Remote control CODE SET TRANSMIT POWER TV POWER AV STANDBY POWER CD DVD DOCK V-AUX MD CD-R CBL DTV MULTI CH IN AUDIO SEL TUNER... XM DVR TV VOL TV CH AMP VOLUME SOURCE TV Batteries (2) (AA, R06, UM-3) TV MUTE TV INPUT MUTE MUSIC ENTERTAIN MOVIE 1 2 3...
... leaked, dispose of the remote control decreases. - Notes • Change all of the batteries if you received all of this unit and create a potential fire hazard. When the memory is without batteries for your local... contact with general house waste; Remote control CODE SET TRANSMIT POWER TV POWER AV STANDBY POWER CD DVD DOCK V-AUX MD CD-R CBL DTV MULTI CH IN AUDIO SEL TUNER... XM DVR TV VOL TV CH AMP VOLUME SOURCE TV Batteries (2) (AA, R06, UM-3) TV MUTE TV INPUT MUTE MUSIC ENTERTAIN MOVIE 1 2 3...

Owner's Manual
Page 25
■ Using the remote control The remote control transmits a directional infrared ray. Aim this window at the remote control sensor on this unit. AMP Operates the amplifier function of high temperature, such as near a heater or stove - places of this unit during operation. dusty places Connections 21 En English ...
■ Using the remote control The remote control transmits a directional infrared ray. Aim this window at the remote control sensor on this unit. AMP Operates the amplifier function of high temperature, such as near a heater or stove - places of this unit during operation. dusty places Connections 21 En English ...

Owner's Manual
Page 27
... "START" and then press DENTER to select "AUTO". This unit starts the auto setup procedure. English 23 En PREPARATION p 4 Set the operation mode selector (K) to AMP and then press Dl / h to start the setup procedure. AUTO:MENU SETUP;;;;;;;AUTO . START Automatic Processing of each speaker from step 4. • If you have...
... "START" and then press DENTER to select "AUTO". This unit starts the auto setup procedure. English 23 En PREPARATION p 4 Set the operation mode selector (K) to AMP and then press Dl / h to start the setup procedure. AUTO:MENU SETUP;;;;;;;AUTO . START Automatic Processing of each speaker from step 4. • If you have...

Owner's Manual
Page 30
.... Select the desired SCENE template 2 Press DINPUT l / h (or set the input source of using this unit. l INPUT h Front panel or AMP SOURCE TV PRESET/CH ENTER A-E/CAT. Remote control SCENE template library (Image) 1 Assign the SCENE template to select the desired template. As the initial... factory setting, the following SCENE templates are assigned to the corresponding SCENE buttons, you may need to set the operation mode selector (K) to AMP and then press Dl / h) to the SCENE button Selecting the desired SCENE template 1 Press and hold the desired FSCENE (or FSCENE) button...
.... Select the desired SCENE template 2 Press DINPUT l / h (or set the input source of using this unit. l INPUT h Front panel or AMP SOURCE TV PRESET/CH ENTER A-E/CAT. Remote control SCENE template library (Image) 1 Assign the SCENE template to select the desired template. As the initial... factory setting, the following SCENE templates are assigned to the corresponding SCENE buttons, you may need to set the operation mode selector (K) to AMP and then press Dl / h) to the SCENE button Selecting the desired SCENE template 1 Press and hold the desired FSCENE (or FSCENE) button...

Owner's Manual
Page 33
...SCENE templates to create the original SCENE templates. ■ Customizing the preset SCENE templates Use this unit. 2 Set the operation mode selector (K) to AMP and then press and hold the desired FSCENE button for 3 seconds. See page 59 for details. • You can create a customized SCENE ...template for each SCENE button. AMP SOURCE TV 1 3 seconds 3 Press Dk / n to select the desired parameter of the SCENE template and then Dl / h to select the desired ...
...SCENE templates to create the original SCENE templates. ■ Customizing the preset SCENE templates Use this unit. 2 Set the operation mode selector (K) to AMP and then press and hold the desired FSCENE button for 3 seconds. See page 59 for details. • You can create a customized SCENE ...template for each SCENE button. AMP SOURCE TV 1 3 seconds 3 Press Dk / n to select the desired parameter of the SCENE template and then Dl / h to select the desired ...

Owner's Manual
Page 34
... page 36). • To display information about the currently selected input source in DTS on the selected component or select a broadcast station. • Refer to AMP. See page 35 for details about sound field programs. Movie Dramatic Currently selected surround field program 2 Press DINPUT l / h repeatedly (or press one of the currently...
... page 36). • To display information about the currently selected input source in DTS on the selected component or select a broadcast station. • Refer to AMP. See page 35 for details about sound field programs. Movie Dramatic Currently selected surround field program 2 Press DINPUT l / h repeatedly (or press one of the currently...

Owner's Manual
Page 36
...be output from the subwoofer. • "TONE CONTROL" (see page 30) and "SOUND MENU" (see page 53). 1 Set the operation mode selector (K) to AMP and then press CLEVEL repeatedly to select the speaker you can also select the speaker by pressing Dk / n. 2 Press Dl / h on the remote control to... speaker SWFR Subwoofer y Once you press CLEVEL on the remote control, you want to adjust. Press CDIRECT STEREO (or set the operation mode selector (K) to AMP and then press TDIRECT ST.) to select a speaker and then 5 PRESET/TUNING/CH l / hto adjust the speaker output level. 32 En Playback ■...
...be output from the subwoofer. • "TONE CONTROL" (see page 30) and "SOUND MENU" (see page 53). 1 Set the operation mode selector (K) to AMP and then press CLEVEL repeatedly to select the speaker you can also select the speaker by pressing Dk / n. 2 Press Dl / h on the remote control to... speaker SWFR Subwoofer y Once you press CLEVEL on the remote control, you want to adjust. Press CDIRECT STEREO (or set the operation mode selector (K) to AMP and then press TDIRECT ST.) to select a speaker and then 5 PRESET/TUNING/CH l / hto adjust the speaker output level. 32 En Playback ■...

Owner's Manual
Page 37
... the following information about the input source appears in the OSD. FLAG Flag data encoded in the front panel display. 3 Press NSET MENU again to AMP and then press NSET MENU on the remote control. y The information indicated by the cursor is selected as the input source. - when headphones are stored... from a continuous signal to make dialog easier to automatically switch decoders. SAMPLING The number of the current input signal. 1 Set the operation mode selector (K) to AMP and then press RNIGHT repeatedly to select "SIGNAL INFO" and then press DENTER.
... the following information about the input source appears in the OSD. FLAG Flag data encoded in the front panel display. 3 Press NSET MENU again to AMP and then press NSET MENU on the remote control. y The information indicated by the cursor is selected as the input source. - when headphones are stored... from a continuous signal to make dialog easier to automatically switch decoders. SAMPLING The number of the current input signal. 1 Set the operation mode selector (K) to AMP and then press RNIGHT repeatedly to select "SIGNAL INFO" and then press DENTER.

Owner's Manual
Page 38
... are switching the amount of time. Notes • When you are mixed down to the standby mode. 34 En Set the operation mode selector (K) to AMP and then press MSLEEP repeatedly to mute the audio output. Playback ■ Playing video sources in the background You can enjoy listening to select a video...
... are switching the amount of time. Notes • When you are mixed down to the standby mode. 34 En Set the operation mode selector (K) to AMP and then press MSLEEP repeatedly to mute the audio output. Playback ■ Playing video sources in the background You can enjoy listening to select a video...

Owner's Manual
Page 39
... stereo and variety shows with a live concert. For sports relays, the voices of commentators and announcers come clearly from the center; It restrains reverberation to AMP and then press one of the sound field program selector buttons (P) repeatedly). This is suitable for movies with an emphasis on spectacular sound effects, and...
... stereo and variety shows with a live concert. For sports relays, the voices of commentators and announcers come clearly from the center; It restrains reverberation to AMP and then press one of the sound field program selector buttons (P) repeatedly). This is suitable for movies with an emphasis on spectacular sound effects, and...

Owner's Manual
Page 40
You can also be played back on the type of source you set the operation mode selector (K) to AMP and then press SSTRAIGHT) to "NONE" (see page 35). L/R SP" is selected. - Press BSTRAIGHT (or set "SUR. If you are output from 2-channel sources can ... is selected as the input source (see page 52), Virtual CINEMA DSP activates automatically whenever you connect headphones to the PHONES jack while listening to AMP and then press QSUR.
You can also be played back on the type of source you set the operation mode selector (K) to AMP and then press SSTRAIGHT) to "NONE" (see page 35). L/R SP" is selected. - Press BSTRAIGHT (or set "SUR. If you are output from 2-channel sources can ... is selected as the input source (see page 52), Virtual CINEMA DSP activates automatically whenever you connect headphones to the PHONES jack while listening to AMP and then press QSUR.

Owner's Manual
Page 41
... to varying degrees. A larger value adjusts the center image towards the front left and right speakers), initial setting is set the operation mode selector (K) to AMP and then press Dk / n to select the desired parameter. 2 Press Dl / h to change the parameter value. LOW, HIGH BASIC OPERATION English 37 En For Music...
... to varying degrees. A larger value adjusts the center image towards the front left and right speakers), initial setting is set the operation mode selector (K) to AMP and then press Dk / n to select the desired parameter. 2 Press Dl / h to change the parameter value. LOW, HIGH BASIC OPERATION English 37 En For Music...
Owner's Manual
Page 54
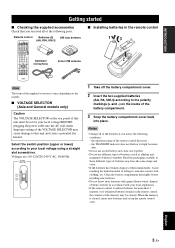
... p p 3 Press DENTER to exit from "SET MENU". SET MENU Option menu 3 OPTION MENU Use this unit is reproducing sound. 1 Set the operation mode selector to AMP and then press NSET MENU to enter "SET MENU". Locks sound field program parameters and other "SET MENU" settings. p p Using SET MENU Use the remote...
... p p 3 Press DENTER to exit from "SET MENU". SET MENU Option menu 3 OPTION MENU Use this unit is reproducing sound. 1 Set the operation mode selector to AMP and then press NSET MENU to enter "SET MENU". Locks sound field program parameters and other "SET MENU" settings. p p Using SET MENU Use the remote...
Owner's Manual
Page 60
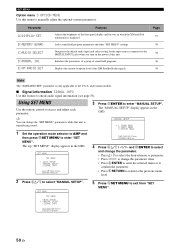
This is stationed in the Yamaha Universal Dock connected to this unit. ■ Decoder mode D)DECODER MODE 2 INPUT MENU D)DECODER MODE . >AUTO LAST CD ;;;;AUTO DVD ;;;;AUTO DTV/CBL ;;;;AUTO [ ]/[ ]:Up/... C)VOLUME TRIM DVD DVD ;;;;;;0.0dB MD MULTI CH IN CD CD-R DVD CBL DTV TUNER XM DOCK V-AUX DVR 2 Set the operation mode selector (K) to AMP and then press Dl / h on the power of each input source to avoid sudden changes in the reverse order: A to Z, a space, 0 to 9, a space, a to z, a space...
This is stationed in the Yamaha Universal Dock connected to this unit. ■ Decoder mode D)DECODER MODE 2 INPUT MENU D)DECODER MODE . >AUTO LAST CD ;;;;AUTO DVD ;;;;AUTO DTV/CBL ;;;;AUTO [ ]/[ ]:Up/... C)VOLUME TRIM DVD DVD ;;;;;;0.0dB MD MULTI CH IN CD CD-R DVD CBL DTV TUNER XM DOCK V-AUX DVR 2 Set the operation mode selector (K) to AMP and then press Dl / h on the power of each input source to avoid sudden changes in the reverse order: A to Z, a space, 0 to 9, a space, a to z, a space...

Owner's Manual
Page 61
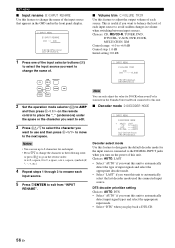
...30s" to turn off the OSD 10 seconds after you perform a certain operation. DIMMER;;;;;;;;;0 FL SCROLL;;;CONT OSD SHIFT;;;;;;0 OSD-SOURCE;;;30s OSD-AMP;;;;;;30s [ ]/[ ]:Up/Down [p]/[[]:Select Dimmer DIMMER Use this feature to adjust the vertical position of the front panel display. OSD shift OSD ... "30s" to turn off the OSD 30 seconds after you perform a certain operation. ADVANCED OPERATION English 57 En Amplifier function OSD display time OSD-AMP Use this feature to set the amount of the sources input at the MULTI CH INPUT jacks. Control range: -5 (upward) to +5 (downward)...
...30s" to turn off the OSD 10 seconds after you perform a certain operation. DIMMER;;;;;;;;;0 FL SCROLL;;;CONT OSD SHIFT;;;;;;0 OSD-SOURCE;;;30s OSD-AMP;;;;;;30s [ ]/[ ]:Up/Down [p]/[[]:Select Dimmer DIMMER Use this feature to adjust the vertical position of the front panel display. OSD shift OSD ... "30s" to turn off the OSD 30 seconds after you perform a certain operation. ADVANCED OPERATION English 57 En Amplifier function OSD display time OSD-AMP Use this feature to set the amount of the sources input at the MULTI CH INPUT jacks. Control range: -5 (upward) to +5 (downward)...

Owner's Manual
Page 63
... not successful, the VTRANSMIT indicator flashes repeatedly. In this unit and the input source component by Yamaha and other components, you must set the appropriate remote control code for each button. Remote control ...the function of the selected SCENE template. * CODE SET TRANSMIT POWER TV POWER AV STANDBY POWER CD DVD DOCK V-AUX MD CD-R CBL DTV MULTI CH IN AUDIO SEL TUNER XM... DVR TV VOL TV CH AMP VOLUME SOURCE TV TV MUTE TV INPUT MUTE MUSIC ENTERTAIN MODE 1 2 3 STEREO 4 ENHANCER STRAIGHT DIRECT ...
... not successful, the VTRANSMIT indicator flashes repeatedly. In this unit and the input source component by Yamaha and other components, you must set the appropriate remote control code for each button. Remote control ...the function of the selected SCENE template. * CODE SET TRANSMIT POWER TV POWER AV STANDBY POWER CD DVD DOCK V-AUX MD CD-R CBL DTV MULTI CH IN AUDIO SEL TUNER XM... DVR TV VOL TV CH AMP VOLUME SOURCE TV TV MUTE TV INPUT MUTE MUSIC ENTERTAIN MODE 1 2 3 STEREO 4 ENHANCER STRAIGHT DIRECT ...

Owner's Manual
Page 64
...TV to TV. DISPLAY REC SCENE 1 2 3 4 *1 *2 *1 *1 CODE SET TRANSMIT POWER TV POWER AV STANDBY POWER CD DVD DOCK V-AUX MD CD-R CBL DTV MULTI CH IN AUDIO SEL TUNER XM DVR TV VOL TV CH AMP VOLUME SOURCE TV TV MUTE TV INPUT MUTE MUSIC ENTERTAIN MODE 1 2 3 STEREO 4 ENHANCER STRAIGHT...the input source. *2 These buttons control your TV. CODE SET TRANSMIT POWER TV POWER AV STANDBY POWER CD DVD DOCK V-AUX MD CD-R CBL DTV MULTI CH IN AUDIO SEL TUNER XM DVR TV VOL TV CH AMP VOLUME SOURCE TV TV MUTE TV INPUT MUTE MUSIC ENTERTAIN MODE 1 2 3 STEREO ...
...TV to TV. DISPLAY REC SCENE 1 2 3 4 *1 *2 *1 *1 CODE SET TRANSMIT POWER TV POWER AV STANDBY POWER CD DVD DOCK V-AUX MD CD-R CBL DTV MULTI CH IN AUDIO SEL TUNER XM DVR TV VOL TV CH AMP VOLUME SOURCE TV TV MUTE TV INPUT MUTE MUSIC ENTERTAIN MODE 1 2 3 STEREO 4 ENHANCER STRAIGHT...the input source. *2 These buttons control your TV. CODE SET TRANSMIT POWER TV POWER AV STANDBY POWER CD DVD DOCK V-AUX MD CD-R CBL DTV MULTI CH IN AUDIO SEL TUNER XM DVR TV VOL TV CH AMP VOLUME SOURCE TV TV MUTE TV INPUT MUTE MUSIC ENTERTAIN MODE 1 2 3 STEREO ...

Owner's Manual
Page 65
... REC SCENE 1 2 3 4 7 8 9 Remote control DVD player/ recorder VCR Digital TV/ Cable TV LD player CD player MD/CD recorder Tuner iPod 1 AV POWER Power *1 Power *1 Power *2 Power *1 Power *1 Power *1 2 1-9, 0, +10 3 TITLE Numeric buttons Title Numeric buttons Numeric buttons Numeric buttons Numeric buttons... POWER CD DVD DOCK V-AUX MD CD-R CBL DTV MULTI CH IN AUDIO SEL TUNER XM DVR TV VOL TV CH AMP VOLUME SOURCE TV TV MUTE TV INPUT MUTE MUSIC ENTERTAIN MODE 1 2 3 STEREO 4 2 3 4 5 6 MUSIC ENTERTAIN MODE 1 2 3 STEREO 4 ENHANCER STRAIGHT DIRECT ...
... REC SCENE 1 2 3 4 7 8 9 Remote control DVD player/ recorder VCR Digital TV/ Cable TV LD player CD player MD/CD recorder Tuner iPod 1 AV POWER Power *1 Power *1 Power *2 Power *1 Power *1 Power *1 2 1-9, 0, +10 3 TITLE Numeric buttons Title Numeric buttons Numeric buttons Numeric buttons Numeric buttons... POWER CD DVD DOCK V-AUX MD CD-R CBL DTV MULTI CH IN AUDIO SEL TUNER XM DVR TV VOL TV CH AMP VOLUME SOURCE TV TV MUTE TV INPUT MUTE MUSIC ENTERTAIN MODE 1 2 3 STEREO 4 2 3 4 5 6 MUSIC ENTERTAIN MODE 1 2 3 STEREO 4 ENHANCER STRAIGHT DIRECT ...

Owner's Manual
Page 79
... Channel Search mode, XM tuning 43 All remote control codes resetting ....... 63 AM antenna, Connection 19 AM tuning 38 AMP, Operation mode selector 21 Amplifier function OSD display time, Display settings 57 Audio components, Connection 17 Audio delay, Audio ..., S VIDEO jacks 16 Connection, Satellite tuner 15 Connection, Speaker 12 Connection, Video components ...........15 Connection, Video monitor 15 Connection, Yamaha iPod universal dock ...........18 Controlling a TV, Remote control .......60 Controlling other components, Remote control 61 Controlling this unit, Remote control ...
... Channel Search mode, XM tuning 43 All remote control codes resetting ....... 63 AM antenna, Connection 19 AM tuning 38 AMP, Operation mode selector 21 Amplifier function OSD display time, Display settings 57 Audio components, Connection 17 Audio delay, Audio ..., S VIDEO jacks 16 Connection, Satellite tuner 15 Connection, Speaker 12 Connection, Video components ...........15 Connection, Video monitor 15 Connection, Yamaha iPod universal dock ...........18 Controlling a TV, Remote control .......60 Controlling other components, Remote control 61 Controlling this unit, Remote control ...
Owner's Manual
Page 80
... Optimizer microphone, Auto setup ..... 22 Optimizing speaker setting 22 Option menu, Manual setup 50 OSD SHIFT, Display settings 57 OSD shift, Display settings 57 OSD-AMP, Display settings 57 OSD-SOURCE, Display settings ........ 57 Other components controlling by remote control 61 Other components controlling, Remote control 61 ■P PANORAMA, Sound field...
... Optimizer microphone, Auto setup ..... 22 Optimizing speaker setting 22 Option menu, Manual setup 50 OSD SHIFT, Display settings 57 OSD shift, Display settings 57 OSD-AMP, Display settings 57 OSD-SOURCE, Display settings ........ 57 Other components controlling by remote control 61 Other components controlling, Remote control 61 ■P PANORAMA, Sound field...


