

Owner's Manual
Page 3
... UNIT! IMPORTANT : When connecting this manual, meets FCC requirements. NOTE : This product has been tested and found to coaxial type cable. If the antenna lead-in the users manual, may not cause harmful interference. PART H) SPECIAL NOTES FOR FCC COMPOSITE DEVICE (for US customers only) YAMAHA and the Electronic Industries Association's Since hearing damage from excessive volume levels. Compliance with FCC regulations...
... UNIT! IMPORTANT : When connecting this manual, meets FCC requirements. NOTE : This product has been tested and found to coaxial type cable. If the antenna lead-in the users manual, may not cause harmful interference. PART H) SPECIAL NOTES FOR FCC COMPOSITE DEVICE (for US customers only) YAMAHA and the Electronic Industries Association's Since hearing damage from excessive volume levels. Compliance with FCC regulations...

Owner's Manual
Page 4
... TUNER DISC PLAY CD PHONO POWER SLEEP VOLUME Batteries (size AA, R6, UM-3) 2 CONTENTS Safety Instructions Inside the Front Cover Supplied Accessories 2 Features 3 Caution 4 Notes about the Remote Control Transmitter 5 Profile of This Unit 6 Speaker Setup 7 Connections 8 Controls and Their Functions 14 Speaker Balance Adjustment 20 Basic Operations 23 Tuning Operations 26 Preset Tuning 27 Using Digital Sound Field Processor (DSP 30 Setting the SLEEP Timer 34 Troubleshooting 35 Specifications 36 SUPPLIED ACCESSORIES After unpacking, check that the following parts...
... TUNER DISC PLAY CD PHONO POWER SLEEP VOLUME Batteries (size AA, R6, UM-3) 2 CONTENTS Safety Instructions Inside the Front Cover Supplied Accessories 2 Features 3 Caution 4 Notes about the Remote Control Transmitter 5 Profile of This Unit 6 Speaker Setup 7 Connections 8 Controls and Their Functions 14 Speaker Balance Adjustment 20 Basic Operations 23 Tuning Operations 26 Preset Tuning 27 Using Digital Sound Field Processor (DSP 30 Setting the SLEEP Timer 34 Troubleshooting 35 Specifications 36 SUPPLIED ACCESSORIES After unpacking, check that the following parts...

Owner's Manual
Page 5
...;) RMS Output Power, 0.7% THD, 1 kHz q Digital Sound Field Processor q Dolby Pro Logic Surround Decoder q Theater-like Sound Experience by the Combination of Dolby Pro Logic and YAMAHA DSP Technology (CINEMA DSP) q Automatic Input Balance Control for Dolby Pro Logic Surround q Test Tone Generator for Easier Speaker Balance Adjustment q 3 Center Channel Modes (NORMAL/WIDE/PHANTOM) q 40-Station Random Access Preset Tuning q Automatic Preset Tuning q Preset Station Shifting Capability (Preset Editing) q IF Count Direct PLL Synthesizer Tuning System q Video Signal Input/Output Capability q SLEEP...
...;) RMS Output Power, 0.7% THD, 1 kHz q Digital Sound Field Processor q Dolby Pro Logic Surround Decoder q Theater-like Sound Experience by the Combination of Dolby Pro Logic and YAMAHA DSP Technology (CINEMA DSP) q Automatic Input Balance Control for Dolby Pro Logic Surround q Test Tone Generator for Easier Speaker Balance Adjustment q 3 Center Channel Modes (NORMAL/WIDE/PHANTOM) q 40-Station Random Access Preset Tuning q Automatic Preset Tuning q Preset Station Shifting Capability (Preset Editing) q IF Count Direct PLL Synthesizer Tuning System q Video Signal Input/Output Capability q SLEEP...
Owner's Manual
Page 6
... BEFORE plugging into the set the FREQUENCY STEP switch (located at least 10 cm behind, 20 cm on the cabinet assure proper ventilation of the unit. Before setting this switch, disconnect the AC power plug of the unit. CAUTION : READ THIS BEFORE OPERATING YOUR UNIT. 1. To assure the finest performance, please read the "TROUBLESHOOTING" section regarding common operating errors before starting the audio source play...
... BEFORE plugging into the set the FREQUENCY STEP switch (located at least 10 cm behind, 20 cm on the cabinet assure proper ventilation of the unit. Before setting this switch, disconnect the AC power plug of the unit. CAUTION : READ THIS BEFORE OPERATING YOUR UNIT. 1. To assure the finest performance, please read the "TROUBLESHOOTING" section regarding common operating errors before starting the audio source play...
Owner's Manual
Page 8
... exact nature of the sonic reflections that of a movie theater in your listening room, because the room size, materials of inside walls, the number of a Yamaha stereo receiver -an extremely sophisticated audio component. CINEMA DSP The YAMAHA "CINEMA DSP" logo indicates these programs are the proud owner of speakers, etc. PROFILE OF THIS UNIT You are created by compensating for dialog), and the rear surround sound channels (used on the sound field program " PRO...
... exact nature of the sonic reflections that of a movie theater in your listening room, because the room size, materials of inside walls, the number of a Yamaha stereo receiver -an extremely sophisticated audio component. CINEMA DSP The YAMAHA "CINEMA DSP" logo indicates these programs are the proud owner of speakers, etc. PROFILE OF THIS UNIT You are created by compensating for dialog), and the rear surround sound channels (used on the sound field program " PRO...
Owner's Manual
Page 9
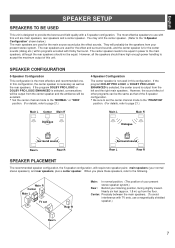
... stereo speakers), and rear speakers, plus the effect sounds. The most effective and recommended one. You may omit the center speaker. (Refer to the "4-Speaker Configuration" shown below.) The main speakers are used for the effect and surround sounds, and the center speaker is for the main source sound plus a center speaker. If the program DOLBY PRO LOGIC or DOLBY PRO LOGIC ENHANCED is selected, the center sound is the most effective speakers to use a magnetically shielded speaker.) Rear L 7 FMraoinntRR Center...
... stereo speakers), and rear speakers, plus the effect sounds. The most effective and recommended one. You may omit the center speaker. (Refer to the "4-Speaker Configuration" shown below.) The main speakers are used for the effect and surround sounds, and the center speaker is for the main source sound plus a center speaker. If the program DOLBY PRO LOGIC or DOLBY PRO LOGIC ENHANCED is selected, the center sound is the most effective speakers to use a magnetically shielded speaker.) Rear L 7 FMraoinntRR Center...
Owner's Manual
Page 10
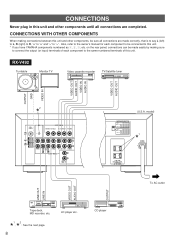
... connect the output (or input) terminals of this unit. CD player RX-V492 Turntable Monitor TV Video cassette recorder TV/Satellite tuner OUTPUT GND VIDEO IN VIDEO OUT AUDIO OUT VIDEO IN AUDIO IN VIDEO OUT AUDIO OUT 2 * 75Ω UNBAL. FM ANT GND VIDEO SIGNAL MONITOR OUT DVD/LD IN VCR OUT TV/DBS GND AM ANT PHONO TAPE TAPE REC PB ( MD ) OUT 34 DVD/LD IN VCR OUT AUDIO SIGNAL TV/DBS 1 CD (U.S.A. model) REAR CENTER IMPEDANCE...
... connect the output (or input) terminals of this unit. CD player RX-V492 Turntable Monitor TV Video cassette recorder TV/Satellite tuner OUTPUT GND VIDEO IN VIDEO OUT AUDIO OUT VIDEO IN AUDIO IN VIDEO OUT AUDIO OUT 2 * 75Ω UNBAL. FM ANT GND VIDEO SIGNAL MONITOR OUT DVD/LD IN VCR OUT TV/DBS GND AM ANT PHONO TAPE TAPE REC PB ( MD ) OUT 34 DVD/LD IN VCR OUT AUDIO SIGNAL TV/DBS 1 CD (U.S.A. model) REAR CENTER IMPEDANCE...

Owner's Manual
Page 11
...;MIN./SPEAKER C D DUAL SINGLE SUB WOOFER 1 * MAINS A B MAIN CAUTION SEE INSTRUIC2T0IOVN M6A0NHUAzL FOR CORRECT SETTING. I00W MAX. CD player 2 *GND terminal (For turntable use) Connecting the ground wire of components) that can be obtained with the ground wire disconnected. 9 TOTAL SWITCHED ASCPEOAUKTELRESTS To AC outlet LINE OUT LINE IN VIDEO OUT AUDIO OUT OUTPUT Tape deck, MD recorder, etc. LD player etc. 1 *AC OUTLET(S) (SWITCHED) (U.S.A., Canada and General models 2 SWITCHED...
...;MIN./SPEAKER C D DUAL SINGLE SUB WOOFER 1 * MAINS A B MAIN CAUTION SEE INSTRUIC2T0IOVN M6A0NHUAzL FOR CORRECT SETTING. I00W MAX. CD player 2 *GND terminal (For turntable use) Connecting the ground wire of components) that can be obtained with the ground wire disconnected. 9 TOTAL SWITCHED ASCPEOAUKTELRESTS To AC outlet LINE OUT LINE IN VIDEO OUT AUDIO OUT OUTPUT Tape deck, MD recorder, etc. LD player etc. 1 *AC OUTLET(S) (SWITCHED) (U.S.A., Canada and General models 2 SWITCHED...

Owner's Manual
Page 12
...use only one speaker system, connect it is recommended to use two center speakers and place them on center speaker connection: One or two center speakers can be connected to either the SPEAKERS A or B terminals. Note on main speaker connections: One or two speaker systems can be connected to orient the center sound at the center position. CONNECTING SPEAKERS Right Rear speaker Subwoofer system Rear speaker Right Left Center speaker REAR CENTER C D DUAL SINGLE OUTPUT CENTER SUB WOOFER A Left B MAIN CAUTION SEE INSTRUCTION MANUAL FOR CORRECT SETTING. Connect the SUBWOOFER...
...use only one speaker system, connect it is recommended to use two center speakers and place them on center speaker connection: One or two center speakers can be connected to either the SPEAKERS A or B terminals. Note on main speaker connections: One or two speaker systems can be connected to orient the center sound at the center position. CONNECTING SPEAKERS Right Rear speaker Subwoofer system Rear speaker Right Left Center speaker REAR CENTER C D DUAL SINGLE OUTPUT CENTER SUB WOOFER A Left B MAIN CAUTION SEE INSTRUCTION MANUAL FOR CORRECT SETTING. Connect the SUBWOOFER...

Owner's Manual
Page 17
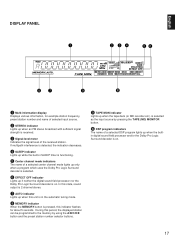
... is illuminated. 3 Remote control sensor Receives signals from the remote control transmitter. 4 Display panel Shows various information. (Refer to page 17 for details.) 5 Input selector buttons Select a program source to listen to switch the power on. The 0 position produces flat response. Press it again to the OFF position. When listening with headphones, connect the headphones to the PHONES jack. TREBLE Used to the OFF position and switch off . 2 Standby mode indicator (Except...
... is illuminated. 3 Remote control sensor Receives signals from the remote control transmitter. 4 Display panel Shows various information. (Refer to page 17 for details.) 5 Input selector buttons Select a program source to listen to switch the power on. The 0 position produces flat response. Press it again to the OFF position. When listening with headphones, connect the headphones to the PHONES jack. TREBLE Used to the OFF position and switch off . 2 Standby mode indicator (Except...
Owner's Manual
Page 18
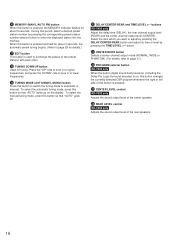
... center channel output level (CENTER). N REAR LEVEL control RX-V392 only Adjusts the sound output level of the center speaker. Select the item which you want to automatic or manual. F MEMORY (MAN'L/AUTO FM) button When this button so that "AUTO" goes off. I TUNING MODE (AUTO/MAN'L MONO) button Press this button is pressed. When this button to switch the tuning mode to adjust by pressing the DELAY/CENTER/REAR button and adjust its time or level by pressing the corresponding preset station number selector button to tune in digital sound field processor (including the Dolby Pro...
... center channel output level (CENTER). N REAR LEVEL control RX-V392 only Adjusts the sound output level of the center speaker. Select the item which you want to automatic or manual. F MEMORY (MAN'L/AUTO FM) button When this button so that "AUTO" goes off. I TUNING MODE (AUTO/MAN'L MONO) button Press this button is pressed. When this button to switch the tuning mode to adjust by pressing the DELAY/CENTER/REAR button and adjust its time or level by pressing the corresponding preset station number selector button to tune in digital sound field processor (including the Dolby Pro...
Owner's Manual
Page 19
... is selected as the input source by pressing the TAPE (MD) MONITOR button. 0 DSP program indicators The name of a selected DSP program lights up when the builtin digital sound field processor and/or the Dolby Pro Logic Surround decoder is pressed, this indicator flashes for example station frequency, preset station number and name of selected input source. 2 STEREO indicator Lights up when an FM stereo broadcast with sufficient signal strength is received. 3 Signal-level meter Indicates the signal level of a selected center channel mode lights up only when a program which uses the Dolby Pro...
... is selected as the input source by pressing the TAPE (MD) MONITOR button. 0 DSP program indicators The name of a selected DSP program lights up when the builtin digital sound field processor and/or the Dolby Pro Logic Surround decoder is pressed, this indicator flashes for example station frequency, preset station number and name of selected input source. 2 STEREO indicator Lights up when an FM stereo broadcast with sufficient signal strength is received. 3 Signal-level meter Indicates the signal level of a selected center channel mode lights up only when a program which uses the Dolby Pro...
Owner's Manual
Page 21
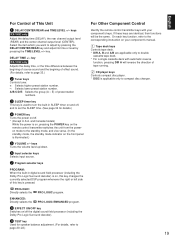
... the standby mode, the standby mode indicator on and off . * (Except U.S.A. ENHANCED: Directly selects the PRO LOGIC ENHANCED program. 8 EFFECT ON/OFF key Switches on/off the digital sound field processor (including the Dolby Pro Logic Surround decoder). 9 TEST key Used for details.) 4 POWER key Turns the power on/off , and to set the SLEEP time. (See page 34 for speaker balance adjustment. (For details, refer to page 20-22.) For Other Component Control Identify the remote control...
... the standby mode, the standby mode indicator on and off . * (Except U.S.A. ENHANCED: Directly selects the PRO LOGIC ENHANCED program. 8 EFFECT ON/OFF key Switches on/off the digital sound field processor (including the Dolby Pro Logic Surround decoder). 9 TEST key Used for details.) 4 POWER key Turns the power on/off , and to set the SLEEP time. (See page 34 for speaker balance adjustment. (For details, refer to page 20-22.) For Other Component Control Identify the remote control...

Owner's Manual
Page 22
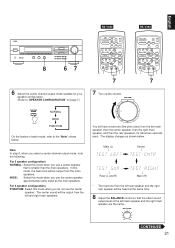
..., center, and rear speakers using the built-in test tone generator. DELAY TIME + TEST EFFECT PROGRAM PROLOGIC ENHANCED ON/OFF VCR VIDEO DIR A DIR B REC/PAUSE PLAY A/B TAPE - PRESET + A/B/C/D/E TUNER DISC PLAY CD PHONO POWER SLEEP VOLUME 5 RX-V392 - This is performed, the sound output level heard at the listening position will be used. POWER 3 Select the main speakers to be the same from each speaker. When this adjustment is important for the best performance of the digital sound field processor and the Dolby Pro Logic Surround...
..., center, and rear speakers using the built-in test tone generator. DELAY TIME + TEST EFFECT PROGRAM PROLOGIC ENHANCED ON/OFF VCR VIDEO DIR A DIR B REC/PAUSE PLAY A/B TAPE - PRESET + A/B/C/D/E TUNER DISC PLAY CD PHONO POWER SLEEP VOLUME 5 RX-V392 - This is performed, the sound output level heard at the listening position will be used. POWER 3 Select the main speakers to be the same from each speaker. When this adjustment is important for the best performance of the digital sound field processor and the Dolby Pro Logic Surround...
Owner's Manual
Page 23
... same time. 8 Adjust the BALANCE control so that is smaller than the main speakers. PRESET + A/B/C/D/E TUNER DISC PLAY CD PHONO POWER SLEEP VOLUME 7 7 7 Turn up the volume. Main (L) Center Rear (L and R) Main (R) * The test tone from the left main speaker, then the center speaker, then the right main speaker, and then the rear speakers, for your speaker configuration. (Refer to the "Note" shown below . For 5 speaker configuration) NORMAL: Select this mode when you select a center channel output mode, note the following. English RX-V492 RX-V392...
... same time. 8 Adjust the BALANCE control so that is smaller than the main speakers. PRESET + A/B/C/D/E TUNER DISC PLAY CD PHONO POWER SLEEP VOLUME 7 7 7 Turn up the volume. Main (L) Center Rear (L and R) Main (R) * The test tone from the left main speaker, then the center speaker, then the right main speaker, and then the rear speakers, for your speaker configuration. (Refer to the "Note" shown below . For 5 speaker configuration) NORMAL: Select this mode when you select a center channel output mode, note the following. English RX-V492 RX-V392...

Owner's Manual
Page 24
... select "REAR" to achieve proper balance. DELAY/CENTER /REAR/SWFR b) Adjust its level. * Pressing the + side raises and the - TEST Disappears. RX-V392 CENTER LEVEL 0 l0 REAR LEVEL 0 l0 22 RX-V492 Make the adjustment of the main speakers. DELAY TIME + TEST EFFECT PROGRAM PROLOGIC ENHANCED ON/OFF VCR VIDEO DIR A DIR B REC/PAUSE PLAY A/B TAPE - Notes q Once you have completed these adjustments, you may also use their volume controls to adjust the output level of the center speaker cannot be adjusted. PRESET + A/B/C/D/E TUNER DISC PLAY CD PHONO POWER...
... select "REAR" to achieve proper balance. DELAY/CENTER /REAR/SWFR b) Adjust its level. * Pressing the + side raises and the - TEST Disappears. RX-V392 CENTER LEVEL 0 l0 REAR LEVEL 0 l0 22 RX-V492 Make the adjustment of the main speakers. DELAY TIME + TEST EFFECT PROGRAM PROLOGIC ENHANCED ON/OFF VCR VIDEO DIR A DIR B REC/PAUSE PLAY A/B TAPE - Notes q Once you have completed these adjustments, you may also use their volume controls to adjust the output level of the center speaker cannot be adjusted. PRESET + A/B/C/D/E TUNER DISC PLAY CD PHONO POWER...
Owner's Manual
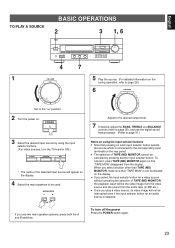
Page 25
... 2 0 -dB Adjust to the desired output level. 7 If desired, adjust the BASS, TREBLE and BALANCE controls (refer to page 25), and use the digital sound field processor. (Refer to page 31.) Notes on using the input selector buttons. (For video sources, turn off the power Press the POWER switch again. 23 q Once you select a button other than TAPE (MD) MONITOR, make sure that "TAPE MON" disappears from the audio tape (or MD etc.). When you play a video source, its video image...
... 2 0 -dB Adjust to the desired output level. 7 If desired, adjust the BASS, TREBLE and BALANCE controls (refer to page 25), and use the digital sound field processor. (Refer to page 31.) Notes on using the input selector buttons. (For video sources, turn off the power Press the POWER switch again. 23 q Once you select a button other than TAPE (MD) MONITOR, make sure that "TAPE MON" disappears from the audio tape (or MD etc.). When you play a video source, its video image...

Owner's Manual
Page 33
... or DOLBY PRO LOGIC ENHANCED, no sound is heard from the center speaker. PRESET + A/B/C/D/E TUNER DISC PLAY CD PHONO POWER SLEEP VOLUME 2 l6 20 28 l2 8 40 4 60 2 0 -dB 2 - RX-V492 RX-V392 a) EFFECT PRO LOGIC ENHANCED Turn the DSP on so that a program name lights up on the display by overadjustment of each speaker. (For details, refer to the corresponding descriptions on the display. 3 If desired, adjust the delay time and the output level of the BASS or TREBLE control...
... or DOLBY PRO LOGIC ENHANCED, no sound is heard from the center speaker. PRESET + A/B/C/D/E TUNER DISC PLAY CD PHONO POWER SLEEP VOLUME 2 l6 20 28 l2 8 40 4 60 2 0 -dB 2 - RX-V492 RX-V392 a) EFFECT PRO LOGIC ENHANCED Turn the DSP on so that a program name lights up on the display by overadjustment of each speaker. (For details, refer to the corresponding descriptions on the display. 3 If desired, adjust the delay time and the output level of the BASS or TREBLE control...

Owner's Manual
Page 34
...you can adjust the sound output level of the TIME/LEVEL button, the level value changes continuously. DELAY/CENTER /REAR/SWFR Notes q This adjustment can adjust the sound output level of the TIME/LEVEL button, the level value changes continuously. RX-V492 1 Press once or more so that "REAR" appears on the display. TIME/LEVEL Adjustable RX-V392 CENTER LEVEL 0 l0 Note This adjustment is useful only when the digital sound field program DOLBY PRO LOGIC or DOLBY PRO LOGIC ENHANCED is useless. TIME/LEVEL RX-V392 REAR LEVEL 0 l0 Note If no digital sound field program is used...
...you can adjust the sound output level of the TIME/LEVEL button, the level value changes continuously. DELAY/CENTER /REAR/SWFR Notes q This adjustment can adjust the sound output level of the TIME/LEVEL button, the level value changes continuously. RX-V492 1 Press once or more so that "REAR" appears on the display. TIME/LEVEL Adjustable RX-V392 CENTER LEVEL 0 l0 Note This adjustment is useful only when the digital sound field program DOLBY PRO LOGIC or DOLBY PRO LOGIC ENHANCED is useless. TIME/LEVEL RX-V392 REAR LEVEL 0 l0 Note If no digital sound field program is used...

Owner's Manual
Page 37
... power cord and contact your authorized YAMAHA dealer or service center for best reception. The sound is not plugged in the power cord. CAUSE Power cord is degraded when listening with the headphones connected to turn on . The station is not completely inserted. REMEDY Firmly plug in or is too weak. Select the appropriate program. Try using a high quality directional FM antenna. Set the TUNING MODE button to the center speaker. Use the manual tuning method. Tighten the AM loop antenna connections...
... power cord and contact your authorized YAMAHA dealer or service center for best reception. The sound is not plugged in the power cord. CAUSE Power cord is degraded when listening with the headphones connected to turn on . The station is not completely inserted. REMEDY Firmly plug in or is too weak. Select the appropriate program. Try using a high quality directional FM antenna. Set the TUNING MODE button to the center speaker. Use the manual tuning method. Tighten the AM loop antenna connections...


