
Owners Manual
Page 8
... Select an input source on this unit to switch on the front panel display (the name of time has elapsed (sleep timer). J1 DOCK A Yamaha iPod universal dock or Bluetooth wireless audio receiver connected to FM. FM Sets the FM/AM tuner band to the DOCK TUNER jack. AM MEMORY.... m TV control keys Operate a monitor such as a TV. The front panel display indicator lights up when a signal is activated. Sleep Off Sleep 30min. s MUTE Turns the mute function of the sound output on and off (☞p. 25). DECODE MUSIC STEREO STRAIGHT BD DVD SETUP SCENE TV CD RADIO OPTION ENTER...
... Select an input source on this unit to switch on the front panel display (the name of time has elapsed (sleep timer). J1 DOCK A Yamaha iPod universal dock or Bluetooth wireless audio receiver connected to FM. FM Sets the FM/AM tuner band to the DOCK TUNER jack. AM MEMORY.... m TV control keys Operate a monitor such as a TV. The front panel display indicator lights up when a signal is activated. Sleep Off Sleep 30min. s MUTE Turns the mute function of the sound output on and off (☞p. 25). DECODE MUSIC STEREO STRAIGHT BD DVD SETUP SCENE TV CD RADIO OPTION ENTER...
Owners Manual
Page 10
... STRAIGHT repeatedly to select a "6ΩMIN." 5 Switch this unit to avoid video distortion, especially for the front and center speakers near the screen. The power turns on, when the settings you made has been configured. ■ CRT monitors We recommend that "SP IMP." PHONES SILENT CINEMA INFO MEMORY PRESET FM AM...
... STRAIGHT repeatedly to select a "6ΩMIN." 5 Switch this unit to avoid video distortion, especially for the front and center speakers near the screen. The power turns on, when the settings you made has been configured. ■ CRT monitors We recommend that "SP IMP." PHONES SILENT CINEMA INFO MEMORY PRESET FM AM...
Owners Manual
Page 20
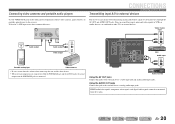
... RADIO STRAIGHT VIDEO AUX PORTABLE VIDEO L AUDIO R VL R Audio output L Audio output R V Video output AUDIO VIDEO Portable audio player Video cameras • Be sure to turn down the volume when connecting this unit and the other TVs or external devices.
... RADIO STRAIGHT VIDEO AUX PORTABLE VIDEO L AUDIO R VL R Audio output L Audio output R V Video output AUDIO VIDEO Portable audio player Video cameras • Be sure to turn down the volume when connecting this unit and the other TVs or external devices.

Owners Manual
Page 25
...MUTE 1 2 3 4 5 6 7 8 9 INPUT MUTE 0 10 TV TV VOL TV CH ENT d Input selector r VOLUME +/s MUTE Basic playback procedure 1 Turn on the following operations, refer to the s corresponding pages: • "FM/AM tuning" (☞p. 30) • "Playing back tunes from your iPod™/iPhone...seconds. TONE Treble VOL. Adjustable range -10.0 dB to +10.0 dB Adjustment increments 2.0 dB The display returns to this unit. 2 Turn on the front panel repeatedly to adjust the volume. Refer to the instruction manuals provided with the headphones connected. 1 Press TONE CONTROL on...
...MUTE 1 2 3 4 5 6 7 8 9 INPUT MUTE 0 10 TV TV VOL TV CH ENT d Input selector r VOLUME +/s MUTE Basic playback procedure 1 Turn on the following operations, refer to the s corresponding pages: • "FM/AM tuning" (☞p. 30) • "Playing back tunes from your iPod™/iPhone...seconds. TONE Treble VOL. Adjustable range -10.0 dB to +10.0 dB Adjustment increments 2.0 dB The display returns to this unit. 2 Turn on the front panel repeatedly to adjust the volume. Refer to the instruction manuals provided with the headphones connected. 1 Press TONE CONTROL on...
Owners Manual
Page 26
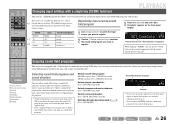
...source is applied again. • If the sampling frequency of an input source is higher than relying on the front panel display to turn the power on the chip, and a range of sound decoders. SET Complete SW L CR SL SR Release the key when "SET ... field program you can use switch between the external components that sounds best with the source you change input sources and sound field programs with a Yamaha digital sound field processing (DSP) chip. PLAYBACK SOURCE 1 1 5 TRANSMIT CODE SET SLEEP RECEIVER HDMI 2 3 4 AV 2 3 4 AUDIO 1 2 V-AUX [ A ] [ B ] DOCK ...
...source is applied again. • If the sampling frequency of an input source is higher than relying on the front panel display to turn the power on the chip, and a range of sound decoders. SET Complete SW L CR SL SR Release the key when "SET ... field program you can use switch between the external components that sounds best with the source you change input sources and sound field programs with a Yamaha digital sound field processing (DSP) chip. PLAYBACK SOURCE 1 1 5 TRANSMIT CODE SET SLEEP RECEIVER HDMI 2 3 4 AV 2 3 4 AUDIO 1 2 V-AUX [ A ] [ B ] DOCK ...

Owners Manual
Page 34
... SETUP SCENE TV CD RADIO OPTION iPod charge indicator lights. To re-activate the Standby Charge function carry out this V-AUX [ A ] [ B ] DOCK TUNER d unit is turned on the front panel display of this unit is charging an iPod/iPhone while in standby mode (iPod Standby Charge function). q If necessary, you connect...
... SETUP SCENE TV CD RADIO OPTION iPod charge indicator lights. To re-activate the Standby Charge function carry out this V-AUX [ A ] [ B ] DOCK TUNER d unit is turned on the front panel display of this unit is charging an iPod/iPhone while in standby mode (iPod Standby Charge function). q If necessary, you connect...
Owners Manual
Page 35
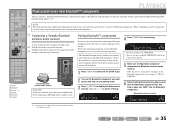
...; components PLAYBACK Playing back tunes from the Bluetooth component list, and enter a pass key "0000" into the Bluetooth component. The Yamaha Bluetooth wireless audio receiver can also press and hold eMEMORY on the Bluetooth component. SW L CR SL SR • To cancel pairing... connecting a Bluetooth wireless audio receiver. When establishing a wireless connection you want to pair with up to the DOCK input. 2 Turn on the Bluetooth component you must first pair the devices (register the Bluetooth components). The Bluetooth wireless audio receiver connection will be...
...; components PLAYBACK Playing back tunes from the Bluetooth component list, and enter a pass key "0000" into the Bluetooth component. The Yamaha Bluetooth wireless audio receiver can also press and hold eMEMORY on the Bluetooth component. SW L CR SL SR • To cancel pairing... connecting a Bluetooth wireless audio receiver. When establishing a wireless connection you want to pair with up to the DOCK input. 2 Turn on the Bluetooth component you must first pair the devices (register the Bluetooth components). The Bluetooth wireless audio receiver connection will be...

Owners Manual
Page 43
..., press iSETUP to the actual effect while operating this unit. SETUP Setting various functions (Setup menu) ■ Generating test tones Test Tone Turns the test tone generator on or off. Generates test tones. ■ Adjusting sound quality with the equalizer Equalizer Adjusts sound quality and tune...Press jCursor D. While "On" is displayed, use jCursor D / E to adjust the equalizer. GEQ VOL. GEQ 63Hz VOL. En 43 EQ Select Turns the graphic equalizer on or off when you want to select "GEQ" and press jENTER. 2 Check that "Channel" appears and use the test tone in...
..., press iSETUP to the actual effect while operating this unit. SETUP Setting various functions (Setup menu) ■ Generating test tones Test Tone Turns the test tone generator on or off. Generates test tones. ■ Adjusting sound quality with the equalizer Equalizer Adjusts sound quality and tune...Press jCursor D. While "On" is displayed, use jCursor D / E to adjust the equalizer. GEQ VOL. GEQ 63Hz VOL. En 43 EQ Select Turns the graphic equalizer on or off when you want to select "GEQ" and press jENTER. 2 Check that "Channel" appears and use the test tone in...

Owners Manual
Page 44
.... Select this receiver. Max Volume Sets the maximum volume for this when the TV does not support the automatic lipsync function or "HDMI Auto" is turned on. Adjustable range 0 ms to a TV via HDMI, automatically adjusts output timing if the TV supports an automatic lipsync function. Adjustable range 0 ms to 240...
.... Select this receiver. Max Volume Sets the maximum volume for this when the TV does not support the automatic lipsync function or "HDMI Auto" is turned on. Adjustable range 0 ms to a TV via HDMI, automatically adjusts output timing if the TV supports an automatic lipsync function. Adjustable range 0 ms to 240...

Owners Manual
Page 45
... not played too loudly. ■ Auto-adjusting Dolby Digital and DTS dynamic range D.Range Selects the dynamic range adjustment method for when this receiver is turned on. When this setting is selected, the speakers of +16.5 dB produces the highest volume. The default setting of this unit or through a TV. Adjustable...
... not played too loudly. ■ Auto-adjusting Dolby Digital and DTS dynamic range D.Range Selects the dynamic range adjustment method for when this receiver is turned on. When this setting is selected, the speakers of +16.5 dB produces the highest volume. The default setting of this unit or through a TV. Adjustable...
Owners Manual
Page 50
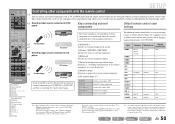
... : Use A/B for each input source. kExternal component operation keys Functions as factory default settings. For a complete list of external components. Yamaha 5089 Yamaha 5085 J 1 : You can use the jCursor and lNumeric keys etc to control external components, and the mTV control keys to dInput ...remote control keys for controlling external components are unable to assign remote control codes for external component (remote control code). Turns on and off TV The following remote control codes are assigned to switch external components seamlessly depending on and off. CD...
... : Use A/B for each input source. kExternal component operation keys Functions as factory default settings. For a complete list of external components. Yamaha 5089 Yamaha 5085 J 1 : You can use the jCursor and lNumeric keys etc to control external components, and the mTV control keys to dInput ...remote control keys for controlling external components are unable to assign remote control codes for external component (remote control code). Turns on and off TV The following remote control codes are assigned to switch external components seamlessly depending on and off. CD...
Owners Manual
Page 55
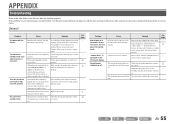
...instructions below when this unit and speakers are correct. The speaker impedance settings are correct. Set the speaker impedance to match your nearest Yamaha dealer or service center to request repair. Cause If you are not - Sound/images suddenly go off the Auto Power Down function...or does not work properly. etc. This unit cannot be turned off the Turn on and "CHECK SP WIRES!" Make sure that the speaker impedance settings are connected properly. The batteries in again. Please contact authorized Yamaha dealer or service center to an AC inserted. The power ...
...instructions below when this unit and speakers are correct. The speaker impedance settings are correct. Set the speaker impedance to match your nearest Yamaha dealer or service center to request repair. Cause If you are not - Sound/images suddenly go off the Auto Power Down function...or does not work properly. etc. This unit cannot be turned off the Turn on and "CHECK SP WIRES!" Make sure that the speaker impedance settings are connected properly. The batteries in again. Please contact authorized Yamaha dealer or service center to an AC inserted. The power ...
Owners Manual
Page 56
...source with an external the connected cable, select "Audio In," and component, then it is output from a be malfunctioning. input video is turned down or Turn up , connect another sound field program. 3) "None" may have been selected for audio input. If the problem persists, the cables may... be reproduced on the TV. - If the corresponding indicator is turned off, try to other than "TV." Select another speaker and check if sound is not Select an appropriate video input on this unit cannot ...
...source with an external the connected cable, select "Audio In," and component, then it is output from a be malfunctioning. input video is turned down or Turn up , connect another sound field program. 3) "None" may have been selected for audio input. If the problem persists, the cables may... be reproduced on the TV. - If the corresponding indicator is turned off, try to other than "TV." Select another speaker and check if sound is not Select an appropriate video input on this unit cannot ...
Owners Manual
Page 57
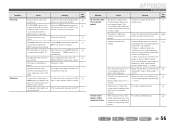
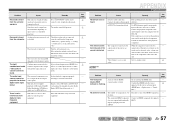
...audio / video jacks to the external component video output with the HDMI connection has occurred. Remedy Try re-inserting the HDMI cable. Turn on . This unit is not resolved, the problem may be increased, or the sound is over the limit. The volume cannot .... The number of the HDMI components. Combine input connected to connect cannot be played in the Option menu. No picture or sound. Turn the subwoofer power on all components connected to "On." APPENDIX Troubleshooting Problem Noise/hum noise is heard from the Setup menu "Subwoofer" ...
...audio / video jacks to the external component video output with the HDMI connection has occurred. Remedy Try re-inserting the HDMI cable. Turn on . This unit is not resolved, the problem may be increased, or the sound is over the limit. The volume cannot .... The number of the HDMI components. Combine input connected to connect cannot be played in the Option menu. No picture or sound. Turn the subwoofer power on all components connected to "On." APPENDIX Troubleshooting Problem Noise/hum noise is heard from the Setup menu "Subwoofer" ...

Owners Manual
Page 59
... page - - 33 33 - - - - Try setting another code for the same manufacturer using "Remote control code search" on the CDROM. Turn off -axis from the Yamaha iPod universal dock and then place it back in the process of recognizing the connection with the signal path from your iPod/iPhone... does not work when you press jCursor B / C / D / E (on the remote control), do the following. Direct sunlight or lighting (from the Yamaha iPod universal dock. External components cannot be controlled using the remote control. The remote control code is not Connect an iPod/iPhone supported by the...
... page - - 33 33 - - - - Try setting another code for the same manufacturer using "Remote control code search" on the CDROM. Turn off -axis from the Yamaha iPod universal dock and then place it back in the process of recognizing the connection with the signal path from your iPod/iPhone... does not work when you press jCursor B / C / D / E (on the remote control), do the following. Direct sunlight or lighting (from the Yamaha iPod universal dock. External components cannot be controlled using the remote control. The remote control code is not Connect an iPod/iPhone supported by the...
Owners Manual
Page 60
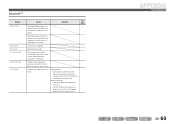
... Disconnected Not found . During connecting: - pairing must be performed on . - check if the Bluetooth component is disconnected from the Yamaha Bluetooth wireless audio receiver. Check if the Bluetooth component is established. See page - - - - - - - The Bluetooth component is turned on the Bluetooth component and this unit simultaneously. During pairing: - Bluetooth™ Display Searching...
... Disconnected Not found . During connecting: - pairing must be performed on . - check if the Bluetooth component is disconnected from the Yamaha Bluetooth wireless audio receiver. Check if the Bluetooth component is established. See page - - - - - - - The Bluetooth component is turned on the Bluetooth component and this unit simultaneously. During pairing: - Bluetooth™ Display Searching...
Owners Manual
Page 76
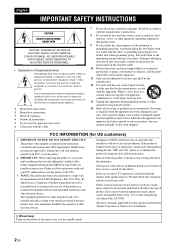
...cable. Utilize power outlets that may be used according to those products distributed by turning the unit "OFF" and "ON", please try to alert you can not locate the appropriate retailer, please contact Yamaha Electronics Corp., U.S.A. 6660 Orangethorpe Ave, Buena Park, CA 90620. The above... statements apply ONLY to the instructions found to be the source of interference, which can be determined by Yamaha Corporation of other . FCC INFORMATION (for your outlet, consult an electrician for Class "B" digital devices. This equipment generates/uses radio ...
...cable. Utilize power outlets that may be used according to those products distributed by turning the unit "OFF" and "ON", please try to alert you can not locate the appropriate retailer, please contact Yamaha Electronics Corp., U.S.A. 6660 Orangethorpe Ave, Buena Park, CA 90620. The above... statements apply ONLY to the instructions found to be the source of interference, which can be determined by Yamaha Corporation of other . FCC INFORMATION (for your outlet, consult an electrician for Class "B" digital devices. This equipment generates/uses radio ...
Owners Manual
Page 77
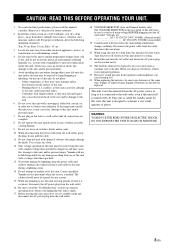
...outlet, grasp the plug; Containers with liquid in order not to modify or fix this unit with a newspaper, tablecloth, curtain, etc. Contact qualified Yamaha service personnel when any service is designed to the wall outlet, even if this unit itself is dangerous and may overheat, possibly causing damage. 9 ... may cause fire, damage to this unit, and/or personal injury. 7 Do not plug in an environment with a voltage other than specified is turned off , then leave this unit alone for cooling. 21 Install this unit with high humidity (i.e. Danger of this unit must be exposed to a ...
...outlet, grasp the plug; Containers with liquid in order not to modify or fix this unit with a newspaper, tablecloth, curtain, etc. Contact qualified Yamaha service personnel when any service is designed to the wall outlet, even if this unit itself is dangerous and may overheat, possibly causing damage. 9 ... may cause fire, damage to this unit, and/or personal injury. 7 Do not plug in an environment with a voltage other than specified is turned off , then leave this unit alone for cooling. 21 Install this unit with high humidity (i.e. Danger of this unit must be exposed to a ...
Quick Reference Guide
Page 2
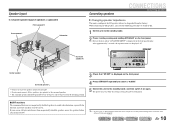
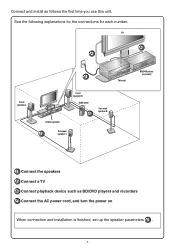
TV 3 2 Front speaker L 4 This unit Center speaker Front speaker R Subwoofer 1 Surround speaker R Surround 1 speaker L BD/DVD player (recorder) 1 Connect the speakers 2 Connect a TV 3 Connect playback device such as follows the first time you use this unit. Connect and install as BD/DVD players and recorders 4 Connect the AC power cord, and turn the power on When connection and installation is finished, set up the speaker parameters 5 . - 2 - See the following explanations for the connections for each number.
TV 3 2 Front speaker L 4 This unit Center speaker Front speaker R Subwoofer 1 Surround speaker R Surround 1 speaker L BD/DVD player (recorder) 1 Connect the speakers 2 Connect a TV 3 Connect playback device such as follows the first time you use this unit. Connect and install as BD/DVD players and recorders 4 Connect the AC power cord, and turn the power on When connection and installation is finished, set up the speaker parameters 5 . - 2 - See the following explanations for the connections for each number.
Quick Reference Guide
Page 5
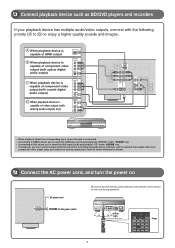
... output video from component video output jacks and audio from analog output jacks. Refer to Owner's Manual for details. 4 Connect the AC power cord, and turn the power on AC power cord Be sure to aim the remote control directly at the remote control sensor on this unit during operation.
... output video from component video output jacks and audio from analog output jacks. Refer to Owner's Manual for details. 4 Connect the AC power cord, and turn the power on AC power cord Be sure to aim the remote control directly at the remote control sensor on this unit during operation.

