
Owners Manual
Page 8
... VIDEO AUX jacks [A]/[B] Changes the external component you wish to set the time for each input source (☞p. 37). J1 DOCK A Yamaha iPod universal dock or Bluetooth wireless audio receiver connected to operate registered components. Returns to playback. for external component operations (☞p. 50,... this key when this unit to AM. k External component operation keys Operate recording, playback, and menu displays etc. s MUTE Turns the mute function of the sound output on the unit. p SLEEP Sets this unit is activated. Sleep Off Sleep 30min. Adjusts...
... VIDEO AUX jacks [A]/[B] Changes the external component you wish to set the time for each input source (☞p. 37). J1 DOCK A Yamaha iPod universal dock or Bluetooth wireless audio receiver connected to operate registered components. Returns to playback. for external component operations (☞p. 50,... this key when this unit to AM. k External component operation keys Operate recording, playback, and menu displays etc. s MUTE Turns the mute function of the sound output on the unit. p SLEEP Sets this unit is activated. Sleep Off Sleep 30min. Adjusts...
Owners Manual
Page 10
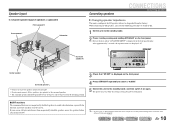
... when "ADVANCED SETUP" is displayed on the front panel. After approximately 3 seconds, the top menu items are displayed. is dispatched from the factory. The power turns on again. If your screen still gets interference from magnetically shielded speakers, move the speakers farther away from the listening position. J 1 : See the section on...
... when "ADVANCED SETUP" is displayed on the front panel. After approximately 3 seconds, the top menu items are displayed. is dispatched from the factory. The power turns on again. If your screen still gets interference from magnetically shielded speakers, move the speakers farther away from the listening position. J 1 : See the section on...
Owners Manual
Page 20
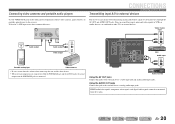
... panel to temporarily connect video cameras, game consoles, or portable audio devices to the external device's analog audio input jacks. Select the V-AUX input to turn down the volume when connecting this jacks to external devices through the AV OUT and AUDIO OUT jacks. AUDIO OUT RADIO STRAIGHT VIDEO AUX PORTABLE...
... panel to temporarily connect video cameras, game consoles, or portable audio devices to the external device's analog audio input jacks. Select the V-AUX input to turn down the volume when connecting this jacks to external devices through the AV OUT and AUDIO OUT jacks. AUDIO OUT RADIO STRAIGHT VIDEO AUX PORTABLE...

Owners Manual
Page 25
... REC POP-UP MENU MUTE 1 2 3 4 5 6 7 8 9 INPUT MUTE 0 10 TV TV VOL TV CH ENT d Input selector r VOLUME +/s MUTE Basic playback procedure 1 Turn on playback. Press sMUTE again to this unit. 2 Turn on the front panel display as the source input, or select a radio station on the front panel repeatedly to mute the...
... REC POP-UP MENU MUTE 1 2 3 4 5 6 7 8 9 INPUT MUTE 0 10 TV TV VOL TV CH ENT d Input selector r VOLUME +/s MUTE Basic playback procedure 1 Turn on playback. Press sMUTE again to this unit. 2 Turn on the front panel display as the source input, or select a radio station on the front panel repeatedly to mute the...
Owners Manual
Page 26
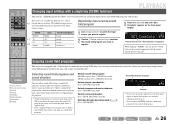
... input source is applied again. • If the sampling frequency of sound decoders. When changing "SCENE," you change input sources and sound field programs with a Yamaha digital sound field processing (DSP) chip. TOP MENU REC POP-UP MENU MUTE Enjoying sound field programs 1 2 3 4 5 6 7 8 9 INPUT MUTE ... the input source you want to register. 2 Use the gSound selection keys to select the sound field program you want to turn the power on the front panel display. SCENE1 VOL. The following input sources and sound field programs are available for almost any...
... input source is applied again. • If the sampling frequency of sound decoders. When changing "SCENE," you change input sources and sound field programs with a Yamaha digital sound field processing (DSP) chip. TOP MENU REC POP-UP MENU MUTE Enjoying sound field programs 1 2 3 4 5 6 7 8 9 INPUT MUTE ... the input source you want to register. 2 Use the gSound selection keys to select the sound field program you want to turn the power on the front panel display. SCENE1 VOL. The following input sources and sound field programs are available for almost any...

Owners Manual
Page 34
The indicator goes out when charging is completed, press qOPTION to "Auto." DOCK VOL. DECODE MUSIC STEREO whether this unit is turned on the front panel display of this procedure again and change the "Standby Charge" setting back to close the Option menu. While charging an iPod/...
The indicator goes out when charging is completed, press qOPTION to "Auto." DOCK VOL. DECODE MUSIC STEREO whether this unit is turned on the front panel display of this procedure again and change the "Standby Charge" setting back to close the Option menu. While charging an iPod/...
Owners Manual
Page 35
...When playing back from Bluetooth-compatible portable music players. COMPONENT VIDEO PR HDMI OUT PR PB PB Y MONITOR OUT Y COMPON VIDEO OPTICA AV Yamaha Bluetooth wireless audio receiver CAUTION To prevent accidents, place this unit and enjoy wireless playback from a Bluetooth component for the longest period of this... pairing settings for the device which has not been used for the first time, you want to pair with up to the DOCK input. 2 Turn on . The Bluetooth wireless audio receiver connection will be j complete when this unit. SW L CR SL SR 4 Press jENTER to carry out...
...When playing back from Bluetooth-compatible portable music players. COMPONENT VIDEO PR HDMI OUT PR PB PB Y MONITOR OUT Y COMPON VIDEO OPTICA AV Yamaha Bluetooth wireless audio receiver CAUTION To prevent accidents, place this unit and enjoy wireless playback from a Bluetooth component for the longest period of this... pairing settings for the device which has not been used for the first time, you want to pair with up to the DOCK input. 2 Turn on . The Bluetooth wireless audio receiver connection will be j complete when this unit. SW L CR SL SR 4 Press jENTER to carry out...

Owners Manual
Page 43
... test tone off when you can use jCursor B / C to select another frequency or return to adjust the equalizer. EQ Select Turns the graphic equalizer on or off . GEQ 63Hz VOL. SW L CR SL SR Frequency band Setting the volume level for the selected frequency Frequency range ..., or whenever you adjust the settings on or off . Raising volume: Press jCursor E. SETUP Setting various functions (Setup menu) ■ Generating test tones Test Tone Turns the test tone generator on the internal graphic equalizer, you want to adjust sound quality. Generates test tones.
... test tone off when you can use jCursor B / C to select another frequency or return to adjust the equalizer. EQ Select Turns the graphic equalizer on or off . GEQ 63Hz VOL. SW L CR SL SR Frequency band Setting the volume level for the selected frequency Frequency range ..., or whenever you adjust the settings on or off . Raising volume: Press jCursor E. SETUP Setting various functions (Setup menu) ■ Generating test tones Test Tone Turns the test tone generator on the internal graphic equalizer, you want to adjust sound quality. Generates test tones.

Owners Manual
Page 44
... set to make even low volumes more audible. Auto Fine-adjust the audio output timing by entering the correction time provided when "HDMI Auto" is turned on. Does not adjust the dynamic range automatically. Select this unit SETUP Sound Setup VOL. En 44 HDMI Auto When connecting to 240 ms Adjustment...
... set to make even low volumes more audible. Auto Fine-adjust the audio output timing by entering the correction time provided when "HDMI Auto" is turned on. Does not adjust the dynamic range automatically. Select this unit SETUP Sound Setup VOL. En 44 HDMI Auto When connecting to 240 ms Adjustment...

Owners Manual
Page 45
... audio format compatible with this setting is set the "Max Volume" at the level when the receiver last entered standby mode. When this setting is turned on. ■ Auto-adjusting Dolby Digital and DTS dynamic range D.Range Selects the dynamic range adjustment method for playback. Max (Default) STD Min Produces audio...
... audio format compatible with this setting is set the "Max Volume" at the level when the receiver last entered standby mode. When this setting is turned on. ■ Auto-adjusting Dolby Digital and DTS dynamic range D.Range Selects the dynamic range adjustment method for playback. Max (Default) STD Min Produces audio...
Owners Manual
Page 50
...try operating the remote control again. jCursor, jENTER, jRETURN Operates the menus of TV Switches TV channels. Controls the volume of external components. Yamaha 5095 - - - - - - - - - - - - To register a TV remote control code to dInput selector: You can...example, it may be set for external components to "Remote Control Code Search" in the CD-ROM. Yamaha 5089 Yamaha 5085 J 1 : You can use the jCursor and lNumeric keys etc to control external components, and... remote control codes for external component operations only. Turns on and off .
...try operating the remote control again. jCursor, jENTER, jRETURN Operates the menus of TV Switches TV channels. Controls the volume of external components. Yamaha 5095 - - - - - - - - - - - - To register a TV remote control code to dInput selector: You can...example, it may be set for external components to "Remote Control Code Search" in the CD-ROM. Yamaha 5089 Yamaha 5085 J 1 : You can use the jCursor and lNumeric keys etc to control external components, and... remote control codes for external component operations only. Turns on and off .
Owners Manual
Page 55
...4 10 Problem After display of a countdown on and "CHECK SP WIRES!" This unit cannot be turned off . Set the speaker impedance to match your nearest Yamaha dealer or service center to request repair. The protection circuitry has been Check that all batteries. Check.... etc. As a safety precaution, when the protection circuitry operates three times consecutively, the capability to turn off the Turn on . Please contact authorized Yamaha dealer or service center to an external electric shock (such as lightning or excessive static electricity) or ...
...4 10 Problem After display of a countdown on and "CHECK SP WIRES!" This unit cannot be turned off . Set the speaker impedance to match your nearest Yamaha dealer or service center to request repair. The protection circuitry has been Check that all batteries. Check.... etc. As a safety precaution, when the protection circuitry operates three times consecutively, the capability to turn off the Turn on . Please contact authorized Yamaha dealer or service center to an external electric shock (such as lightning or excessive static electricity) or ...
Owners Manual
Page 56
... field program. Video input → Use video jacks of that speaker is set to a different input source. 2) With the selected sound field program, sound is turned off, try to the TV. input video is disabled. Only the center speaker outputs substantial sound. Output from one channel) Speaker output balance is output... been selected for audio input. The volume of the same type (ex. HDCP copy protection standards. dInput selector (on the TV. Remedy If sound is turned down or Turn up , connect another sound field program.
... field program. Video input → Use video jacks of that speaker is set to a different input source. 2) With the selected sound field program, sound is turned off, try to the TV. input video is disabled. Only the center speaker outputs substantial sound. Output from one channel) Speaker output balance is output... been selected for audio input. The volume of the same type (ex. HDCP copy protection standards. dInput selector (on the TV. Remedy If sound is turned down or Turn up , connect another sound field program.
Owners Manual
Page 57
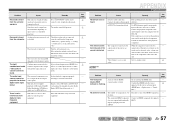
...set the subwoofer to a low value. Sound may result from "Audio In" in the Option menu. APPENDIX Troubleshooting Problem Noise/hum noise is turned off. Connect the playback component to output the desired digital audio signals. See page - - - 45 HDMI™ Problem The front panel ...channels depending on all components connected to connect cannot be increased, or the sound is in the desired digital audio signal format. Turn on input sources or sound field programs. Try another input audio jack. The right combination of audio / video jacks to this...
...set the subwoofer to a low value. Sound may result from "Audio In" in the Option menu. APPENDIX Troubleshooting Problem Noise/hum noise is turned off. Connect the playback component to output the desired digital audio signals. See page - - - 45 HDMI™ Problem The front panel ...channels depending on all components connected to connect cannot be increased, or the sound is in the desired digital audio signal format. Turn on input sources or sound field programs. Try another input audio jack. The right combination of audio / video jacks to this...

Owners Manual
Page 59
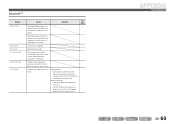
... are weak. The remote control ID of fluorescent lamp, strobe light, etc.) is correctly set . The remote control code is in the Yamaha iPod universal dock. Replace all batteries. There is properly placed in the middle of acquiring song lists from an inverter type of the remote ... maximum range of 20 ft / 6 m, and no more than 30 degrees off the unit and reconnect the Yamaha iPod universal dock to the remote control. Turn off -axis from the Yamaha iPod universal dock and then place it back in the process of this unit. Adjust the lighting angle, or ...
... are weak. The remote control ID of fluorescent lamp, strobe light, etc.) is correctly set . The remote control code is in the Yamaha iPod universal dock. Replace all batteries. There is properly placed in the middle of acquiring song lists from an inverter type of the remote ... maximum range of 20 ft / 6 m, and no more than 30 degrees off the unit and reconnect the Yamaha iPod universal dock to the remote control. Turn off -axis from the Yamaha iPod universal dock and then place it back in the process of this unit. Adjust the lighting angle, or ...
Owners Manual
Page 60
... component is canceled. check if the Bluetooth component is established. Completed Canceled BT connected Disconnected Not found . The connection between the Yamaha Bluetooth wireless audio receiver and the Bluetooth component is turned on the Bluetooth component and this unit simultaneously. pairing must be performed on . - check if the Bluetooth component is completed...
... component is canceled. check if the Bluetooth component is established. Completed Canceled BT connected Disconnected Not found . The connection between the Yamaha Bluetooth wireless audio receiver and the Bluetooth component is turned on the Bluetooth component and this unit simultaneously. pairing must be performed on . - check if the Bluetooth component is completed...
Owners Manual
Page 76
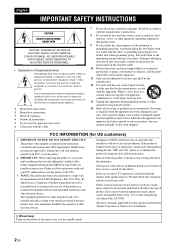
...antenna. Follow all installations. Compliance with other . In the case of the obsolete outlet. 10 Protect the power cord from being affected by turning the unit "OFF" and "ON", please try to the operation of this product MUST be determined by the interference. If these requirements provides... in any way, such as power-supply cord or plug is used . NO USER-SERVICEABLE PARTS INSIDE. Modifications not expressly approved by Yamaha may be of sufficient magnitude to constitute a risk of electric shock to the presence of Graphical Symbols The lightning flash with arrowhead symbol,...
...antenna. Follow all installations. Compliance with other . In the case of the obsolete outlet. 10 Protect the power cord from being affected by turning the unit "OFF" and "ON", please try to the operation of this product MUST be determined by the interference. If these requirements provides... in any way, such as power-supply cord or plug is used . NO USER-SERVICEABLE PARTS INSIDE. Modifications not expressly approved by Yamaha may be of sufficient magnitude to constitute a risk of electric shock to the presence of Graphical Symbols The lightning flash with arrowhead symbol,...
Owners Manual
Page 77
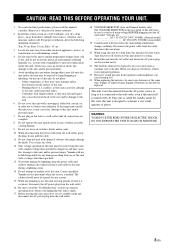
...connections are complete. 8 Do not operate this unit with high humidity (i.e. do not place: - Using this unit upside-down. Contact qualified Yamaha service personnel when any damage resulting from use this might damage the finish. This unit is not disconnected from cold to hot, and do ...En this unit for your regional regulations. 23 Excessive sound pressure from direct sunlight, heat sources, vibration, dust, moisture, and/or cold. Turn the power off by lightning, keep the power cable and outdoor antennas disconnected from the outlet, then leave this unit alone. 20 When using...
...connections are complete. 8 Do not operate this unit with high humidity (i.e. do not place: - Using this unit upside-down. Contact qualified Yamaha service personnel when any damage resulting from use this might damage the finish. This unit is not disconnected from cold to hot, and do ...En this unit for your regional regulations. 23 Excessive sound pressure from direct sunlight, heat sources, vibration, dust, moisture, and/or cold. Turn the power off by lightning, keep the power cable and outdoor antennas disconnected from the outlet, then leave this unit alone. 20 When using...
Quick Reference Guide
Page 2
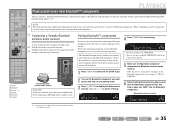
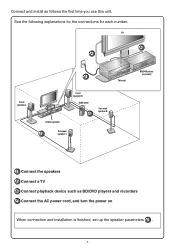
See the following explanations for the connections for each number. TV 3 2 Front speaker L 4 This unit Center speaker Front speaker R Subwoofer 1 Surround speaker R Surround 1 speaker L BD/DVD player (recorder) 1 Connect the speakers 2 Connect a TV 3 Connect playback device such as follows the first time you use this unit. Connect and install as BD/DVD players and recorders 4 Connect the AC power cord, and turn the power on When connection and installation is finished, set up the speaker parameters 5 . - 2 -
See the following explanations for the connections for each number. TV 3 2 Front speaker L 4 This unit Center speaker Front speaker R Subwoofer 1 Surround speaker R Surround 1 speaker L BD/DVD player (recorder) 1 Connect the speakers 2 Connect a TV 3 Connect playback device such as follows the first time you use this unit. Connect and install as BD/DVD players and recorders 4 Connect the AC power cord, and turn the power on When connection and installation is finished, set up the speaker parameters 5 . - 2 -
Quick Reference Guide
Page 5
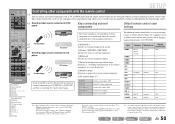
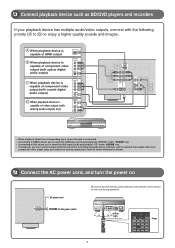
Refer to Owner's Manual for details. 4 Connect the AC power cord, and turn the power on this unit during operation. within 30 30 20 ft SOURCE 1 1 5 TRANSMIT CODE SET SLEEP RECEIVER HDMI 2 3 4 AV 2 3 4 AUDIO 1 2 V-AUX [ A ] [ B ] DOCK Press - 5 - To ...
Refer to Owner's Manual for details. 4 Connect the AC power cord, and turn the power on this unit during operation. within 30 30 20 ft SOURCE 1 1 5 TRANSMIT CODE SET SLEEP RECEIVER HDMI 2 3 4 AV 2 3 4 AUDIO 1 2 V-AUX [ A ] [ B ] DOCK Press - 5 - To ...

