Easy Start Guide
Page 1
... Setup Guide (Owner's Manual) *Using for connections The following cables (not supplied) are of the main unit and remote control used in this guide are required to build the system described in this document. • Speaker cables (x9) • HDMI cable (x2) • Audio pin cable (x1) • Digital optical cable or stereo pin cable (x1*) * Not required if your TV supports ARC (Audio Return Channel) Cables required for angle measurement during YPAO. *The supplied power cable varies...
... Setup Guide (Owner's Manual) *Using for connections The following cables (not supplied) are of the main unit and remote control used in this guide are required to build the system described in this document. • Speaker cables (x9) • HDMI cable (x2) • Audio pin cable (x1) • Digital optical cable or stereo pin cable (x1*) * Not required if your TV supports ARC (Audio Return Channel) Cables required for angle measurement during YPAO. *The supplied power cable varies...
Easy Start Guide
Page 2
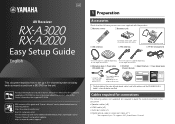
2 Placing speakers Set up the speakers in the room using the following diagram as a reference. E 0.5 to 1 m (1.6 to 3.3 ft) R 0.5 to 1 m (1.6 to 3.3 ft) 1.8 m (5.9 ft) 1 2 1.8 m (5.9 ft) 9 3 1 Front speaker (L) 2 Front speaker (R) 3 Center speaker 4 Surround speaker (L) 5 Surround speaker (R) 6 Surround back speaker (L) 7 Surround back speaker (R) E Front presence speaker (L) R Front presence speaker (R) 9 Subwoofer 2 4 10° to 30° 6 10° to "Owner's Manual". For information on speaker systems other than 9.1-channel system, refer to 30° 5 7 0.3 m (1 ft) or ...
2 Placing speakers Set up the speakers in the room using the following diagram as a reference. E 0.5 to 1 m (1.6 to 3.3 ft) R 0.5 to 1 m (1.6 to 3.3 ft) 1.8 m (5.9 ft) 1 2 1.8 m (5.9 ft) 9 3 1 Front speaker (L) 2 Front speaker (R) 3 Center speaker 4 Surround speaker (L) 5 Surround speaker (R) 6 Surround back speaker (L) 7 Surround back speaker (R) E Front presence speaker (L) R Front presence speaker (R) 9 Subwoofer 2 4 10° to 30° 6 10° to "Owner's Manual". For information on speaker systems other than 9.1-channel system, refer to 30° 5 7 0.3 m (1 ft) or ...
Easy Start Guide
Page 3
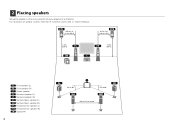
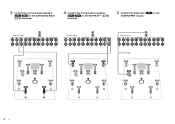
... is for 8-ohm speakers. a Remove approximately 10 mm (3/8") of insulation from the AC wall outlet and turn off the subwoofer. • Ensure that the core wires of the cable firmly together. c Insert the bare wires of the cable into the end of the terminal. BACK (REAR) SUBWOOFER CENTER R SURROUND L R SURROUND BACK L SPEAKERS ZONE 2/ZONE 3/R.PRESENCE R EXTRA SP2 L CENTER R FRONT L ZONE 2/ZONE 3/F.PRESENCE/ BI-AMP R EXTRA SP1 L ■ Connecting speaker cables Speaker cables have two wires. One...
... is for 8-ohm speakers. a Remove approximately 10 mm (3/8") of insulation from the AC wall outlet and turn off the subwoofer. • Ensure that the core wires of the cable firmly together. c Insert the bare wires of the cable into the end of the terminal. BACK (REAR) SUBWOOFER CENTER R SURROUND L R SURROUND BACK L SPEAKERS ZONE 2/ZONE 3/R.PRESENCE R EXTRA SP2 L CENTER R FRONT L ZONE 2/ZONE 3/F.PRESENCE/ BI-AMP R EXTRA SP1 L ■ Connecting speaker cables Speaker cables have two wires. One...
Easy Start Guide
Page 4
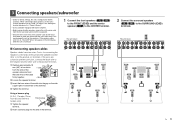
...(REAR) SUBWOOFER CENTER R SURROUND L R SURROUND BACK L SPEAKERS ZONE 2/ZONE 3/R.PRESENCE R EXTRA SP2 L CENTER R FRONT L ZONE 2/ZONE 3/F.PRESENCE/ BI-AMP R EXTRA SP1 L SINGLE E 1 2 R 9 3 4 6 5 7 CENTER ZONE OUT/PRE OUT PRE OUT (SINGLE) (FRONT) 1 2 The unit (rear) FRONT SURROUND SUR. BACK (REAR) SUBWOOFER CENTER R SURROUND L R SURROUND BACK L SPEAKERS ZONE 2/ZONE 3/R.PRESENCE R EXTRA SP2 L CENTER R FRONT L ZONE 2/ZONE 3/F.PRESENCE/ BI-AMP R EXTRA SP1 L SINGLE Audio pin cable E 1 2 R 9 3 4 6 5 7 4 En BACK (REAR) SUBWOOFER CENTER...
...(REAR) SUBWOOFER CENTER R SURROUND L R SURROUND BACK L SPEAKERS ZONE 2/ZONE 3/R.PRESENCE R EXTRA SP2 L CENTER R FRONT L ZONE 2/ZONE 3/F.PRESENCE/ BI-AMP R EXTRA SP1 L SINGLE E 1 2 R 9 3 4 6 5 7 CENTER ZONE OUT/PRE OUT PRE OUT (SINGLE) (FRONT) 1 2 The unit (rear) FRONT SURROUND SUR. BACK (REAR) SUBWOOFER CENTER R SURROUND L R SURROUND BACK L SPEAKERS ZONE 2/ZONE 3/R.PRESENCE R EXTRA SP2 L CENTER R FRONT L ZONE 2/ZONE 3/F.PRESENCE/ BI-AMP R EXTRA SP1 L SINGLE Audio pin cable E 1 2 R 9 3 4 6 5 7 4 En BACK (REAR) SUBWOOFER CENTER...
Easy Start Guide
Page 5
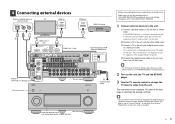
... model only) Make sure you set the switch position of English menu screens are complete. Proceed to the next page to the unit with an HDMI cable. a Connect a BD/DVD player to optimize the speaker settings. • You can select the on the unit. 4 Connecting external devices Audio out (digital optical or TV analog stereo) OPTICAL R L HDMI in "Owner's Manual". 2 Turn on the unit, the TV and the BD/DVD player. 3 Use the TV remote control to change the TV input...
... model only) Make sure you set the switch position of English menu screens are complete. Proceed to the next page to the unit with an HDMI cable. a Connect a BD/DVD player to optimize the speaker settings. • You can select the on the unit. 4 Connecting external devices Audio out (digital optical or TV analog stereo) OPTICAL R L HDMI in "Owner's Manual". 2 Turn on the unit, the TV and the BD/DVD player. 3 Use the TV remote control to change the TV input...
Easy Start Guide
Page 6
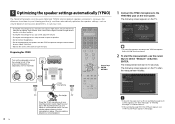
...) SOURCE RECEIVER AV 1 2 3 5 6 7 AUDIO 1 2 3 PHONO TUNER 1 MULTI USB [ A ] [B] SCENE 2 3 4 V-AUX 4 NET [ C ] 4 PROGRAM MUTE VOLUME TOP MENU ON SCREEN POP-UP/MENU OPTION ENTER RETURN DISPLAY Cursor keys ENTER RETURN MIN MAX MIN MAX YPAO microphone MODE PRESET INPUT MUTE CLASSICAL MOVIE TV TV VOL LIVE CLUB STEREO TV CH ENTERTAIN STRAIGHT PURE DIRECT Ear height 6 En Place the YPAO microphone at your room. • During the measuring process, test tones are output at...
...) SOURCE RECEIVER AV 1 2 3 5 6 7 AUDIO 1 2 3 PHONO TUNER 1 MULTI USB [ A ] [B] SCENE 2 3 4 V-AUX 4 NET [ C ] 4 PROGRAM MUTE VOLUME TOP MENU ON SCREEN POP-UP/MENU OPTION ENTER RETURN DISPLAY Cursor keys ENTER RETURN MIN MAX MIN MAX YPAO microphone MODE PRESET INPUT MUTE CLASSICAL MOVIE TV TV VOL LIVE CLUB STEREO TV CH ENTERTAIN STRAIGHT PURE DIRECT Ear height 6 En Place the YPAO microphone at your room. • During the measuring process, test tones are output at...
Easy Start Guide
Page 7
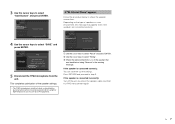
... 7 b Use the cursor keys to step 3. If the speaker is connected correctly: You can save the current settings. c Check the cable connections (+/-) of Phase" appears Follow the procedure below to check the speaker connections. This completes optimization of the speaker settings. • The YPAO microphone is sensitive to heat, so should not be placed anywhere where it could be exposed to select...
... 7 b Use the cursor keys to step 3. If the speaker is connected correctly: You can save the current settings. c Check the cable connections (+/-) of Phase" appears Follow the procedure below to check the speaker connections. This completes optimization of the speaker settings. • The YPAO microphone is sensitive to heat, so should not be placed anywhere where it could be exposed to select...
Easy Start Guide
Page 8
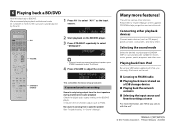
... sound mode Select the desired sound program (CINEMA DSP) or surround decoder suitable for movies, music, games, sports programs, and other uses. DOCK TAG HD STEREO TUNED PRE AMP PARTY ZONE ZONE ZONE IN OUT 1 OUT 2 2 3 4 ENHANCER SLEEP HD 3 AV1 A.Sel: Auto MUTE VOLUME ADAPTIVE DRC PL L C R PR SL SW1 SW SW2 SR PL SBL SB SBR PR 2 Start playback on the BD/DVD player. Many more ) to select "STRAIGHT". SOURCE RECEIVER AV 1 2 3 5 6 7 AUDIO 1 2 3 PHONO TUNER 1 MULTI USB [ A ] [B] SCENE 2 3 4 V-AUX...
... sound mode Select the desired sound program (CINEMA DSP) or surround decoder suitable for movies, music, games, sports programs, and other uses. DOCK TAG HD STEREO TUNED PRE AMP PARTY ZONE ZONE ZONE IN OUT 1 OUT 2 2 3 4 ENHANCER SLEEP HD 3 AV1 A.Sel: Auto MUTE VOLUME ADAPTIVE DRC PL L C R PR SL SW1 SW SW2 SR PL SBL SB SBR PR 2 Start playback on the BD/DVD player. Many more ) to select "STRAIGHT". SOURCE RECEIVER AV 1 2 3 5 6 7 AUDIO 1 2 3 PHONO TUNER 1 MULTI USB [ A ] [B] SCENE 2 3 4 V-AUX...


