
Setup Guide
Page 1
... Check that the following accessories are supplied with this product. ■ Remote control ■ Batteries (AAA, R03, UM-4) (x 2) Easy Setup Guide English for connections You need to separately prepare the following cables to set up a 5.1- For more information, refer to "Owner 's Manual..." on this document) This document explains how to build the system based on the supplied CD-ROM. http://download.yamaha.com/ Cables necessary for U.S.A. ■ YPAO microphone Insert into the remote control in the correct polarity (+/-). ■ Power cable ■...
... Check that the following accessories are supplied with this product. ■ Remote control ■ Batteries (AAA, R03, UM-4) (x 2) Easy Setup Guide English for connections You need to separately prepare the following cables to set up a 5.1- For more information, refer to "Owner 's Manual..." on this document) This document explains how to build the system based on the supplied CD-ROM. http://download.yamaha.com/ Cables necessary for U.S.A. ■ YPAO microphone Insert into the remote control in the correct polarity (+/-). ■ Power cable ■...
Setup Guide
Page 5
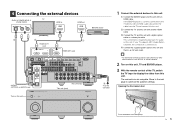
... cable to this unit and then to an AC wall outlet. • For information on how to connect radio antennas or other external devices, see "SETUP" in HDMI HDMI out HDMI BD/DVD player O R L c b HDMI OUT 1 HDMI jack HDMI HDMI HDMI a HDMI OUT 1 2 ARC AV 1 (1 BD/DVD) ...) 75Ω FM GND AM 5 OPTICAL SINGLE O AUDIO1 (OPTICAL or AUDIO) jack This unit (rear) This unit (front) NATURAL SOUND AV RECEIVER RX-A1010 Turn on this unit MAIN ZONE PURE DIRECT INPUT ON SCREEN OPTION TONE/BALANCE STRAIGHT 1 RETURN ENTER DISPLAY USB PROGRAM PHONES ZONE 2 SCENE 2 3 MULTI ...
... cable to this unit and then to an AC wall outlet. • For information on how to connect radio antennas or other external devices, see "SETUP" in HDMI HDMI out HDMI BD/DVD player O R L c b HDMI OUT 1 HDMI jack HDMI HDMI HDMI a HDMI OUT 1 2 ARC AV 1 (1 BD/DVD) ...) 75Ω FM GND AM 5 OPTICAL SINGLE O AUDIO1 (OPTICAL or AUDIO) jack This unit (rear) This unit (front) NATURAL SOUND AV RECEIVER RX-A1010 Turn on this unit MAIN ZONE PURE DIRECT INPUT ON SCREEN OPTION TONE/BALANCE STRAIGHT 1 RETURN ENTER DISPLAY USB PROGRAM PHONES ZONE 2 SCENE 2 3 MULTI ...

Setup Guide
Page 8
...3 4 ENHANCER SLEEP HD 3 Main:Volume MUTE VOLUME ADAPTIVE DRC PL L C R PR SL SW1 SW SW2 SR PL SBL SB SBR PR Now the basic setup procedure is enabled, each speaker produces each channel audio signal directly (without sound field processing). No sound is heard from the surround back speakers. 4 Press...VOLUME 1 Press AV1 to FM/AM radio (p.55) ■ Playing back music stored on the supplied CD-ROM and utilize this unit" (p.6). © 2011 Yamaha Corporation YD503B0/ESEN1 SP IMP. - If you play back a BD/DVD. Please refer to "Owner's Manual" on a USB storage device (p.73) ■...
...3 4 ENHANCER SLEEP HD 3 Main:Volume MUTE VOLUME ADAPTIVE DRC PL L C R PR SL SW1 SW SW2 SR PL SBL SB SBR PR Now the basic setup procedure is enabled, each speaker produces each channel audio signal directly (without sound field processing). No sound is heard from the surround back speakers. 4 Press...VOLUME 1 Press AV1 to FM/AM radio (p.55) ■ Playing back music stored on the supplied CD-ROM and utilize this unit" (p.6). © 2011 Yamaha Corporation YD503B0/ESEN1 SP IMP. - If you play back a BD/DVD. Please refer to "Owner's Manual" on a USB storage device (p.73) ■...
Owners Manual
Page 2
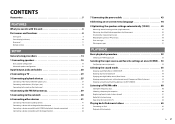
... 5 FEATURES What you can do with this unit 6 Part names and functions 8 Front panel 8 Front display (indicators 10 Rear panel 11 Remote control 12 SETUP General setup procedure 14 1 Connecting speakers 15 Basic speaker configuration 16 Advanced speaker configuration 21 Input/output jacks and cables 28 2 Connecting a TV 29 3 Connecting playback devices...
... 5 FEATURES What you can do with this unit 6 Part names and functions 8 Front panel 8 Front display (indicators 10 Rear panel 11 Remote control 12 SETUP General setup procedure 14 1 Connecting speakers 15 Basic speaker configuration 16 Advanced speaker configuration 21 Input/output jacks and cables 28 2 Connecting a TV 29 3 Connecting playback devices...
Owners Manual
Page 3
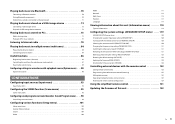
.../surround decoders (Sound Program menu) . . . . 98 Sound Program menu items 99 Configuring various functions (Setup menu 101 Setup menu items 102 Speaker (Manual Setup 104 Sound 108 Video 109 HDMI 111 Network 112 Multi Zone 113 Function 115 Language 117 Viewing information about this... unit (Information menu 118 Types of information 118 Configuring the system settings (ADVANCED SETUP menu) . . . . . 119 ADVANCED SETUP menu items 120 Changing the speaker impedance setting (SPEAKER IMP 120 Turning on/off the remote control sensor (REMOTE...
.../surround decoders (Sound Program menu) . . . . 98 Sound Program menu items 99 Configuring various functions (Setup menu 101 Setup menu items 102 Speaker (Manual Setup 104 Sound 108 Video 109 HDMI 111 Network 112 Multi Zone 113 Function 115 Language 117 Viewing information about this... unit (Information menu 118 Types of information 118 Configuring the system settings (ADVANCED SETUP menu) . . . . . 119 ADVANCED SETUP menu items 120 Changing the speaker impedance setting (SPEAKER IMP 120 Turning on/off the remote control sensor (REMOTE...

Owners Manual
Page 5
... microphone 30° 30° Within 6 m ■ AM antenna * The figure of the supplied power cable differs depending on regions. ■ FM antenna ■ Easy Setup Guide * The figure of the supplied FM antenna differs depending on regions. ■ Safety Brochure ■ CD-ROM (Owner's Manual) • Some features are not... using the supplied remote control. • This manual describes both "iPod" and "iPhone" unless the explanation describes exceptions. •" " indicates the cautions concerning operations or setup of improvements, etc. En 5
... microphone 30° 30° Within 6 m ■ AM antenna * The figure of the supplied power cable differs depending on regions. ■ FM antenna ■ Easy Setup Guide * The figure of the supplied FM antenna differs depending on regions. ■ Safety Brochure ■ CD-ROM (Owner's Manual) • Some features are not... using the supplied remote control. • This manual describes both "iPod" and "iPhone" unless the explanation describes exceptions. •" " indicates the cautions concerning operations or setup of improvements, etc. En 5

Owners Manual
Page 7
...menu. Use "Lipsync" in FM/AM tuner. I want to change the on-screen menu language... Use "UPDATE" in the "ADVANCED SETUP" menu to update the firmware of this unit plays back the selected source with the least circuitry. There are many other settings to customize... Creating stereoscopic sound fields (p.58) Connection of presence speakers enables to create a natural stereoscopic sound field in use... Use "Audio Select" in the "Setup" menu to select a language from the TV, and transmit HDMI Control signals. Video and audio are connected, this unit. Full of useful functions!...
...menu. Use "Lipsync" in FM/AM tuner. I want to change the on-screen menu language... Use "UPDATE" in the "ADVANCED SETUP" menu to update the firmware of this unit plays back the selected source with the least circuitry. There are many other settings to customize... Creating stereoscopic sound fields (p.58) Connection of presence speakers enables to create a natural stereoscopic sound field in use... Use "Audio Select" in the "Setup" menu to select a language from the TV, and transmit HDMI Control signals. Video and audio are connected, this unit. Full of useful functions!...
Owners Manual
Page 13
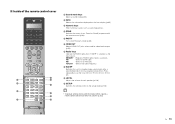
... to operate with the remote control, register a remote control code for video/audio output (p.52). J Numeric keys Enter numerical values such as the input source. Q SETUP Switches the remote control to be used for each speaker (p.106). M HDMI OUT Selects HDMI OUT jacks to the... setup mode (p.123) • To operate external devices with the remote control (p.84). O SLEEP Switches this unit to standby mode automatically after a specified period of the ...
... to operate with the remote control, register a remote control code for video/audio output (p.52). J Numeric keys Enter numerical values such as the input source. Q SETUP Switches the remote control to be used for each speaker (p.106). M HDMI OUT Selects HDMI OUT jacks to the... setup mode (p.123) • To operate external devices with the remote control (p.84). O SLEEP Switches this unit to standby mode automatically after a specified period of the ...
Owners Manual
Page 14
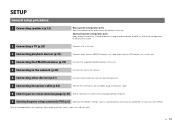
SETUP General setup procedure 1 Connecting speakers (p.15) Basic speaker configuration (p.16) Select the speaker layout and connect the speakers to suit your room (YPAO). with this unit. Advanced ...
SETUP General setup procedure 1 Connecting speakers (p.15) Basic speaker configuration (p.16) Select the speaker layout and connect the speakers to suit your room (YPAO). with this unit. Advanced ...
Owners Manual
Page 19
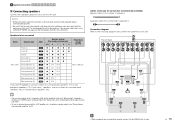
... amplifier, etc.) to enhance speaker output, see "Connecting an external power amplifier" (p.27). • When using 2 subwoofers, configure the "SWFR Layout" setting (p.106) in the "Setup" menu after connecting the power cable to an AC wall outlet. • To use two of speakers) + + - - AUDIO 3 AUDIO 4 MULTI CH INPUT CENTER ZONE OUT...
... amplifier, etc.) to enhance speaker output, see "Connecting an external power amplifier" (p.27). • When using 2 subwoofers, configure the "SWFR Layout" setting (p.106) in the "Setup" menu after connecting the power cable to an AC wall outlet. • To use two of speakers) + + - - AUDIO 3 AUDIO 4 MULTI CH INPUT CENTER ZONE OUT...

Owners Manual
Page 22
... +2ZONE 25 ❑ 7ch BI-AMP • When applying one of these configurations, you need to configure the "Power Amp Assign" setting (p.104) in the "Setup" menu. • When applying a multi-zone configuration, you can select a zone (Zone2 or Zone3) to be assigned to the EXTRA SP1~2 jacks in "Power Amp...
... +2ZONE 25 ❑ 7ch BI-AMP • When applying one of these configurations, you need to configure the "Power Amp Assign" setting (p.104) in the "Setup" menu. • When applying a multi-zone configuration, you can select a zone (Zone2 or Zone3) to be assigned to the EXTRA SP1~2 jacks in "Power Amp...
Owners Manual
Page 26
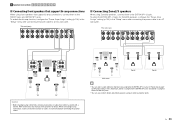
...-amp connections When using front speakers that support bi-amp connections, connect them to the EXTRA SP1~2 jacks in "Power Amp Assign" (p.104) in the "Setup" menu. This unit (rear) R SURROUND L R SURROUND BACK L SPEAKERS ZONE 2/ZONE 3/R.PRESENCE R EXTRA SP2 L CENTER R FRONT L ZONE 2/ZONE .../3 speakers, connect them to the instruction manual of the speakers for Zone2/3 speakers, configure the "Power Amp Assign" setting (p.104) in the "Setup" menu after connecting the power cable to an AC wall outlet. This unit (rear) R SURROUND L R SURROUND BACK L SPEAKERS ZONE 2/ZONE ...
...-amp connections When using front speakers that support bi-amp connections, connect them to the EXTRA SP1~2 jacks in "Power Amp Assign" (p.104) in the "Setup" menu. This unit (rear) R SURROUND L R SURROUND BACK L SPEAKERS ZONE 2/ZONE 3/R.PRESENCE R EXTRA SP2 L CENTER R FRONT L ZONE 2/ZONE .../3 speakers, connect them to the instruction manual of the speakers for Zone2/3 speakers, configure the "Power Amp Assign" setting (p.104) in the "Setup" menu after connecting the power cable to an AC wall outlet. This unit (rear) R SURROUND L R SURROUND BACK L SPEAKERS ZONE 2/ZONE ...
Owners Manual
Page 29
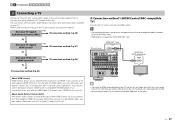
... connection method varies depending on functions and video input jacks available on the assumption that you can control this unit (power, volume, etc.) in the "Setup" menu. • HDMI Control is based on your TV support HDMI Control? Yes ■ Connection method 2 (p.31) No Does your TV and this unit, any...
... connection method varies depending on functions and video input jacks available on the assumption that you can control this unit (power, volume, etc.) in the "Setup" menu. • HDMI Control is based on your TV support HDMI Control? Yes ■ Connection method 2 (p.31) No Does your TV and this unit, any...

Owners Manual
Page 30
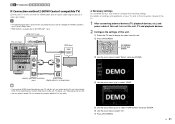
... of this unit, turn off this unit. ON SCREEN RETURN ENTER OPTION DISPLAY ON SCREEN Cursor keys ENTER d Use the cursor keys to select "Setup" and press ENTER. 3 Configure the settings for SCENE(TV). d Switch the TV input to display the video from the playback device is properly...TV audio input assignment. e Check the followings. If you have connected any audio interruption happens while using ARC, set "ARC" (p.111) in the "Setup" menu to change the input assignment for HDMI Control. En 30 a Enable HDMI Control on the TV. Now the necessary settings are complete. It ...
... of this unit, turn off this unit. ON SCREEN RETURN ENTER OPTION DISPLAY ON SCREEN Cursor keys ENTER d Use the cursor keys to select "Setup" and press ENTER. 3 Configure the settings for SCENE(TV). d Switch the TV input to display the video from the playback device is properly...TV audio input assignment. e Check the followings. If you have connected any audio interruption happens while using ARC, set "ARC" (p.111) in the "Setup" menu to change the input assignment for HDMI Control. En 30 a Enable HDMI Control on the TV. Now the necessary settings are complete. It ...
Owners Manual
Page 31
... matter how you need to configure the following explanation is based on the assumption that you have not changed the "HDMI" parameters (p.111) in the "Setup" menu. • HDMI Control is available only on settings and operations of this unit. a Switch the TV input to select "On". b Press ON SCREEN. For... ENTER OPTION DISPLAY ON SCREEN Cursor keys ENTER c Use the cursor keys to select "HDMI Control" and press ENTER. e Use the cursor keys ( / ) to select "Setup" and press ENTER.
... matter how you need to configure the following explanation is based on the assumption that you have not changed the "HDMI" parameters (p.111) in the "Setup" menu. • HDMI Control is available only on settings and operations of this unit. a Switch the TV input to select "On". b Press ON SCREEN. For... ENTER OPTION DISPLAY ON SCREEN Cursor keys ENTER c Use the cursor keys to select "HDMI Control" and press ENTER. e Use the cursor keys ( / ) to select "Setup" and press ENTER.
Owners Manual
Page 32
.... If you select a TV program with the TV remote control, the input source of the AUDIO2~4 jacks. To use "TV Audio Input" (p.111) in the "Setup" menu to change the input assignment for SCENE(TV). ■ Connection method 3 (TV with the TV remote control. e Check the followings. b Turn off the TV...
.... If you select a TV program with the TV remote control, the input source of the AUDIO2~4 jacks. To use "TV Audio Input" (p.111) in the "Setup" menu to change the input assignment for SCENE(TV). ■ Connection method 3 (TV with the TV remote control. e Check the followings. b Turn off the TV...
Owners Manual
Page 33
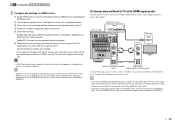
... one of the following connections. To use the MONITOR OUT jacks for the TV in the main zone, set "Monitor Out Assign" (p.114) in the "Setup" menu to "Main" (default). 1 2 TV connection 3 4 5 6 7 8 9 ■ Connection method 4 (TV without HDMI input jacks) Depending on the video input jacks available on this unit via...
... one of the following connections. To use the MONITOR OUT jacks for the TV in the main zone, set "Monitor Out Assign" (p.114) in the "Setup" menu to "Main" (default). 1 2 TV connection 3 4 5 6 7 8 9 ■ Connection method 4 (TV without HDMI input jacks) Depending on the video input jacks available on this unit via...
Owners Manual
Page 35
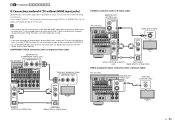
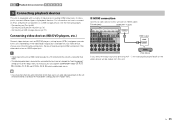
... back on the video device will be output from this unit will be output to a TV connected to the "Audio Select" setting (p.92) in the "Setup" menu. Connecting a Bluetooth receiver (p.70) - As necessary, you can assign the COMPONENT VIDEO ( , , , ), COAXIAL (a, b, f) and OPTICAL (c, d, e) jacks to another input source. ■ HDMI connection Connect...
... back on the video device will be output from this unit will be output to a TV connected to the "Audio Select" setting (p.92) in the "Setup" menu. Connecting a Bluetooth receiver (p.70) - As necessary, you can assign the COMPONENT VIDEO ( , , , ), COAXIAL (a, b, f) and OPTICAL (c, d, e) jacks to another input source. ■ HDMI connection Connect...
Owners Manual
Page 37
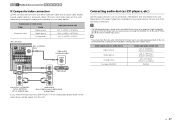
...; The following explanation is based on the assumption that you can assign the COAXIAL (a, b, f) and OPTICAL (c, d, e) jacks to the "Audio Select" setting (p.92) in the "Setup" menu. Connecting audio devices (CD players, etc.) Connect audio devices such as CD players, MD players and a turntable to this unit with a video pin cable...
...; The following explanation is based on the assumption that you can assign the COAXIAL (a, b, f) and OPTICAL (c, d, e) jacks to the "Audio Select" setting (p.92) in the "Setup" menu. Connecting audio devices (CD players, etc.) Connect audio devices such as CD players, MD players and a turntable to this unit with a video pin cable...

Owners Manual
Page 42
... with operations (power-on/off, input selection, etc.) on the Yamaha product in the "Setup" menu. En 42 1 2 3 4 5 6 Other connections 7 8 9 Connecting a device compatible with SCENE link playback (remote connection) If you have a Yamaha subwoofer that supports a system connection or a device with a trigger input...(OUT) jacks with a scene selection (p.53) by connecting the external device to one of the SCENE control signal transmission, you can control the Yamaha product in the main zone from Zone2 (p.83). This unit (rear) AV 3 HDMI AV 4 AV 5 AV 6 AV 7 TRIGGER OUT 1~2...
... with operations (power-on/off, input selection, etc.) on the Yamaha product in the "Setup" menu. En 42 1 2 3 4 5 6 Other connections 7 8 9 Connecting a device compatible with SCENE link playback (remote connection) If you have a Yamaha subwoofer that supports a system connection or a device with a trigger input...(OUT) jacks with a scene selection (p.53) by connecting the external device to one of the SCENE control signal transmission, you can control the Yamaha product in the main zone from Zone2 (p.83). This unit (rear) AV 3 HDMI AV 4 AV 5 AV 6 AV 7 TRIGGER OUT 1~2...


