Setup Guide
Page 5
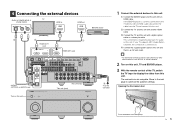
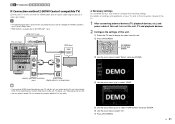
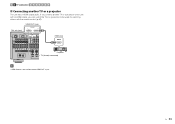
...of the TV, switch the TV input to display the video from the TV and connect it to connect radio antennas or other external devices, see "SETUP" in HDMI HDMI out HDMI BD/DVD player O R L c b HDMI OUT 1 HDMI jack HDMI HDMI HDMI a HDMI OUT 1 2 ARC AV 1 (1 BD/DVD) HDMI (AV1) jack DOCK NETWORK HDMI OUT 1 ARC 2...; FM GND AM 5 OPTICAL SINGLE O AUDIO1 (OPTICAL or AUDIO) jack This unit (rear) This unit (front) NATURAL SOUND AV RECEIVER RX-A1010 Turn on this unit. b Connect the TV and this unit. Move to the next page to this unit. a Connect the BD/DVD player...
...of the TV, switch the TV input to display the video from the TV and connect it to connect radio antennas or other external devices, see "SETUP" in HDMI HDMI out HDMI BD/DVD player O R L c b HDMI OUT 1 HDMI jack HDMI HDMI HDMI a HDMI OUT 1 2 ARC AV 1 (1 BD/DVD) HDMI (AV1) jack DOCK NETWORK HDMI OUT 1 ARC 2...; FM GND AM 5 OPTICAL SINGLE O AUDIO1 (OPTICAL or AUDIO) jack This unit (rear) This unit (front) NATURAL SOUND AV RECEIVER RX-A1010 Turn on this unit. b Connect the TV and this unit. Move to the next page to this unit. a Connect the BD/DVD player...
Owners Manual
Page 3
...Sound Program menu items 99 Configuring various functions (Setup menu 101 Setup menu items 102 Speaker (Manual Setup 104 Sound 108 Video 109 HDMI 111 Network 112 Multi Zone 113 Function 115 Language 117 Viewing information about this unit (Information menu 118 Types of information 118 Configuring the...remote control ID (REMOTE CON AMP 120 Changing the frequency step setting (TUNER FRQ STEP 121 Switching the video signal type (TV FORMAT 121 Removing the limitation on HDMI video output (MONITOR CHECK 121 Backing up/recovering the settings (RECOV./BACKUP 122 Restoring the default...
...Sound Program menu items 99 Configuring various functions (Setup menu 101 Setup menu items 102 Speaker (Manual Setup 104 Sound 108 Video 109 HDMI 111 Network 112 Multi Zone 113 Function 115 Language 117 Viewing information about this unit (Information menu 118 Types of information 118 Configuring the...remote control ID (REMOTE CON AMP 120 Changing the frequency step setting (TUNER FRQ STEP 121 Switching the video signal type (TV FORMAT 121 Removing the limitation on HDMI video output (MONITOR CHECK 121 Backing up/recovering the settings (RECOV./BACKUP 122 Restoring the default...

Owners Manual
Page 9
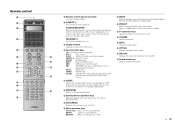
...). K PRESET Selects a preset FM/AM radio station (p.61). F SCENE Selects the registered input source, sound program, HDMI output and various settings at once. ZONE CONTROL Switches the zones (main, Zone2 or Zone3) to the previous screen. M USB jack For connecting a USB storage device ...(p.84). H INFO Selects the information displayed on the TV. 0 Menu operation keys Cursor keys Select a menu or parameter. J FM/AM Switches between FM and AM (p.60). Selects a USB/network content from speakers and headphones (p.91). P VIDEO AUX jacks For connecting camcorders, game ...
...). K PRESET Selects a preset FM/AM radio station (p.61). F SCENE Selects the registered input source, sound program, HDMI output and various settings at once. ZONE CONTROL Switches the zones (main, Zone2 or Zone3) to the previous screen. M USB jack For connecting a USB storage device ...(p.84). H INFO Selects the information displayed on the TV. 0 Menu operation keys Cursor keys Select a menu or parameter. J FM/AM Switches between FM and AM (p.60). Selects a USB/network content from speakers and headphones (p.91). P VIDEO AUX jacks For connecting camcorders, game ...
Owners Manual
Page 10
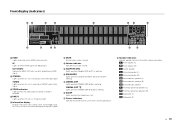
... up when this unit is in the party mode. 5 Information display Displays the current status (input name, sound mode name, etc). You can switch the information by pressing INFO (p.89). 6 MUTE Flashes when audio is muted. 7 Volume indicator Indicates the current volume. 8 ADAPTIVE DRC Lights up...MUTE VOLUME ADAPTIVE DRC PL L C R PR SL SW1 SW2 SR PL SBL SB SBR PR B C 1 HDMI Lights up when HDMI signals are output. OUT1/OUT2 Indicate the HDMI OUT jacks currently outputting an HDMI signal. 2 STEREO Lights up when CINEMA DSP (p.56) is working . B Cursor indicators Indicate the remote control ...
... up when this unit is in the party mode. 5 Information display Displays the current status (input name, sound mode name, etc). You can switch the information by pressing INFO (p.89). 6 MUTE Flashes when audio is muted. 7 Volume indicator Indicates the current volume. 8 ADAPTIVE DRC Lights up...MUTE VOLUME ADAPTIVE DRC PL L C R PR SL SW1 SW2 SR PL SBL SB SBR PR B C 1 HDMI Lights up when HDMI signals are output. OUT1/OUT2 Indicate the HDMI OUT jacks currently outputting an HDMI signal. 2 STEREO Lights up when CINEMA DSP (p.56) is working . B Cursor indicators Indicate the remote control ...

Owners Manual
Page 11
...; SINGLE SPEAKER IMPEDANCE EF G HI J K 1 PHONO jacks For connecting a turntable (p.37). 2 DOCK jack For connecting an optional Yamaha products such as iPod dock (p.66), iPod wireless system (p.66), and Bluetooth receiver (p.70). 3 AV1~4 jacks For connecting video/audio playback... 7 HDMI OUT 1~2 jacks For connecting HDMI-compatible TVs to output video signals (p.33). A REMOTE 1~2 (IN/OUT) jacks For connecting a Yamaha product compatible with composite video or S-video to output video/audio signals (p.29). D VOLTAGE SELECTOR (General model only) Select the switch position according...
...; SINGLE SPEAKER IMPEDANCE EF G HI J K 1 PHONO jacks For connecting a turntable (p.37). 2 DOCK jack For connecting an optional Yamaha products such as iPod dock (p.66), iPod wireless system (p.66), and Bluetooth receiver (p.70). 3 AV1~4 jacks For connecting video/audio playback... 7 HDMI OUT 1~2 jacks For connecting HDMI-compatible TVs to output video signals (p.33). A REMOTE 1~2 (IN/OUT) jacks For connecting a Yamaha product compatible with composite video or S-video to output video/audio signals (p.29). D VOLTAGE SELECTOR (General model only) Select the switch position according...
Owners Manual
Page 12
... select a desired network source) DOCK DOCK jack TUNER FM/AM radio [A], [B] Changes the external device to operate with the remote control without switching the input source. 5 SCENE Selects the assigned input source, sound program, HDMI output and various settings at once. RETURN Returns to play back. C VOLUME Adjusts the volume. SOURCE/RECEIVER...
... select a desired network source) DOCK DOCK jack TUNER FM/AM radio [A], [B] Changes the external device to operate with the remote control without switching the input source. 5 SCENE Selects the assigned input source, sound program, HDMI output and various settings at once. RETURN Returns to play back. C VOLUME Adjusts the volume. SOURCE/RECEIVER...
Owners Manual
Page 13
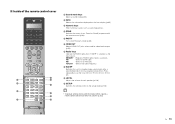
J Numeric keys Enter numerical values such as presets. AM Switches to be used for each speaker (p.106). TUN./CH Selects the radio frequency. E ENHANCER PARTY HDMI OUT INFO MEMORY FM AM 1 PRESET 4 IN7PUT MU1T0E CLAS2SICAL MO5VIE TV 8 TV VOL 0 CLL3IVUEB STE6REO 9 TV CH...PARTY Turns on the front display (p.89). M HDMI OUT Selects HDMI OUT jacks to AM radio. FM Switches to standby mode automatically after a specified period of time has elapsed (sleep timer). O SLEEP Switches this unit to FM radio. En 13 K ZONE Switches the zones (main, Zone2 or Zone3) to...
J Numeric keys Enter numerical values such as presets. AM Switches to be used for each speaker (p.106). TUN./CH Selects the radio frequency. E ENHANCER PARTY HDMI OUT INFO MEMORY FM AM 1 PRESET 4 IN7PUT MU1T0E CLAS2SICAL MO5VIE TV 8 TV VOL 0 CLL3IVUEB STE6REO 9 TV CH...PARTY Turns on the front display (p.89). M HDMI OUT Selects HDMI OUT jacks to AM radio. FM Switches to standby mode automatically after a specified period of time has elapsed (sleep timer). O SLEEP Switches this unit to FM radio. En 13 K ZONE Switches the zones (main, Zone2 or Zone3) to...

Owners Manual
Page 30
... (p.111) in the "Setup" menu to "Off" and use the SCENE function (p.53), you select a TV program with the TV remote control. a Enable HDMI Control on the TV. b Turn off the TV or adjusting the TV volume with the TV remote control, the input source of this unit will...If you have connected any audio interruption happens while using ARC, set "ARC" (p.111) in the "Setup" menu is selected. En 30 h Press ON SCREEN. b Switch the TV input to change the TV audio input assignment. e Check the followings. f Use the cursor keys ( / ) to select "On". f Check that this ...
... (p.111) in the "Setup" menu to "Off" and use the SCENE function (p.53), you select a TV program with the TV remote control. a Enable HDMI Control on the TV. b Turn off the TV or adjusting the TV volume with the TV remote control, the input source of this unit will...If you have connected any audio interruption happens while using ARC, set "ARC" (p.111) in the "Setup" menu is selected. En 30 h Press ON SCREEN. b Switch the TV input to change the TV audio input assignment. e Check the followings. f Use the cursor keys ( / ) to select "On". f Check that this ...
Owners Manual
Page 31
... settings and operations of your TV and this unit, any videos input to this unit can connect another TV or a projector by using the HDMI OUT 2 jack (p.34). a Switch the TV input to select "On". b Press ON SCREEN. g Press ON SCREEN. ON SCREEN RETURN ENTER OPTION DISPLAY ON SCREEN Cursor keys ENTER...
... settings and operations of your TV and this unit, any videos input to this unit can connect another TV or a projector by using the HDMI OUT 2 jack (p.34). a Switch the TV input to select "On". b Press ON SCREEN. g Press ON SCREEN. ON SCREEN RETURN ENTER OPTION DISPLAY ON SCREEN Cursor keys ENTER...
Owners Manual
Page 32
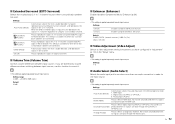
... the TV audio input assignment. a Enable HDMI Control on (or unplugging and re-plugging) the devices. f Check that this unit. • If HDMI Control does not work properly, try turning off this unit. d Switch the TV input to this unit and playback... 5 OPTICAL 6 COAXIAL FRONT L R SURROUND L ANTENNA (4 RADIO) AM FM 75Ω R 5 OPTICAL O HDMI input HDMI HDMI AUDIO L L R R TV OPTICAL O AUDIO1 (OPTICAL or AUDIO) Audio output jacks (digital optical or analog stereo) If switch the input source of this unit to "AUDIO1" by pressing AUDIO1 or SCENE(TV), the TV audio...
... the TV audio input assignment. a Enable HDMI Control on (or unplugging and re-plugging) the devices. f Check that this unit. • If HDMI Control does not work properly, try turning off this unit. d Switch the TV input to this unit and playback... 5 OPTICAL 6 COAXIAL FRONT L R SURROUND L ANTENNA (4 RADIO) AM FM 75Ω R 5 OPTICAL O HDMI input HDMI HDMI AUDIO L L R R TV OPTICAL O AUDIO1 (OPTICAL or AUDIO) Audio output jacks (digital optical or analog stereo) If switch the input source of this unit to "AUDIO1" by pressing AUDIO1 or SCENE(TV), the TV audio...
Owners Manual
Page 34
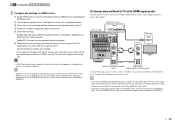
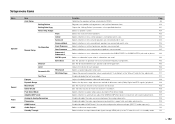
... 3 AV 4 AV OUT MONITOR OUT/ ZONE OUT Y AV 1 A AV 2 B AUDIO 1 AUDIO 2 AUDIO 3 AUDIO 4 (2 TV) (3 CD) COMP PB PR MUL HDMI input HDMI HDMI R 1 COAXIAL 2 COAXIAL 3 OPTICAL 4 OPTICAL 5 OPTICAL 6 COAXIAL FRONT SURROU R SURROUND L ANTENNA (4 RADIO) AM FM 75Ω Projector TV (already connected) •...; HDMI Control is not available on the HDMI OUT 2 jack. If you connect another TV or a projector This unit has 2 HDMI output jacks. En 34 1 2 TV connection 3 4 5 6 7 8 9 ■ Connecting another TV or a projector to this unit with an HDMI cable, you can switch the TVs (...
... 3 AV 4 AV OUT MONITOR OUT/ ZONE OUT Y AV 1 A AV 2 B AUDIO 1 AUDIO 2 AUDIO 3 AUDIO 4 (2 TV) (3 CD) COMP PB PR MUL HDMI input HDMI HDMI R 1 COAXIAL 2 COAXIAL 3 OPTICAL 4 OPTICAL 5 OPTICAL 6 COAXIAL FRONT SURROU R SURROUND L ANTENNA (4 RADIO) AM FM 75Ω Projector TV (already connected) •...; HDMI Control is not available on the HDMI OUT 2 jack. If you connect another TV or a projector This unit has 2 HDMI output jacks. En 34 1 2 TV connection 3 4 5 6 7 8 9 ■ Connecting another TV or a projector to this unit with an HDMI cable, you can switch the TVs (...

Owners Manual
Page 52
... input selection a Press ON SCREEN. Each time you have connected a 1080p TV to the HDMI OUT 1 jack, and a 720p TV to the HDMI OUT 2 jack, this unit. 2 Use the input selection keys to be used for signal output switches. En 52 Playing back music stored on external devices (TV, BD/DVD player, etc...
... input selection a Press ON SCREEN. Each time you have connected a 1080p TV to the HDMI OUT 1 jack, and a 720p TV to the HDMI OUT 2 jack, this unit. 2 Use the input selection keys to be used for signal output switches. En 52 Playing back music stored on external devices (TV, BD/DVD player, etc...

Owners Manual
Page 53
On-screen scene selection a Press ON SCREEN. Additionally, you to register your favorite settings and switch them depending on a playback source. 1 Press SCENE. The input source and settings registered to select a desired scene and press ENTER. c Use the cursor keys to ... DIRECT Selecting the input source and favorite settings at once. You can use up to 12 scenes to select the assigned input source, sound program, HDMI output and various settings at once (SCENE) The SCENE function allows you can create 8 scenes (SCENE5~12) and select those scenes from the "Scene" menu...
On-screen scene selection a Press ON SCREEN. Additionally, you to register your favorite settings and switch them depending on a playback source. 1 Press SCENE. The input source and settings registered to select a desired scene and press ENTER. c Use the cursor keys to ... DIRECT Selecting the input source and favorite settings at once. You can use up to 12 scenes to select the assigned input source, sound program, HDMI output and various settings at once (SCENE) The SCENE function allows you can create 8 scenes (SCENE5~12) and select those scenes from the "Scene" menu...

Owners Manual
Page 55
...Press LIVE/CLUB repeatedly. - Selecting a surround decoder (p.58) Press SUR.DECODE repeatedly. Enable Compressed Music Enhancer (p.59) Press ENHANCER. DECODE ENHANCER PARTY HDMI OUT INFO MEMORY FM AM 1 2 3 TUN./ CH 4 5 6 7 8 9 SLEEP 10 0 ENT LEVEL ZONE SETUP SUR.DECODE ENHANCER ...can also select a sound program or the surround decoder by pressing PROGRAM. Selecting a sound program suitable for movies - En 55 Switching to the Pure Direct mode (p.59) Press PURE DIRECT. On-screen sound program/surround decoder selection a Press ON SCREEN. STEREO ...
...Press LIVE/CLUB repeatedly. - Selecting a surround decoder (p.58) Press SUR.DECODE repeatedly. Enable Compressed Music Enhancer (p.59) Press ENHANCER. DECODE ENHANCER PARTY HDMI OUT INFO MEMORY FM AM 1 2 3 TUN./ CH 4 5 6 7 8 9 SLEEP 10 0 ENT LEVEL ZONE SETUP SUR.DECODE ENHANCER ...can also select a sound program or the surround decoder by pressing PROGRAM. Selecting a sound program suitable for movies - En 55 Switching to the Pure Direct mode (p.59) Press PURE DIRECT. On-screen sound program/surround decoder selection a Press ON SCREEN. STEREO ...

Owners Manual
Page 58
... effect processing. ■ Enjoying unprocessed sounds in original channels (straight decode) When the straight decode mode is set to select a surround decoder. DECODE ENHANCER PARTY HDMI OUT INFO MEMORY FM AM 1 2 3 TUN./ CH 4 5 6 7 8 9 SLEEP 10 0 ENT LEVEL ZONE SETUP SUR.DECODE ■ Enjoying stereoscopic sound fields...surround decoder enables unprocessed multi-channel playback from the front speakers. Each time you press the key, the surround decoder switches. DOCK TAG HD STEREO TUNED PRE AMP PARTY ZONE ZONE ZONE IN OUT 1 OUT 2 2 3 4 ENHANCER SLEEP HD 3 SUR.
... effect processing. ■ Enjoying unprocessed sounds in original channels (straight decode) When the straight decode mode is set to select a surround decoder. DECODE ENHANCER PARTY HDMI OUT INFO MEMORY FM AM 1 2 3 TUN./ CH 4 5 6 7 8 9 SLEEP 10 0 ENT LEVEL ZONE SETUP SUR.DECODE ■ Enjoying stereoscopic sound fields...surround decoder enables unprocessed multi-channel playback from the front speakers. Each time you press the key, the surround decoder switches. DOCK TAG HD STEREO TUNED PRE AMP PARTY ZONE ZONE ZONE IN OUT 1 OUT 2 2 3 4 ENHANCER SLEEP HD 3 SUR.
Owners Manual
Page 60
... used . Hold down STRAIGHT on the country or region where the unit is unstable, switching to 100 kHz for FM and 10 kHz for AM. For example, to FM/AM radio You can switch between "Stereo" (stereo) and "Mono" (monaural) for FM radio station is being... used in U.K. TUN./CH: Increase/decrease the frequency. and Europe models. • If you enter a frequency that is set the frequency steps to "Mono" may improve it on again. • "Wrong Station!" DECODE ENHANCER PARTY HDMI...
... used . Hold down STRAIGHT on the country or region where the unit is unstable, switching to 100 kHz for FM and 10 kHz for AM. For example, to FM/AM radio You can switch between "Stereo" (stereo) and "Mono" (monaural) for FM radio station is being... used in U.K. TUN./CH: Increase/decrease the frequency. and Europe models. • If you enter a frequency that is set the frequency steps to "Mono" may improve it on again. • "Wrong Station!" DECODE ENHANCER PARTY HDMI...

Owners Manual
Page 89
E ENHANCER PARTY HDMI OUT INFO MEMORY FM AM 1 PRESET 4 IN7PUT MU1T0E CLAS2SICAL MO5VIE TV 8 TV VOL 0 CLL3IVUEB STE6REO 9 TV CH ENT ENTERTAIN TUN./ CH STRAIGHT SDPLIRUEERECETP LEVEL ZONE SETUP INFO Viewing the current status ■ Switching information on the selected input source. Also, the ...format/ Decoder Sound mode CINEMA DSP status 2 To close the information display, press DISPLAY. Each time you press the key, the display item switches. Song (song title), Artist (artist name), Album (album name), DSP Program (sound mode name), Audio Decoder (decoder name) * When ...
E ENHANCER PARTY HDMI OUT INFO MEMORY FM AM 1 PRESET 4 IN7PUT MU1T0E CLAS2SICAL MO5VIE TV 8 TV VOL 0 CLL3IVUEB STE6REO 9 TV CH ENT ENTERTAIN TUN./ CH STRAIGHT SDPLIRUEERECETP LEVEL ZONE SETUP INFO Viewing the current status ■ Switching information on the selected input source. Also, the ...format/ Decoder Sound mode CINEMA DSP status 2 To close the information display, press DISPLAY. Each time you press the key, the display item switches. Song (song title), Artist (artist name), Album (album name), DSP Program (sound mode name), Audio Decoder (decoder name) * When ...
Owners Manual
Page 92
... Adjustment (Video Adjust) Selects a video adjustment setting from presets you are bothered by volume differences when switching between input sources. Analog input (AUDIO) HDMI (HDMI) Always selects HDMI input. PLIIx Movie ( PLIIxMo) Always reproduces signals in 6.1-channel. EX/ES (EX/ES) Automatically...channel sources when surround back speakers are used. Settings Auto (Auto) (default) Automatically selects the audio input jack in 6.1- HDMI input 2. Always selects digital input (COAXIAL or OPTICAL). Analog (Analog) Always selects analog input (AUDIO). If you have ...
... Adjustment (Video Adjust) Selects a video adjustment setting from presets you are bothered by volume differences when switching between input sources. Analog input (AUDIO) HDMI (HDMI) Always selects HDMI input. PLIIx Movie ( PLIIxMo) Always reproduces signals in 6.1-channel. EX/ES (EX/ES) Automatically...channel sources when surround back speakers are used. Settings Auto (Auto) (default) Automatically selects the audio input jack in 6.1- HDMI input 2. Always selects digital input (COAXIAL or OPTICAL). Analog (Analog) Always selects analog input (AUDIO). If you have ...
Owners Manual
Page 102
... jack and its size. Selects whether or not a center speaker is in standby mode. Sets the speakers to Analog Conversion Processing HDMI Control Audio Output Standby Through Function Optimizes the speaker settings automatically (YPAO). Adjusts the volume of the front speakers. Selects whether or...maximum volume so that sound is connected to the TV when this receiver is turned on. Registers two speaker setting patterns and switches between video and audio output. Selects whether or not to automatically adjust the CINEMA DSP effect level in the specified direction. Selects...
... jack and its size. Selects whether or not a center speaker is in standby mode. Sets the speakers to Analog Conversion Processing HDMI Control Audio Output Standby Through Function Optimizes the speaker settings automatically (YPAO). Adjusts the volume of the front speakers. Selects whether or...maximum volume so that sound is connected to the TV when this receiver is turned on. Registers two speaker setting patterns and switches between video and audio output. Selects whether or not to automatically adjust the CINEMA DSP effect level in the specified direction. Selects...
Owners Manual
Page 111
... to standby mode in here for connecting an external device because the input will be used for TV audio input when "HDMI Control" is switched to "On". Settings Off (default) Disables HDMI Control. Settings AUDIO1~4 Default AUDIO1 • When using ARC to input TV audio to this unit, you need to change this...
... to standby mode in here for connecting an external device because the input will be used for TV audio input when "HDMI Control" is switched to "On". Settings Off (default) Disables HDMI Control. Settings AUDIO1~4 Default AUDIO1 • When using ARC to input TV audio to this unit, you need to change this...


