
Owners Manual
Page 2
... Electronics Group want you to the presence of important operating and maintenance (servicing) instructions in any way, such as radiators, heat registers, stoves, or other . i En A polarized plug has two blades with dry cloth. 7 Do not block any heat sources such as power-supply cord or plug is too late, Yamaha and the Electronic Industries Association's Consumer Electronics Group...
... Electronics Group want you to the presence of important operating and maintenance (servicing) instructions in any way, such as radiators, heat registers, stoves, or other . i En A polarized plug has two blades with dry cloth. 7 Do not block any heat sources such as power-supply cord or plug is too late, Yamaha and the Electronic Industries Association's Consumer Electronics Group...

Owners Manual
Page 3
... source of interference, which can not locate the appropriate retailer, please contact Yamaha Corporation of this product to use only high quality shielded cables. IMPORTANT SAFETY INSTRUCTIONS FCC INFORMATION (for Class "B" digital devices. This equipment generates/uses radio frequencies and, if not installed and used . Utilize power outlets that interference will not occur in harmful interference with the requirements listed in the users manual...
... source of interference, which can not locate the appropriate retailer, please contact Yamaha Corporation of this product to use only high quality shielded cables. IMPORTANT SAFETY INSTRUCTIONS FCC INFORMATION (for Class "B" digital devices. This equipment generates/uses radio frequencies and, if not installed and used . Utilize power outlets that interference will not occur in harmful interference with the requirements listed in the users manual...
Owners Manual
Page 4
... the user and/or damage to sudden temperature changes from an AC wall outlet or this unit during operation. If the temperature inside this unit, which the temperature of power. Use a clean, dry cloth. 12 Only voltage specified on switches, knobs and/or cords. 10 When disconnecting the power cable from use force on this unit. - vacation), disconnect the AC power plug...
... the user and/or damage to sudden temperature changes from an AC wall outlet or this unit during operation. If the temperature inside this unit, which the temperature of power. Use a clean, dry cloth. 12 Only voltage specified on switches, knobs and/or cords. 10 When disconnecting the power cable from use force on this unit. - vacation), disconnect the AC power plug...
Owners Manual
Page 5
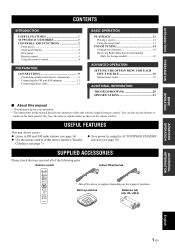
... panel 2 Front panel display 4 Rear panel 5 Remote control 6 Using the remote control 8 PREPARATION CONNECTIONS 9 Connecting speakers and source components 9 Connecting the FM and AM antennas 11 Connecting power cable 11 BASIC OPERATION PLAYBACK 12 Playing a source 12 Using the sleep timer 13 FM/AM TUNING 14 Using preset functions 14 Receiving Radio Data System information (Only for Europe model 18 ADVANCED OPERATION SETTING THE OPTION MENU FOR EACH INPUT SOURCE 19 Option menu items 19 ADDITIONAL INFORMATION TROUBLESHOOTING 20 SPECIFICATIONS 23 ■ About this manual...
... panel 2 Front panel display 4 Rear panel 5 Remote control 6 Using the remote control 8 PREPARATION CONNECTIONS 9 Connecting speakers and source components 9 Connecting the FM and AM antennas 11 Connecting power cable 11 BASIC OPERATION PLAYBACK 12 Playing a source 12 Using the sleep timer 13 FM/AM TUNING 14 Using preset functions 14 Receiving Radio Data System information (Only for Europe model 18 ADVANCED OPERATION SETTING THE OPTION MENU FOR EACH INPUT SOURCE 19 Option menu items 19 ADDITIONAL INFORMATION TROUBLESHOOTING 20 SPECIFICATIONS 23 ■ About this manual...
Owners Manual
Page 6
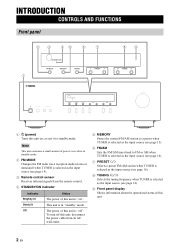
... power of this unit is in standby mode. 2 FM MODE Changes the FM radio wave reception mode (stereo or monaural) when TUNER is selected as the input source (see page 14). 3 Remote control sensor Receives infrared signals from an AC wall outlet. 5 MEMORY Stores the current FM/AM station as a preset when TUNER is selected as the input source (see page 14). 9 Front panel display Shows information about the operational status of power even when in "standby" mode...
... power of this unit is in standby mode. 2 FM MODE Changes the FM radio wave reception mode (stereo or monaural) when TUNER is selected as the input source (see page 14). 3 Remote control sensor Receives infrared signals from an AC wall outlet. 5 MEMORY Stores the current FM/AM station as a preset when TUNER is selected as the input source (see page 14). 9 Front panel display Shows information about the operational status of power even when in "standby" mode...
Owners Manual
Page 7
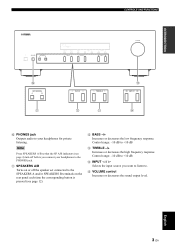
... decreases the low frequency response. Control range: -10 dB to +10 dB D INPUT l / h Selects the input source you connect your headphones for private listening. CONTROLS AND FUNCTIONS INTRODUCTION 0 PHONES jack Outputs audio to your headphones to the PHONES jack. A SPEAKERS A/B Turns on or off the speaker set connected to the SPEAKERS A and/or SPEAKERS B terminals on the rear panel each time the corresponding button is pressed (see page 4) turn off before you want to listen to. Control range: -10...
... decreases the low frequency response. Control range: -10 dB to +10 dB D INPUT l / h Selects the input source you connect your headphones for private listening. CONTROLS AND FUNCTIONS INTRODUCTION 0 PHONES jack Outputs audio to your headphones to the PHONES jack. A SPEAKERS A/B Turns on or off the speaker set connected to the SPEAKERS A and/or SPEAKERS B terminals on the rear panel each time the corresponding button is pressed (see page 4) turn off before you want to listen to. Control range: -10...
Owners Manual
Page 8
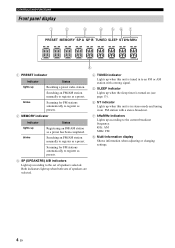
... turned on (see page 13). 6 ST indicator Lights up when this unit is in stereo mode and tuning in an FM station with a stereo broadcast. 7 kHz/MHz indicators Lights up according to register as a preset has been completed. Searching an FM/AM station manually to register as a preset. kHz: AM MHz: FM 8 Multi-information display Shows information when adjusting or changing settings. 4 En Both indicators light up Recalling a preset radio station. blinks...
... turned on (see page 13). 6 ST indicator Lights up when this unit is in stereo mode and tuning in an FM station with a stereo broadcast. 7 kHz/MHz indicators Lights up according to register as a preset has been completed. Searching an FM/AM station manually to register as a preset. kHz: AM MHz: FM 8 Multi-information display Shows information when adjusting or changing settings. 4 En Both indicators light up Recalling a preset radio station. blinks...
Owners Manual
Page 10
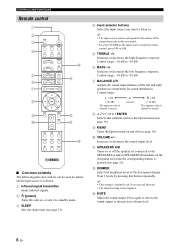
... which input source is selected. 1 Infrared signal transmitter Sends infrared signals. 2 A (power) Turns this button repeatedly. y • The input source names correspond to the names of the left and right speakers to +10 dB 7 BALANCE L/R Adjusts the sound output balance of the connection jacks on or off (see page 12). A SPEAKERS A/B Turns on the rear panel. • To select TUNER as the input source using the remote control, press FM or AM. 5 TREBLE -/+ Increases or decreases the high frequency response. Control range: -10...
... which input source is selected. 1 Infrared signal transmitter Sends infrared signals. 2 A (power) Turns this button repeatedly. y • The input source names correspond to the names of the left and right speakers to +10 dB 7 BALANCE L/R Adjusts the sound output balance of the connection jacks on or off (see page 12). A SPEAKERS A/B Turns on the rear panel. • To select TUNER as the input source using the remote control, press FM or AM. 5 TREBLE -/+ Increases or decreases the high frequency response. Control range: -10...
Owners Manual
Page 11
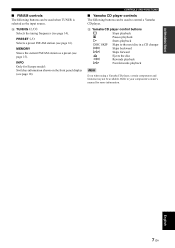
English 7 En D TUNING jj / ii Selects the tuning frequency (see page 15). Refer to your component's owner's manual for Europe model: Switches information shown on the front panel display (see page 16). MEMORY Stores the current FM/AM station as the input source. E Yamaha CD player control buttons s Stops playback e Pauses playback p Starts playback DISC SKIP b a Skips to the next disc in a CD changer Skips backward Skips forward w f Ejects the disc Rewinds...
English 7 En D TUNING jj / ii Selects the tuning frequency (see page 15). Refer to your component's owner's manual for Europe model: Switches information shown on the front panel display (see page 16). MEMORY Stores the current FM/AM station as the input source. E Yamaha CD player control buttons s Stops playback e Pauses playback p Starts playback DISC SKIP b a Skips to the next disc in a CD changer Skips backward Skips forward w f Ejects the disc Rewinds...
Owners Manual
Page 14
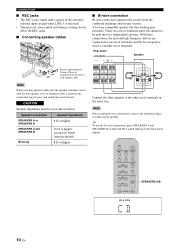
... cables on the front panel display. CAUTION Speaker impedance must be split into the speaker terminals, insert only the bare speaker wire. If insulated cable is selected). • Volume level, tone control and balance settings do not affect the REC jacks. ■ Connecting speaker cables ■ Bi-wire connection Bi-wire connection separates the woofer from the end of terminals and the low frequency driver to the other set as shown below. With these connections, the mid and high frequency drivers are connected...
... cables on the front panel display. CAUTION Speaker impedance must be split into the speaker terminals, insert only the bare speaker wire. If insulated cable is selected). • Volume level, tone control and balance settings do not affect the REC jacks. ■ Connecting speaker cables ■ Bi-wire connection Bi-wire connection separates the woofer from the end of terminals and the low frequency driver to the other set as shown below. With these connections, the mid and high frequency drivers are connected...
Owners Manual
Page 16
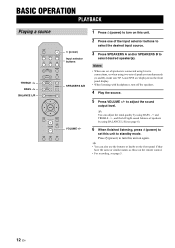
... Input selector buttons to select the desired input source. 3 Press SPEAKERS A and/or SPEAKERS B to select desired speaker(s). to standby mode. Press A (power) to turn this unit on the front panel display. • When listening with headphones, turn on the remote control. • For recording, see page 6). 6 When finished listening, press A (power) to set of speakers is connected using bi-wire connections, or when using BALANCE L/R (see page 5. 12 En BASIC OPERATION PLAYBACK Playing a source TREBLE -/+ BASS -/+ BALANCE L/R A (power) Input selector buttons SPEAKERS A/B VOLUME...
... Input selector buttons to select the desired input source. 3 Press SPEAKERS A and/or SPEAKERS B to select desired speaker(s). to standby mode. Press A (power) to turn this unit on the front panel display. • When listening with headphones, turn on the remote control. • For recording, see page 6). 6 When finished listening, press A (power) to set of speakers is connected using bi-wire connections, or when using BALANCE L/R (see page 5. 12 En BASIC OPERATION PLAYBACK Playing a source TREBLE -/+ BASS -/+ BALANCE L/R A (power) Input selector buttons SPEAKERS A/B VOLUME...
Owners Manual
Page 17
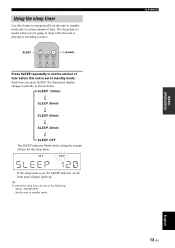
... press SLEEP, the front panel display changes cyclically as shown below. If the sleep timer is set this unit to standby mode after a certain amount of time before this unit is set, the SLEEP indicator on the front panel display lights up. PLAYBACK 13 En English BASIC OPERATION The sleep timer is playing or recording a source. The SLEEP indicator blinks while setting the amount of the...
... press SLEEP, the front panel display changes cyclically as shown below. If the sleep timer is set this unit to standby mode after a certain amount of time before this unit is set, the SLEEP indicator on the front panel display lights up. PLAYBACK 13 En English BASIC OPERATION The sleep timer is playing or recording a source. The SLEEP indicator blinks while setting the amount of the...

Owners Manual
Page 18
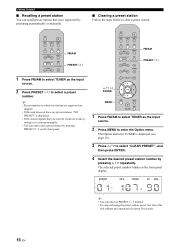
... the station you tune into a radio station (see page 4). Notes • If a station is registered to a preset number that have strong signals. y FM stations registered as the input source and select the band. 2 Press and hold TUNING jj / ii to a higher frequency. Once you have the same or similar names as presets. Remote control Enter FM MODE from the station is weak and the sound quality is not good, set the tuner frequency...
... the station you tune into a radio station (see page 4). Notes • If a station is registered to a preset number that have strong signals. y FM stations registered as the input source and select the band. 2 Press and hold TUNING jj / ii to a higher frequency. Once you have the same or similar names as presets. Remote control Enter FM MODE from the station is weak and the sound quality is not good, set the tuner frequency...

Owners Manual
Page 19
... empty preset number (i.e., the preset number following the last preset number used). 3 Press PRESET j / i to select the preset number to which a station has already been registered, the frequency of the station is displayed. BASIC OPERATION 1 Press FM to select TUNER as the input source. 2 Press MENU to the Option menu. When you select a preset number to which the station will be used by pressing buttons on the front panel display, and then the preset number to the original state. FM/AM TUNING 1 Tune in...
... empty preset number (i.e., the preset number following the last preset number used). 3 Press PRESET j / i to select the preset number to which a station has already been registered, the frequency of the station is displayed. BASIC OPERATION 1 Press FM to select TUNER as the input source. 2 Press MENU to the Option menu. When you select a preset number to which the station will be used by pressing buttons on the front panel display, and then the preset number to the original state. FM/AM TUNING 1 Tune in...
Owners Manual
Page 20
... operations for TUNER is displayed (see page 19). 3 Press B / C to select "CLEAR PRESET", and then press ENTER. 4 Select the desired preset station number by pressing B / C repeatedly. FM/AM PRESET j / i FM/AM PRESET j / i 1 Press FM/AM to select TUNER as the input source. 2 Press MENU to select a preset number. The Option menu for about 30 seconds. 16 En B / C / D ENTER MENU 1 Press FM/AM to select TUNER as the input source. 2 Press PRESET j / i to enter the Option menu. The selected preset number blinks...
... operations for TUNER is displayed (see page 19). 3 Press B / C to select "CLEAR PRESET", and then press ENTER. 4 Select the desired preset station number by pressing B / C repeatedly. FM/AM PRESET j / i FM/AM PRESET j / i 1 Press FM/AM to select TUNER as the input source. 2 Press MENU to select a preset number. The Option menu for about 30 seconds. 16 En B / C / D ENTER MENU 1 Press FM/AM to select TUNER as the input source. 2 Press PRESET j / i to enter the Option menu. The selected preset number blinks...
Owners Manual
Page 22
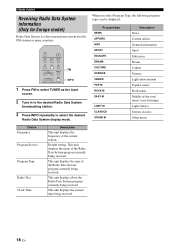
... Other music Choice Frequency Program Service Program Type Radio Text Clock Time Description This unit displays the frequency of the Radio Data System program currently being received. 18 En This unit displays the name of the current station. Default setting. This unit displays the type of the Radio Data System program currently being received. This unit displays about the Radio Data System program currently being received. This unit displays the current time being received. FM/AM TUNING Receiving Radio Data...
... Other music Choice Frequency Program Service Program Type Radio Text Clock Time Description This unit displays the frequency of the Radio Data System program currently being received. 18 En This unit displays the name of the current station. Default setting. This unit displays the type of the Radio Data System program currently being received. This unit displays about the Radio Data System program currently being received. This unit displays the current time being received. FM/AM TUNING Receiving Radio Data...
Owners Manual
Page 23
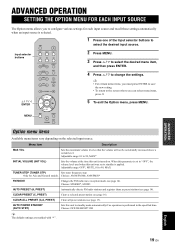
... the Option menu, press MENU. AUTO POWER STANDBY (AUTO STBY) Sets this unit was set to select the desired input source. When this parameter is set to "OFF", the volume level used when this unit to standby mode automatically if no operation is selected. 1 Press one of the Input selector buttons to standby is turned on the selected input source. CLEAR ALL PRESET (C,A, PREST) Clears all preset stations (see page 14). MENU Option menu items Available menu items vary depending on . Adjustable range: OFF...
... the Option menu, press MENU. AUTO POWER STANDBY (AUTO STBY) Sets this unit was set to select the desired input source. When this parameter is set to "OFF", the volume level used when this unit to standby mode automatically if no operation is selected. 1 Press one of the Input selector buttons to standby is turned on the selected input source. CLEAR ALL PRESET (C,A, PREST) Clears all preset stations (see page 14). MENU Option menu items Available menu items vary depending on . Adjustable range: OFF...
Owners Manual
Page 24
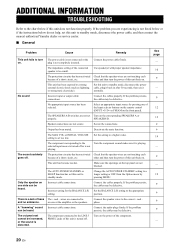
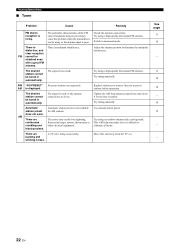
... that the speaker wires are not set too low. Connect the cables properly. There is not completely inserted. The component connected to turn the power of a short circuit, etc. See page - 10 9 - 9 12 12 9 6 19 - 9 - 19 9 6 9 9 - 20 En plug is a lack of this unit to standby mode. Select an appropriate input source by pressing MENU. Make sure the openings on the front panel). can be defective. The volume level cannot...
... that the speaker wires are not set too low. Connect the cables properly. There is not completely inserted. The component connected to turn the power of a short circuit, etc. See page - 10 9 - 9 12 12 9 6 19 - 9 - 19 9 6 9 9 - 20 En plug is a lack of this unit to standby mode. Select an appropriate input source by pressing MENU. Make sure the openings on the front panel). can be defective. The volume level cannot...
Owners Manual
Page 25
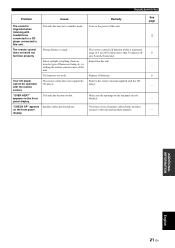
... been set to standby mode. The remote control does not work nor function properly. Your CD player cannot be operated with the CD palyer. "CHECK SP" appears on the front panel display. Replace all batteries. Twist bare wires of this unit. The remote control does not support the CD player. "OVER HEAT" appears on the front panel display. Reposition this unit and speakers properly. See page 12 8 - 8 - - - Direct sunlight or lighting (from...
... been set to standby mode. The remote control does not work nor function properly. Your CD player cannot be operated with the CD palyer. "CHECK SP" appears on the front panel display. Replace all batteries. Twist bare wires of this unit. The remote control does not support the CD player. "OVER HEAT" appears on the front panel display. Reposition this unit and speakers properly. See page 12 8 - 8 - - - Direct sunlight or lighting (from...
Owners Manual
Page 26
... AM stations. Try using an outdoor antenna and a earth ground. Switch to as preset stations before operation. FM/ "NO PRESET" No preset stations are continuous crackling and hissing noises. The signal is difficult to eliminate the multipath interference. Try using a high-quality directional FM antenna. Move this problem when the transmitter is too far away or the antenna input is displayed. The desired station cannot be tuned in automatically. Try tuning manually...
... AM stations. Try using an outdoor antenna and a earth ground. Switch to as preset stations before operation. FM/ "NO PRESET" No preset stations are continuous crackling and hissing noises. The signal is difficult to eliminate the multipath interference. Try using a high-quality directional FM antenna. Move this problem when the transmitter is too far away or the antenna input is displayed. The desired station cannot be tuned in automatically. Try tuning manually...


