
PX-3 OWNERS MANUAL
Page 1
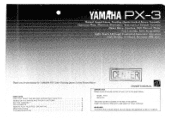
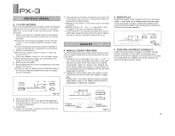
... ADJUSTMENTS HOW TO PLAY RECORDS /OPERATING SPECIFICATIONS TROUBLESHOOTING Model: PX-3 2 Serial No.: 3 5 The serial number is located on the rear of your unit in a safe place for purchasing the YAMAHA PX-3 Liner Tracking Quartz Locked Record Player. iP• 4 YAMAHA PX 3 Natural Sound Linear Tracking Quartz Locked Stereo Turntable Optimum Mass, Minimum Resonance, Syrthnetrical Straight Tonearm Direct Drive, Coreless, Hall Element Motor Full Cartridge Interchangeability Light-Touch LSI Logic Controlled...
... ADJUSTMENTS HOW TO PLAY RECORDS /OPERATING SPECIFICATIONS TROUBLESHOOTING Model: PX-3 2 Serial No.: 3 5 The serial number is located on the rear of your unit in a safe place for purchasing the YAMAHA PX-3 Liner Tracking Quartz Locked Record Player. iP• 4 YAMAHA PX 3 Natural Sound Linear Tracking Quartz Locked Stereo Turntable Optimum Mass, Minimum Resonance, Syrthnetrical Straight Tonearm Direct Drive, Coreless, Hall Element Motor Full Cartridge Interchangeability Light-Touch LSI Logic Controlled...
PX-3 OWNERS MANUAL
Page 2
... to service the appliance beyond those means described in installation, such as radiators, heat registers, stoves, or other appliances (including other servicing should be used near water-for a long period of time. 15 Object and Liquid Entry -Care should be taken so that may impede the ...rain; The appliance has been exposed to be used only with its proper ventilation. All other audio components) that produce heat. 10 Power Sources-The appliance should be connected to a power supply only of the type described in the operating instructions or as marked on the appliance. 11 ...
... to service the appliance beyond those means described in installation, such as radiators, heat registers, stoves, or other appliances (including other servicing should be used near water-for a long period of time. 15 Object and Liquid Entry -Care should be taken so that may impede the ...rain; The appliance has been exposed to be used only with its proper ventilation. All other audio components) that produce heat. 10 Power Sources-The appliance should be connected to a power supply only of the type described in the operating instructions or as marked on the appliance. 11 ...

PX-3 OWNERS MANUAL
Page 3
... the best possible sound reproduction. 8 Keep your speakers. 5 If it is a danger of the arm unit slipping out. A stylus with a diamond tip should be re-checked. 3 Avoid installing the tonearm side of the PX-3 next to change the layout of adjustment. To ensure proper operation for the best possible sound reproduction, Please read the "troubleshooting" section for advice on common operating errors before...
... the best possible sound reproduction. 8 Keep your speakers. 5 If it is a danger of the arm unit slipping out. A stylus with a diamond tip should be re-checked. 3 Avoid installing the tonearm side of the PX-3 next to change the layout of adjustment. To ensure proper operation for the best possible sound reproduction, Please read the "troubleshooting" section for advice on common operating errors before...
PX-3 OWNERS MANUAL
Page 4
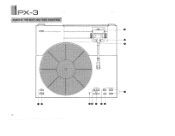
PX 3 NAMES OF THE PARTS AND THEIR FUNCTIONS:: (*YAMAHA PX4B1 • .111.•• ELM OEM 17 • • 3
PX 3 NAMES OF THE PARTS AND THEIR FUNCTIONS:: (*YAMAHA PX4B1 • .111.•• ELM OEM 17 • • 3

PX-3 OWNERS MANUAL
Page 5
... the same side of these switches is pressed, the auto play temporarily. The tonearm will rise and return to begin record play will be selected. For 33-1/3 rpm records press the switch so that the "45" indicator lights. • CUEING SWITCH (Down) Pressing the switch while the tonearm is activated. Refer to page 7 for adjustment. UP Manual Tonearm Movement) Press either...
... the same side of these switches is pressed, the auto play temporarily. The tonearm will rise and return to begin record play will be selected. For 33-1/3 rpm records press the switch so that the "45" indicator lights. • CUEING SWITCH (Down) Pressing the switch while the tonearm is activated. Refer to page 7 for adjustment. UP Manual Tonearm Movement) Press either...

PX-3 OWNERS MANUAL
Page 6
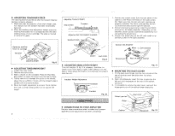
...the tonearm. Platter - Center shaft C:2 4O1 Fig. 4 Fixing screws (2) 5 Transit bracket Remove the vinyl string before using the PX-3. Remove the bracket and screws before unscrewing Fig. 2 Keep them with the screws. O Transport fixing screw Fig. 3 HOW ...center shaft. When transporting, do not forget to Fig. 2, secure the tonearm in position with the three transport screws. 3. connect power. PX-3 BEFORE ASSEMBLY Headshell EP adaptor Main weight Cartridge setting gauge r a 11 11 0 0 Cartridge set screws 0=18mrn x 4, 10mm x 4) Sub. Firmly tighten the LOCK A knob and fix...
...the tonearm. Platter - Center shaft C:2 4O1 Fig. 4 Fixing screws (2) 5 Transit bracket Remove the vinyl string before using the PX-3. Remove the bracket and screws before unscrewing Fig. 2 Keep them with the screws. O Transport fixing screw Fig. 3 HOW ...center shaft. When transporting, do not forget to Fig. 2, secure the tonearm in position with the three transport screws. 3. connect power. PX-3 BEFORE ASSEMBLY Headshell EP adaptor Main weight Cartridge setting gauge r a 11 11 0 0 Cartridge set screws 0=18mrn x 4, 10mm x 4) Sub. Firmly tighten the LOCK A knob and fix...

PX-3 OWNERS MANUAL
Page 7
.... Rear end of cartridge Green (R -) Red (R +) e e Blue (L-) White (L +) Cartridge Cartridge set screw --Serial nut Stylus point Stylus point , I Cartridge setting gauge Fig. 5 ® ASSEMBLING THE TONEARM 1. Flip the stylus cover to secure the headshell firmly.) Cartridge Fig. 6 PX-3 ADJUSTMENTS ® ADJUSTING TONEARM BALANCE 1. After verifying that the tonearm is possible.) 3. Once the tonearm has been balanced, press the Cut button...
.... Rear end of cartridge Green (R -) Red (R +) e e Blue (L-) White (L +) Cartridge Cartridge set screw --Serial nut Stylus point Stylus point , I Cartridge setting gauge Fig. 5 ® ASSEMBLING THE TONEARM 1. Flip the stylus cover to secure the headshell firmly.) Cartridge Fig. 6 PX-3 ADJUSTMENTS ® ADJUSTING TONEARM BALANCE 1. After verifying that the tonearm is possible.) 3. Once the tonearm has been balanced, press the Cut button...
PX-3 OWNERS MANUAL
Page 8
... balanced. 2. Receptacle Fig. 12 Connect the Amplifier 040.0 White : L (Left) channel atIP a Ground wire Red : R (Right) channel Fig. 11 MOUNTING THE DUST COVER 1. The scale is possible to disturb the height. 7 Adjusting Tonearm Height Disc surface Tonearm 4 H( Adjust so that the tonearm is parallel with the rated tracking force of the insulators to lower the stylus onto the disc surface. 4. Connect the output cords...
... balanced. 2. Receptacle Fig. 12 Connect the Amplifier 040.0 White : L (Left) channel atIP a Ground wire Red : R (Right) channel Fig. 11 MOUNTING THE DUST COVER 1. The scale is possible to disturb the height. 7 Adjusting Tonearm Height Disc surface Tonearm 4 H( Adjust so that the tonearm is parallel with the rated tracking force of the insulators to lower the stylus onto the disc surface. 4. Connect the output cords...
PX-3 OWNERS MANUAL
Page 9
... turntable power automatically selects 33-1/3 rpm. ANN, CONTROL - ■ REPEAT PLAY Pressing the Repeat switch causes the PX-3 to start automatically. 8. PX 3 HOW TO PLAY RECORDS • PLAYING RECORDS After you have been inserted into the correct terminals. • The power cord should be plugged into an AC wall outlet or into the audio amplifier's auxiliary power outlet. • If you are using the ground wire, check...
... turntable power automatically selects 33-1/3 rpm. ANN, CONTROL - ■ REPEAT PLAY Pressing the Repeat switch causes the PX-3 to start automatically. 8. PX 3 HOW TO PLAY RECORDS • PLAYING RECORDS After you have been inserted into the correct terminals. • The power cord should be plugged into an AC wall outlet or into the audio amplifier's auxiliary power outlet. • If you are using the ground wire, check...
PX-3 OWNERS MANUAL
Page 10
... with height adjustment CONTROL SECTION Automatic functions Size selector Manual functions AUTO-LEAD-IN AUTO-RETURN AUTO-REPEAT AUTO-CUT AUTO-UP (During Power-OFF) 17/30 cm (7"/12") Arm-up Arm-down Left & Right 2-speed feeding GENERAL S/N ratio 77 dB (I EC 98A Weighted) Wow and flutter 0 015 % WRMS (FG direct) Power supply and consumption U.S.A & Canadian Models . . . 120V AC, 60Hz .... 27W European Model 220V AC...
... with height adjustment CONTROL SECTION Automatic functions Size selector Manual functions AUTO-LEAD-IN AUTO-RETURN AUTO-REPEAT AUTO-CUT AUTO-UP (During Power-OFF) 17/30 cm (7"/12") Arm-up Arm-down Left & Right 2-speed feeding GENERAL S/N ratio 77 dB (I EC 98A Weighted) Wow and flutter 0 015 % WRMS (FG direct) Power supply and consumption U.S.A & Canadian Models . . . 120V AC, 60Hz .... 27W European Model 220V AC...

PX-3 OWNERS MANUAL
Page 11
... amplifier's spare power supply socket. PLAY has been started manually. Dust accumulated on when POWER switch is not positioned to amplifier's GND terminal. Turn up the volume to proper tonearm height. Adjust to an adequate level. Clean stylus tip using special stylus cleaning brush. Turn the treble control back to PHONO. Turntable is particularly affected. Set FUNCTION properly to the flat position. Unpleasant reproduced sounds with clicking or crackling sound. Amplifier's FUNCTION switch...
... amplifier's spare power supply socket. PLAY has been started manually. Dust accumulated on when POWER switch is not positioned to amplifier's GND terminal. Turn up the volume to proper tonearm height. Adjust to an adequate level. Clean stylus tip using special stylus cleaning brush. Turn the treble control back to PHONO. Turntable is particularly affected. Set FUNCTION properly to the flat position. Unpleasant reproduced sounds with clicking or crackling sound. Amplifier's FUNCTION switch...


