
Owner's Manual
Page 5
... Step 1: Set up your speakers 5 Step 2: Connect your DVD player and other components.... 51 Setting remote control codes 53 Advanced setup 54 ADDITIONAL INFORMATION Troubleshooting 55 Glossary 60 Specifications 62 Index 63 APPENDIX (at the end of this manual for the information about each position... 12 Information on jacks and cable plugs 13 Information on HDMI 14 Connecting video components 15 Connecting audio components 17 Connecting a Yamaha iPod™ universal dock and Bluetooth™ adapter 18 Connecting to production. In case of differences between the front panel and...
... Step 1: Set up your speakers 5 Step 2: Connect your DVD player and other components.... 51 Setting remote control codes 53 Advanced setup 54 ADDITIONAL INFORMATION Troubleshooting 55 Glossary 60 Specifications 62 Index 63 APPENDIX (at the end of this manual for the information about each position... 12 Information on jacks and cable plugs 13 Information on HDMI 14 Connecting video components 15 Connecting audio components 17 Connecting a Yamaha iPod™ universal dock and Bluetooth™ adapter 18 Connecting to production. In case of differences between the front panel and...

Owner's Manual
Page 12
... various input sources • Basic controls of this unit ☞ P. 29 • Enjoying FM/AM radio programs ☞ P. 37 • Using your listening room (BASIC SETUP) ☞ P. 22 • Manually adjusting various parameters of this unit ☞ P. 43 • Setting the remote control ☞ P. 51 • Adjusting the advanced parameters ☞...
... various input sources • Basic controls of this unit ☞ P. 29 • Enjoying FM/AM radio programs ☞ P. 37 • Using your listening room (BASIC SETUP) ☞ P. 22 • Manually adjusting various parameters of this unit ☞ P. 43 • Setting the remote control ☞ P. 51 • Adjusting the advanced parameters ☞...

Owner's Manual
Page 16
... unit. 12 En SP IMP.- 6 MIN 5 Press ASTANDBY/ON to secure the wire. and Canada models only) Caution If you turn on , an the advanced setup menu appears in the front panel display. 3 Press KPROGRAM l / h repeatedly to the FRONT A terminals 2 1 Red: positive (+) Black: negative (-) 3 Setting the speaker impedance (U.S.A. to "6ΩMIN...
... unit. 12 En SP IMP.- 6 MIN 5 Press ASTANDBY/ON to secure the wire. and Canada models only) Caution If you turn on , an the advanced setup menu appears in the front panel display. 3 Press KPROGRAM l / h repeatedly to the FRONT A terminals 2 1 Red: positive (+) Black: negative (-) 3 Setting the speaker impedance (U.S.A. to "6ΩMIN...
Owner's Manual
Page 26
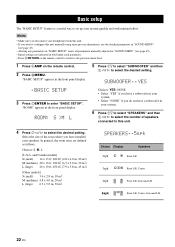
... Press 7l / h to the previous menu level. 1 Press 4AMP on the remote control to return to select the desired setting. YES .BASIC SETUP 3 Press 7ENTER to select the desired setting. "ROOM" appears in your system. • Select "NONE" if you have a subwoofer in the...connected to this unit manually using more precise adjustments, use the detailed parameters in "SOUND MENU" (see page 45). • Altering any parameters in "BASIC SETUP" resets all parameters manually adjusted in "SOUND MENU" (see page 45). • Initial settings are defined as follows: Choices: S, M, L [U.S.A. and...
... Press 7l / h to the previous menu level. 1 Press 4AMP on the remote control to return to select the desired setting. YES .BASIC SETUP 3 Press 7ENTER to select the desired setting. "ROOM" appears in your system. • Select "NONE" if you have a subwoofer in the...connected to this unit manually using more precise adjustments, use the detailed parameters in "SOUND MENU" (see page 45). • Altering any parameters in "BASIC SETUP" resets all parameters manually adjusted in "SOUND MENU" (see page 45). • Initial settings are defined as follows: Choices: S, M, L [U.S.A. and...

Owner's Manual
Page 27
...test tone twice in the front panel display. 9 Press 7l / h to the top set menu display. y You can also press HMENU to cancel the setup procedure. 8 Press 7ENTER to confirm your selection. • If you selected "NO" in step 9, the front speaker level adjustment display appears in step 9, ... to select the desired setting. Note The available speaker channels differ depending on the setting of the speakers. 12 Press HMENU to exit from "BASIC SETUP". • If you selected "YES" in the front panel display. 11 Press 7k / n to select a speaker and then 7l / h to decrease the value....
...test tone twice in the front panel display. 9 Press 7l / h to the top set menu display. y You can also press HMENU to cancel the setup procedure. 8 Press 7ENTER to confirm your selection. • If you selected "NO" in step 9, the front speaker level adjustment display appears in step 9, ... to select the desired setting. Note The available speaker channels differ depending on the setting of the speakers. 12 Press HMENU to exit from "BASIC SETUP". • If you selected "YES" in the front panel display. 11 Press 7k / n to select a speaker and then 7l / h to decrease the value....
Owner's Manual
Page 36
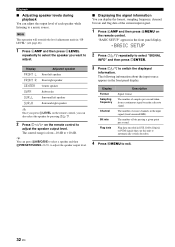
... per second taken from -10 dB to make a discrete signal. Note This operation will override the level adjustment made in the front panel display. ;BASIC SETUP 2 Press 7k / n repeatedly to a music source. y You can press DA/B/C/D/E to select a speaker and then EPRESET/TUNING l / h to adjust the speaker ... levels during playback You can adjust the output level of each speaker while listening to select "SIGNAL INFO" and then press 7ENTER. "BASIC SETUP" appears in "SP LEVEL" (see page 46). 1 Press 4AMP and then press 6LEVEL repeatedly to select the speaker you can also select...
... per second taken from -10 dB to make a discrete signal. Note This operation will override the level adjustment made in the front panel display. ;BASIC SETUP 2 Press 7k / n repeatedly to a music source. y You can press DA/B/C/D/E to select a speaker and then EPRESET/TUNING l / h to adjust the speaker ... levels during playback You can adjust the output level of each speaker while listening to select "SIGNAL INFO" and then press 7ENTER. "BASIC SETUP" appears in "SP LEVEL" (see page 46). 1 Press 4AMP and then press 6LEVEL repeatedly to select the speaker you can also select...
Owner's Manual
Page 47
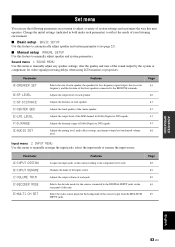
... FRONT B terminals. Select the video source played in the background of your listening environment. ■ Basic setup BASIC SETUP Use this feature to automatically adjust speaker and system parameters (see page 22). ■ Manual setup MANUAL SETUP Use this unit operates. Set menu Set menu You can use the following parameters in set menu...
... FRONT B terminals. Select the video source played in the background of your listening environment. ■ Basic setup BASIC SETUP Use this feature to automatically adjust speaker and system parameters (see page 22). ■ Manual setup MANUAL SETUP Use this unit operates. Set menu Set menu You can use the following parameters in set menu...

Owner's Manual
Page 48
...to decrease the value. 7 Press HMENU to select and enter the desired menu. The following menus appear in the front panel display. .BASIC SETUP 4 Press 7k / n repeatedly and then press 7ENTER to exit from set menu settings. Using set menu parameters while this unit is reproducing...submenu. • Repeat this step to navigate to enter "MANUAL SETUP". Pairs the connected Yamaha Bluetooth adapter (such as you press 7k / n repeatedly. 1 SOUND MENU 2 INPUT MENU 3 OPTION MENU 2 Press 7 k / n to select "MANUAL SETUP". .MANUAL SETUP 3 Press 7ENTER to and enter the items you turn on the ...
...to decrease the value. 7 Press HMENU to select and enter the desired menu. The following menus appear in the front panel display. .BASIC SETUP 4 Press 7k / n repeatedly and then press 7ENTER to exit from set menu settings. Using set menu parameters while this unit is reproducing...submenu. • Repeat this step to navigate to enter "MANUAL SETUP". Pairs the connected Yamaha Bluetooth adapter (such as you press 7k / n repeatedly. 1 SOUND MENU 2 INPUT MENU 3 OPTION MENU 2 Press 7 k / n to select "MANUAL SETUP". .MANUAL SETUP 3 Press 7ENTER to and enter the items you turn on the ...

Owner's Manual
Page 53
... the power of the input selector buttons (3) or BMULTI CH IN to select the input source you play back a DTS-CD. ■ Multi channel input setup E)MULTI CH SET BGV BGV Use this feature to designate the default decoder mode for each input. • Press 7n to change the character in...
... the power of the input selector buttons (3) or BMULTI CH IN to select the input source you play back a DTS-CD. ■ Multi channel input setup E)MULTI CH SET BGV BGV Use this feature to designate the default decoder mode for each input. • Press 7n to change the character in...

Owner's Manual
Page 57
... this case, repeat the clearing procedure. V-AUX/D OCK TUNER Yamaha 5011 DVR DVR Yamaha 2011 A TUNER Yamaha 5012 B TUNER Yamaha 5009 C TUNER Yamaha 5017 D - - - If this happens, repeat the setup procedure. ■ Resetting all remote control codes Use this case...RemoteSetup OK" appears; Remote control code default settings Input source Component category Manufacturer Default code CD CD Yamaha 5013 MD/CD-R CD-R Yamaha 5001 TUNER TUNER Yamaha 5007 DVD DVD Yamaha 2000 DTV/CBL - - - E - - - CD MD/CD-R TUNER DVD DTV/CBL DVR...
... this case, repeat the clearing procedure. V-AUX/D OCK TUNER Yamaha 5011 DVR DVR Yamaha 2011 A TUNER Yamaha 5012 B TUNER Yamaha 5009 C TUNER Yamaha 5017 D - - - If this happens, repeat the setup procedure. ■ Resetting all remote control codes Use this case...RemoteSetup OK" appears; Remote control code default settings Input source Component category Manufacturer Default code CD CD Yamaha 5013 MD/CD-R CD-R Yamaha 5001 TUNER TUNER Yamaha 5007 DVD DVD Yamaha 2000 DTV/CBL - - - E - - - CD MD/CD-R TUNER DVD DTV/CBL DVR...

Owner's Manual
Page 58
... that it matches that are activated next time you want to reset the parameters of this unit including the set menu parameters. Advanced setup Advanced setup This unit has additional menus that of your listening environment. Notes • Only ASTANDBY/ON, KPROGRAM l / h and LSTRAIGHT are... effective while you are using the advanced setup menu. • No other areas. ■ Initializing PRESET Use this feature to reset all the parameters of this unit. However, the advanced setup menu parameters will not be made are reflected next time you are using...
... that it matches that are activated next time you want to reset the parameters of this unit including the set menu parameters. Advanced setup Advanced setup This unit has additional menus that of your listening environment. Notes • Only ASTANDBY/ON, KPROGRAM l / h and LSTRAIGHT are... effective while you are using the advanced setup menu. • No other areas. ■ Initializing PRESET Use this feature to reset all the parameters of this unit. However, the advanced setup menu parameters will not be made are reflected next time you are using...
Owner's Manual
Page 63
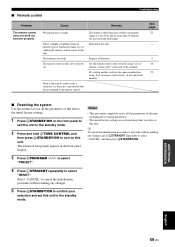
... this unit. ■ Remote control Troubleshooting Problem The remote control does not work nor function properly. Replace all the parameters of this unit. The advanced setup menu appears in the front panel display. Select "CANCEL" to cancel the initialization procedure without making any changes, press LSTRAIGHT repeatedly to select "CANCEL" and...
... this unit. ■ Remote control Troubleshooting Problem The remote control does not work nor function properly. Replace all the parameters of this unit. The advanced setup menu appears in the front panel display. Select "CANCEL" to cancel the initialization procedure without making any changes, press LSTRAIGHT repeatedly to select "CANCEL" and...

Owner's Manual
Page 67
... 48 Automatic preset tuning 38 Automatic tuning 37 ■B B)INPUT RENAME 49 B)MEMORY GUARD 50 B)SP LEVEL 46 BASIC SETUP 22, 43 Basic setup 43 BASS OUT 46 BGV 49 Bluetooth setting 50 Bluetooth status message 58 BT connected, Bluetooth status message 58 ■C ...Connecting speakers 11 Connecting the AM antennas 19 Connecting the FM antennas 19 Connecting the power cable 19 Connecting the Yamaha Bluetooth adapter 18 Connecting the Yamaha iPod universal dock ...........18 Connecting to the CENTER terminals 12 Connecting to the COMPONENT VIDEO jacks ..........16 Connecting ...
... 48 Automatic preset tuning 38 Automatic tuning 37 ■B B)INPUT RENAME 49 B)MEMORY GUARD 50 B)SP LEVEL 46 BASIC SETUP 22, 43 Basic setup 43 BASS OUT 46 BGV 49 Bluetooth setting 50 Bluetooth status message 58 BT connected, Bluetooth status message 58 ■C ...Connecting speakers 11 Connecting the AM antennas 19 Connecting the FM antennas 19 Connecting the power cable 19 Connecting the Yamaha Bluetooth adapter 18 Connecting the Yamaha iPod universal dock ...........18 Connecting to the CENTER terminals 12 Connecting to the COMPONENT VIDEO jacks ..........16 Connecting ...
Owner's Manual
Page 68
... the pages at the end of this unit to unprocessed input signals 36 Low-frequency effect level 47 ■M Manual preset tuning 38 MANUAL SETUP 43 Manual setup 43 Manual tuning 37 MAX VOL 48 Maximum volume 48 MEM.GUARD 50 Memory guard 50 Movie Dramatic 34 Movie Spacious 34 MULTI CH... INPUT jacks 9 Multi channel input setup 49 Multi-channel sources and sound field programs with headphones 36 Multi-information display 20 Music Disc Listening 26 Music Enh. 2ch 34 Music Enh...
... the pages at the end of this unit to unprocessed input signals 36 Low-frequency effect level 47 ■M Manual preset tuning 38 MANUAL SETUP 43 Manual setup 43 Manual tuning 37 MAX VOL 48 Maximum volume 48 MEM.GUARD 50 Memory guard 50 Movie Dramatic 34 Movie Spacious 34 MULTI CH... INPUT jacks 9 Multi channel input setup 49 Multi-channel sources and sound field programs with headphones 36 Multi-information display 20 Music Disc Listening 26 Music Enh. 2ch 34 Music Enh...


