Owner's Manual
Page 4
... as it may cause electrical shock to the user and/or damage to this unit. - Containers with a newspaper, tablecloth, curtain, etc. do not place: - Yamaha will not be exposed to excessive heat such as they may fall and liquid may cause fire, damage to this unit. 6 Do not cover this.... 14 Do not attempt to obstruct heat radiation. On the top of this unit may cause fire, damage to this unit, press ASTANDBY/ON to set for any service is designed to consume a very small quantity of this unit. 3 Locate this unit in a environment with a humidifier) to prevent condensation ...
... as it may cause electrical shock to the user and/or damage to this unit. - Containers with a newspaper, tablecloth, curtain, etc. do not place: - Yamaha will not be exposed to excessive heat such as they may fall and liquid may cause fire, damage to this unit. 6 Do not cover this.... 14 Do not attempt to obstruct heat radiation. On the top of this unit may cause fire, damage to this unit, press ASTANDBY/ON to set for any service is designed to consume a very small quantity of this unit. 3 Locate this unit in a environment with a humidifier) to prevent condensation ...

Owner's Manual
Page 5
...only 12 Information on jacks and cable plugs 13 Information on HDMI 14 Connecting video components 15 Connecting audio components 17 Connecting a Yamaha iPod™ universal dock and Bluetooth™ adapter 18 Connecting to production. In case of differences between the front panel and ...41 Pairing the Bluetooth™ adapter and your Bluetooth™ component 41 Playback of the Bluetooth™ component 41 Recording 42 ADVANCED OPERATION Set menu 43 Using set menu 44 1 SOUND MENU 45 2 INPUT MENU 48 3 OPTION MENU 50 Remote control features 51 Controlling this unit, a TV,...
...only 12 Information on jacks and cable plugs 13 Information on HDMI 14 Connecting video components 15 Connecting audio components 17 Connecting a Yamaha iPod™ universal dock and Bluetooth™ adapter 18 Connecting to production. In case of differences between the front panel and ...41 Pairing the Bluetooth™ adapter and your Bluetooth™ component 41 Playback of the Bluetooth™ component 41 Recording 42 ADVANCED OPERATION Set menu 43 Using set menu 44 1 SOUND MENU 45 2 INPUT MENU 48 3 OPTION MENU 50 Remote control features 51 Controlling this unit, a TV,...

Owner's Manual
Page 7
...have leaked, dispose of them correctly in accordance with your local regulations. • If the remote control is cleared, insert new batteries and set for more than 2 minutes, or if exhausted batteries remain in the remote control 13 ■ VOLTAGE SELECTOR (Asia and General models only)...-4) according to your local voltage BEFORE plugging the power cable into the AC wall outlet. dispose of them immediately. Improper setting of the VOLTAGE SELECTOR may be set up the remote control code. the operation range of the remote control decreases. • Do not use an old battery...
...have leaked, dispose of them correctly in accordance with your local regulations. • If the remote control is cleared, insert new batteries and set for more than 2 minutes, or if exhausted batteries remain in the remote control 13 ■ VOLTAGE SELECTOR (Asia and General models only)...-4) according to your local voltage BEFORE plugging the power cable into the AC wall outlet. dispose of them immediately. Improper setting of the VOLTAGE SELECTOR may be set up the remote control code. the operation range of the remote control decreases. • Do not use an old battery...
Owner's Manual
Page 8
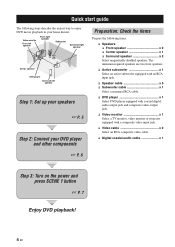
Video monitor Front left speaker Front right speaker Subwoofer Surround right speaker Center speaker DVD player Surround left speaker Step 1: Set up your speakers ☞ P. 5 Step 2: Connect your DVD player and other components Preparation: Check the items Prepare the following steps describe the easiest way to ...
Video monitor Front left speaker Front right speaker Subwoofer Surround right speaker Center speaker DVD player Surround left speaker Step 1: Set up your speakers ☞ P. 5 Step 2: Connect your DVD player and other components Preparation: Check the items Prepare the following steps describe the easiest way to ...

Owner's Manual
Page 9
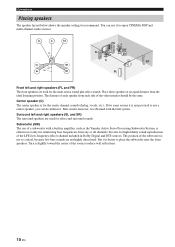
..., etc.) cable to each speaker cable to this unit and the subwoofer are colored or shaped differently, perhaps with a stripe, groove or ridge. INTRODUCTION Step 1: Set up your speakers Place your speakers in the room. 2 Connect speaker cables to the "+" (red) terminals of this unit. 4 Connect the subwoofer cable to the...
..., etc.) cable to each speaker cable to this unit and the subwoofer are colored or shaped differently, perhaps with a stripe, groove or ridge. INTRODUCTION Step 1: Set up your speakers Place your speakers in the room. 2 Connect speaker cables to the "+" (red) terminals of this unit. 4 Connect the subwoofer cable to the...

Owner's Manual
Page 11
...optimize own status for this room. The SCENE templates are 6 ohm speakers, set the input source selector of the video monitor to the SCENE button. sound field program: STRAIGHT For when you connect a Yamaha product that has been assigned to this room. INTRODUCTION Step 3: Turn on the...the other SCENE buttons Default SCENE button SCENE 1 SCENE 2 SCENE 3 SCENE 4 The name of the desired DVD on the video monitor and then set "SP IMP." input source: DVD - input source: TUNER - sound field program: Music Enh. 5ch For when you can automatically activate the component ...
...optimize own status for this room. The SCENE templates are 6 ohm speakers, set the input source selector of the video monitor to the SCENE button. sound field program: STRAIGHT For when you connect a Yamaha product that has been assigned to this room. INTRODUCTION Step 3: Turn on the...the other SCENE buttons Default SCENE button SCENE 1 SCENE 2 SCENE 3 SCENE 4 The name of the desired DVD on the video monitor and then set "SP IMP." input source: DVD - input source: TUNER - sound field program: Music Enh. 5ch For when you can automatically activate the component ...

Owner's Manual
Page 12
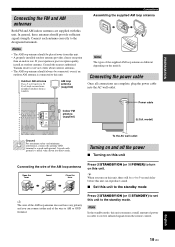
... AM loop antenna, or adjust the position of the end of the indoor FM antenna. Press ASTANDBY/ON on the front panel to set to the standby mode. What do with this unit? ■ Customizing the SCENE templates • Using various SCENE templates ☞...; P. 37 • Using your listening room (BASIC SETUP) ☞ P. 22 • Manually adjusting various parameters of this unit ☞ P. 43 • Setting the remote control ☞ P. 51 • Adjusting the advanced parameters ☞ P. 54 ■ Additional features • Automatically turning off this unit ☞ P....
... AM loop antenna, or adjust the position of the end of the indoor FM antenna. Press ASTANDBY/ON on the front panel to set to the standby mode. What do with this unit? ■ Customizing the SCENE templates • Using various SCENE templates ☞...; P. 37 • Using your listening room (BASIC SETUP) ☞ P. 22 • Manually adjusting various parameters of this unit ☞ P. 43 • Setting the remote control ☞ P. 51 • Adjusting the advanced parameters ☞ P. 54 ■ Additional features • Automatically turning off this unit ☞ P....
Owner's Manual
Page 14
... the center of the subwoofer is not so critical, because low bass sounds are obtained with a built-in amplifier, such as the Yamaha Active Servo Processing Subwoofer System, is effective not only for reinforcing bass frequencies from any or all channels, but also for some reason ...The front speakers are used for the center channel sounds (dialog, vocals, etc.). Connections Placing speakers The speaker layout below shows the speaker setting we recommend. Place these speakers at an equal distance from each side of the LFE (low-frequency effect) channel included in Dolby Digital ...
... the center of the subwoofer is not so critical, because low bass sounds are obtained with a built-in amplifier, such as the Yamaha Active Servo Processing Subwoofer System, is effective not only for reinforcing bass frequencies from any or all channels, but also for some reason ...The front speakers are used for the center channel sounds (dialog, vocals, etc.). Connections Placing speakers The speaker layout below shows the speaker setting we recommend. Place these speakers at an equal distance from each side of the LFE (low-frequency effect) channel included in Dolby Digital ...

Owner's Manual
Page 15
... of this unit. Connect the plain cable to the "+" (red) terminals of insulated cables running side by side. PREPARATION Connections Connecting speakers Be sure to set "SP IMP." Remove approximately 10 mm (3/8") of this unit. • If you are faulty, this unit and/or speakers. • Use magnetically shielded speakers. Cables...
... of this unit. Connect the plain cable to the "+" (red) terminals of insulated cables running side by side. PREPARATION Connections Connecting speakers Be sure to set "SP IMP." Remove approximately 10 mm (3/8") of this unit. • If you are faulty, this unit and/or speakers. • Use magnetically shielded speakers. Cables...

Owner's Manual
Page 16
...■ Connecting to the FRONT B, CENTER, and SURROUND terminals 4 Press LSTRAIGHT repeatedly to the FRONT A terminals 2 1 Red: positive (+) Black: negative (-) 3 Setting the speaker impedance (U.S.A. SP IMP.- 6 MIN 5 Press ASTANDBY/ON to "6ΩMIN" as follows BEFORE using this unit. 1 Loosen the knob. 2 Insert the...wire. Connections ■ Connecting to select "6ΩMIN". This unit turns on the terminal. 3 Release the tab to use 6 ohm speakers, set this unit. Red: positive (+) Black: negative (-) 1 Press down the tab. 2 Insert the bare end of the speaker wire into the...
...■ Connecting to the FRONT B, CENTER, and SURROUND terminals 4 Press LSTRAIGHT repeatedly to the FRONT A terminals 2 1 Red: positive (+) Black: negative (-) 3 Setting the speaker impedance (U.S.A. SP IMP.- 6 MIN 5 Press ASTANDBY/ON to "6ΩMIN" as follows BEFORE using this unit. 1 Loosen the knob. 2 Insert the...wire. Connections ■ Connecting to select "6ΩMIN". This unit turns on the terminal. 3 Release the tab to use 6 ohm speakers, set this unit. Red: positive (+) Black: negative (-) 1 Press down the tab. 2 Insert the bare end of the speaker wire into the...

Owner's Manual
Page 18
... output from the connected component (such as DVD player etc.) are output to the connected video monitor only when this unit is turned on and set to this unit using HDMI connections.
... output from the connected component (such as DVD player etc.) are output to the connected video monitor only when this unit is turned on and set to this unit using HDMI connections.

Owner's Manual
Page 20
... DVD player Notes • Connect the input source components to the HDMI DVD or HDMI DTV/CBL jack to display the video images on and set to this unit using the HDMI or COMPONENT VIDEO connection. Refer to this unit using HDMI or COMPONENT VIDEO connections. Note Be sure to connect...
... DVD player Notes • Connect the input source components to the HDMI DVD or HDMI DTV/CBL jack to display the video images on and set to this unit using the HDMI or COMPONENT VIDEO connection. Refer to this unit using HDMI or COMPONENT VIDEO connections. Note Be sure to connect...
Owner's Manual
Page 23
...In the standby mode, this unit consumes a small amount of vinyl-covered wire extended outdoors from the remote control. Consult the nearest authorized Yamaha dealer or service center about outdoor antennas. • The AM loop antenna should always be a 4 to receive infrared signals from a window... antenna. A good earth ground is different depending on this unit. In general, these antennas should be placed away from this unit to set this unit. • A properly installed outdoor antenna provides clearer reception than an indoor one. If you turn on the models. AM loop...
...In the standby mode, this unit consumes a small amount of vinyl-covered wire extended outdoors from the remote control. Consult the nearest authorized Yamaha dealer or service center about outdoor antennas. • The AM loop antenna should always be a 4 to receive infrared signals from a window... antenna. A good earth ground is different depending on this unit. In general, these antennas should be placed away from this unit to set this unit. • A properly installed outdoor antenna provides clearer reception than an indoor one. If you turn on the models. AM loop...

Owner's Manual
Page 24
... (see page 30). Input channel indicators Indicate the channel components of the current sound field program and other information when adjusting or changing settings. B SP A B indicators Light up according to show the currently selected input source. 7 Tuner indicators Lights up when this unit is... Bluetooth component (see page 41). • Light up while the connected Yamaha Bluetooth adaptor is connected to the Bluetooth component (see page 18). 6 Input source indicators The corresponding cursor lights up to the set of front speakers selected (see page 33). G Input channel and speaker ...
... (see page 30). Input channel indicators Indicate the channel components of the current sound field program and other information when adjusting or changing settings. B SP A B indicators Light up according to show the currently selected input source. 7 Tuner indicators Lights up when this unit is... Bluetooth component (see page 41). • Light up while the connected Yamaha Bluetooth adaptor is connected to the Bluetooth component (see page 18). 6 Input source indicators The corresponding cursor lights up to the set of front speakers selected (see page 33). G Input channel and speaker ...
Owner's Manual
Page 25
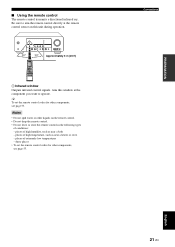
... remote control codes for other components, see page 53. places of conditions: - Connections English 21 En dusty places • To set the remote control codes for other liquids on this window at the component you want to aim the remote control directly at the remote control ...
... remote control codes for other components, see page 53. places of conditions: - Connections English 21 En dusty places • To set the remote control codes for other liquids on this window at the component you want to aim the remote control directly at the remote control ...
Owner's Manual
Page 26
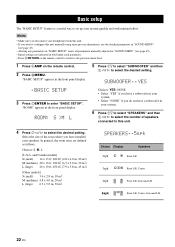
... to select "SUBWOOFER" and then 7l / h to enter "BASIC SETUP". In general, the room sizes are indicated in "SOUND MENU" (see page 45). • Initial settings are defined as follows: Choices: S, M, L [U.S.A. and Canada models] S (small) 16 x 13 ft, 200 ft2 (4.8 x 4.0 m, 20 m2) M (medium) 20 x 16 ft, 300 ft2 ... Notes • Make sure you disconnect your system quickly and with minimal effort. YES .BASIC SETUP 3 Press 7ENTER to select the desired setting. Select the size of the room where you have a subwoofer in the front panel display. Basic setup Basic setup The "BASIC SETUP" ...
... to select "SUBWOOFER" and then 7l / h to enter "BASIC SETUP". In general, the room sizes are indicated in "SOUND MENU" (see page 45). • Initial settings are defined as follows: Choices: S, M, L [U.S.A. and Canada models] S (small) 16 x 13 ft, 200 ft2 (4.8 x 4.0 m, 20 m2) M (medium) 20 x 16 ft, 300 ft2 ... Notes • Make sure you disconnect your system quickly and with minimal effort. YES .BASIC SETUP 3 Press 7ENTER to select the desired setting. Select the size of the room where you have a subwoofer in the front panel display. Basic setup Basic setup The "BASIC SETUP" ...

Owner's Manual
Page 27
... speakers. • Select "SR" to adjust the balance between the surround left and surround right speakers. • Select "SWFR" to select the desired setting. If you selected "YES" in turn . "CHECK:TestTone" appears in the front panel display. 9 Press 7l / h to adjust the balance. appears... in the front panel display. 11 Press 7k / n to select a speaker and then 7l / h to select the desired setting. Press HMENU to exit from each speaker were satisfactory. • Select "NO" to proceed to the speaker level adjustment menu to balance the output level...
... speakers. • Select "SR" to adjust the balance between the surround left and surround right speakers. • Select "SWFR" to select the desired setting. If you selected "YES" in turn . "CHECK:TestTone" appears in the front panel display. 9 Press 7l / h to adjust the balance. appears... in the front panel display. 11 Press 7k / n to select a speaker and then 7l / h to select the desired setting. Press HMENU to exit from each speaker were satisfactory. • Select "NO" to proceed to the speaker level adjustment menu to balance the output level...
Owner's Manual
Page 28
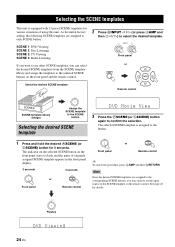
As the initial factory setting, the following SCENE templates are assigned to the corresponding SCENE buttons, you can select the desired SCENE templates from the SCENE template library and assign ... 3 seconds. The indicator on the selected SCENE button on the front panel and the remote control. 2 Press NINPUT l / h (or press 4AMP and then 7l / h) to set the input source of using this unit. Note Once the desired SCENE templates are assigned to each SCENE button: SCENE 1: DVD Viewing SCENE 2: Disc Listening...
As the initial factory setting, the following SCENE templates are assigned to the corresponding SCENE buttons, you can select the desired SCENE templates from the SCENE template library and assign ... 3 seconds. The indicator on the selected SCENE button on the front panel and the remote control. 2 Press NINPUT l / h (or press 4AMP and then 7l / h) to set the input source of using this unit. Note Once the desired SCENE templates are assigned to each SCENE button: SCENE 1: DVD Viewing SCENE 2: Disc Listening...

Owner's Manual
Page 30
...template when you enjoy sports programs on your iPod stationed in a Yamaha iPod universal dock or Bluetooth component that is connected to the Bluetooth adapter. CD 2ch Stereo Radio Listening (SCENE 4 as the default setting) Select this SCENE template when you enjoy FM or AM radio ... the SCENE templates ■ Preset SCENE template descriptions SCENE template Features Input source Playback mode DVD Viewing (SCENE 1 as the default setting) Select this SCENE template when you play back general contents on your CD player. DVD 5ch Stereo CD Listening Select this SCENE template...
...template when you enjoy sports programs on your iPod stationed in a Yamaha iPod universal dock or Bluetooth component that is connected to the Bluetooth adapter. CD 2ch Stereo Radio Listening (SCENE 4 as the default setting) Select this SCENE template when you enjoy FM or AM radio ... the SCENE templates ■ Preset SCENE template descriptions SCENE template Features Input source Playback mode DVD Viewing (SCENE 1 as the default setting) Select this SCENE template when you play back general contents on your CD player. DVD 5ch Stereo CD Listening Select this SCENE template...
Owner's Manual
Page 31
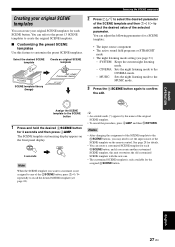
...following parameters for a SCENE template: • The input source component • The active sound field programs or STRAIGHT mode • The night listening mode setting (see page 24). 1 y • An asterisk mark (*) appears by the name of the 5SCENE button, press 7l / h repeatedly to customize the ... desired SCENE template (see page 31) − SYSTEM: Keeps the current night listening mode. − CINEMA: Sets the night listening mode to the CINEMA mode. − MUSIC: Sets the night listening mode to the MUSIC mode. 3 Press the 5SCENE button again to confirm the edit. 1 Assign...
...following parameters for a SCENE template: • The input source component • The active sound field programs or STRAIGHT mode • The night listening mode setting (see page 24). 1 y • An asterisk mark (*) appears by the name of the 5SCENE button, press 7l / h repeatedly to customize the ... desired SCENE template (see page 31) − SYSTEM: Keeps the current night listening mode. − CINEMA: Sets the night listening mode to the CINEMA mode. − MUSIC: Sets the night listening mode to the MUSIC mode. 3 Press the 5SCENE button again to confirm the edit. 1 Assign...

