
Owner's Manual
Page 5
...the button name on HDMI 14 Connecting video components 15 Connecting audio components 17 Connecting a Yamaha iPod™ universal dock and Bluetooth™ adapter 18 Connecting to production. INTRODUCTION PREPARATION... Getting started 3 Quick start guide 4 Preparation: Check the items 4 Step 1: Set up your speakers 5 Step 2: Connect your operation. • Some operations can be performed by using either the buttons... 19 Turning on and off the power 19 Front panel display 20 Basic setup 22 BASIC OPERATION Selecting the SCENE templates 24 Selecting the desired SCENE template...
...the button name on HDMI 14 Connecting video components 15 Connecting audio components 17 Connecting a Yamaha iPod™ universal dock and Bluetooth™ adapter 18 Connecting to production. INTRODUCTION PREPARATION... Getting started 3 Quick start guide 4 Preparation: Check the items 4 Step 1: Set up your speakers 5 Step 2: Connect your operation. • Some operations can be performed by using either the buttons... 19 Turning on and off the power 19 Front panel display 20 Basic setup 22 BASIC OPERATION Selecting the SCENE templates 24 Selecting the desired SCENE template...

Owner's Manual
Page 12
... infrared signals from the standby mode, press ASTANDBY/ON (or DPOWER) on the front panel to set to 39 for your listening room (BASIC SETUP) ☞ P. 22 • Manually adjusting various parameters of this unit ☞ P. 43 • Setting the remote control ☞ ...51 • Adjusting the advanced parameters ☞ P. 54 ■ Additional features • Automatically turning off this unit • Optimizing the speaker parameters for the tuning information. *4 To achieve the best possible reception, orient the connected AM loop antenna, or adjust the position of the ...
... infrared signals from the standby mode, press ASTANDBY/ON (or DPOWER) on the front panel to set to 39 for your listening room (BASIC SETUP) ☞ P. 22 • Manually adjusting various parameters of this unit ☞ P. 43 • Setting the remote control ☞ ...51 • Adjusting the advanced parameters ☞ P. 54 ■ Additional features • Automatically turning off this unit • Optimizing the speaker parameters for the tuning information. *4 To achieve the best possible reception, orient the connected AM loop antenna, or adjust the position of the ...

Owner's Manual
Page 16
.... Red: positive (+) Black: negative (-) 1 Press down the tab. 2 Insert the bare end of the speaker wire into the hole on , an the advanced setup menu appears in the front panel display. Connections ■ Connecting to use 6 ohm speakers, set this unit. Connecting the banana plug (except Europe, Russia, Korea, and Asia models) The...
.... Red: positive (+) Black: negative (-) 1 Press down the tab. 2 Insert the bare end of the speaker wire into the hole on , an the advanced setup menu appears in the front panel display. Connections ■ Connecting to use 6 ohm speakers, set this unit. Connecting the banana plug (except Europe, Russia, Korea, and Asia models) The...
Owner's Manual
Page 26
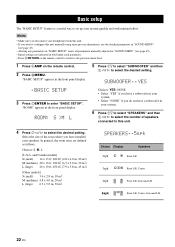
...the desired setting. YES .BASIC SETUP 3 Press 7ENTER to select the desired setting. Select the size of the room where you have a subwoofer in your system. 6 Press 7n to select "SPEAKERS" and then 7l / h to select the number of speakers connected to this unit manually ...8226; Initial settings are defined as follows: Choices: S, M, L [U.S.A. ROOM: S >M L Choices: YES, NONE • Select "YES" if you disconnect your speakers. In general, the room sizes are indicated in the front panel display. SUBWOOFER .. Notes • Make sure you have a subwoofer in "SOUND MENU" (see page...
...the desired setting. YES .BASIC SETUP 3 Press 7ENTER to select the desired setting. Select the size of the room where you have a subwoofer in your system. 6 Press 7n to select "SPEAKERS" and then 7l / h to select the number of speakers connected to this unit manually ...8226; Initial settings are defined as follows: Choices: S, M, L [U.S.A. ROOM: S >M L Choices: YES, NONE • Select "YES" if you disconnect your speakers. In general, the room sizes are indicated in the front panel display. SUBWOOFER .. Notes • Make sure you have a subwoofer in "SOUND MENU" (see page...

Owner's Manual
Page 27
...turn . CHECK OK? ..YES Choices: YES, NO • Select "YES" to complete the setup procedure if the test tone levels from each speaker were satisfactory. • Select "NO" to proceed to the speaker level adjustment menu to the top set menu display. English 23 En "CHECK:TestTone" appears in... • Select "SET" to apply the settings you selected "YES" in step 9, the setup procedure is completed and the display returns to balance the output level of the speakers. 12 Press HMENU to exit from "BASIC SETUP". • If you selected "SET" in the front panel display. 9 Press 7l / ...
...turn . CHECK OK? ..YES Choices: YES, NO • Select "YES" to complete the setup procedure if the test tone levels from each speaker were satisfactory. • Select "NO" to proceed to the speaker level adjustment menu to the top set menu display. English 23 En "CHECK:TestTone" appears in... • Select "SET" to apply the settings you selected "YES" in step 9, the setup procedure is completed and the display returns to balance the output level of the speakers. 12 Press HMENU to exit from "BASIC SETUP". • If you selected "SET" in the front panel display. 9 Press 7l / ...
Owner's Manual
Page 36
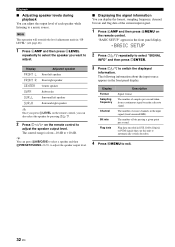
... in the front panel display. ;BASIC SETUP 2 Press 7k / n repeatedly to exit. 32 En Display Adjusted speaker FRONT L Front left speaker FRONT R Front right speaker CENTER Center speaker SWFR Subwoofer SUR.L Surround left speaker SUR.R Surround right speaker y Once you press 6LEVEL on the remote control, you want to adjust... in the front panel display. The number of bits passing a given point per second taken from -10 dB to adjust the speaker output level. Flag data encoded in DTS, Dolby Digital, or PCM signals that cue this unit to automatically switch decoders. 4 ...
... in the front panel display. ;BASIC SETUP 2 Press 7k / n repeatedly to exit. 32 En Display Adjusted speaker FRONT L Front left speaker FRONT R Front right speaker CENTER Center speaker SWFR Subwoofer SUR.L Surround left speaker SUR.R Surround right speaker y Once you press 6LEVEL on the remote control, you want to adjust... in the front panel display. The number of bits passing a given point per second taken from -10 dB to adjust the speaker output level. Flag data encoded in DTS, Dolby Digital, or PCM signals that cue this unit to automatically switch decoders. 4 ...
Owner's Manual
Page 47
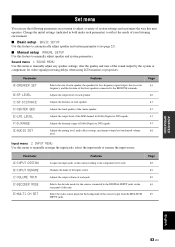
..., and the location of your listening environment. ■ Basic setup BASIC SETUP Use this feature to automatically adjust speaker and system parameters (see page 22). ■ Manual setup MANUAL SETUP Use this menu to manually adjust speaker and system parameters. Select the video source played in the background... of the sources in bold under each parameter) to reflect the needs of the front speakers connected to the DIGITAL INPUT ...
..., and the location of your listening environment. ■ Basic setup BASIC SETUP Use this feature to automatically adjust speaker and system parameters (see page 22). ■ Manual setup MANUAL SETUP Use this menu to manually adjust speaker and system parameters. Select the video source played in the background... of the sources in bold under each parameter) to reflect the needs of the front speakers connected to the DIGITAL INPUT ...

Owner's Manual
Page 58
... reset all the parameters of this feature to the standby mode. Advanced setup Advanced setup This unit has additional menus that of your speakers. The name of the selected parameter appears in your area. Speaker Impedance level 8ΩMIN Front (A or B) Center Surround The impedance ... • Select "AM9/FM50" for all the parameters of your selection and set the speaker impedance of this unit. ■ Speaker impedance SP IMP. (U.S.A. However, the advanced setup menu parameters will not be made are activated next time you want to the initial factory settings...
... reset all the parameters of this feature to the standby mode. Advanced setup Advanced setup This unit has additional menus that of your speakers. The name of the selected parameter appears in your area. Speaker Impedance level 8ΩMIN Front (A or B) Center Surround The impedance ... • Select "AM9/FM50" for all the parameters of your selection and set the speaker impedance of this unit. ■ Speaker impedance SP IMP. (U.S.A. However, the advanced setup menu parameters will not be made are activated next time you want to the initial factory settings...

Owner's Manual
Page 67
... 48 Automatic preset tuning 38 Automatic tuning 37 ■B B)INPUT RENAME 49 B)MEMORY GUARD 50 B)SP LEVEL 46 BASIC SETUP 22, 43 Basic setup 43 BASS OUT 46 BGV 49 Bluetooth setting 50 Bluetooth status message 58 BT connected, Bluetooth status message 58 ■C ...15 Connecting a video monitor 15 Connecting audio components 17 Connecting speakers 11 Connecting the AM antennas 19 Connecting the FM antennas 19 Connecting the power cable 19 Connecting the Yamaha Bluetooth adapter 18 Connecting the Yamaha iPod universal dock ...........18 Connecting to the CENTER terminals 12 ...
... 48 Automatic preset tuning 38 Automatic tuning 37 ■B B)INPUT RENAME 49 B)MEMORY GUARD 50 B)SP LEVEL 46 BASIC SETUP 22, 43 Basic setup 43 BASS OUT 46 BGV 49 Bluetooth setting 50 Bluetooth status message 58 BT connected, Bluetooth status message 58 ■C ...15 Connecting a video monitor 15 Connecting audio components 17 Connecting speakers 11 Connecting the AM antennas 19 Connecting the FM antennas 19 Connecting the power cable 19 Connecting the Yamaha Bluetooth adapter 18 Connecting the Yamaha iPod universal dock ...........18 Connecting to the CENTER terminals 12 ...
Owner's Manual
Page 68
... end of this unit to unprocessed input signals 36 Low-frequency effect level 47 ■M Manual preset tuning 38 MANUAL SETUP 43 Manual setup 43 Manual tuning 37 MAX VOL 48 Maximum volume 48 MEM.GUARD 50 Memory guard 50 Movie Dramatic 34 Movie Spacious...Sound menu 43 SP A B indicators 20 SP D.R 47 SP IMP 54 SP LFE 47 Speaker distance 47 Speaker distances 47 Speaker dynamic range 47 Speaker impedance 54 Speaker level 46 Speaker LFE 47 Speaker settings 45 SPEAKERS terminals 9 Specifications 62 START PAIRING 50 Start pairing 50 Straight mode 36 SUBWOOFER OUTPUT jack 9...
... end of this unit to unprocessed input signals 36 Low-frequency effect level 47 ■M Manual preset tuning 38 MANUAL SETUP 43 Manual setup 43 Manual tuning 37 MAX VOL 48 Maximum volume 48 MEM.GUARD 50 Memory guard 50 Movie Dramatic 34 Movie Spacious...Sound menu 43 SP A B indicators 20 SP D.R 47 SP IMP 54 SP LFE 47 Speaker distance 47 Speaker distances 47 Speaker dynamic range 47 Speaker impedance 54 Speaker level 46 Speaker LFE 47 Speaker settings 45 SPEAKERS terminals 9 Specifications 62 START PAIRING 50 Start pairing 50 Straight mode 36 SUBWOOFER OUTPUT jack 9...


