
Owner's Manual
Page 5
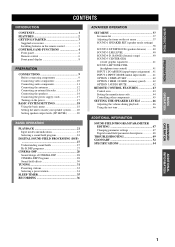
........... 41 OPTION 1 DISPLAY SET 42 OPTION 2 MEM. GUARD (memory guard) ......... 42 OPTION 3 AUDIO MUTE 42 REMOTE CONTROL FEATURES 43 Control area 43 Setting the manufacturer code 44 Controlling other components 45 SETTING THE SPEAKER LEVELS 46 Adjusting the...BASIC OPERATION CONTENTS INTRODUCTION CONTENTS 1 FEATURES 2 GETTING STARTED 3 Supplied accessories 3 Installing batteries in the remote control 3 CONTROLS AND FUNCTIONS 4 Front panel 4 Remote control 6 Front panel display 8 PREPARATION CONNECTIONS 9 Before connecting components 9 Connecting video components 10 ...
........... 41 OPTION 1 DISPLAY SET 42 OPTION 2 MEM. GUARD (memory guard) ......... 42 OPTION 3 AUDIO MUTE 42 REMOTE CONTROL FEATURES 43 Control area 43 Setting the manufacturer code 44 Controlling other components 45 SETTING THE SPEAKER LEVELS 46 Adjusting the...BASIC OPERATION CONTENTS INTRODUCTION CONTENTS 1 FEATURES 2 GETTING STARTED 3 Supplied accessories 3 Installing batteries in the remote control 3 CONTROLS AND FUNCTIONS 4 Front panel 4 Remote control 6 Front panel display 8 PREPARATION CONNECTIONS 9 Before connecting components 9 Connecting video components 10 ...
Owner's Manual
Page 6
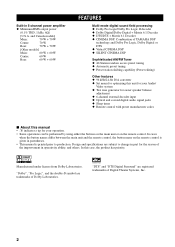
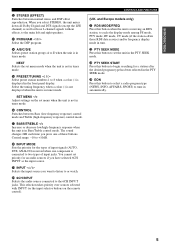
... In this unit for your operation. • Some operations can be performed by using either the buttons on the main unit or on the remote control is given in parentheses. • This manual is printed prior to change in 5-channel power amplifier N Minimum RMS output power (0.1% THD... 6-channel external decoder input N Optical and coaxial digital audio signal jacks N Sleep timer N Remote control with preset manufacturer codes I About this manual • y indicates a tip for the reason of YAMAHA DSP technology and Dolby Pro Logic, Dolby Digital or DTS N Virtual CINEMA DSP N SILENT ...
... In this unit for your operation. • Some operations can be performed by using either the buttons on the main unit or on the remote control is given in parentheses. • This manual is printed prior to change in 5-channel power amplifier N Minimum RMS output power (0.1% THD... 6-channel external decoder input N Optical and coaxial digital audio signal jacks N Sleep timer N Remote control with preset manufacturer codes I About this manual • y indicates a tip for the reason of YAMAHA DSP technology and Dolby Pro Logic, Dolby Digital or DTS N Virtual CINEMA DSP N SILENT ...
Owner's Manual
Page 7
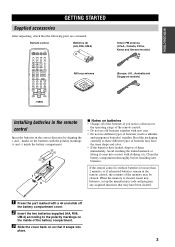
... batteries remain in the correct direction by aligning the + and - Read the packaging carefully as alkaline and manganese batteries) together. If the remote control is cleared, insert new batteries, set up the manufacturer code and program any acquired functions that may be cleared. marks on the batteries... with the polarity markings (+ and -) inside of them immediately. Remote control SYSTEM POWER POWER STANDBY POWER TV AV CD MD/CD-R TUNER SLEEP DVD D-TV/CBL VCR V-AUX REC DISC SKIP AUDIO 6CH ...
... batteries remain in the correct direction by aligning the + and - Read the packaging carefully as alkaline and manganese batteries) together. If the remote control is cleared, insert new batteries, set up the manufacturer code and program any acquired functions that may be cleared. marks on the batteries... with the polarity markings (+ and -) inside of them immediately. Remote control SYSTEM POWER POWER STANDBY POWER TV AV CD MD/CD-R TUNER SLEEP DVD D-TV/CBL VCR V-AUX REC DISC SKIP AUDIO 6CH ...
Owner's Manual
Page 8
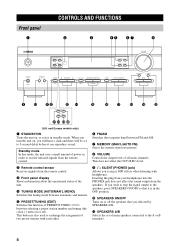
and Europe models only) 1 STANDBY/ON Turns the unit on, or sets it in order to receive infrared-signals from the remote control. 2 Remote control sensor Receives signals from the speakers. Standby mode In this mode, the unit uses a small amount of power in standby mode. This button ... , you turn the unit on or off ). Inserting the plug from your headphones into the PHONES jack does not affect the sound output from the remote control. 3 Front panel display Shows information about the operational status of the unit. 4 TUNING MODE (AUTO/MAN'L MONO) Switches the tuning mode between automatic ...
and Europe models only) 1 STANDBY/ON Turns the unit on, or sets it in order to receive infrared-signals from the remote control. 2 Remote control sensor Receives signals from the speakers. Standby mode In this mode, the unit uses a small amount of power in standby mode. This button ... , you turn the unit on or off ). Inserting the plug from your headphones into the PHONES jack does not affect the sound output from the remote control. 3 Front panel display Shows information about the operational status of the unit. 4 TUNING MODE (AUTO/MAN'L MONO) Switches the tuning mode between automatic ...
Owner's Manual
Page 9
.... Select the tuning frequency when a colon (:) is not displayed when the unit is in tuner mode. CONTROLS AND FUNCTIONS (U.K. SET MENU -/+ Adjust settings on the remote control). o INPUT l / h Selects the input source you press one component is receiving an RDS station, to cycle the display mode among PS mode, PTY mode...
.... Select the tuning frequency when a colon (:) is not displayed when the unit is in tuner mode. CONTROLS AND FUNCTIONS (U.K. SET MENU -/+ Adjust settings on the remote control). o INPUT l / h Selects the input source you press one component is receiving an RDS station, to cycle the display mode among PS mode, PTY mode...
Owner's Manual
Page 10
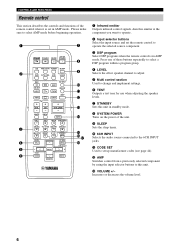
... the input selector buttons to this unit in standby mode. 8 SYSTEM POWER Turns on the power of the remote control when it is in AMP mode. e VOLUME +/- q CODE SET Used to set the remote control to operate the selected source component. 3 DSP program Select DSP programs when the... remote control is set in AMP mode. CONTROLS AND FUNCTIONS Remote control This section describes the controls and functions of the unit. 9 SLEEP Sets...
... the input selector buttons to this unit in standby mode. 8 SYSTEM POWER Turns on the power of the remote control when it is in AMP mode. e VOLUME +/- q CODE SET Used to set the remote control to operate the selected source component. 3 DSP program Select DSP programs when the... remote control is set in AMP mode. CONTROLS AND FUNCTIONS Remote control This section describes the controls and functions of the unit. 9 SLEEP Sets...

Owner's Manual
Page 11
... types of conditions: - TEST RETURN SELECT SET MENU MENU A/B/C/D/E + PRESET/CH DISPLAY Approximately 6 m (20 feet) The remote control transmits a directional infrared beam. I Using the remote control STANDBY /ON PRESET/TUNING FM/AM EDIT TUNING MODE MEMORY AUTO/MAN`L MONO MAN`L/AUTO FM SILENT PHONES SPEAKERS ON A... the set menu mode. high humidity or temperature such as those 2-channel signals without effect sounds, to aim the remote control directly at the remote control sensor on or off the Dolby Digital + Matrix 6.1 or DTS + Matrix 6.1 decoder. dusty places; or -
... types of conditions: - TEST RETURN SELECT SET MENU MENU A/B/C/D/E + PRESET/CH DISPLAY Approximately 6 m (20 feet) The remote control transmits a directional infrared beam. I Using the remote control STANDBY /ON PRESET/TUNING FM/AM EDIT TUNING MODE MEMORY AUTO/MAN`L MONO MAN`L/AUTO FM SILENT PHONES SPEAKERS ON A... the set menu mode. high humidity or temperature such as those 2-channel signals without effect sounds, to aim the remote control directly at the remote control sensor on or off the Dolby Digital + Matrix 6.1 or DTS + Matrix 6.1 decoder. dusty places; or -
Owner's Manual
Page 20
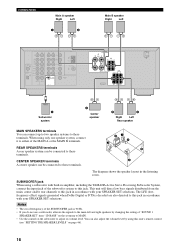
... 6Ω MIN./SPEAKER 4 Subwoofer system 3 Center speaker 5 6 Right Left Rear speaker MAIN SPEAKERS terminals You can be connected to this unit's remote control (see "SETTING THE SPEAKER LEVELS" on the subwoofer to MAIN. • Use the control on page 46). 16 REAR SPEAKERS terminals A... rear speaker system can connect up to two speaker systems to this jack in amplifier, including the YAMAHA Active Servo Processing Subwoofer System, connect the input jack of the MAIN A or the MAIN B terminals. CONNECTIONS Main A speaker Right ...
... 6Ω MIN./SPEAKER 4 Subwoofer system 3 Center speaker 5 6 Right Left Rear speaker MAIN SPEAKERS terminals You can be connected to this unit's remote control (see "SETTING THE SPEAKER LEVELS" on the subwoofer to MAIN. • Use the control on page 46). 16 REAR SPEAKERS terminals A... rear speaker system can connect up to two speaker systems to this jack in amplifier, including the YAMAHA Active Servo Processing Subwoofer System, connect the input jack of the MAIN A or the MAIN B terminals. CONNECTIONS Main A speaker Right ...

Owner's Manual
Page 21
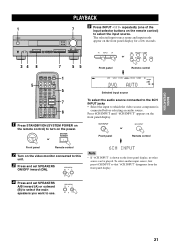
SYSTEM POWER STANDBY /ON or Front panel Remote control The level of this unit must be set for your local main voltage BEFORE plugging into the AC main supply. I Connecting the AC power .../CD-R TUNER SLEEP DVD D-TV/CBL VCR V-AUX REC DISC SKIP TV ++ AUDIO 6CH INPUT CODE SET AMP + 1 1 Press STANDBY/ON (SYSTEM POWER on the remote control) to a wall outlet. PREPARATION Connecting the power supply cords VOLTAGE SELECTOR CONNECTIONS Turning on the power When all connections are 110V120V/220V-240V AC...
SYSTEM POWER STANDBY /ON or Front panel Remote control The level of this unit must be set for your local main voltage BEFORE plugging into the AC main supply. I Connecting the AC power .../CD-R TUNER SLEEP DVD D-TV/CBL VCR V-AUX REC DISC SKIP TV ++ AUDIO 6CH INPUT CODE SET AMP + 1 1 Press STANDBY/ON (SYSTEM POWER on the remote control) to a wall outlet. PREPARATION Connecting the power supply cords VOLTAGE SELECTOR CONNECTIONS Turning on the power When all connections are 110V120V/220V-240V AC...
Owner's Manual
Page 22
... in the "SOUND" menu. AMP TV ++ VOL CH - - + VOLUME - SETUP Changes the speaker and amplifier settings to show anything - Using the basic menu Use the remote control to make adjustments. • Press SPEAKERS A/B on page 20 for more detailed parameters from the "SOUND" menu instead of the speakers. MUTE INPUT MUTE...
... in the "SOUND" menu. AMP TV ++ VOL CH - - + VOLUME - SETUP Changes the speaker and amplifier settings to show anything - Using the basic menu Use the remote control to make adjustments. • Press SPEAKERS A/B on page 20 for more detailed parameters from the "SOUND" menu instead of the speakers. MUTE INPUT MUTE...
Owner's Manual
Page 25
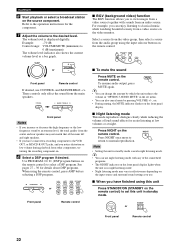
... ROCK ENTERTAINMENT 3 4 MUSIC TV THTR MOVIE1 MOVIE2 5 6 7 8 /DTS 9 NIGHT 0 6.1/5.1 +10 STEREO ENTER 1 5 7 8 1 Press STANDBY/ON (SYSTEM POWER on the remote control) to which the video source component is shown on the front panel display, no other source can be played. To select another input source...MENU CONTROL BASS/TREBLE VOLUME INPUT MODE 6CH INPUT INPUT 5 Press INPUT l / h repeatedly (one of the input selector buttons on the remote control) to use. The selected input source name and input mode appear on the video monitor connected to this unit. 3 Press and ...
... ROCK ENTERTAINMENT 3 4 MUSIC TV THTR MOVIE1 MOVIE2 5 6 7 8 /DTS 9 NIGHT 0 6.1/5.1 +10 STEREO ENTER 1 5 7 8 1 Press STANDBY/ON (SYSTEM POWER on the remote control) to which the video source component is shown on the front panel display, no other source can be played. To select another input source...MENU CONTROL BASS/TREBLE VOLUME INPUT MODE 6CH INPUT INPUT 5 Press INPUT l / h repeatedly (one of the input selector buttons on the remote control) to use. The selected input source name and input mode appear on the video monitor connected to this unit. 3 Press and ...
Owner's Manual
Page 26
...finished using this unit in standby mode cancels night listening mode. These controls only effect the sound from a video source on the remote control) to classical music while watching beautiful scenery from the main speakers. Front panel Notes • If you increase or decrease ...BASS/TREBLE -/+. y • You can change the amount by pressing VOLUME +/-, etc. • During muting, the MUTE indicator flashes on the MUTE remote control. VOLUME + VOLUME or - y • You can also cancel mute by which the unit reduces the volume in "OPTION 3 AUDIO MUTE" ...
...finished using this unit in standby mode cancels night listening mode. These controls only effect the sound from a video source on the remote control) to classical music while watching beautiful scenery from the main speakers. Front panel Notes • If you increase or decrease ...BASS/TREBLE -/+. y • You can change the amount by pressing VOLUME +/-, etc. • During muting, the MUTE indicator flashes on the MUTE remote control. VOLUME + VOLUME or - y • You can also cancel mute by which the unit reduces the volume in "OPTION 3 AUDIO MUTE" ...
Owner's Manual
Page 28
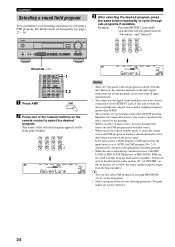
... switches the sub-program between "Adventure" and "General". For details about each program, see pages 27 - 30. The name of the numeric buttons on the remote control to cycle through sub-programs if available.
... switches the sub-program between "Adventure" and "General". For details about each program, see pages 27 - 30. The name of the numeric buttons on the remote control to cycle through sub-programs if available.
Owner's Manual
Page 30
... only, press SPEAKERS ON/OFF to turn off the sound effects, no sound is output from the headphones. STEREO STEREO or ENTER EFFECT Front panel Remote control Notes • If you turn on the set "SOUND 4 D. RANGE (dynamic range)" on the sound effect. SELECT + PRESET/CH (Format): The display shows the...
... only, press SPEAKERS ON/OFF to turn off the sound effects, no sound is output from the headphones. STEREO STEREO or ENTER EFFECT Front panel Remote control Notes • If you turn on the set "SOUND 4 D. RANGE (dynamic range)" on the sound effect. SELECT + PRESET/CH (Format): The display shows the...

Owner's Manual
Page 35
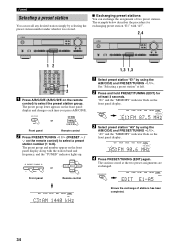
... the button to select the reception band. Automatic tuning is effective when station signals are 2 methods of the station received is shown on the remote control) to a lower frequency. 33 2 PRESET/TUNING STANDBY /ON PRESET/TUNING FM/AM EDIT TUNING MODE MEMORY AUTO/MAN`L MONO MAN`L/AUTO...AM 1530 kHz 4 1 1 Press INPUT l / h (TUNER on the front panel display. I Manual tuning If the signal from the front panel display. Front panel Remote control 2 Press FM/AM to continue searching. PRESET/TUNING EDIT VCR V-AUX D-TV/CBL DVD MD/CD-R TUNER TUNED A AM 1440 kHz 3 Press PRESET/TUNING...
... the button to select the reception band. Automatic tuning is effective when station signals are 2 methods of the station received is shown on the remote control) to a lower frequency. 33 2 PRESET/TUNING STANDBY /ON PRESET/TUNING FM/AM EDIT TUNING MODE MEMORY AUTO/MAN`L MONO MAN`L/AUTO...AM 1530 kHz 4 1 1 Press INPUT l / h (TUNER on the front panel display. I Manual tuning If the signal from the front panel display. Front panel Remote control 2 Press FM/AM to continue searching. PRESET/TUNING EDIT VCR V-AUX D-TV/CBL DVD MD/CD-R TUNER TUNED A AM 1440 kHz 3 Press PRESET/TUNING...
Owner's Manual
Page 38
...CBL DVD MD/CD-R TUNER TUNED MEMORY A5:FM 90.6 MHz 4 Press PRESET/TUNING (EDIT) again. A/B/C/D/E or NEXT SET MENU MENU A/B/C/D/E Front panel Remote control 2 Press PRESET/TUNING l / h (PRESET u / d on the front panel display along with "A5". 2,4 STANDBY /ON PRESET/TUNING FM/...1 JAZZ 2 ROCK ENTERTAINMENT 3 4 MUSIC TV THTR MOVIE1 MOVIE2 5 6 7 8 /DTS 9 NIGHT 0 6.1/5.1 +10 STEREO ENTER LEVEL TITLE - SELECT + PRESET/CH Remote control 1,3 1,3 1 Select preset station "E1" by using the A/B/C/D/E and PRESET/TUNING l / h. PRESET/TUNING EDIT VCR V-AUX D-TV/CBL DVD MD/CD-R TUNER ...
...CBL DVD MD/CD-R TUNER TUNED MEMORY A5:FM 90.6 MHz 4 Press PRESET/TUNING (EDIT) again. A/B/C/D/E or NEXT SET MENU MENU A/B/C/D/E Front panel Remote control 2 Press PRESET/TUNING l / h (PRESET u / d on the front panel display along with "A5". 2,4 STANDBY /ON PRESET/TUNING FM/...1 JAZZ 2 ROCK ENTERTAINMENT 3 4 MUSIC TV THTR MOVIE1 MOVIE2 5 6 7 8 /DTS 9 NIGHT 0 6.1/5.1 +10 STEREO ENTER LEVEL TITLE - SELECT + PRESET/CH Remote control 1,3 1,3 1 Select preset station "E1" by using the A/B/C/D/E and PRESET/TUNING l / h. PRESET/TUNING EDIT VCR V-AUX D-TV/CBL DVD MD/CD-R TUNER ...

Owner's Manual
Page 39
...timer Press SLEEP repeatedly until "SLEEP OFF" appears on the front panel display. SLEEP y • The sleep timer setting can also be set with the remote control. I Setting the sleep timer SYSTEM POWER POWER STANDBY POWER TV AV CD MD/CD-R TUNER SLEEP DVD D-TV/CBL VCR V-AUX REC DISC SKIP... display changes as shown below. BASIC OPERATION SLEEP TIMER Use this feature to automatically set this unit in standby mode by using STANDBY on the remote control (or STANDBY/ON on the front panel) or by setting this unit in standby mode after the sleep timer has been set. Refer ...
...timer Press SLEEP repeatedly until "SLEEP OFF" appears on the front panel display. SLEEP y • The sleep timer setting can also be set with the remote control. I Setting the sleep timer SYSTEM POWER POWER STANDBY POWER TV AV CD MD/CD-R TUNER SLEEP DVD D-TV/CBL VCR V-AUX REC DISC SKIP... display changes as shown below. BASIC OPERATION SLEEP TIMER Use this feature to automatically set this unit in standby mode by using STANDBY on the remote control (or STANDBY/ON on the front panel) or by setting this unit in standby mode after the sleep timer has been set. Refer ...

Owner's Manual
Page 40
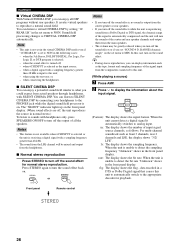
... you cannot record between the components connected to it from . RECORDING Recording adjustments and other operations are performed on the recording component. 36 Front panel Remote control 3 Start playback (or select a broadcast station) on the source component. 4 Start recording on other recording components. Please connect a source to the analog in jacks...
... you cannot record between the components connected to it from . RECORDING Recording adjustments and other operations are performed on the recording component. 36 Front panel Remote control 3 Start playback (or select a broadcast station) on the source component. 4 Start recording on other recording components. Please connect a source to the analog in jacks...

Owner's Manual
Page 41
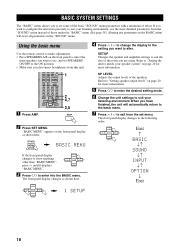
... night listening mode. 1 Press AMP. Change the settings to make adjustments. It consists of the following menus. Set menu list The set menu Use the remote control to reflect the needs of the following menus that you must set menu.
... night listening mode. 1 Press AMP. Change the settings to make adjustments. It consists of the following menus. Set menu list The set menu Use the remote control to reflect the needs of the following menus that you must set menu.
Owner's Manual
Page 45
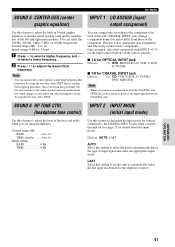
... the center speaker and you can select the 100 Hz, 300 Hz, 1 kHz, 3 kHz, or 10 kHz frequencies. Once you begin this unit on the remote control).
... the center speaker and you can select the 100 Hz, 300 Hz, 1 kHz, 3 kHz, or 10 kHz frequencies. Once you begin this unit on the remote control).


