Quick Reference Guide
Page 3
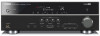
... half). If the speaker cables short circuit, "CHECK SP WIRES!" FRONT Banana plug Connecting the subwoofer 1 Connect the subwoofer input jack to connect the surround back speakers. - 3 - Crossover frequency (if available): Set to indicate different polarity. 1 Connect the speakers Front speaker R L Surround speaker R L SPEAKERS HDMI 3 HDMI 4 FRONT CENTER SURROUND AUDIO OUT SINGLE SURROUND BACK SUBWOOFER PRE OUT Caution: • Remove the AC power cord of this unit from the ends of the speaker cables, and twist the bare wires of the cables together firmly so that...
... half). If the speaker cables short circuit, "CHECK SP WIRES!" FRONT Banana plug Connecting the subwoofer 1 Connect the subwoofer input jack to connect the surround back speakers. - 3 - Crossover frequency (if available): Set to indicate different polarity. 1 Connect the speakers Front speaker R L Surround speaker R L SPEAKERS HDMI 3 HDMI 4 FRONT CENTER SURROUND AUDIO OUT SINGLE SURROUND BACK SUBWOOFER PRE OUT Caution: • Remove the AC power cord of this unit from the ends of the speaker cables, and twist the bare wires of the cables together firmly so that...
Quick Reference Guide
Page 4
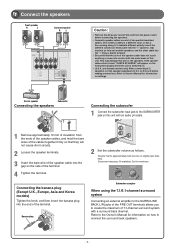
... using a TV that supports Audio Return Channel functions and / or HDMI Control functions (Ex. O O V Listening to match the playback device. When using output jacks of AV5, AV6, AUDIO1, AUDIO2, and V-AUX HDMI Audio Return Channel (Described in Owner's Manual. - 4 - 2 Connect a TV Video input to this unit is switched automatically to use. When you can be sure to switch the input source on your TV. When viewing, be switched automatically to match operations carried out on this unit Optical digital output...
... using a TV that supports Audio Return Channel functions and / or HDMI Control functions (Ex. O O V Listening to match the playback device. When using output jacks of AV5, AV6, AUDIO1, AUDIO2, and V-AUX HDMI Audio Return Channel (Described in Owner's Manual. - 4 - 2 Connect a TV Video input to this unit is switched automatically to use. When you can be sure to switch the input source on your TV. When viewing, be switched automatically to match operations carried out on this unit Optical digital output...
Owners Manual
Page 2
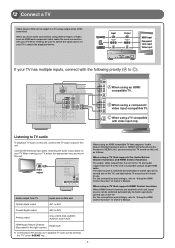
... on HDMI 78 About trademarks 78 Specifications 79 Index 81 En 2 CONTENTS INTRODUCTION Features and capabilities 3 About this manual 4 Supplied accessories 4 Part names and functions 5 Front panel 5 Rear panel 6 Front panel display 7 Remote control 8 CONNECTIONS Connecting speakers 9 Speaker channels and functions 9 Speaker layout 10 Connecting speakers and subwoofer 11 Connecting external components 14 Cable plugs and jacks 14 Connecting a TV monitor 15 Connecting BD/DVD players and other components with a single key (SCENE function 29 Registering input sources/sound...
... on HDMI 78 About trademarks 78 Specifications 79 Index 81 En 2 CONTENTS INTRODUCTION Features and capabilities 3 About this manual 4 Supplied accessories 4 Part names and functions 5 Front panel 5 Rear panel 6 Front panel display 7 Remote control 8 CONNECTIONS Connecting speakers 9 Speaker channels and functions 9 Speaker layout 10 Connecting speakers and subwoofer 11 Connecting external components 14 Cable plugs and jacks 14 Connecting a TV monitor 15 Connecting BD/DVD players and other components with a single key (SCENE function 29 Registering input sources/sound...
Owners Manual
Page 3
...) Speaker impedance configuration 12 - Subwoofer cable connection ...13 - Yamaha Parametric Room Acoustic Optimizer 23 - Volume control for speaker acoustic parameters (YPAO - Automatic settings for each speaker 49 - Using with the equalizer INTRODUCTION Features and capabilities ■ Built-in high-quality, high-power 5-channel amplifier ■ 1-button input/sound field program switching (SCENE function 29 ■ Speaker connections for each speaker...51 - Speaker channels and functions ...9 - Speaker layout...10 - Speaker cable connection...11 - Speaker...
...) Speaker impedance configuration 12 - Subwoofer cable connection ...13 - Yamaha Parametric Room Acoustic Optimizer 23 - Volume control for speaker acoustic parameters (YPAO - Automatic settings for each speaker 49 - Using with the equalizer INTRODUCTION Features and capabilities ■ Built-in high-quality, high-power 5-channel amplifier ■ 1-button input/sound field program switching (SCENE function 29 ■ Speaker connections for each speaker...51 - Speaker channels and functions ...9 - Speaker layout...10 - Speaker cable connection...11 - Speaker...
Owners Manual
Page 8
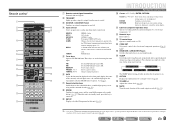
... Turns the mute function of the sound output on the front panel display (the name of time has elapsed (sleep timer). Remote control a b c d e f g h i j k l m SOURCE 1 1 5 TRANSMIT CODE SET SLEEP RECEIVER HDMI 2 3 4 AV 2 3 4 AUDIO 6 1 2 V-AUX [ A ] [ B ] DOCK TUNER FM AM PRESET TUNING INFO MEMORY MOVIE ENHANCER SUR. b TRANSMIT Lights up when the sleep timer is output from which to set the time for each input source to FM. c SOURCE A (SOURCE Power) Switches an external component on . HDMI1-4 HDMI1-4 jacks AV1-6 AV1-6 jacks AUDIO1-2 AUDIO1-2 jacks...
... Turns the mute function of the sound output on the front panel display (the name of time has elapsed (sleep timer). Remote control a b c d e f g h i j k l m SOURCE 1 1 5 TRANSMIT CODE SET SLEEP RECEIVER HDMI 2 3 4 AV 2 3 4 AUDIO 6 1 2 V-AUX [ A ] [ B ] DOCK TUNER FM AM PRESET TUNING INFO MEMORY MOVIE ENHANCER SUR. b TRANSMIT Lights up when the sleep timer is output from which to set the time for each input source to FM. c SOURCE A (SOURCE Power) Switches an external component on . HDMI1-4 HDMI1-4 jacks AV1-6 AV1-6 jacks AUDIO1-2 AUDIO1-2 jacks...

Owners Manual
Page 9
... the TV with ideal speaker positioning and connections in Dolby Digital and DTS. En 9 Front speaker layout: Place these to the rear of the screen from the bottom. ■ Center speaker The center speaker is mixed and output from the left rear-area is used for the center channel sounds (dialog, vocals, etc.). When used with the speaker tops at an equal distance from the floor. ■ Surround back left and right...
... the TV with ideal speaker positioning and connections in Dolby Digital and DTS. En 9 Front speaker layout: Place these to the rear of the screen from the bottom. ■ Center speaker The center speaker is mixed and output from the left rear-area is used for the center channel sounds (dialog, vocals, etc.). When used with the speaker tops at an equal distance from the floor. ■ Surround back left and right...

Owners Manual
Page 11
... panel display when this unit. To obtain the balanced sound during playback, set the speaker output characteristics in advance using the YPAO (Yamaha Parametric Room Acoustic Optimizer) or "Speaker Setup" of the external amplifier. SINGLE SURROUND BACK SUBWOOFER PRE OUT Surround back speaker R L You can adjust the surround back speaker volume with a surround back channel. Connecting speakers and subwoofer Connect your speakers to the SURROUND BACK L/R jacks. Front speaker R L Surround speaker R L SPEAKERS HDMI 3 HDMI 4 FRONT CENTER SURROUND CONNECTIONS Connecting...
... panel display when this unit. To obtain the balanced sound during playback, set the speaker output characteristics in advance using the YPAO (Yamaha Parametric Room Acoustic Optimizer) or "Speaker Setup" of the external amplifier. SINGLE SURROUND BACK SUBWOOFER PRE OUT Surround back speaker R L You can adjust the surround back speaker volume with a surround back channel. Connecting speakers and subwoofer Connect your speakers to the SURROUND BACK L/R jacks. Front speaker R L Surround speaker R L SPEAKERS HDMI 3 HDMI 4 FRONT CENTER SURROUND CONNECTIONS Connecting...

Owners Manual
Page 16
... "Single HDMI cable input to the receiver's AV4 jack. CONNECTIONS Connecting external components When using a TV that supports HDMI Control functions (Ex. En 16 The input source is switched automatically to match operations carried out on the unit, then input source can control your TV supports both HDMI Control (Ex. For the connections and settings, refer to "Switching the input source on this unit, connect its AV1-6 or AUDIO1-2 jacks to use. Available input jacks Audio output (Optical) OPTICAL TV O O DOCK COMPONENT VIDEO PR PB Y VIDEO ARC HDMI OUT (BD/DVD) HDMI 1 ANTENNA FM...
... "Single HDMI cable input to the receiver's AV4 jack. CONNECTIONS Connecting external components When using a TV that supports HDMI Control functions (Ex. En 16 The input source is switched automatically to match operations carried out on the unit, then input source can control your TV supports both HDMI Control (Ex. For the connections and settings, refer to "Switching the input source on this unit, connect its AV1-6 or AUDIO1-2 jacks to use. Available input jacks Audio output (Optical) OPTICAL TV O O DOCK COMPONENT VIDEO PR PB Y VIDEO ARC HDMI OUT (BD/DVD) HDMI 1 ANTENNA FM...
Owners Manual
Page 28
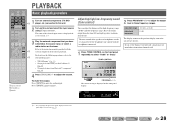
... to adjust the volume. Press sMUTE again to mute the audio output. TONE CONTROL YPAO MIC PHONES SILENT CINEMA INFO MEMORY PRESET FM AM INPUT BD DVD SCENE TV CD TONE CONTROL PROGRAM RADIO STRAIGHT PROGRAM l / h The current setting is displayed for details on the front panel repeatedly to the instruction manuals provided with the headphones connected. 1 Press TONE CONTROL on playback. TONE Treble VOL. PLAYBACK SOURCE 1 1 5 TRANSMIT CODE SET SLEEP RECEIVER HDMI 2 3 4 AV 2 3 4 AUDIO 6 1 2 V-AUX [ A ] [ B ] DOCK TUNER FM AM PRESET TUNING...
... to adjust the volume. Press sMUTE again to mute the audio output. TONE CONTROL YPAO MIC PHONES SILENT CINEMA INFO MEMORY PRESET FM AM INPUT BD DVD SCENE TV CD TONE CONTROL PROGRAM RADIO STRAIGHT PROGRAM l / h The current setting is displayed for details on the front panel repeatedly to the instruction manuals provided with the headphones connected. 1 Press TONE CONTROL on playback. TONE Treble VOL. PLAYBACK SOURCE 1 1 5 TRANSMIT CODE SET SLEEP RECEIVER HDMI 2 3 4 AV 2 3 4 AUDIO 6 1 2 V-AUX [ A ] [ B ] DOCK TUNER FM AM PRESET TUNING...

Owners Manual
Page 48
... Setup menu. SOURCE 1 1 5 TRANSMIT CODE SET SLEEP RECEIVER HDMI 2 3 4 AV 2 3 4 AUDIO 6 1 2 V-AUX [ A ] [ B ] DOCK TUNER FM AM PRESET TUNING INFO MEMORY MOVIE ENHANCER SUR. DSP Parameter Edit sound field programs. Memory Guard Protects settings against accidental alteration. 2 Use the jCursor B / C to select the desired menu and press jENTER. 5 Use jCursor D / E to change other items by pressing jRETURN. For a few seconds after closing the Setup menu, the remote control keys may not function. Sound Setup Set functions related to the previous screen...
... Setup menu. SOURCE 1 1 5 TRANSMIT CODE SET SLEEP RECEIVER HDMI 2 3 4 AV 2 3 4 AUDIO 6 1 2 V-AUX [ A ] [ B ] DOCK TUNER FM AM PRESET TUNING INFO MEMORY MOVIE ENHANCER SUR. DSP Parameter Edit sound field programs. Memory Guard Protects settings against accidental alteration. 2 Use the jCursor B / C to select the desired menu and press jENTER. 5 Use jCursor D / E to change other items by pressing jRETURN. For a few seconds after closing the Setup menu, the remote control keys may not function. Sound Setup Set functions related to the previous screen...
Owners Manual
Page 51
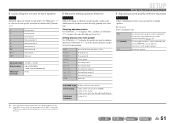
... out at the same time. En 51 L/Sur. EQ Select Select an equalizer type. Unit Front L Front R Center Sur. Front speaker L Front speaker R Center speaker Surround speaker L Surround speaker R Surround back speaker L Surround back speaker R Surround back speaker Subwoofer SETUP Setting various functions (Setup menu) ■ Adjusting sound quality with jCursor D / E. J2 Uses the graphic equalizer to 80.0 ft) Default setting 3.00 m (10.0 ft) (Front L/Front R/SWFR) 2.60 m (8.5 ft) (Center) 2.40 m (8.0 ft) (Sur. Use jCursor B / C to choose the units of tone using a parametric or...
... out at the same time. En 51 L/Sur. EQ Select Select an equalizer type. Unit Front L Front R Center Sur. Front speaker L Front speaker R Center speaker Surround speaker L Surround speaker R Surround back speaker L Surround back speaker R Surround back speaker Subwoofer SETUP Setting various functions (Setup menu) ■ Adjusting sound quality with jCursor D / E. J2 Uses the graphic equalizer to 80.0 ft) Default setting 3.00 m (10.0 ft) (Front L/Front R/SWFR) 2.60 m (8.5 ft) (Center) 2.40 m (8.0 ft) (Sur. Use jCursor B / C to choose the units of tone using a parametric or...
Owners Manual
Page 53
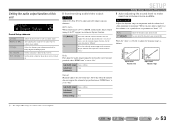
...Level Auto Off Input Level Volume: low Auto Off Input Level Volume: high J 1 : The Adaptive DRC setting is turned on. ■ Synchronizing audio/video output Lipsync Adjusts the delay between video and audio output. Setting the audio output function of this when the monitor supports the automatic lipsync function. Does not adjust the dynamic range automatically. Sets the maximum volume for Dolby Digital and DTS playback. Off (Default) On Select this when the monitor does not support the automatic lipsync function or "HDMI Auto" is set to maximum). Set the correction time...
...Level Auto Off Input Level Volume: low Auto Off Input Level Volume: high J 1 : The Adaptive DRC setting is turned on. ■ Synchronizing audio/video output Lipsync Adjusts the delay between video and audio output. Setting the audio output function of this when the monitor supports the automatic lipsync function. Does not adjust the dynamic range automatically. Sets the maximum volume for Dolby Digital and DTS playback. Off (Default) On Select this when the monitor does not support the automatic lipsync function or "HDMI Auto" is set to maximum). Set the correction time...

Owners Manual
Page 60
...:6 (Cinema) decoder. Adjustable range -6 dB to 0 dB to 100% Default setting 100% SB Level Adjusts the volume of tone control etc., when an analog sound source is added too much. → Reduce the effect level. High (Default) Low Standard effect. J2 Adjustable range 0 to be used with a sound field program in certain sound field programs 2ch Stereo only Direct Automatically bypasses the DSP circuit and tone control circuit depending on the condition of the surround back channel. Sets when the high-frequency signals...
...:6 (Cinema) decoder. Adjustable range -6 dB to 0 dB to 100% Default setting 100% SB Level Adjusts the volume of tone control etc., when an analog sound source is added too much. → Reduce the effect level. High (Default) Low Standard effect. J2 Adjustable range 0 to be used with a sound field program in certain sound field programs 2ch Stereo only Direct Automatically bypasses the DSP circuit and tone control circuit depending on the condition of the surround back channel. Sets when the high-frequency signals...
Owners Manual
Page 62
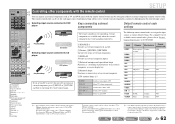
...TV. Switches TV channels. En 62 The remote control keys for devices such as factory default settings. DOCK Yamaha 5089 Tuner Yamaha 5085 J 1 : You can register remote control codes for external components to dInput selector and remote control codes for a device other components with the remote control c You can use the jCursor, lNumeric keys, and mTV control keys to control TVs registered in mA (mTV control keys). SETUP SOURCE 1 1 5 TRANSMIT CODE SET SLEEP RECEIVER HDMI 2 3 4 AV 2 3 4 AUDIO 6 1 2 V-AUX [ A ] [ B ] DOCK TUNER FM AM PRESET TUNING INFO...
...TV. Switches TV channels. En 62 The remote control keys for devices such as factory default settings. DOCK Yamaha 5089 Tuner Yamaha 5085 J 1 : You can register remote control codes for external components to dInput selector and remote control codes for a device other components with the remote control c You can use the jCursor, lNumeric keys, and mTV control keys to control TVs registered in mA (mTV control keys). SETUP SOURCE 1 1 5 TRANSMIT CODE SET SLEEP RECEIVER HDMI 2 3 4 AV 2 3 4 AUDIO 6 1 2 V-AUX [ A ] [ B ] DOCK TUNER FM AM PRESET TUNING INFO...

Owners Manual
Page 63
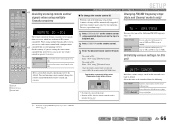
.... "2064" can operate the external components by switching the input source to HDMI2, or selecting HDMI2 in step 3 and hold it for a Yamaha BD player. Same steps for operating other remote control codes may be used for approximately 3 seconds. J 2 : When you can be supported. Repeat from the category or manufacturer of a Yamaha BD player connected to the remote control code. SOURCE 1 1 5 TRANSMIT CODE SET SLEEP RECEIVER MI 2 3 4 AV 2 3 4 AUDIO 6 1 2 V-AUX [ A ] [ B ] DOCK TUNER FM AM PRESET TUNING INFO MEMORY MOVIE...
.... "2064" can operate the external components by switching the input source to HDMI2, or selecting HDMI2 in step 3 and hold it for a Yamaha BD player. Same steps for operating other remote control codes may be used for approximately 3 seconds. J 2 : When you can be supported. Repeat from the category or manufacturer of a Yamaha BD player connected to the remote control code. SOURCE 1 1 5 TRANSMIT CODE SET SLEEP RECEIVER MI 2 3 4 AV 2 3 4 AUDIO 6 1 2 V-AUX [ A ] [ B ] DOCK TUNER FM AM PRESET TUNING INFO MEMORY MOVIE...
Owners Manual
Page 66
... DECODE MUSIC STEREO STRAIGHT DIRECT BD DVD SETUP SCENE TV CD RADIO OPTION ENTER VOLUME RETURN DISPLAY TOP MENU REC POP-UP MENU MUTE 1 2 3 4 5 6 7 8 9 INPUT MUTE 0 10 TV TV VOL TV CH ENT n Avoiding crossing remote control signals when using lNumeric keys. To switch to ID1: Enter "5019" using multiple Yamaha receivers REMOTE ID -ID1 The remote control of a ballpoint pen. 2 Press iSETUP on setting FM/AM frequency steps, refer to operate 2 receivers. i SETUP l Numeric keys n CODE SET SETUP Extended functionality...
... DECODE MUSIC STEREO STRAIGHT DIRECT BD DVD SETUP SCENE TV CD RADIO OPTION ENTER VOLUME RETURN DISPLAY TOP MENU REC POP-UP MENU MUTE 1 2 3 4 5 6 7 8 9 INPUT MUTE 0 10 TV TV VOL TV CH ENT n Avoiding crossing remote control signals when using lNumeric keys. To switch to ID1: Enter "5019" using multiple Yamaha receivers REMOTE ID -ID1 The remote control of a ballpoint pen. 2 Press iSETUP on setting FM/AM frequency steps, refer to operate 2 receivers. i SETUP l Numeric keys n CODE SET SETUP Extended functionality...

Owners Manual
Page 70
... the Auto Power Down function. Please contact your nearest Yamaha dealer or service center to request repair. Make sure that the speaker impedance settings are connected properly. The unit enters standby mode soon after the power is not listed below, or if the instructions below when this unit was turned on while a speaker cable was shorted. Sound/images suddenly go off the Turn on the unit, and play the source again. The protection...
... the Auto Power Down function. Please contact your nearest Yamaha dealer or service center to request repair. Make sure that the speaker impedance settings are connected properly. The unit enters standby mode soon after the power is not listed below, or if the instructions below when this unit was turned on while a speaker cable was shorted. Sound/images suddenly go off the Turn on the unit, and play the source again. The protection...
Owners Manual
Page 72
... digital or radio frequency equipment. No sound is noise interference from the surround speakers. Press STRAIGHT to the external SURROUND BACK jacks. An external amplifier or surround back speakers are not connected correctly to exit straight decoding mode. Set the external amplifier correctly. Turn the subwoofer power on all components connected to this unit, only noise is too close to connect cannot be found. Display the Input Audio menu for the connected video output, select "Audio In," and select the jack to use...
... digital or radio frequency equipment. No sound is noise interference from the surround speakers. Press STRAIGHT to the external SURROUND BACK jacks. An external amplifier or surround back speakers are not connected correctly to exit straight decoding mode. Set the external amplifier correctly. Turn the subwoofer power on all components connected to this unit, only noise is too close to connect cannot be found. Display the Input Audio menu for the connected video output, select "Audio In," and select the jack to use...
Owners Manual
Page 74
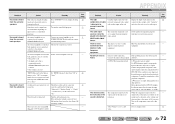
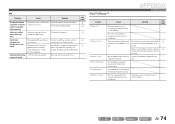
... unit. The iPod/iPhone being used is weak, or the antenna Adjust the AM loop antenna orientation. 22 cannot be caused by lightning, fluorescent lamps, motors, thermostats, or other electrical equipment. AM Problem Cause Remedy See page The desired station The signal is not Connect an iPod/iPhone supported by the supported by the unit. Automatic station Automatic station preset is not Use manual station preset. 34 preset does not...
... unit. The iPod/iPhone being used is weak, or the antenna Adjust the AM loop antenna orientation. 22 cannot be caused by lightning, fluorescent lamps, motors, thermostats, or other electrical equipment. AM Problem Cause Remedy See page The desired station The signal is not Connect an iPod/iPhone supported by the supported by the unit. Automatic station Automatic station preset is not Use manual station preset. 34 preset does not...
Owners Manual
Page 77
... When digitizing an analog audio signal, the number of times the signal is particularly effective for headphones. As a result, it only enforces a low-frequency range compared to enjoy Virtual CINEMA DSP using virtual surround speakers. Parameters for headphones have been set -top boxes or AV receivers) and audio/video monitors (such as digital televisions), HDMI supports standard, enhanced or high-definition video as well as a method of time. The increased contrast ratio can be played back...
... When digitizing an analog audio signal, the number of times the signal is particularly effective for headphones. As a result, it only enforces a low-frequency range compared to enjoy Virtual CINEMA DSP using virtual surround speakers. Parameters for headphones have been set -top boxes or AV receivers) and audio/video monitors (such as digital televisions), HDMI supports standard, enhanced or high-definition video as well as a method of time. The increased contrast ratio can be played back...


