Owners Manual
Page 2
... all remote control codes 52 Extended functionality that can be configured as needed (Advanced Setup menu 53 Displaying/Setting the Advanced Setup menu 53 Setting the impedance of speakers 53 Avoiding crossing remote control signals when using multiple Yamaha receivers 54 Initializing various settings for this unit 54 APPENDIX Troubleshooting 55 General 55...
... all remote control codes 52 Extended functionality that can be configured as needed (Advanced Setup menu 53 Displaying/Setting the Advanced Setup menu 53 Setting the impedance of speakers 53 Avoiding crossing remote control signals when using multiple Yamaha receivers 54 Initializing various settings for this unit 54 APPENDIX Troubleshooting 55 General 55...
Owners Manual
Page 8
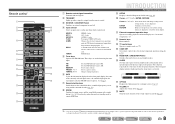
... 4 AV 2 3 4 AUDIO 1 2 V-AUX [ A ] [ B ] DOCK TUNER FM AM PRESET TUNING INFO MEMORY MOVIE ENHANCER SUR. DECODE MUSIC STEREO STRAIGHT BD DVD SETUP SCENE TV CD RADIO OPTION ENTER VOLUME RETURN DISPLAY TOP MENU REC POP-UP MENU MUTE n o p q r s 1 2 3 4 5 6 7 8 9 INPUT MUTE ... AUDIO1-2 jacks V-AUX Front panel VIDEO AUX jacks [A]/[B] Changes the external component you wish to playback. J1 DOCK A Yamaha iPod universal dock or Bluetooth wireless audio receiver connected to operate registered components. These keys are displayed, or ends the menu...
... 4 AV 2 3 4 AUDIO 1 2 V-AUX [ A ] [ B ] DOCK TUNER FM AM PRESET TUNING INFO MEMORY MOVIE ENHANCER SUR. DECODE MUSIC STEREO STRAIGHT BD DVD SETUP SCENE TV CD RADIO OPTION ENTER VOLUME RETURN DISPLAY TOP MENU REC POP-UP MENU MUTE n o p q r s 1 2 3 4 5 6 7 8 9 INPUT MUTE ... AUDIO1-2 jacks V-AUX Front panel VIDEO AUX jacks [A]/[B] Changes the external component you wish to playback. J1 DOCK A Yamaha iPod universal dock or Bluetooth wireless audio receiver connected to operate registered components. These keys are displayed, or ends the menu...
Owners Manual
Page 10
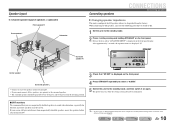
...right). • If you use magnetically shielded speakers to the standby mode. 2 Press A while pressing and holding STRAIGHT on the Advanced Setup menu (☞p. 53). J 1 : See the section on "Extended functionality that can be placed between 60 degrees and 80 degrees from ...procedure to switch to 6Ω. 1 Set this unit to the surround speakers. • The surround speakers should be configured as needed (Advanced Setup menu)" for details on the front panel. Speaker layout 5.1-channel speaker layout (5 speakers + subwoofer) Front speaker R Front speaker L Subwoofer Connecting...
...right). • If you use magnetically shielded speakers to the standby mode. 2 Press A while pressing and holding STRAIGHT on the Advanced Setup menu (☞p. 53). J 1 : See the section on "Extended functionality that can be placed between 60 degrees and 80 degrees from ...procedure to switch to 6Ω. 1 Set this unit to the surround speakers. • The surround speakers should be configured as needed (Advanced Setup menu)" for details on the front panel. Speaker layout 5.1-channel speaker layout (5 speakers + subwoofer) Front speaker R Front speaker L Subwoofer Connecting...
Owners Manual
Page 16
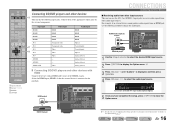
...ENHANCER SUR. Audio;;;;;;AV1 SW L CR SL SR If you have selected AV1 input audio (optical digital) 5 Once you have completed the setup, press qOPTION to the appropriate output jacks on the external components. Connect them to close the Option menu. For example, if an external device... the audio input. J1 3 Press jCursor C until "Audio In" is connected to select the audio input source. En 16 DECODE MUSIC STEREO STRAIGHT BD DVD SETUP SCENE TV CD RADIO OPTION ENTER VOLUME RETURN DISPLAY TOP MENU REC POP-UP MENU MUTE 1 2 3 4 5 6 7 8 9 INPUT MUTE 0 10 TV...
...ENHANCER SUR. Audio;;;;;;AV1 SW L CR SL SR If you have selected AV1 input audio (optical digital) 5 Once you have completed the setup, press qOPTION to the appropriate output jacks on the external components. Connect them to close the Option menu. For example, if an external device... the audio input. J1 3 Press jCursor C until "Audio In" is connected to select the audio input source. En 16 DECODE MUSIC STEREO STRAIGHT BD DVD SETUP SCENE TV CD RADIO OPTION ENTER VOLUME RETURN DISPLAY TOP MENU REC POP-UP MENU MUTE 1 2 3 4 5 6 7 8 9 INPUT MUTE 0 10 TV...
Owners Manual
Page 17
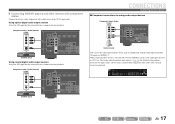
... input sources" (☞p. 16) for AV1 or AV2. When connecting these devices, select the AV3-5 or the AUDIO1-2 jacks as the audio input for detailed setup guidance. Select the AV input source (AV1-2) that the external device is connected to for playback. Audio;;;AUDIO1 SW L CR SL SR En 17 ■...
... input sources" (☞p. 16) for AV1 or AV2. When connecting these devices, select the AV3-5 or the AUDIO1-2 jacks as the audio input for detailed setup guidance. Select the AV input source (AV1-2) that the external device is connected to for playback. Audio;;;AUDIO1 SW L CR SL SR En 17 ■...
Owners Manual
Page 22
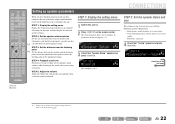
... listening to designate a specific speaker i (or subwoofer) for speaker settings. STEP 1: Display the setting menu Display the Setup menu from each speaker and configure them so that the sound is balanced. STEP 5: Adjust the volume Adjust the volume ... with the following steps to configure this unit, and then display the menu for low-frequency sound. Carry out the following speaker configuration: - SW Speaker Setup L CR SL SR 3 Check that they output sound normally. SOURCE 1 1 5 TRANSMIT CODE SET SLEEP RECEIVER HDMI 2 3 4 AV 2 3 4 AUDIO 1 2 V-AUX...
... listening to designate a specific speaker i (or subwoofer) for speaker settings. STEP 1: Display the setting menu Display the Setup menu from each speaker and configure them so that the sound is balanced. STEP 5: Adjust the volume Adjust the volume ... with the following steps to configure this unit, and then display the menu for low-frequency sound. Carry out the following speaker configuration: - SW Speaker Setup L CR SL SR 3 Check that they output sound normally. SOURCE 1 1 5 TRANSMIT CODE SET SLEEP RECEIVER HDMI 2 3 4 AV 2 3 4 AUDIO 1 2 V-AUX...
Owners Manual
Page 23
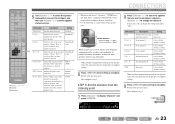
... completed the settings for one speaker, repeat the same procedure for all speakers to display "Distance" and press jENTER. DECODE MUSIC STEREO STRAIGHT BD DVD SETUP SCENE TV CD RADIO OPTION ENTER VOLUME RETURN DISPLAY TOP MENU REC POP-UP MENU MUTE 1 2 3 4 5 6 7 8 9 INPUT MUTE 0 10 TV TV VOL TV CH ENT...
... completed the settings for one speaker, repeat the same procedure for all speakers to display "Distance" and press jENTER. DECODE MUSIC STEREO STRAIGHT BD DVD SETUP SCENE TV CD RADIO OPTION ENTER VOLUME RETURN DISPLAY TOP MENU REC POP-UP MENU MUTE 1 2 3 4 5 6 7 8 9 INPUT MUTE 0 10 TV TV VOL TV CH ENT...
Owners Manual
Page 24
... REC POP-UP MENU MUTE j Front L Center Front R 1 2 3 4 5 6 7 8 9 INPUT MUTE 0 10 TV TV VOL TV CH ENT Subwoofer Surround L Surround R i SETUP j Cursor B / C / D / E j ENTER j RETURN 12 Check that the test tone is outputting the test tone. This completes step 4. SW L CR SL SR 14 Use jCursor B...-12 (step 4) to stop playback of the test tone. 19 Once you have completed all speakers to close the Setup menu. DECODE MUSIC STEREO STRAIGHT BD DVD SETUP SCENE TV CD RADIO OPTION STEP 4: Playback a test tone 10 Press jCursor C repeatedly to the others , use ...
... REC POP-UP MENU MUTE j Front L Center Front R 1 2 3 4 5 6 7 8 9 INPUT MUTE 0 10 TV TV VOL TV CH ENT Subwoofer Surround L Surround R i SETUP j Cursor B / C / D / E j ENTER j RETURN 12 Check that the test tone is outputting the test tone. This completes step 4. SW L CR SL SR 14 Use jCursor B...-12 (step 4) to stop playback of the test tone. 19 Once you have completed all speakers to close the Setup menu. DECODE MUSIC STEREO STRAIGHT BD DVD SETUP SCENE TV CD RADIO OPTION STEP 4: Playback a test tone 10 Press jCursor C repeatedly to the others , use ...
Owners Manual
Page 25
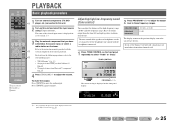
... match those frequency ranges. to adjust the output level in those from Bluetooth™ components" (☞p. 35) 4 Press rVOLUME +/- DECODE MUSIC STEREO STRAIGHT BD DVD SETUP SCENE TV CD RADIO OPTION ENTER VOLUME RETURN DISPLAY TOP MENU REC POP-UP MENU MUTE 1 2 3 4 5 6 7 8 9 INPUT MUTE 0 10 TV TV VOL TV CH ENT...
... match those frequency ranges. to adjust the output level in those from Bluetooth™ components" (☞p. 35) 4 Press rVOLUME +/- DECODE MUSIC STEREO STRAIGHT BD DVD SETUP SCENE TV CD RADIO OPTION ENTER VOLUME RETURN DISPLAY TOP MENU REC POP-UP MENU MUTE 1 2 3 4 5 6 7 8 9 INPUT MUTE 0 10 TV TV VOL TV CH ENT...
Owners Manual
Page 26
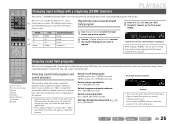
... 1 2 V-AUX [ A ] [ B ] DOCK TUNER FM AM PRESET TUNING INFO MEMORY MOVIE ENHANCER SUR. DECODE MUSIC STEREO STRAIGHT BD DVD SETUP SCENE TV CD RADIO OPTION ENTER VOLUME RETURN DISPLAY Changing input settings with a Yamaha digital sound field processing (DSP) chip. Selecting sound field programs and sound decoders This unit offers sound field settings...
... 1 2 V-AUX [ A ] [ B ] DOCK TUNER FM AM PRESET TUNING INFO MEMORY MOVIE ENHANCER SUR. DECODE MUSIC STEREO STRAIGHT BD DVD SETUP SCENE TV CD RADIO OPTION ENTER VOLUME RETURN DISPLAY Changing input settings with a Yamaha digital sound field processing (DSP) chip. Selecting sound field programs and sound decoders This unit offers sound field settings...
Owners Manual
Page 27
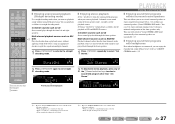
... MEMORY MOVIE ENHANCER SUR. You can enjoy the reproduction sound field presence with ease (SILENT CINEMA mode). En 27 DECODE MUSIC STEREO STRAIGHT BD DVD SETUP SCENE TV CD RADIO OPTION ■ Enjoying unprocessed playback (Straight decoding mode) Use straight decoding mode when you can playback as follows in the following...
... MEMORY MOVIE ENHANCER SUR. You can enjoy the reproduction sound field presence with ease (SILENT CINEMA mode). En 27 DECODE MUSIC STEREO STRAIGHT BD DVD SETUP SCENE TV CD RADIO OPTION ■ Enjoying unprocessed playback (Straight decoding mode) Use straight decoding mode when you can playback as follows in the following...

Owners Manual
Page 30
... SW L CR SL SR 3 Use eTUNING H / I Decreases the frequency. J 2 : "Wrong Station!" Leave the decimal point out when entering a number. DECODE MUSIC STEREO STRAIGHT BD DVD SETUP SCENE TV CD RADIO OPTION ENTER VOLUME RETURN DISPLAY TOP MENU REC POP-UP MENU MUTE FM/AM tuning When using the FM/AM tuner...
... SW L CR SL SR 3 Use eTUNING H / I Decreases the frequency. J 2 : "Wrong Station!" Leave the decimal point out when entering a number. DECODE MUSIC STEREO STRAIGHT BD DVD SETUP SCENE TV CD RADIO OPTION ENTER VOLUME RETURN DISPLAY TOP MENU REC POP-UP MENU MUTE FM/AM tuning When using the FM/AM tuner...
Owners Manual
Page 31
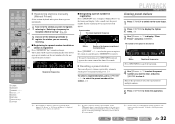
.... V-AUX [ A ] [ B ] DOCK TUNER 1 d Press dTUNER to switch to display the Option menu. DECODE MUSIC STEREO e 2 Press qOPTION to select "FM Mode." J1 STRAIGHT BD DVD SETUP SCENE TV CD RADIO OPTION 3 Use jCursor B / C to display the Option menu. There are receiving an FM broadcast and cannot obtain a stable stereo broadcast, you...
.... V-AUX [ A ] [ B ] DOCK TUNER 1 d Press dTUNER to switch to display the Option menu. DECODE MUSIC STEREO e 2 Press qOPTION to select "FM Mode." J1 STRAIGHT BD DVD SETUP SCENE TV CD RADIO OPTION 3 Use jCursor B / C to display the Option menu. There are receiving an FM broadcast and cannot obtain a stable stereo broadcast, you...
Owners Manual
Page 32
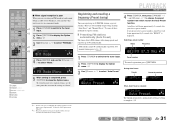
... station you are currently receiving. ■ Registering to a preset number to display "Manual Preset" on the front panel display. DECODE MUSIC STEREO STRAIGHT BD DVD SETUP SCENE TV CD RADIO OPTION ENTER VOLUME RETURN DISPLAY TOP MENU REC POP-UP MENU MUTE 1 2 3 4 5 6 7 8 9 INPUT MUTE 0 10 TV TV VOL TV CH ENT...
... station you are currently receiving. ■ Registering to a preset number to display "Manual Preset" on the front panel display. DECODE MUSIC STEREO STRAIGHT BD DVD SETUP SCENE TV CD RADIO OPTION ENTER VOLUME RETURN DISPLAY TOP MENU REC POP-UP MENU MUTE 1 2 3 4 5 6 7 8 9 INPUT MUTE 0 10 TV TV VOL TV CH ENT...
Owners Manual
Page 33
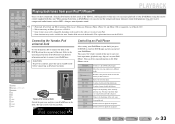
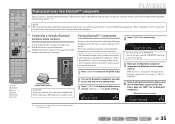
DECODE MUSIC STEREO STRAIGHT BD DVD SETUP SCENE TV CD RADIO OPTION ENTER VOLUME RETURN DISPLAY TOP MENU REC POP-UP MENU MUTE 1 2 3 4... between playback and pause. When playing back from your iPod™/iPhone™ PLAYBACK Once you have connected a Yamaha iPod universal dock (such as MP3 a sharper, more dynamic sound. Switches between playback and pause. k CAUTION ...iPod mini, iPhone, iPhone 3G, and iPhone 3GS are supported (As of your iPod/iPhone. Connecting the Yamaha iPod universal dock Use the dedicated cable to connect the dock to the j DOCK jack on the model ...
DECODE MUSIC STEREO STRAIGHT BD DVD SETUP SCENE TV CD RADIO OPTION ENTER VOLUME RETURN DISPLAY TOP MENU REC POP-UP MENU MUTE 1 2 3 4... between playback and pause. When playing back from your iPod™/iPhone™ PLAYBACK Once you have connected a Yamaha iPod universal dock (such as MP3 a sharper, more dynamic sound. Switches between playback and pause. k CAUTION ...iPod mini, iPhone, iPhone 3G, and iPhone 3GS are supported (As of your iPod/iPhone. Connecting the Yamaha iPod universal dock Use the dedicated cable to connect the dock to the j DOCK jack on the model ...
Owners Manual
Page 34
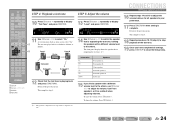
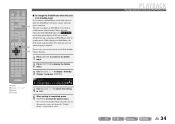
...;;;;Auto SW L CR SL SR 4 Use jCursor D / E to switch the setting to "Off." 5 When setting is finished. While charging an iPod/iPhone, the BD DVD SETUP SCENE TV CD RADIO OPTION iPod charge indicator lights. This unit can also deactivate the iPod Standby ENTER VOLUME j Charge function. The indicator goes out...
...;;;;Auto SW L CR SL SR 4 Use jCursor D / E to switch the setting to "Off." 5 When setting is finished. While charging an iPod/iPhone, the BD DVD SETUP SCENE TV CD RADIO OPTION iPod charge indicator lights. This unit can also deactivate the iPod Standby ENTER VOLUME j Charge function. The indicator goes out...
Owners Manual
Page 35
...SETUP SCENE TV CD RADIO OPTION ENTER VOLUME RETURN DISPLAY TOP MENU REC POP-UP MENU MUTE 1 2 3 4 5 6 7 8 9 INPUT MUTE 0 10 TV TV VOL TV CH ENT d DOCK e MEMORY j Cursor B / C j ENTER j RETURN q OPTION Playing back tunes from Bluetooth™ components PLAYBACK Playing back tunes from Bluetooth™ components You can connect a Yamaha...This unit supports A2DP (Advanced Audio Distribution Profile) of your Bluetooth component as "YBA-10 YAMAHA." 6 Select the Bluetooth wireless audio receiver from Bluetooth-compatible portable music players. The Bluetooth ...
...SETUP SCENE TV CD RADIO OPTION ENTER VOLUME RETURN DISPLAY TOP MENU REC POP-UP MENU MUTE 1 2 3 4 5 6 7 8 9 INPUT MUTE 0 10 TV TV VOL TV CH ENT d DOCK e MEMORY j Cursor B / C j ENTER j RETURN q OPTION Playing back tunes from Bluetooth™ components PLAYBACK Playing back tunes from Bluetooth™ components You can connect a Yamaha...This unit supports A2DP (Advanced Audio Distribution Profile) of your Bluetooth component as "YBA-10 YAMAHA." 6 Select the Bluetooth wireless audio receiver from Bluetooth-compatible portable music players. The Bluetooth ...

Owners Manual
Page 36
... the Option menu. 1 2 3 4 5 6 7 8 9 INPUT MUTE 0 10 TV TV VOL TV CH ENT PLAYBACK Playing back tunes from Bluetooth components. DECODE MUSIC STEREO STRAIGHT BD DVD SETUP SCENE TV CD RADIO OPTION ENTER VOLUME RETURN DISPLAY TOP MENU REC POP-UP MENU MUTE Using Bluetooth™ components When pairing is complete, carry...
... the Option menu. 1 2 3 4 5 6 7 8 9 INPUT MUTE 0 10 TV TV VOL TV CH ENT PLAYBACK Playing back tunes from Bluetooth components. DECODE MUSIC STEREO STRAIGHT BD DVD SETUP SCENE TV CD RADIO OPTION ENTER VOLUME RETURN DISPLAY TOP MENU REC POP-UP MENU MUTE Using Bluetooth™ components When pairing is complete, carry...

Owners Manual
Page 37
...MUTE j Option menu OPTION Volume Trim VOL. SW L CR SL SR 1 2 3 4 5 6 7 8 9 INPUT MUTE 0 10 TV TV VOL TV CH ENT 3 Select the desired control/setup item using jCursor B / C / D / E and jENTER. d Input selector j Cursor B / C / D / E j ENTER j RETURN q OPTION 4 Select the desired menu item (... are provided for each input source. You can also use jRETURN to return to +6.0 dB Default setting 0.0 dB Adjustment increments 0.5 dB steps En 37 SETUP SOURCE 1 1 5 TRANSMIT CODE SET SLEEP RECEIVER HDMI 2 3 4 AV 2 3 4 AUDIO 1 2 V-AUX [ A ] [ B ] DOCK...
...MUTE j Option menu OPTION Volume Trim VOL. SW L CR SL SR 1 2 3 4 5 6 7 8 9 INPUT MUTE 0 10 TV TV VOL TV CH ENT 3 Select the desired control/setup item using jCursor B / C / D / E and jENTER. d Input selector j Cursor B / C / D / E j ENTER j RETURN q OPTION 4 Select the desired menu item (... are provided for each input source. You can also use jRETURN to return to +6.0 dB Default setting 0.0 dB Adjustment increments 0.5 dB steps En 37 SETUP SOURCE 1 1 5 TRANSMIT CODE SET SLEEP RECEIVER HDMI 2 3 4 AV 2 3 4 AUDIO 1 2 V-AUX [ A ] [ B ] DOCK...
Owners Manual
Page 38
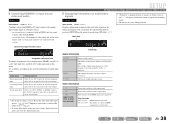
... sources" (☞p. 16) and "Component connections to analog audio output devices" (☞p. 17). • To return audio inputs to their previous settings, display this menu. SETUP Configuring the settings specific for the selected input. Set as : - Coaxial digital audio Select AV2 or AV3. Device Over The number of video input signal...
... sources" (☞p. 16) and "Component connections to analog audio output devices" (☞p. 17). • To return audio inputs to their previous settings, display this menu. SETUP Configuring the settings specific for the selected input. Set as : - Coaxial digital audio Select AV2 or AV3. Device Over The number of video input signal...


