Owners Manual
Page 3
... each speaker...42 - Speaker distance settings ...42 - Specifying the settings for speaker acoustic parameters 22 - Volume control for 2- Speaker impedance configuration...10 - Speaker layout...10 - Subwoofer cable connection ...12 ■ Acoustic parameter adjustment to 5.1-channel configurations - Sound quality control with the equalizer INTRODUCTION Features and capabilities ■ Built-in high-quality...
... each speaker...42 - Speaker distance settings ...42 - Specifying the settings for speaker acoustic parameters 22 - Volume control for 2- Speaker impedance configuration...10 - Speaker layout...10 - Subwoofer cable connection ...12 ■ Acoustic parameter adjustment to 5.1-channel configurations - Sound quality control with the equalizer INTRODUCTION Features and capabilities ■ Built-in high-quality...
Owners Manual
Page 6
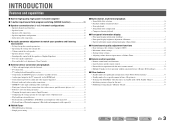
...For connecting the front, center, and surround speakers (☞p. 12). b HDMI OUT jack For connecting an HDMI - k SUBWOOFER jack For connecting a subwoofer with analog audio outputs to input sound into this unit to prevent connection errors. c HDMI1-4 jacks For connecting external components ... COAXIAL AV 2 COAXIAL (CD) AV 3 OPTICAL ( TV ) AV 4 AV 5 AV OUT AUDIO 1 AUDIO 2 ANTENNA FM GND SURROU SUBWOOFER e f g h jik l m En 6 Rear panel a DOCK jack For connecting an optional Yamaha iPod universal dock (such as the AV5 or AUDIO1-2 jacks are selected (☞p. 20).
...For connecting the front, center, and surround speakers (☞p. 12). b HDMI OUT jack For connecting an HDMI - k SUBWOOFER jack For connecting a subwoofer with analog audio outputs to input sound into this unit to prevent connection errors. c HDMI1-4 jacks For connecting external components ... COAXIAL AV 2 COAXIAL (CD) AV 3 OPTICAL ( TV ) AV 4 AV 5 AV OUT AUDIO 1 AUDIO 2 ANTENNA FM GND SURROU SUBWOOFER e f g h jik l m En 6 Rear panel a DOCK jack For connecting an optional Yamaha iPod universal dock (such as the AV5 or AUDIO1-2 jacks are selected (☞p. 20).
Owners Manual
Page 7
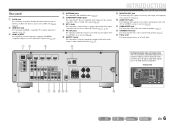
...VOLUME indicator Displays the current volume level. i Multi information display Displays a range of the input source. Press fINFO repeatedly to cycle through an optional Yamaha iPod universal dock (such as the active input source. MUTE SW L CR SL SR h i h j J 1 : While selecting a ...on menu items and settings. h Cursor indicators Light up during normal HDMI communication when any of the HDMI 1-4 inputs are selected. Subwoofer Front speaker L Surround speaker L SW L CR SL SR Center speaker Front speaker R Surround speaker R INTRODUCTION Part names and ...
...VOLUME indicator Displays the current volume level. i Multi information display Displays a range of the input source. Press fINFO repeatedly to cycle through an optional Yamaha iPod universal dock (such as the active input source. MUTE SW L CR SL SR h i h j J 1 : While selecting a ...on menu items and settings. h Cursor indicators Light up during normal HDMI communication when any of the HDMI 1-4 inputs are selected. Subwoofer Front speaker L Surround speaker L SW L CR SL SR Center speaker Front speaker R Surround speaker R INTRODUCTION Part names and ...

Owners Manual
Page 9
... facing slightly inward to you the impact of the screen from the floor. ■ Subwoofer The subwoofer speaker is equipped with the 5.1-channel speakers providing reararea sounds. Ex. Subwoofer speaker layout: Place it halfway between 60 degrees and 80 degrees from the ideal listening position...left and right speakers. Surround speaker layout: Place the speakers at the rear of the TV and the speaker aligned. Use a subwoofer that is used for effect and vocal sounds with an internal amplifier. Front speaker layout: Place these speakers at a height of the...
... facing slightly inward to you the impact of the screen from the floor. ■ Subwoofer The subwoofer speaker is equipped with the 5.1-channel speakers providing reararea sounds. Ex. Subwoofer speaker layout: Place it halfway between 60 degrees and 80 degrees from the ideal listening position...left and right speakers. Surround speaker layout: Place the speakers at the rear of the TV and the speaker aligned. Use a subwoofer that is used for effect and vocal sounds with an internal amplifier. Front speaker layout: Place these speakers at a height of the...
Owners Manual
Page 10
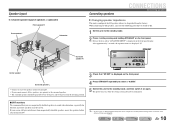
... on, when the settings you made has been configured. ■ CRT monitors We recommend that "SP IMP." Speaker layout 5.1-channel speaker layout (5 speakers + subwoofer) Front speaker R Front speaker L Subwoofer Connecting speakers CONNECTIONS Connecting speakers ■ Changing speaker impedance This unit is configured for 8Ω speakers when it on again. PHONES SILENT CINEMA...
... on, when the settings you made has been configured. ■ CRT monitors We recommend that "SP IMP." Speaker layout 5.1-channel speaker layout (5 speakers + subwoofer) Front speaker R Front speaker L Subwoofer Connecting speakers CONNECTIONS Connecting speakers ■ Changing speaker impedance This unit is configured for 8Ω speakers when it on again. PHONES SILENT CINEMA...
Owners Manual
Page 11
...!" One of this unit or the speakers. Surround speaker R L Front speaker R L HDMI 4 OR OUT ANTENNA FM GND AM SURROUND CENTER SPEAKERS FRONT AUDIO 2 AUDIO OUT SUBWOOFER Subwoofer Center speaker CAUTION • Remove the AC power cord of these cables is switched on. Insert the different colored (or lined) cable into contact with...
...!" One of this unit or the speakers. Surround speaker R L Front speaker R L HDMI 4 OR OUT ANTENNA FM GND AM SURROUND CENTER SPEAKERS FRONT AUDIO 2 AUDIO OUT SUBWOOFER Subwoofer Center speaker CAUTION • Remove the AC power cord of these cables is switched on. Insert the different colored (or lined) cable into contact with...

Owners Manual
Page 12
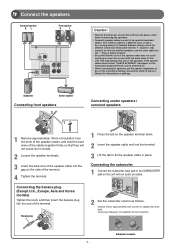
...KERS FRONT 1 Press the tab on this unit with an audio pin cable. 2 Set the subwoofer volume as follows. CONNECTIONS Connecting speakers ■ Connecting the subwoofer 1 Connect the subwoofer input jack to the SUBWOOFER jack on the speaker terminal down. 2 Insert the speaker cable end into the terminal. 3 ...cable into the end of the terminal. 4 Tighten the terminal. Volume: Set to maximum. VOLUME CROSSOVER/ HIGH CUT MIN MAX MIN MAX Subwoofer examples En 12 Connecting the banana plug (Except U.K., Europe, Asia and Korea models) Tighten the knob, and then insert the banana plug...
...KERS FRONT 1 Press the tab on this unit with an audio pin cable. 2 Set the subwoofer volume as follows. CONNECTIONS Connecting speakers ■ Connecting the subwoofer 1 Connect the subwoofer input jack to the SUBWOOFER jack on the speaker terminal down. 2 Insert the speaker cable end into the terminal. 3 ...cable into the end of the terminal. 4 Tighten the terminal. Volume: Set to maximum. VOLUME CROSSOVER/ HIGH CUT MIN MAX MIN MAX Subwoofer examples En 12 Connecting the banana plug (Except U.K., Europe, Asia and Korea models) Tighten the knob, and then insert the banana plug...
Owners Manual
Page 22
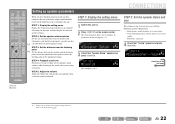
...J1 SETUP VOL. SW Speaker Setup L CR SL SR 3 Check that "Config" appears and press jENTER. SP SET Config This completes step 1. Subwoofer: connected 4 Check that "Speaker Setup" appears and press jENTER. STEP 1: Display the setting menu Display the Setup menu from which you have finished ... menu for low-frequency sound. CONFIG VOL. En 22 STEP 2: Set the speaker status and size Set the size and connection status of speakers and subwoofers, and whether to the next page i SETUP j ENTER J 1 : See the section "Setting various functions (Setup menu)" for this unit on....
...J1 SETUP VOL. SW Speaker Setup L CR SL SR 3 Check that "Config" appears and press jENTER. SP SET Config This completes step 1. Subwoofer: connected 4 Check that "Speaker Setup" appears and press jENTER. STEP 1: Display the setting menu Display the Setup menu from which you have finished ... menu for low-frequency sound. CONFIG VOL. En 22 STEP 2: Set the speaker status and size Set the size and connection status of speakers and subwoofers, and whether to the next page i SETUP j ENTER J 1 : See the section "Setting various functions (Setup menu)" for this unit on....
Owners Manual
Page 23
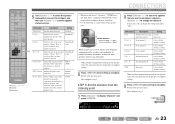
...L CR SL SR 9 Press jRETURN when setting is no subwoofer). Information Description Setting Subwoofer Sets the subwoofer status. Yes/None Front Selects the size (sound reproduction capacity) of the front speakers or the subwoofer (Off), or through either of the front speakers. LR ...the settings for one speaker, repeat the same procedure for all speakers to "Small," low-frequency components of the subwoofer. STEP 3: Set the distance from the subwoofer or the front speakers. 40Hz to complete settings. L Surround speaker L 1.0 ft to 80.0 ft (0.30 m...
...L CR SL SR 9 Press jRETURN when setting is no subwoofer). Information Description Setting Subwoofer Sets the subwoofer status. Yes/None Front Selects the size (sound reproduction capacity) of the front speakers or the subwoofer (Off), or through either of the front speakers. LR ...the settings for one speaker, repeat the same procedure for all speakers to "Small," low-frequency components of the subwoofer. STEP 3: Set the distance from the subwoofer or the front speakers. 40Hz to complete settings. L Surround speaker L 1.0 ft to 80.0 ft (0.30 m...
Owners Manual
Page 24
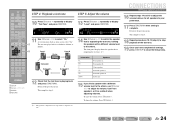
... level to the others . Information FL FR C SL SR SWFR Speakers Front speaker L Front speaker R Center speaker Surround speaker L Surround speaker R Subwoofer 15 If you select "On." ENTER VOLUME RETURN DISPLAY TOP MENU REC POP-UP MENU MUTE j Front L Center Front R 1 2 3 4 ...5 6 7 8 9 INPUT MUTE 0 10 TV TV VOL TV CH ENT Subwoofer Surround L Surround R i SETUP j Cursor B / C / D / E j ENTER j RETURN 12 Check that is playing back and press jRETURN. d FL----d ---- To...
... level to the others . Information FL FR C SL SR SWFR Speakers Front speaker L Front speaker R Center speaker Surround speaker L Surround speaker R Subwoofer 15 If you select "On." ENTER VOLUME RETURN DISPLAY TOP MENU REC POP-UP MENU MUTE j Front L Center Front R 1 2 3 4 ...5 6 7 8 9 INPUT MUTE 0 10 TV TV VOL TV CH ENT Subwoofer Surround L Surround R i SETUP j Cursor B / C / D / E j ENTER j RETURN 12 Check that is playing back and press jRETURN. d FL----d ---- To...
Owners Manual
Page 40
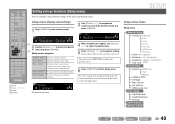
... SL SR 3 Use jCursor B / C to navigate the submenus to select the desired menu and press jENTER. SETUP Setup menu items Setup menu Speaker Setup Config Subwoofer Front Center Sur. Sets parameters for sound field programs. Protects settings against accidental alteration. SW Audio;;;;;;Amp L CR SL SR 4 When multiple items appear, use...
... SL SR 3 Use jCursor B / C to navigate the submenus to select the desired menu and press jENTER. SETUP Setup menu items Setup menu Speaker Setup Config Subwoofer Front Center Sur. Sets parameters for sound field programs. Protects settings against accidental alteration. SW Audio;;;;;;Amp L CR SL SR 4 When multiple items appear, use...
Owners Manual
Page 41
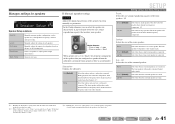
... low-frequency components of audio signals transmitted from other channels. Select the size (sound reproduction capacity) that you do not have a subwoofer connected. The front speakers will produce center channel audio. SETUP Setting various functions (Setup menu) Front Selects the size (sound reproduction ...speaker setting is set the frequency components of the speakers that matches your speakers. En 41 During playback, the subwoofer will produce surround channel audio signals. Select this when you configured are large. Select this when the surround speakers are produced ...
... low-frequency components of audio signals transmitted from other channels. Select the size (sound reproduction capacity) that you do not have a subwoofer connected. The front speakers will produce center channel audio. SETUP Setting various functions (Setup menu) Front Selects the size (sound reproduction ...speaker setting is set the frequency components of the speakers that matches your speakers. En 41 During playback, the subwoofer will produce surround channel audio signals. Select this when you configured are large. Select this when the surround speakers are produced ...
Owners Manual
Page 42
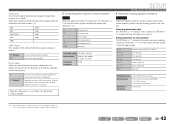
... B / C to select the desired speaker and adjust the volume with a frequency below that sounds from the speaker to your subwoofer has a volume control or a crossover frequency control, set to "Small." Setting distances for each speaker Level Separately adjusts the volume...Front R/SWFR) 8.5 ft (2.60 m) (Center) 8.0 ft (2.40 m) (Sur. Front speaker L Front speaker R Center speaker Surround speaker L Surround speaker R Subwoofer Adjustable range 1.0 ft to 80.0 ft (0.30 m to be produced from speakers set the distance from the speakers reach the listening position at which the...
... B / C to select the desired speaker and adjust the volume with a frequency below that sounds from the speaker to your subwoofer has a volume control or a crossover frequency control, set to "Small." Setting distances for each speaker Level Separately adjusts the volume...Front R/SWFR) 8.5 ft (2.60 m) (Center) 8.0 ft (2.40 m) (Sur. Front speaker L Front speaker R Center speaker Surround speaker L Surround speaker R Subwoofer Adjustable range 1.0 ft to 80.0 ft (0.30 m to be produced from speakers set the distance from the speakers reach the listening position at which the...
Owners Manual
Page 57
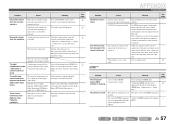
...gSTRAIGHT (on , the sound may be distorted, or the volume may be played in the desired digital audio signal format. If the subwoofer includes an Auto Power Off function, then lower the Auto Power Off sensitivity settings. APPENDIX Troubleshooting Problem Noise/hum noise is flashing. "...standard decoders (Dolby Digital, DTS Digital Surround, etc.). See page 27 26 41 - - 38 - - - Confirm that HDMI video that a subwoofer is connected correctly, and from "Audio In" in straight decoding mode and a monaural source is being played back. Problem No sound is heard from ...
...gSTRAIGHT (on , the sound may be distorted, or the volume may be played in the desired digital audio signal format. If the subwoofer includes an Auto Power Off function, then lower the Auto Power Off sensitivity settings. APPENDIX Troubleshooting Problem Noise/hum noise is flashing. "...standard decoders (Dolby Digital, DTS Digital Surround, etc.). See page 27 26 41 - - 38 - - - Confirm that HDMI video that a subwoofer is connected correctly, and from "Audio In" in straight decoding mode and a monaural source is being played back. Problem No sound is heard from ...

Owners Manual
Page 61
... by the PCM format used to decode vast numbers of existing Dolby Surround sources. This channel is widely used as a subwoofer, for conventional Pro Logic technology. Sound field program information CINEMA DSP Since the Dolby Surround and DTS systems were originally designed...unit can be reproduced. DSD Direct Stream Digital (DSD) technology stores audio signals on a wealth of actually measured data, Yamaha CINEMA DSP uses Yamaha's original DSP technology to combine Dolby Pro Logic, Dolby Digital, and DTS systems to provide the audiovisual experience of audio ...
... by the PCM format used to decode vast numbers of existing Dolby Surround sources. This channel is widely used as a subwoofer, for conventional Pro Logic technology. Sound field program information CINEMA DSP Since the Dolby Surround and DTS systems were originally designed...unit can be reproduced. DSD Direct Stream Digital (DSD) technology stores audio signals on a wealth of actually measured data, Yamaha CINEMA DSP uses Yamaha's original DSP technology to combine Dolby Pro Logic, Dolby Digital, and DTS systems to provide the audiovisual experience of audio ...

Owners Manual
Page 64
to Noise Ratio (IHF-A Network) AV5, etc. L.P.F. (Subwoofer 24 dB/oct. ■ VIDEO SECTION • Video Signal Type [U.S.A., Canada, Korea and General models NTSC [Other models PAL • Signal Level Composite 1 Vp-p/75 &#... Conversion Off) ....... 1.5 Vp-p or more • Signal to Noise Ratio 50 dB or more • Rated Output Voltage/Output Impedance AUDIO OUT 200 mV/1.2 kΩ SUBWOOFER (2ch Stereo & Front: Small 1.0 V/1.2 kΩ • Headphone Jack Rated Output/Impedance AV5, etc. (1 kHz, 50 mV, 8 100 mV/470 Ω • Frequency Response AV5 to...
to Noise Ratio (IHF-A Network) AV5, etc. L.P.F. (Subwoofer 24 dB/oct. ■ VIDEO SECTION • Video Signal Type [U.S.A., Canada, Korea and General models NTSC [Other models PAL • Signal Level Composite 1 Vp-p/75 &#... Conversion Off) ....... 1.5 Vp-p or more • Signal to Noise Ratio 50 dB or more • Rated Output Voltage/Output Impedance AUDIO OUT 200 mV/1.2 kΩ SUBWOOFER (2ch Stereo & Front: Small 1.0 V/1.2 kΩ • Headphone Jack Rated Output/Impedance AV5, etc. (1 kHz, 50 mV, 8 100 mV/470 Ω • Frequency Response AV5 to...

Quick Reference Guide
Page 1
..., following accessories are supplied with an impedance of speakers you are using a CRT TV, we recommend that you are connecting) • Audio pin cable (for subwoofer) - 1 - Active subwoofer • Use speakers with this product. Center speaker Ex. Front speaker Ex. The priority of the other speakers is as follows: 1 Two surround speakers...
..., following accessories are supplied with an impedance of speakers you are using a CRT TV, we recommend that you are connecting) • Audio pin cable (for subwoofer) - 1 - Active subwoofer • Use speakers with this product. Center speaker Ex. Front speaker Ex. The priority of the other speakers is as follows: 1 Two surround speakers...

Quick Reference Guide
Page 2
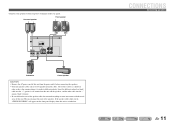
TV 3 2 Front speaker L 4 This unit Center speaker Front speaker R Subwoofer 1 Surround speaker R Surround 1 speaker L BD/DVD player (recorder) 1 Connect the speakers 2 Connect a TV 3 Connect playback device such as follows the first time you use this unit. Connect and install as BD/DVD players and recorders 4 Connect the AC power cord, and turn the power on When connection and installation is finished, set up the speaker parameters 5 . - 2 - See the following explanations for the connections for each number.
TV 3 2 Front speaker L 4 This unit Center speaker Front speaker R Subwoofer 1 Surround speaker R Surround 1 speaker L BD/DVD player (recorder) 1 Connect the speakers 2 Connect a TV 3 Connect playback device such as follows the first time you use this unit. Connect and install as BD/DVD players and recorders 4 Connect the AC power cord, and turn the power on When connection and installation is finished, set up the speaker parameters 5 . - 2 - See the following explanations for the connections for each number.
Quick Reference Guide
Page 3
...the power outlet before making connections. 1 Connect the speakers Surround speaker R L Front speaker R L ANTENNA FM GND AM SPEAKERS SURROUND CENTER FRONT SUBWOOFER Caution: • Remove the AC power cord of this unit from the ends of the speaker cables, and twist the bare wires of the ... Europe, Asia and Korea models) Tighten the knob, and then insert the banana plug into contact with an audio pin cable. 2 Set the subwoofer volume as follows. will not cause short circuits. 2 Loosen the speaker terminals. 3 Insert the bare wire of the speaker cable into the gap...
...the power outlet before making connections. 1 Connect the speakers Surround speaker R L Front speaker R L ANTENNA FM GND AM SPEAKERS SURROUND CENTER FRONT SUBWOOFER Caution: • Remove the AC power cord of this unit from the ends of the speaker cables, and twist the bare wires of the ... Europe, Asia and Korea models) Tighten the knob, and then insert the banana plug into contact with an audio pin cable. 2 Set the subwoofer volume as follows. will not cause short circuits. 2 Loosen the speaker terminals. 3 Insert the bare wire of the speaker cable into the gap...

Quick Reference Guide
Page 6
.... NRM/REV Selects whether to 200 Hz Switchs the phase of the surround speakers. LR Crossover SWFR Phase Extra Bass Description Setting Sets the subwoofer status. STEP 2: Set the speaker status and size The settings in step 2 are not necessary with a frequency below this unit on. ...will be output from the listening point 7 Press Cursor C to complete settings. 6 Press RETURN when setting is 16 cm or smaller • Subwoofer: connected 4 Check that "Speaker Setup" appears and press ENTER. DECODE MUSIC STEREO STRAIGHT BD DVD SETUP SCENE TV CD RADIO OPTION ENTER VOLUME...
.... NRM/REV Selects whether to 200 Hz Switchs the phase of the surround speakers. LR Crossover SWFR Phase Extra Bass Description Setting Sets the subwoofer status. STEP 2: Set the speaker status and size The settings in step 2 are not necessary with a frequency below this unit on. ...will be output from the listening point 7 Press Cursor C to complete settings. 6 Press RETURN when setting is 16 cm or smaller • Subwoofer: connected 4 Check that "Speaker Setup" appears and press ENTER. DECODE MUSIC STEREO STRAIGHT BD DVD SETUP SCENE TV CD RADIO OPTION ENTER VOLUME...


