
Owners Manual
Page 2
... intended to alert you to the presence of electric shock to allow spaces of at least 10 cm above, behind and on both sides of DVR-C310, and at the plugs, convenience receptacles, and the point where they exit from the apparatus. 11 Only use attachments/accessories specified by the manufacturer. 12...
... intended to alert you to the presence of electric shock to allow spaces of at least 10 cm above, behind and on both sides of DVR-C310, and at the plugs, convenience receptacles, and the point where they exit from the apparatus. 11 Only use attachments/accessories specified by the manufacturer. 12...
Owners Manual
Page 4
... of this unit, do not place: -Other components, as it is connected to place this unit on this unit itself . this manual carefully. Contact qualified YAMAHA service personnel when any service is called the standby mode. This unit is incorrectly replaced. CAUTION Danger of emitting radiation exceeding the limit for Class... easily. Replace only with at least 10 cm on the top, 10 cm on the left and right, and 10 cm at the back of DVR-C310 and at least 1 m above, 30 cm behind and on switches, knobs and/or cords. 10 When disconnecting the power cord from the outlet, then leave...
... of this unit, do not place: -Other components, as it is connected to place this unit on this unit itself . this manual carefully. Contact qualified YAMAHA service personnel when any service is called the standby mode. This unit is incorrectly replaced. CAUTION Danger of emitting radiation exceeding the limit for Class... easily. Replace only with at least 10 cm on the top, 10 cm on the left and right, and 10 cm at the back of DVR-C310 and at least 1 m above, 30 cm behind and on switches, knobs and/or cords. 10 When disconnecting the power cord from the outlet, then leave...
Owners Manual
Page 5
... 11 Connecting the DVD receiver and the subwoofer 11 CONNECTION 12 Connecting a TV 12 Connecting an HDMI component 13 Connecting a VCR 14 Connecting a YAMAHA iPod universal dock 15 Connecting a digital audio component .......... 16 Connecting a portable audio player 16 Connecting the FM/AM antennas 17 GETTING STARTED 18 ... 19 Setting a TV type and display 19 Setting language preferences 20 3. CONTENTS 1 1. INTRODUCTION INTRODUCTION 2 Main unit 3 Supplied accessories 3 FUNCTIONAL OVERVIEW 4 Front panel (DVR-C310 4 Rear panel (DVR-C310 5 Remote control (For DVR-C310 6 2.
... 11 Connecting the DVD receiver and the subwoofer 11 CONNECTION 12 Connecting a TV 12 Connecting an HDMI component 13 Connecting a VCR 14 Connecting a YAMAHA iPod universal dock 15 Connecting a digital audio component .......... 16 Connecting a portable audio player 16 Connecting the FM/AM antennas 17 GETTING STARTED 18 ... 19 Setting a TV type and display 19 Setting language preferences 20 3. CONTENTS 1 1. INTRODUCTION INTRODUCTION 2 Main unit 3 Supplied accessories 3 FUNCTIONAL OVERVIEW 4 Front panel (DVR-C310 4 Rear panel (DVR-C310 5 Remote control (For DVR-C310 6 2.
Owners Manual
Page 7
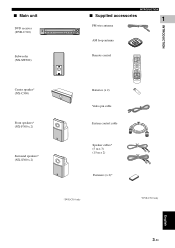
INTRODUCTION ■ Main unit DVD receiver (DVR-C310) NATURAL SOUND HOME THEATER SYSTEM DVR-C310 1 2 3 4 5 DISC PORTABLE AUDIO/VIDEO INPUT VOLUME PLAYXCHANGE INTRODUCTION ■ Supplied accessories 1 FM wire antenna AM loop antenna Subwoofer (NX-SW300) Center speaker* (NX-C300) Remote ... INPUT VOL MUTE XM DOCK TV AUX TUNER DVD/CD Front speakers* (NX-F300 x 2) System control cable Surround speakers* (NX-S300 x 2) Speaker cables* (5 m x 3) (15 m x 2) Fasteners (x 2)* *DVX-C310 only *DVX-C310 only English 3 En
INTRODUCTION ■ Main unit DVD receiver (DVR-C310) NATURAL SOUND HOME THEATER SYSTEM DVR-C310 1 2 3 4 5 DISC PORTABLE AUDIO/VIDEO INPUT VOLUME PLAYXCHANGE INTRODUCTION ■ Supplied accessories 1 FM wire antenna AM loop antenna Subwoofer (NX-SW300) Center speaker* (NX-C300) Remote ... INPUT VOL MUTE XM DOCK TV AUX TUNER DVD/CD Front speakers* (NX-F300 x 2) System control cable Surround speakers* (NX-S300 x 2) Speaker cables* (5 m x 3) (15 m x 2) Fasteners (x 2)* *DVX-C310 only *DVX-C310 only English 3 En

Owners Manual
Page 8
... infrared signal from the remote control. C DISC (1, 2, 3, 4, 5) / LEDs Selects and directly plays back the preferred disc. FUNCTIONAL OVERVIEW FUNCTIONAL OVERVIEW ■ Front panel (DVR-C310) 1 2 NATURAL SOUND HOME THEATER SYSTEM DVR-C310 1 2 3 4 5 DISC PORTABLE 34 AUDIO/VIDEO INPUT VOLUME PLAYXCHANGE C B A 0 9 87 6 5 1 STANDBY/ON ( ) Turns on this DVD receiver recognizes that the corresponding disc has...
... infrared signal from the remote control. C DISC (1, 2, 3, 4, 5) / LEDs Selects and directly plays back the preferred disc. FUNCTIONAL OVERVIEW FUNCTIONAL OVERVIEW ■ Front panel (DVR-C310) 1 2 NATURAL SOUND HOME THEATER SYSTEM DVR-C310 1 2 3 4 5 DISC PORTABLE 34 AUDIO/VIDEO INPUT VOLUME PLAYXCHANGE C B A 0 9 87 6 5 1 STANDBY/ON ( ) Turns on this DVD receiver recognizes that the corresponding disc has...

Owners Manual
Page 9
... or cassette deck (see page 17). D GND and AM ANT terminals Connect the AM loop antenna (see page 14). English 5 En ■ Rear panel (DVR-C310) 12 3 4 FUNCTIONAL OVERVIEW 1 5 INTRODUCTION FM HDMI 75 UNBAL. B AUX IN jacks Connect to the audio output jacks on a digital audio component (see ... jack Connect to an HDMI compatible component (see page 13). 3 XM jack Connect an XM Passport System (see page 41). 4 DOCK terminal Connect a YAMAHA iPod universal dock (see page 15). 5 AC power cord Connect to a standard AC outlet. 6 VIDEO output jack Connect to the video (composite) jack...
... or cassette deck (see page 17). D GND and AM ANT terminals Connect the AM loop antenna (see page 14). English 5 En ■ Rear panel (DVR-C310) 12 3 4 FUNCTIONAL OVERVIEW 1 5 INTRODUCTION FM HDMI 75 UNBAL. B AUX IN jacks Connect to the audio output jacks on a digital audio component (see ... jack Connect to an HDMI compatible component (see page 13). 3 XM jack Connect an XM Passport System (see page 41). 4 DOCK terminal Connect a YAMAHA iPod universal dock (see page 15). 5 AC power cord Connect to a standard AC outlet. 6 VIDEO output jack Connect to the video (composite) jack...

Owners Manual
Page 10
... page 18. 1 POWER (TV) Turns on or off. 9s DVD/CD mode: stops playback. A SUBTITLE Selects a subtitle language. 6 En FUNCTIONAL OVERVIEW ■ Remote control (For DVR-C310) 1 2 3 4 5 6 7 8 9 0 A B C D E F G POWER DIMMER SLEEP POWER TV SCAN PAGE PROG REPEAT A - Enters a number of a disc. TUNER mode: selects the preset number. TUNER mode: starts automatic/manual preset...
... page 18. 1 POWER (TV) Turns on or off. 9s DVD/CD mode: stops playback. A SUBTITLE Selects a subtitle language. 6 En FUNCTIONAL OVERVIEW ■ Remote control (For DVR-C310) 1 2 3 4 5 6 7 8 9 0 A B C D E F G POWER DIMMER SLEEP POWER TV SCAN PAGE PROG REPEAT A - Enters a number of a disc. TUNER mode: selects the preset number. TUNER mode: starts automatic/manual preset...


