
Owners Manual
Page 3
... device. Eviter toute exposition au faisceau. This equipment generates/uses radio frequencies and, if not installed and used . If these requirements provides a reasonable level of product. If you to beam. When this product MUST be determined by Yamaha may cause interference harmful to coaxial type cable. Modifications not expressly approved by turning the product "OFF" and "ON", please try to...
... device. Eviter toute exposition au faisceau. This equipment generates/uses radio frequencies and, if not installed and used . If these requirements provides a reasonable level of product. If you to beam. When this product MUST be determined by Yamaha may cause interference harmful to coaxial type cable. Modifications not expressly approved by turning the product "OFF" and "ON", please try to...
Owners Manual
Page 4
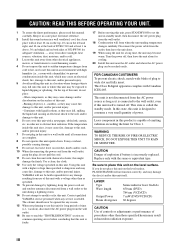
... power source as long as it is connected to the wall outlet, even if this unit itself . This state is incorrectly replaced. CAUTION Danger of explosion if battery is called the standby mode. LASER Type Wave length Output Power Beam divergence Semiconductor laser GaAlAs 650 nm (DVD) 784 nm (VCD/CD) 7 mW (DVD/VCD/CD) 60 degrees CAUTION Use of controls or adjustments...
... power source as long as it is connected to the wall outlet, even if this unit itself . This state is incorrectly replaced. CAUTION Danger of explosion if battery is called the standby mode. LASER Type Wave length Output Power Beam divergence Semiconductor laser GaAlAs 650 nm (DVD) 784 nm (VCD/CD) 7 mW (DVD/VCD/CD) 60 degrees CAUTION Use of controls or adjustments...
Owners Manual
Page 5
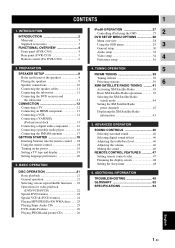
... receiver and the subwoofer 11 CONNECTION 12 Connecting a TV 12 Connecting an HDMI component 13 Connecting a VCR 14 Connecting a YAMAHA iPod universal dock 15 Connecting a digital audio component .......... 16 Connecting a portable audio player 16 Connecting the FM/AM antennas 17 GETTING STARTED 18 Inserting batteries into the remote control .... 18 Using the remote control 18 Turning on the power 19 Setting a TV type and display 19 Setting language preferences 20 3. TUNING OPERATION 5 FM/AM TUNING 39 Tuning stations 39 6 Presetting stations 39 XM® SATELLITE RADIO...
... receiver and the subwoofer 11 CONNECTION 12 Connecting a TV 12 Connecting an HDMI component 13 Connecting a VCR 14 Connecting a YAMAHA iPod universal dock 15 Connecting a digital audio component .......... 16 Connecting a portable audio player 16 Connecting the FM/AM antennas 17 GETTING STARTED 18 Inserting batteries into the remote control .... 18 Using the remote control 18 Turning on the power 19 Setting a TV type and display 19 Setting language preferences 20 3. TUNING OPERATION 5 FM/AM TUNING 39 Tuning stations 39 6 Presetting stations 39 XM® SATELLITE RADIO...
Owners Manual
Page 7
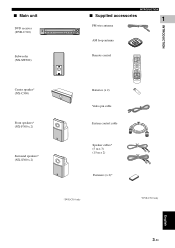
... DOCK TV AUX TUNER DVD/CD Front speakers* (NX-F300 x 2) System control cable Surround speakers* (NX-S300 x 2) Speaker cables* (5 m x 3) (15 m x 2) Fasteners (x 2)* *DVX-C310 only *DVX-C310 only English 3 En INTRODUCTION ■ Main unit DVD receiver (DVR-C310) NATURAL SOUND HOME THEATER SYSTEM DVR-C310 1 2 3 4 5 DISC PORTABLE AUDIO/VIDEO INPUT VOLUME PLAYXCHANGE INTRODUCTION ■ Supplied accessories 1 FM wire antenna AM loop antenna Subwoofer (NX-SW300) Center speaker* (NX-C300) Remote control Batteries (x 2) Video pin cable POWER DIMMER SLEEP POWER TV SCAN...
... DOCK TV AUX TUNER DVD/CD Front speakers* (NX-F300 x 2) System control cable Surround speakers* (NX-S300 x 2) Speaker cables* (5 m x 3) (15 m x 2) Fasteners (x 2)* *DVX-C310 only *DVX-C310 only English 3 En INTRODUCTION ■ Main unit DVD receiver (DVR-C310) NATURAL SOUND HOME THEATER SYSTEM DVR-C310 1 2 3 4 5 DISC PORTABLE AUDIO/VIDEO INPUT VOLUME PLAYXCHANGE INTRODUCTION ■ Supplied accessories 1 FM wire antenna AM loop antenna Subwoofer (NX-SW300) Center speaker* (NX-C300) Remote control Batteries (x 2) Video pin cable POWER DIMMER SLEEP POWER TV SCAN...

Owners Manual
Page 8
...panel (DVR-C310) 1 2 NATURAL SOUND HOME THEATER SYSTEM DVR-C310 1 2 3 4 5 DISC PORTABLE 34 AUDIO/VIDEO INPUT VOLUME PLAYXCHANGE C B A 0 9 87 6 5 1 STANDBY/ON ( ) Turns on this DVD receiver, or sets it consumes a small amount of power. 2 Disc tray Loads up when you play a multi-channel audio source. TUNER mode: selects the preset number. 0 PORTABLE jack Connects a portable audio player. Press and hold to the standby mode. A Remote control sensor Receives infrared signal from the remote control. It does not light up in the disc tray. 3 VOLUME Adjusts the volume level...
...panel (DVR-C310) 1 2 NATURAL SOUND HOME THEATER SYSTEM DVR-C310 1 2 3 4 5 DISC PORTABLE 34 AUDIO/VIDEO INPUT VOLUME PLAYXCHANGE C B A 0 9 87 6 5 1 STANDBY/ON ( ) Turns on this DVD receiver, or sets it consumes a small amount of power. 2 Disc tray Loads up when you play a multi-channel audio source. TUNER mode: selects the preset number. 0 PORTABLE jack Connects a portable audio player. Press and hold to the standby mode. A Remote control sensor Receives infrared signal from the remote control. It does not light up in the disc tray. 3 VOLUME Adjusts the volume level...

Owners Manual
Page 10
... a selection. 8 MENU Accesses the menu of a preset radio station. 4 REPEAT Selects various repeat modes. 5 PROG DVD/CD mode: starts programming. Holding down the button opens and closes the disc tray. Press and hold to the previous menu. Displays the top-level disc menu (if available). 7 Cursors ( / / / ) DVD/CD mode: Use to select OSD menu items. TUNER mode: press / to tune into a station or press / to the main menu. During playback, returns to starts automatic tuning. FUNCTIONAL OVERVIEW ■ Remote control (For DVR-C310) 1 2 3 4 5 6 7 8 9 0 A B C D E F G POWER...
... a selection. 8 MENU Accesses the menu of a preset radio station. 4 REPEAT Selects various repeat modes. 5 PROG DVD/CD mode: starts programming. Holding down the button opens and closes the disc tray. Press and hold to the previous menu. Displays the top-level disc menu (if available). 7 Cursors ( / / / ) DVD/CD mode: Use to select OSD menu items. TUNER mode: press / to tune into a station or press / to the main menu. During playback, returns to starts automatic tuning. FUNCTIONAL OVERVIEW ■ Remote control (For DVR-C310) 1 2 3 4 5 6 7 8 9 0 A B C D E F G POWER...

Owners Manual
Page 11
...CD mode: starts playback. X SURR Switches to TUNER/FM, TUNER/AM or XM RADIO input source. F EFFECT Selects a sound effect. TUNER: switches to multi-channel surround mode or stereo mode. K PAGE Turns the pages of power. N ON SCREEN/DISPLAY Accesses or exits from the setup menu of this DVD receiver is in the standby mode, it to change the tone level. Press again to restore the audio output to TV input source. English 7 En B AUDIO Selects an audio language (DVD) or an audio channel (VCD). TV: switches to the previous volume level. TUNER mode: starts preset installation...
...CD mode: starts playback. X SURR Switches to TUNER/FM, TUNER/AM or XM RADIO input source. F EFFECT Selects a sound effect. TUNER: switches to multi-channel surround mode or stereo mode. K PAGE Turns the pages of power. N ON SCREEN/DISPLAY Accesses or exits from the setup menu of this DVD receiver is in the standby mode, it to change the tone level. Press again to restore the audio output to TV input source. English 7 En B AUDIO Selects an audio language (DVD) or an audio channel (VCD). TV: switches to the previous volume level. TUNER mode: starts preset installation...

Owners Manual
Page 12
Allow adequate ventilation around the DVD receiver and subwoofer. - Main roles: Produces surround sounds and effect sounds. 4 Subwoofer Place the subwoofer near a front speaker and turn it slightly toward the center of the screen such as dialogues or vocal sounds. 3 Surround Speakers (L, R) Place the surround left /right speakers on both sides of your TV. - Main roles: Produces bass sounds and low frequency (LFE) sounds contained in their appropriate positions and install them correctly.The following...
Allow adequate ventilation around the DVD receiver and subwoofer. - Main roles: Produces surround sounds and effect sounds. 4 Subwoofer Place the subwoofer near a front speaker and turn it slightly toward the center of the screen such as dialogues or vocal sounds. 3 Surround Speakers (L, R) Place the surround left /right speakers on both sides of your TV. - Main roles: Produces bass sounds and low frequency (LFE) sounds contained in their appropriate positions and install them correctly.The following...

Owners Manual
Page 16
... HDMI XM DOCK L GND AM R ANTENNA TV IN AUX IN LINE OUT SYSTEM CONNECTOR TO NX-SW300 PR Y VIDEO PCM/DTS q DIGITAL PB COAXIAL COMPONENT S VIDEO DIGITAL IN VIDEO OUT (DVD ONLY) 1 VIDEO output jack Use the supplied video pin cable (yellow) to connect the VIDEO jack of this DVD receiver to make one audio connections from the following options (1 or 2) and one video connection from the speakers connected to this DVD receiver, use a commercially available coaxial cable to the analog audio and digital audio at the same time, the digital audio signals input...
... HDMI XM DOCK L GND AM R ANTENNA TV IN AUX IN LINE OUT SYSTEM CONNECTOR TO NX-SW300 PR Y VIDEO PCM/DTS q DIGITAL PB COAXIAL COMPONENT S VIDEO DIGITAL IN VIDEO OUT (DVD ONLY) 1 VIDEO output jack Use the supplied video pin cable (yellow) to connect the VIDEO jack of this DVD receiver to make one audio connections from the following options (1 or 2) and one video connection from the speakers connected to this DVD receiver, use a commercially available coaxial cable to the analog audio and digital audio at the same time, the digital audio signals input...

Owners Manual
Page 17
... as multi-channel digital audio using a commercially available HDMI cable. When connecting an HDMI component, refer to the HDMI input jack of content providers and system operators. PREPARATION 2 Select the appropriate audio output from [HDMI SETUP] in combination with HDCPincompatible HDMI or DVI components. - Doing so may disrupt playback or cause noise. Notes - For further information on HDMI, visit the HDMI website at "http://www.hdmi.org/". This DVD receiver is the first industry-supported, uncompressed, all-digital A/V (audio/video...
... as multi-channel digital audio using a commercially available HDMI cable. When connecting an HDMI component, refer to the HDMI input jack of content providers and system operators. PREPARATION 2 Select the appropriate audio output from [HDMI SETUP] in combination with HDCPincompatible HDMI or DVI components. - Doing so may disrupt playback or cause noise. Notes - For further information on HDMI, visit the HDMI website at "http://www.hdmi.org/". This DVD receiver is the first industry-supported, uncompressed, all-digital A/V (audio/video...
Owners Manual
Page 23
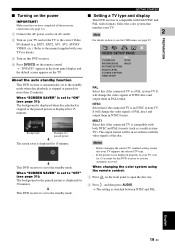
... standby mode. ■ Turning on the front panel to open the disc tray. 2 Press , and then press AUDIO. → The setting is switched between NTSC and PAL. Background Example of the disc. PREPARATION VIDEO SETUP PAGE TV TYPE TV DISPLAY PROGRESSIVE PICTURE SETTING BLACK LEVEL CLOSED CAPTION HDMI SETUP PAL NTSC MULTI PAL Select this DVD receiver to activate automatic recovery. The output format will be in the front panel display and the default screen...
... standby mode. ■ Turning on the front panel to open the disc tray. 2 Press , and then press AUDIO. → The setting is switched between NTSC and PAL. Background Example of the disc. PREPARATION VIDEO SETUP PAGE TV TYPE TV DISPLAY PROGRESSIVE PICTURE SETTING BLACK LEVEL CLOSED CAPTION HDMI SETUP PAL NTSC MULTI PAL Select this DVD receiver to activate automatic recovery. The output format will be in the front panel display and the default screen...

Owners Manual
Page 31
... ON SCREEN DISPLAY CA+T MENU CH SRCH SET UP PRESET SUBTITLE AUDIO ANGLE DISC SKIP ZOOM TVVOL TV CH TRE BASS EFFECT SURR TV INPUT VOL MUTE XM DOCK TV AUX TUNER DVD/CD h e DOCK 1 Press INPUT on the front panel or DOCK on the remote control repeatedly until "DOCKED" appears in the front panel display. → The iPod menu appears on your iPod using the OSD of your iPod in the display window...
... ON SCREEN DISPLAY CA+T MENU CH SRCH SET UP PRESET SUBTITLE AUDIO ANGLE DISC SKIP ZOOM TVVOL TV CH TRE BASS EFFECT SURR TV INPUT VOL MUTE XM DOCK TV AUX TUNER DVD/CD h e DOCK 1 Press INPUT on the front panel or DOCK on the remote control repeatedly until "DOCKED" appears in the front panel display. → The iPod menu appears on your iPod using the OSD of your iPod in the display window...

Owners Manual
Page 32
... SETTING BLACK LEVEL CLOSED CAPTION HDMI SETUP PREFERENCE PAGE (page 36) AUDIO SUBTITLE DISC MENU PARENTAL PBC MP3/JPEG NAV VR LIST PASSWORD DIVX SUBTITLE DEFAULT Parameter/Submenu* DVD-AUDIO MODE DVD-VIDEO MODE UNLOCK LOCK FTS FDS ENGLISH, FRANÇAIS, ESPANÕL ON OFF (Registration code) SPEAKERS VOLUME* SPEAKERS DELAY* HDMI AUDIO* LPCM OUTPUT* OFF 88.2 kHz (X2) ON OFF DELAY TIME FRONT LEFT, FRONT RIGHT, CENTER, SUBWOOFER, SURROUND L, SURROUND R CENTER, SURROUND L, SURROUND R OFF, ALL, PCM ONLY 48KHz, 96KHz PAL NTSC MULTI...
... SETTING BLACK LEVEL CLOSED CAPTION HDMI SETUP PREFERENCE PAGE (page 36) AUDIO SUBTITLE DISC MENU PARENTAL PBC MP3/JPEG NAV VR LIST PASSWORD DIVX SUBTITLE DEFAULT Parameter/Submenu* DVD-AUDIO MODE DVD-VIDEO MODE UNLOCK LOCK FTS FDS ENGLISH, FRANÇAIS, ESPANÕL ON OFF (Registration code) SPEAKERS VOLUME* SPEAKERS DELAY* HDMI AUDIO* LPCM OUTPUT* OFF 88.2 kHz (X2) ON OFF DELAY TIME FRONT LEFT, FRONT RIGHT, CENTER, SUBWOOFER, SURROUND L, SURROUND R CENTER, SURROUND L, SURROUND R OFF, ALL, PCM ONLY 48KHz, 96KHz PAL NTSC MULTI...

Owners Manual
Page 36
... SYNC SPEAKER SETUP PAGE SPEAKERS VOLUME SPEAKERS DELAY [SPEAKERS VOLUME] Volume level setting for individual speakers (-6dB to help you optimize the sound of each speaker. 32 En SPEAKERS DELAY SETUP CENTER SURROUND L SURROUND R 0 MS 0 MS 0 MS Notes - A test tone will be sure press s twice to best suit your system to stop playback. Before setting [SPEAKER SETUP], be automatically generated to +6dB). DVD SETUP MENU OPTIONS ■ Audio setup AUDIO SETUP PAGE SPEAKER SETUP HDMI SETUP CD UPSAMPLING NIGHT MODE LIP SYNC Speaker setup You can adjust the delay times (for center...
... SYNC SPEAKER SETUP PAGE SPEAKERS VOLUME SPEAKERS DELAY [SPEAKERS VOLUME] Volume level setting for individual speakers (-6dB to help you optimize the sound of each speaker. 32 En SPEAKERS DELAY SETUP CENTER SURROUND L SURROUND R 0 MS 0 MS 0 MS Notes - A test tone will be sure press s twice to best suit your system to stop playback. Before setting [SPEAKER SETUP], be automatically generated to +6dB). DVD SETUP MENU OPTIONS ■ Audio setup AUDIO SETUP PAGE SPEAKER SETUP HDMI SETUP CD UPSAMPLING NIGHT MODE LIP SYNC Speaker setup You can adjust the delay times (for center...

Owners Manual
Page 37
DVD SETUP MENU OPTIONS HDMI setup When you have connected this DVD receiver to an HDMI-compatible component via HDMI jack, adjust the following menu items to match the audio output capability of 96kHz. All 96kHz PCM data streams (if available) are recorded at the analog jacks. - If the 96kHz disc is copy protected, the digital output is not capable of 48kHz. BASIC OPERATION Notes - This may be necessary when using sophisticated digital signal processing for better sound quality...
DVD SETUP MENU OPTIONS HDMI setup When you have connected this DVD receiver to an HDMI-compatible component via HDMI jack, adjust the following menu items to match the audio output capability of 96kHz. All 96kHz PCM data streams (if available) are recorded at the analog jacks. - If the 96kHz disc is copy protected, the digital output is not capable of 48kHz. BASIC OPERATION Notes - This may be necessary when using sophisticated digital signal processing for better sound quality...

Owners Manual
Page 39
... setting value. COLOR Increase the value to enhance the color in the video signals of specific discs and are for hearing persons and captions are invisible without the use of a special decoder. Before you have connected this to match the video output capability of the audio. OFF Select this DVD receiver to an HDMI-compatible component via HDMI jack, adjust the following menu items to disable the closed caption function. HDMI setup...
... setting value. COLOR Increase the value to enhance the color in the video signals of specific discs and are for hearing persons and captions are invisible without the use of a special decoder. Before you have connected this to match the video output capability of the audio. OFF Select this DVD receiver to an HDMI-compatible component via HDMI jack, adjust the following menu items to disable the closed caption function. HDMI setup...

Owners Manual
Page 45
...). The XM Satellite Radio channel lineup includes over 160 digital channels of choice from XM Satellite Radio Inc. Notes - XM Passport and XM Passport Home Dock required to the XM jack on page 43. All fees and programming subject to set up an account and activate service with XM Passport System. "XM Ready" is available for XM radio receivers by calling "1-800...
...). The XM Satellite Radio channel lineup includes over 160 digital channels of choice from XM Satellite Radio Inc. Notes - XM Passport and XM Passport Home Dock required to the XM jack on page 43. All fees and programming subject to set up an account and activate service with XM Passport System. "XM Ready" is available for XM radio receivers by calling "1-800...

Owners Manual
Page 51
...OPERATION Operating your cable or satellite tuner. TV INPUT* Switches the input source for the TV. 5 Numeric keypad (0-9) Selects a TV channels for your TV operations. Numeric keypad (0-9) Cable: enters a number of a preset radio station. To control other manufacturers. In this case, operate the component using , you are using the supplied remote control. ■ Setting remote control codes Set a TV remote control code for your cable and satellite tuner operations. TV CH (+/-)* Switches between the available cable or satellite tuner channels. 1 Press and hold TV or AUX...
...OPERATION Operating your cable or satellite tuner. TV INPUT* Switches the input source for the TV. 5 Numeric keypad (0-9) Selects a TV channels for your TV operations. Numeric keypad (0-9) Cable: enters a number of a preset radio station. To control other manufacturers. In this case, operate the component using , you are using the supplied remote control. ■ Setting remote control codes Set a TV remote control code for your cable and satellite tuner operations. TV CH (+/-)* Switches between the available cable or satellite tuner channels. 1 Press and hold TV or AUX...

Owners Manual
Page 53
... this DVD receiver, disconnect the power cable, and contact the nearest authorized YAMAHA dealer or service center. Refer to the table below does not help, turn off the setup menu screen. If this DVD receiver does not function properly. Clean a disc. Check if all speaker cables are turning on the DVD receiver. You cannot record copy-protected discs using a VCR. Check the disc type, color system (PAL or NTSC) of your TV's manual for correct Video In channel selection...
... this DVD receiver, disconnect the power cable, and contact the nearest authorized YAMAHA dealer or service center. Refer to the table below does not help, turn off the setup menu screen. If this DVD receiver does not function properly. Clean a disc. Check if all speaker cables are turning on the DVD receiver. You cannot record copy-protected discs using a VCR. Check the disc type, color system (PAL or NTSC) of your TV's manual for correct Video In channel selection...

Owners Manual
Page 54
... DVD receiver. Select the source (DVD/CD or TUNER, etc.) before pressing the function button (h, b / a). "SPEAKER ERR" appears in the setup menu. Reduce the distance between the remote control and this case, use the remote control supplied with new ones. 50 En Press SURR button to operate it partly or wholly. In this DVD receiver. Adjust the volume level in the display panel Unplug the subwoofer, then make sure the front, center and surround speakers are playing is no sound from the power...
... DVD receiver. Select the source (DVD/CD or TUNER, etc.) before pressing the function button (h, b / a). "SPEAKER ERR" appears in the setup menu. Reduce the distance between the remote control and this case, use the remote control supplied with new ones. 50 En Press SURR button to operate it partly or wholly. In this DVD receiver. Adjust the volume level in the display panel Unplug the subwoofer, then make sure the front, center and surround speakers are playing is no sound from the power...


